1
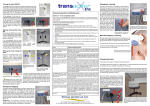
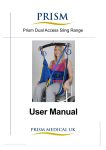
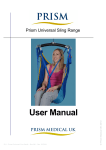
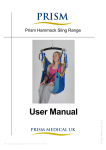
Prism Cressy Sling
PL - Prism Cressy Sling User Guide - Doc 009 - Rev 01.2013
© Prism Medical UK 2013
User Manual
Prism Cressy Sling
The Prism Cressy sling has been designed in conjunction with the M&H team at
Derbyshire CC. The continuous shoulder to hip strap allows flexibility in movement
should a spasm occur and the person goes into abduction.
Application
The Cressy Sling provides maximum support to the sacral area. It can be used to
transfer from the seated to recumbent position or from recumbent to seated. The
person must be assessed by a competent person who must be fully trained in the
suitability, application and fitting of the sling. Carers should always be trained in the
use of hoists and slings.
Sling Inspection
All Prism Slings are manufactured to meet and exceed the requirements of
BS EN 10535:2006 ’Hoists for the transfer of disabled persons – Requirements and
test methods’. Slings should be inspected prior to use and after washing. Damaged
or badly worn slings should be discarded. The label on the sling contains vital
information to identify the sling - if any part of the label becomes illegible, then it
must be removed from service and replaced.
The sling should be visually inspected with regard to the following items:•
Any signs of damage (i.e. Cuts, frays, tears, burns) to the sling straps
•
Any signs of stitching becoming undone on any part of the sling
•
Any signs of the fabric being stretched, tearing or undue wear
•
Any signs of discolouring or bleaching on the material
•
Is the sling complete? i.e. all straps present, stiffeners in place - where
applicable, etc
•
Label clearly legible
Compatibility
The issue of sling compatibility with various manufacturers’ hoists has been a
concern for specifiers for a number of years, an issue that is compounded by the
increased number of companies supplying hoists and slings.
A comprehensive list is available separately and your local agent will be able to
provide assistance with compatibility issues.
Maximum Load (Safe Working Load - S W L)
The maximum load for the sling is clearly marked on the label of the sling. The
maximum load will also be displayed on the hoist and any detachable elements of
the hoisting system.
DO NOT exceed the maximum load stated on any of the equipment.
PL - Prism Cressy Sling User Guide - Doc 009 - Rev 01.2013
© Prism Medical UK 2013
Some hoist/sling manufacturers will state that only slings manufactured by them can
be used on their hoists and vice versa. This is their policy only and is NOT a legal
requirement. A risk assessment must still be completed even if the same
manufacturer of hoist and sling are to be used, and the specifier simply has to state that
the carry bar is of a similar design and that the sling manufacturer has
authorised
its use on it.
Sling Dimensions
A
Continuous
Shoulder Strap
Integral Removable Neck Roll
Blue
(Black on spacer)
B
Green
Yellow
Red
Outer Leg
Straps
White
Linking
Loop *
Binding Removed
From Outer Edge
for Client Comfort
C
Navy Blue Inner
Leg Loops *
A
B
C
Small
680
660
600
Medium
750
680
620
Large
810
730
650
All dimensions have a tolerance of +/- 20mm
PL - Prism Cressy Sling User Guide - Doc 009 - Rev 01.2013
© Prism Medical UK 2013
* These loops must NOT be attached directly to the carry bar on the hoist
Hoisting from a chair
Note: The person to be transferred shall be referred to as “the person”.
Bring the leg sections along-side the
person’s thighs and pull lightly to ensure
that they are of equal length. Note the
person has been asked to reach across
to raise hip.
Using good manual handling techniques, Both leg sections should be the same
raise the persons leg and feed the leg length and come through in the same
sections under the person’s thighs. position on the clients thighs.
Ensure that the leg material is flat
without any creases.
HOW TO FIT FROM SEATING POSITION
b
PL - Prism Cressy Sling User Guide - Doc 009 - Rev 01.2013
© Prism Medical UK 2013
Introduce the sling by sliding it down
between the chair backrest and the
person’s back until the top of the
commode aperture reaches the base of
the spine. Leave the sling half way down
the persons back (don't drape over the
persons shoulders)
Pass the Navy Blue Inner Leg Loop Pass the Outer Leg Straps through the
through the White Linking Loop.
Inner Leg Loops.
Raise the carry bar just enough to
tension the straps and ensure that they
are still securely attached.
The person can now be raised and
transferred.
To remove the sling, carry out the fitting procedure in reverse.
Important - always peel the sling away from the person to avoid skin friction and movement.
Notes
•
•
The above techniques are for guidance only and you must comply with your
local policies
If in doubt, consult your moving and handling advisor
PL - Prism Cressy Sling User Guide - Doc 009 - Rev 01.2013
© Prism Medical UK 2013
Attach the Outer Leg Straps and the
Shoulder Straps to the Carry Bar.
NOTE: The Inner leg loops and white
linking loop must NOT be attached to
the carry bar
Hoisting from a lying position
Raise the persons leg (if possible) and
feed the leg sections under the person’s
thighs. Ensure that the leg material is flat
without any creases. Repeat to both
sides. Both leg sections should be the
same length and come through in the
same position on the clients thighs.
Pass the Navy Blue Inner Leg Loop
through the White Linking Loop.
Pass the Outer Leg Straps through the If using a profile bed, profile the bed to a
Inner Leg Loops.
sitting position.
Ease the back section upwards to ensure
that there are no creases in the back
section.
PL - Prism Cressy Sling User Guide - Doc 009 - Rev 01.2013
© Prism Medical UK 2013
Using good manual handling techniques
roll the person towards you so that they
are positioned on their side. To
introduce the sling, roll half of the sling
up underneath itself so that when the
person is rolled onto their opposite side,
the sling can be unrolled until it is flat.
Use the centre rear panel on the back
section to ensure that the sling is in line
with the person’s spine. Ensure that
handle loops are to the outside.
Connect the outer leg straps and the
shoulder straps to the carry bar.
NOTE: The Inner leg loops and white
linking loop must NOT be attached to
the carry bar
Raise the carry bar just enough to
tension the straps and ensure that they
are all still securely attached to the
carry bar.
The person can now be raised and
transferred.
To remove the sling, carry out the fitting procedure in reverse.
Important - always peel the sling away from the person to avoid skin friction and movement.
Notes
•
•
The above techniques are for guidance only and you must comply with your
local policies
If in doubt, consult your moving and handling advisor
PL - Prism Cressy Sling User Guide - Doc 009 - Rev 01.2013
© Prism Medical UK 2013
Hoisting from the floor
Before commencing the manoeuvre, introduce a pillow to ensure the client is
comfortable. Follow the procedures as above to fit the sling. If using a mobile hoist,
introduce the hoist using the method approved in your local area so that the carry
bar is positioned correctly above the client. Connect the sling as shown above
ensuring that all checks are completed and hoist the person.
Sling position
The persons position can be adjusted by simply using a different coloured loop on
the outer leg straps. The continuous shoulder strap will self adjust.
Person in an upright position using the Person in a slight recline position using
Blue loop (Black loop on spacer variant) the Green loop
PL - Prism Cressy Sling User Guide - Doc 009 - Rev 01.2013
© Prism Medical UK 2013
Person in a semi-reclined position using Person in a full reclined position using
the Yellow loop
the Red loop
Prism Cressy Sling - Material Variants / Uses
Standard Slings
Poly:
Spacer:
The sling is made from a close knit polyester material and has nylon ‘rip
stop’ material to the outer side of the leg sections to aid the fitting of the
sling. This is a general purpose sling and can be used for sitting and
Recumbent transfers between chairs, beds, baths, changing beds, WC’s
etc.
The sling is made from knitted polyester “spacer” fabric that is
manufactured with an ‘air gap’ internally. The material stretches slightly
in all directions and moulds perfectly to the shape of the person being
hoisted. This is a general purpose sling that can be used as the Poly but
has the added benefit of being suitable to be left in position if required
(subject to risk assessment and monitoring of pressure risks).
CE Marking - Declaration of Conformity
Registered Manufacturer No: CA013248
Prism UK Medical hereby declares that the Prism Sling Range meets the provisions of the
European Union Council Directive 2007 / 47 / EEC concerning Medical Devices and are
classified as Class 1 Devices in accordance with that Directive.
Prism Cressy Sling
Serial Number………………………………………….
…………………………….
Signed : For Prism Medical UK
PL - Prism Cressy Sling User Guide - Doc 009 - Rev 01.2013
© Prism Medical UK 2013
We hereby certify that the products listed above are manufactured, labelled and packaged
in accordance with the provisions of Directive 2007 / 47 / EEC and conform in all aspects to
the specification(s) relevant to them at the time of despatch and are CE Marked in
accordance with Directive 2007 / 47 / EEC .
SLING CARE: LAUNDERING
GENERAL.
Sensitive laundering of lifting slings will extend the service life of the product.
Conversely, improper laundering will reduce the service life and possibly affect the
strength and integrity of the sling.
To be avoided:
Use of bleach at washing, particularly hypochlorite [may cause structural
damage]
•
Overheating the sling [temperatures in excess of 100º may cause extreme
shrinkage and structural damage]
•
Use of non-biological detergents is not recommended (especially Fairy Non - Bio):
as these types of detergent contain bleaching agents that can degrade the strength
of the sling.
The use of fabric conditioners is not recommended.
Any hook & loop fastenings should be closed prior to laundering to avoid the ‘hook’
side damaging the sling or other items laundered with it.
GENERAL SOILING.
The sling should be laundered with soap or detergent at 50°C on a standard
domestic cycle.
DISINFECTION.
The sling should be laundered to ensure a ‘period at temperature’ of:
10 minutes at 65ºC
3 minutes at 72ºC
•
•
Following NHS guidelines, extra time should be added to ensure thorough mixing of
hot water through the wash load.
It may be that available equipment does not allow the required level of temperature
control. The sling may be washed on a 90ºC wash cycle, though it is likely that
some moderate shrinkage and/or colour bleed will occur.
Slings will air dry quite quickly in a warm room.
Slings should not be placed over radiators or convectors.
Slings may be CAREFULLY tumble dried on a cool [60ºC] setting and short cycle.
The sling should be checked at intervals not exceeding 5 minutes.
Do not allow the sling to overheat.
The sling should last in excess of 5 years if the above guidelines are adhered to. All
Prism slings have a manufacturers guarantee of 12 months.
PL - Prism Cressy Sling User Guide - Doc 009 - Rev 01.2013
© Prism Medical UK 2013
DRYING.
PL - Prism Cressy Sling User Guide - Doc 009 - Rev 01.2013
© Prism Medical UK 2013
Notes
SLING SAFETY
Care Plan Information
All Prism Cressy Slings have space on the labels to record the clients name. Each
sling has unique individually colour coded lifting loops on the outer leg straps which
helps maintain good lifting practice. The loop options facilitate variable positions
from sitting to recline.
FIM Score:
Date of Assessment :
Clients Name:
Approx Weight:
D.O.B:
Type of Sling:
Size:
Sling Straps Coloured Loop Options
Outer Leg Strap Blue/ Black Green Yellow Red Inner Leg Loop Loop Position 1
Loop Position 2
Linking Loop Loop Position 1
Loop Position 2
Comments
Prism Medical UK, Unit 4 Jubilee Business Park,
Jubilee Way, Grange Moor, Wakefield, WF4 4TD
Tel +44 (0) 845 409 2000
www.prismmedical.co.uk
[email protected]
This document conforms to BS EN ISO 10535:2006 Requirements
PL - Prism Cressy Sling User Guide - Doc 009 - Rev 01.2013
© Prism Medical UK 2013
If you have any questions regarding the use
of this equipment, please contact
Prism Medical UK, or your local authorised dealer.