1
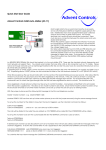
Quick Start User Guide
Advent Controls GSM Intercom (DE2.02F4.01)
IMEI:
PIN:
863071014684994
84994
Remove the SIM card and terminal cover shown in the above diagram and insert a suitable SIM card. Pass any required cables
through the slit in the rear cover and connect them to the PCB. Refit the rear cover. Remove the aluminium cover panel by
removing the screw on the bottom. Screw the hood to the wall using the four screws and wall plugs supplied. Screw the unit to
the hood through the holes shown above. Ensure the rubber gasket is in place between the unit and the hood.
A SIM card is required to operate the unit. This is inserted within the plastic indoor enclosure. In the UK we recommend O2,
Tesco, Giff Gaff, Vodafone. Orange/EE network do not allow DTMF tones to be sent under all circumstances so we do not
recommend these networks. Do not use ‘3’ or Shebang networks.
Registering the Master Phone
The user in charge of setting up the unit (known as the ‘Master’ user) must first send the following SMS text message to the SIM
card number (or setup the master using the jumper method – see manual):
MASTER <master’s number>,<PIN>.
There must be one space after MASTER before the number
There must be a stop (.) at the end of the message
e.g.
MASTER 07000000000,84994.
Sets the master phone number as 07000000000
Only the first Master has to use the pin – further master numbers can be added by other masters as follows:
MASTER 07000000001.
Adding and Removing Call Numbers
The order in which numbers are dialled is the order in which they are added to the system. To add a call number to the system
use the following command:
CALLNUM <user number>. e.g.
CALLNUM 07574777888.
CALLNUM 07574888999.
First number dialled
Second number dialled
To remove a number the REMOVE command is used. Numbers are removed in the reverse order to which they are added:
REMOVE 07574777888.
If a number is both a master number and a call number the last one added will be removed first. If the master was added
before the call number, the call number will be removed by the first REMOVE command. If another REMOVE command is sent
the master will also be removed by the second command
Useful Commands
VOLUME 9
RTIME 30
CTIME 60
sets the volume to maximum (VOLUME 1 sets the volume to minimum)
sets the maximum dialling time to 30 seconds (max 250s)
sets the maximum call length to 60 seconds (max 250s)
Quick Start User Guide
Output and Call Handling
During a call the output is activated by pressing the ∗ key on the telephone keypad. This will activate the relay output (as per
RLYTIME and RLYMODE) and instantly disconnect the call.
By default, any user number, call number or master number can activate the output relay by dialling the intercom SIM card
telephone number. The default setting is for the intercom to reject the call as soon as the number is read. To switch back to this
default mode the following command is sent to the intercom:
REJECT CALL
If desired the intercom can be set to answer incoming calls if the number is recognised and a conversation can made between
the intercom and the calling telephone. In this mode, to activate the relay the ∗ key is pressed. To enter this mode the
following message is sent to the intercom:
CONNECT CALL
If the output must be controlled for a measured period of time the RING mode is selected. In this mode the relay is activated
when a recognised number calls the intercom for as long as the caller continues to dial the number. The call is never answered.
This is also useful when it is not desirable to reject the call. To enter this mode the RLYMODE command is used as follows:
RLYMODE RING