1
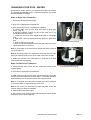
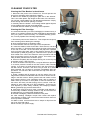
Owner’s Manual
2007
For ‘Trident Pro’ Exercise Pool
Revised 27th February 2007
Page 1
TABLE OF CONTENTS
IMPORTANT SAFETY INFORMATION
Safety Instructions.........................................................................P 03
Additional Safety Instructions ........................................................P 04
INSTALLATION AND SET-UP
Selecting a Site for Your Exercise Pool .........................................P 05
Electrical Requirements and Connections ....................................P 05
Checklist Before Filling Your Exercise Pool...................................P 06
CONTOL PANEL OPERATIONS
Indicator Lights ..............................................................................P
Locking Features...........................................................................P
Control Panel Buttons and Display................................................P
Temperature Control......................................................................P
Jets Control ...................................................................................P
Lights Control ................................................................................P
Summer Mode...............................................................................P
Cleaning Cycle ..............................................................................P
Exercise Pool Counter Currents....................................................P
Greasing Points.............................................................................P
07
07
08
08
09
09
09
10
10
10
MAINTENANCE
Water Chemistry............................................................................P
Starting Your Exercise Pool with New Water .................................P
Maintaining Exercise Pool Water...................................................P
Water Chemistry Trouble Shooting................................................P
Changing Your Exercise Pool Water .............................................P
Cleaning Your Filter .......................................................................P
Pool Shell Care .............................................................................P
Pool Cover Care............................................................................P
Miscellaneous Care.......................................................................P
Periods of Low or No Use .............................................................P
Winterisation..................................................................................P
Volumes.........................................................................................P
11
12
12
13
14
15
16
16
17
17
17
21
SERVICE.......................................................................................P 18
TROUBLESHOOTING GUIDE .....................................................P 20
INTERNATIONAL WARRANTY....................................................P 22
Revised 27th February 2007
Page 2
IMPORTANT SAFETY INSTRUCTIONS
When installing and using this electrical equipment, basic safety precautions should always be followed,
including the following:
1. READ AND FOLLOW ALL INSTRUCTIONS.
2. WARNING - To reduce the risk of injury, do not permit children to use this product unless they
are closely supervised at all times.
3. In standard form the Trident Pro requires only one supply of 240volts 32amp. Please consult with a
qualified electrician to verify current legislation .
ALWAYS USE A QUALIFIED ELECTRICIAN TO CONNECT THIS EXERCISE POOL TO YOUR
ELECTRICITY SUPPLY
4. DANGER - Risk of Accidental Drowning. Extreme caution must be exercised to prevent unauthorized access by children. To avoid accidents, ensure that children cannot use the Trident Pro unless they
are supervised at all times.
5. DANGER - Risk of Injury. The suction fittings in the Trident Pro are sized to match the specific water
flow created by the pump. Should the need arise to replace the suction fittings or the pump, be sure that
the flow rates are compatible.
Never operate the Trident Pro if the suction fittings are broken or missing. Never replace a suction fitting
with one rated less than the flow rate marked on the original suction fitting.
6. DANGER - Risk of Electric Shock. Do not permit any electric appliance, such as a light, telephone, radio, or
television, within 5 feet (1.5 m) of the unit. These units have an integral ground fault circuit interrupter,
but this only covers the pools own electrics
7. WARNING - To reduce the risk of injury:
a) Before entering the Pool or pool check the temperature.
b) Since excessive water temperatures have a high potential for causing foetal damage during the
early months of pregnancy, pregnant or possibly pregnant women should seek advice before using
pool and should maintain safe water temperatures.
c) The JetStream motor of the Trident Pro is extremely powerful and could cause injury if used incorrectly. Do not stand next to the JetStream nozzles when the motor is running. Ideally you should be
placed at least 1 meter from the nozzles. Never attempt to adjust the SwimJet nozzles whilst the motor is running
d) The use of alcohol, drugs, or medication before or during exercise pool use may lead to unconsciousness with the possibility of drowning.
e) Persons suffering from obesity or with a medical history of heart disease, low or high blood pressure, circulatory system problems, or diabetes should consult a physician before using exercise pool.
f) Persons using medication should consult a physician before using the exercise pool since some
medication may induce drowsiness while other medication may affect heart rate, blood pressure and
circulation.
ADDITIONAL SAFETY INSTRUCTIONS:
1. WARNING - Risk of Fatal Hypothermia.
a) The use of alcohol, drugs, or medication can greatly increase the risk of fatal Hypothermia in an
exercise pool.
b) The causes, symptoms, and effects of Hypothermia may be described as follows:
Hypothermia occurs when the internal temperature of the body reaches a level several degrees above the normal body temperature of 37°C (98.6°F). The symptoms of Hypothermia include an increase in the internal
•
•
•
•
•
•
temperature of the body, dizziness, lethargy, drowsiness, and fainting. The effects of Hypothermia
include:
Unawareness of impending hazard;
Failure to perceive heat;
Failure to recognize the need to exit the Pool ;
Physical inability to exit the Pool ;
Foetal damage in pregnant women; and
Unconsciousness and danger of drowning.
2. WARNING - Risk to Infants, the Elderly, and Women Planning or Experiencing Pregnancy.
Please consult your physician if the above applies to you or anyone using your exercise pool.
3. WARNING - Risk of Children Drowning. Although your Trident Pro cover is not rated as a safety
cover, it is wise to always keep the exercise pool cover securely fastened when not in use. This will
help discourage children from attempting to enter the exercise pool while not supervised by an adult.
4. WARNING - Risk of Drowning. Use caution when bathing alone. Overexposure to hot water may
Revised 27th February 2007
Page 3
cause nausea, dizziness, and fainting.
5. WARNING - Risk of Injury. Always use extreme caution while entering or exiting the exercise pool . Surfaces can be very slippery when wet. Do not step or sit on head rests. Also, keep all breakable objects out
of the exercise pool area.
6. WARNING - Risk of Injury. Never use the exercise pool immediately after strenuous exercise.
7. WARNING - Risk of Injury. Individuals with infectious diseases should not use the exercise pool .
8. WARNING - Risk of Injury. Maintain water chemistry in accordance with chemical manufacturer’s instructions.
9. WARNING - Risk of Shock. The exercise pool shall not be operated in severe weather conditions, i.e.
electrical storms.
10. CAUTION - Unauthorized Access. Secure the exercise pool area against unauthorized access. Make
sure all barriers meet local codes. Keep the exercise pool cover on exercise pool when not being used.
11. CAUTION - Risk of Damage to Pool or Equipment. By performing maintenance as described later in this
Owner's Manual, the chance of damage to your exercise pool and it's equipment will be greatly reduced.
Never block the air vents that lead to the equipment compartment. Doing so may cause the exercise pool
equipment to overheat.
12. CAUTION - Non-Approved Accessories. Using accessories not approved by the manufacturer could
void your guarantee or cause other problems. Please consult with your authorized Riptide Dealer.
13. CAUTION - Location of Your Trident Pro . Locate your Trident Pro on a surface that can withstand
the weight bearing requirements of the exercise pool (see "Selecting a Site for your Trident Pro " in this
Manual). Also, locate your exercise pool in an environment that can withstand repeated exposure to water
and the possibility of a major spill.
Revised 27th February 2007
Page 4
INSTALLATION & SET-UP
SELECTING A SITE FOR YOUR TRIDENT PRO:
Your Riptide Trident Pro was designed for either indoor or outdoor use. Whether indoors or outdoors,
please adhere to the following guidelines:
1. Select a site that is stable and capable of supporting the weight of your exercise pool, its water, and
the people using it (refer to the “Model Brochure” or contact an authorized Riptide Dealer for the Filled
Weight of your Pool). If installed on a suspended floor/deck, the floor/deck should be capable of supporting your exercise pool . If you have concerns on this matter, please contact a qualified Licensed Contractor.
2. Select a surface that is flat and level. This surface must provide continuous support for the entire bottom of the exercise pool structure. Do not shim or block up the exercise pool creating voids below the
base framework. If you do not intend to use a pit please ensure you have adequate drainage or a soak
away.
3. Avoid installing the exercise pool in a pit or low area where water may accumulate and damage the
exercise pool or its equipment. Choose a site where water will drain away from the exercise pool and not
towards it.
4. Important: With all installations, the Trident Pro must be located at least 150 cm [5 feet] from all electrical outlets, switches, and other permanently installed electrical devices.
Indoor Considerations: There are several considerations when installing your Trident Pro indoors:
First, the environment both around and below the exercise pool should be water resistant. It must be
capable of handling water splashed out from the exercise pool as well as the possibility of a leak from
the vessel ( A catch basin equivalent to the volume of your exercise pool is recommended); Second, it is
recommended that the room you install the exercise pool in has proper ventilation. Proper ventilation
can usually be achieved by an exhaust fan or a dehumidifier, if exercise pool is used for less than one
hour per day.
Note: Typical indoor surfaces include, but are not limited to: concrete, wood, non-slip tile, or linoleum.
Outdoor Considerations: When selecting an outdoor site, several things should be considered: First,
avoid selecting a site where excessive water may contact the exercise pool , such as from sprinklers or
a roof edge without rain gutters; Second, and if possible, avoid areas of direct, prolonged sunlight. The
ultraviolet rays of sunlight will tend to fade and damage your Trident Pro cover and cabinet; Last, avoid
locating your exercise pool in an area where debris could be blown into the exercise pool . If sinking the
Trident Pro into the ground a suitable drainage system must be installed to avoid the risk of hydrostatic
pressure from rising ground water. Note: Typical outdoor surfaces include, but are not limited to: concrete, brick, non-slip tile, wood-decking, pea shingle or sand.
ELECTRICAL REQUIREMENTS & CONNECTION
All Riptide Trident Pro exercise pools must be wired in accordance with all local & national electric codes.
Always use a qualified electrician to perform the electrical installation.
WIRING DIAGRAMS
Please reference the wiring diagram that is specific to your Trident Pro ‘s Control System:
• Standard Trident Pro 32amp model control system—one input 240V 32amp single phase.
• Special Trident Pro 50amp model control system—one input 240V 50amp single phase.
220/240 VOLT INSTALLATION
Use only a qualified Licensed Electrician to make 240 Volt electrical installations.
Your 220/240 Volt Riptide Standard Trident Pro 32amp model requires one fused and dedicated electrical
circuit of 32amp and a minimum supply wire size of 4mm. It is important that these circuits are dedicated (not
being used by any other electrical appliance) or your Exercise Pool may not function properly.
Your 220/240 Volt Riptide Special Trident Pro 50amp model requires one fused and dedicated electrical circuit of 50amp and a minimum supply wire size of 6mm. It is important that these circuits are dedicated (not
being used by any other electrical appliance) or your Exercise Pool may not function properly.
Position your Riptide Trident Pro at least (1.5m) from all electrical outlets or devices.
ELECTRICIAN'S INSTRUCTIONS:
We strongly recommend that a suitable seal cable guide is installed to retain the water tight seal of the control boxes. The incoming power line must be suitably fused and protected to a C.E. minimum standard and
any local specific regulations required.
Revised 27th February 2007
Page 5
CHECKLIST BEFORE FILLING YOUR POOL
Important: The equipment should never be operated without water in the exercise pool . Serious damage
to the equipment will occur.
01. Installing Your Cover: Your Trident Pro cover comes with tie-down straps and locking hardware to
attach the cover to the exercise pool cabinet or decking.
02. Check drain valves: Trident Pro — Check that the drain valve is closed completely (see figure C)
03. Tighten Equipment Fittings: In the equipment compartment, hand-tighten all PVC pipe unions,
pump bleed valve and pump drain plugs (Fig. D) to prevent the possibility of leakage (sometimes these
fittings loosen during shipment). Check also that all fittings on the filter are closed ( H A N D
TIGHT
ONLY! )
04. Check Valve : Verify that all valves aside from the drainage valves described above are in the fully
open position. A red Valve Keeper (Fig.E) is installed on most of the slice valves. Valve keepers prevent
the valve from vibrating shut during shipment or operation. A slice valve that closes will result in a noisy
pump due to a lack of water flow to the pump.
05. Fill the Pool: Fill the Trident Pro to approximately the halfway point on the skimmers.
Note 1: The higher the water level, the less Pool users it will take to cause the water to overflow the top
of the Pool and water will splash out more easily whilst swimming in the pool.
Note 2: Do not fill the Exercise Pool with soft water unless the mineral content is raised immediately (see
your Dealer).
06. Check for Leaks: After the Trident Pro is full, but before turning the power on, check all the fittings
and equipment in the equipment compartment for signs of leakage. If a leak is detected, except from fittings that can be hand-tightened, call your authorized Riptide Dealer.
Figure C
Figure D
Figure E
Revised 27th February 2007
Page 6
CONTROL PANEL OPERATIONS
INDICATOR LIGHTS
At a glance, the indicator lights are readily visible on the main control panel. The two indicator lights
(POWER and READY) work independently from the rest of the control panel display. That way, even if
the control panel is off, you can simply glance at the “READY” indicator light to determine whether or not
your Pool is within the range of your set temperature.
Power indicator: The POWER indicator is ‘on’ when the unit is properly supplied with power. It also
provides a diagnostic function – a blinking POWER indicator indicates that the heater high-limit has
tripped, meaning that either the water is above its acceptable temperature range, or a malfunction has
occurred within the unit (such as low circulation due to a clogged filter). An ‘off’ POWER indicator means
that there is a problem with the control panel or the power supplied.
Ready indicator: The READY indicator will light when the water temperature is within 2-1/2°F of the set
temperature, and will turn off when the temperature is outside of that range. If you increase or decrease
the temperature setting, the READY indicator will turn off until the water temperature reaches the acceptable range for the new set temperature. Additionally, a blinking READY indicator indicates that a
problem exists with the temperature sensor.
Both Flashing: If both the POWER and READY lights flash together this could indicate a pressure problem,
1- The filter may be blocking. Remove the filter and clean.
2- The amount of water flow may be inadequate. Make sure the Pool is filled to correct level.
3– The filter pump may have an air block. Hand loosen slightly the union on the top of the filter pump
until the air is purged. Re-tighten by hand the union when the water begins to flow.
4– A gate valve may be partially or completely closed. Check that all the valves on the filtration circuit
are fully open..
You must reset the heater manually after this message. To do this simply press any button on the top
side control.
LOCKING FEATURES
The two locking features, SPA LOCK and TEMPERATURE LOCK, are enabled from the control panel
by pressing a specific combination of buttons. Once enabled, a lock will remain active until the specific
button combination is applied to disable the lock. Even if power is disconnected from the unit and soon
thereafter reapplied (such as in a power outage) the lock will remain in place.
SPA LOCK
The SPA LOCK feature deactivates all of the functions of the control panel. It is generally used to prevent unwanted use of the unit.
To activate the SPA LOCK, press the Riptide logo and TEMP Minus (-) buttons at the
same time and hold them down until the word SPA and the lock symbol are illuminated
on the display (approximately five seconds).
NOTE: The hidden button is under the logo. By pressing lightly and moving your finger across the logo,
the depression of the button can be felt.
When the SPA LOCK is activated, the buttons for the jets, temperature control and light are deactivated.
Revised 27th February 2007
Page 7
If a button is pressed, the control panel will display the lock symbol and the word SPA for 30 seconds, then
turn off.
To deactivate the SPA LOCK, press the Riptide logo and TEMP Minus (-) buttons at the same time and
hold them down until the word SPA and the lock symbol are no longer illuminated on the display
(approximately five seconds).
TEMPERATURE LOCK
The TEMPERATURE LOCK feature deactivates the temperature control function of the control panel. The
jets and the light functions will operate normally. TEMPERATURE LOCK is most often used by people who
do not want others to tamper with or change the set temperature of the water.
To activate the TEMPERATURE LOCK, press the Riptide logo and TEMP Plus (+) buttons at the same time and hold them down until the words SET TEMP, the numerical
set temperature value and the lock symbol are illuminated on the display
(approximately five seconds).
NOTE: The hidden button is located under the logo. By pressing lightly and moving your finger across
the logo, the depression of the button can be felt.
When the TEMPERATURE LOCK is activated, the JETS and LIGHT buttons will operate normally, and the
temperature setting can be viewed but can NOT be changed. If a temperature button is pressed, the control
panel will display the lock symbol and the set temperature for 30 seconds, then turn off.
To deactivate the TEMPERATURE LOCK, press the Riptide® logo and TEMP Plus (+) buttons at the same
time and hold them down until the lock symbol is no longer illuminated on the display (approximately five
seconds).
LOCK OVERRIDE
The Lock Override feature is for users who normally keep the set temperature locked. Should the user wish
to lock all controls temporarily, the Spa lock can be applied over an already-applied temperature lock. Then,
when the Spa lock is removed, the temperature lock will remain on to prevent unwanted tampering with the
set temperature.
CONTROL PANEL BUTTONS AND DISPLAY
The control panel has buttons which the Pool user presses to set the temperature, turn the light on and off, and activate or deactivate the jet pump.
The control panel display responds to let you know you’ve pressed a button, and that the selected function has been performed. After a period of
non-use, pressing any button will wake up a sleeping display, as well as
performing its function.
TEMPERATURE CONTROL
The set temperature range is from 26°C to 40°C (80°F to 104°F).
The set temperature of the water will automatically be 102°F the first time power is applied. This is the setting programmed at the factory. After the unit has been set up and used, the last temperature value set by
the user will be stored in memory. If power is disconnected from the unit, it will automatically revert to the
last set temperature when power is reapplied.
To display the set temperature of the water, press the TEMP Plus (+) button.
The set temperature will be displayed, unless the Pool is locked (in which case
the word POOL is displayed with the lock symbol). The set temperature display will automatically shut off after 30 seconds.
To increase the set temperature of the water, press the TEMP Plus (+) button.
Each time the button is pressed, the set temperature display will increment by one degree. If the button is
held down, the set temperature display will increase by one degree every half-second.
To decrease the set temperature of the water, press the TEMP Minus (-) button. Each time the button is
pressed, the set temperature display will decrement by one degree. If the button is held down, the set temperature display will decrease by one degree every half-second.
Revised 27th February 2007
Page 8
If the set temperature value will not change, check the TEMPERATURE LOCK and POOL LOCK features. When either of these features is applied, the temperature control is disabled. To activate the temperature control buttons, remove all locking features applied.
JETS CONTROL
The JETS button activates the variable frequency drive. When the JETS button is
pressed, the JETS symbol will illuminate on the control panel display. The symbol
will remain lit until the button is pressed to turn off the variable frequency drive, or
after two hours of continuous operation when the variable frequency drive is automatically shut off.
With the variable frequency drive activated the counter current can be fully controlled by the auxilliary control panel
If the JETS symbol fails to illuminate make sure SPA LOCK is deactivated.
AUXILLARY CONTROL PANEL
To start the counter current press the ‘on’ button. The counter current will start at minimum speed. To
increase the speed of the of the counter current press the ‘+’ button. To decrease the speed of the
counter current press the ‘-’ button. To stop the counter current press the ‘off’ button
LIGHT CONTROL
The light control uses four positions: High, Medium, Low, and Off. To turn on the
Pool light, press the LIGHT button. This will place the light in the High, or maximum
intensity position. When the light turns on, the light symbol will also illuminate on the
control panel display. Press the LIGHT button again to lower the intensity of the light
to the Medium position. Press the LIGHT button again to lower the intensity even
more, placing the light intensity in the Low position. Press the LIGHT button one
more time to shut the light off. When the light is deactivated, the light symbol will
also turn off.
To change the colour of the pool light press the Riptide logo and light button at the same time. To
change the colour again it is necessary to release both buttons and repeat the above procedure.
The colour loop sequence is as follows: blue, aqua, green, white, amber, red, loop on, loop off.
To activate the colour loop process press the Riptide logo and light button after the colour red. The colours will then run through the order listed above. To stop the loop press the Riptide logo and the light
button whilst the loop is on.
If the light is left on, it will automatically be turned off by the control system after 6 hours of continuous
operation. The light symbol on the panel will also turn off when the light is deactivated.
If the light will not turn on, make sure POOL LOCK is deactivated. POOL LOCK disables the controls on
the control panel.
LIGHTS
All Riptide® exercise pools come equipped with a light to enhance night time use. The Pool uses a specially designed low voltage dimmable LED light source.
Revised 27th February 2007
Page 9
SUMMER MODE DISPLAY:
The summer mode symbol is on when the summer mode switch (on the control panel) is in the ON position.
In bright sunlight, the symbol may be visible even when the main display is off (if the summer mode is on).
Otherwise, the summer mode symbol will only be visible when the display is illuminated by pressing a control panel button.
SUMMER MODE
Your Trident Pro is equipped with a Summer Mode timer. The Summer mode timer
can be activated during extremely hot summer months if it becomes difficult to
maintain water temperatures low enough for comfort. Upon switching to the ON
mode, the circulation pump (which can add heat to the water through normal operation) and heater will immediately shut down for the next eight hours. Additionally,
the summer mode display on the control panel will activate and remain active for as
long as the summer mode is on.
Following this eight hour period, the circulation pump and heater will automatically re-start and will operate
normally for the next sixteen hours. The circulation pump and heater will continue to turn off for an eight
hour period every day that the timer remains in the ON position. In this way, the amount of heat transferred
to the Pool water will be minimized. When the outside temperatures begin to cool, the Summer Mode timer
should be turned to the OFF position (the summer mode display on the main control panel will go out). This
is the efficient 24 hour circulation mode that keeps the heater operation and operating costs to a minimum
during colder/heavier usage months.
NOTE: Whenever power is disconnected and then reconnected to the Pool, the Summer Mode timer will
reset starting with the 8-hour shutdown mode. If a different eight-hour shut down time is desired, deactivate
the Summer Mode, then reactivate at the beginning of the desired eight-hour shut down time.
IMPORTANT: The Summer Mode will not lower the Pool’s water temperature below the ambient air
temperature.
To activate the Summer Mode, simply follow these steps:
1. Set the temperature control to 80°F (26°C).
2. On the control panel, simultaneously press and hold for 5 seconds Temp Plus and Temp Minus buttons
to activate the Summer Timer.
The Summer Mode must be deactivated when cooler temperatures return. To do this, simply repeat step 2.
WARNING: Failure to deactivate the Summer Mode when the temperature drops below 32°F will result in
freezing of the Pool. Damage resulting from this situation is not covered under the terms of the limited warranty.
Greasing Points
There are two greasing points on your Riptide Trident Pro. It is recommended these are greased after every
100 hours of use.
These greasing points are located:
1. On top of the motor directly where it joins the pump unit.
2. On the bearing where the motor shaft runs into the pump unit.
Please use a standard greasing gun as can be found in the motor trade.
Revised 27th February 2007
Page 10
MAINTENANCE
WATER CHEMISTRY
Tap water that is safe to drink is not always right for your Trident Pro . Normal tap water is usually filled
with minerals and micro-contaminants that are not visible to the naked eye. Properly testing and treating
your Pool water is essential for the health of your Pool as well as the people that use it.
Proper chemical maintenance can control and help prevent the following: 1. Bacteria, algae and fungi,
which can spread disease and infection to humans; and, 2. Staining and scale build-up on your Exercise
Pool shell, equipment, and piping; and, 3. Clogged filters.
With the Exercise Pool please be aware that the chemical maintenance of your hot water Pool section
and the cooler pool section will be different and not always proportional to the volume of water
Note 1: When using chemicals, always follow the instructions provided on the manufacturer's labels.
Note 2: Use an accurate test kit to perform all chemistry tests.
Note 3: Never mix chemicals.
Note 4: Always add chemicals directly to the Exercise Pool, evenly spreading the chemicals over the
surface of the water. Run the Filter Pump for 15 or more minutes after applying any chemical. To help
with the mixing off chemicals you can turn on your massage system as well
OVERVIEW OF WATER CHEMISTRY:
1. Sanitation: Sanitizers kill bacteria and keep the water clean. Effective and safe sanitizers include any
of the following: STABILISED CHLORINE GRANULES (sodium dichloro isocyanurate dihydrate).
Note: Trichlor chlorine tablets and/or non-dichlor granular chlorines must not be used in your Trident
Pro , they may damage the Trident Pro , voiding your warranty.
2. Super-Chlorination: As your Trident Pro is used, non-filterable wastes, including perspiration, oils,
hair sprays, etc, will build up in the water. These substances make the water unattractive in appearance
and odour, and can also interfere with sanitizer effectiveness. Normal sanitation does not eliminate
these waste substances, but Super-Chlorination does. Super-Chlorination is achieved by "shocking" the
Pool water with a double dose of STABLISED CHLORINE GRANULES.
3. pH Control: Proper pH balance is extremely important in controlling bacteria, providing water that's
comfortable for the user, and in preventing damage to the Trident Pro and its equipment. Using the
scale of 0-14, pH is the measure of acidity and alkaline in the water. pH levels under 7.0 are acidic while
pH levels over 7.0 are alkaline. The proper pH range for a Pool is 7.2 to 7.6.
High pH levels (over 7.6) can cause the following:
Scale build-up on the Trident Pro and its equipment, cloudy water, a prematurely dirty filter, and less
effective chlorine sanitation. To correct high pH levels, add a pH DECREASER.
Low pH levels (under 7.4) can cause the following:
Discomfort to the user and corrosion to the Trident Pro and its equipment. To correct low pH levels, add
a pH INCREASER.
Note: Never use muriatic or hydrochloric acid to adjust pH as it can damage your Trident Pro shell and
surroundings.
4. Total Alkalinity (TA): Total Alkalinity (TA) is the measure of carbonates and bicarbonates in the water. Low TA can cause pH to be unstable, bouncing from one level to another, causing the water to be
corrosive or scale forming to the Trident Pro and it’s equipment. To correct low TA, add a TOTAL ALKALINITY INCREASER. High TA can cause scale build-up, cloudy water, as well as other pH problems. To
correct high TA, contact your authorized Riptide Dealer.
5. Calcium Hardness (CH): Calcium Hardness (CH) is the measure of dissolved calcium in the water.
Low CH (soft water) can result in staining to the Trident Pro’s surface as well as corrosion to the Trident
Pro and it’s equipment. To correct low CH, add a CALCIUM HARDNESS INCREASER. High CH (hard
water) can cause cloudy water as well as rough scale build-up on the Pool's surface and equipment. To
correct or manage high CH, contact your authorized Riptide Dealer.
Revised 27th February 2007
Page 11
6. Stain & Scale Control: Stain and scale problems are common in hot water environments. To help prevent and control staining and scaling, add a STAIN & SCALE INHIBITOR.
7. Foam Control: Exercise Pool water that is polluted with body oils and lotions, combined with high water
temperatures, can cause excessive surface foaming. To prevent and control foam on the surface of the water, add a FOAM REDUCER.
8. Clearing Cloudy Water: There are two basic reasons that exercise pool water becomes cloudy. First,
non-filterable liquid wastes (perspiration, etc.) have contaminated the water. To remove these waste substances, Super-Sanitize the water (as described above). Second, non-filterable micro-particulate wastes
(dust, etc.) have contaminated the water. To remove these wastes substances, use a WATER CLARIFIER.
9. Sanitising with Non-Chlorine Shock (Potassium Peroxymonosulfate): When sanitising your exercise
pool with Non-Chlorine Shock you should add the correct dose directly to the Exercise Pool/pool water with
the jets running.
Non-Chlorine Shock will give up to, two hours of safe bathing. If you use the exercise pool for more than
two hours it will be necessary to redose.
On a weekly basis it is important to super chlorinate your exercise pool as non chlorine shock are unable to
deal with non filterable wastes.
Note: Use only Branded HotSpring Pool chemicals to ensure premium performance.
STARTING YOUR EXCERISE POOL WITH NEW WATER:
1.
As your exercise pool fills with tap water, add 10 teaspoons of STABLISED CHLORINE GRANULES . This will provide the initial protection against bacteria in your pipes.
Note: Do not use soft water unless the mineral content is raised immediately.
2.
When the exercise pool is completely filled with water complete the following.
3. If possible, have your authorized Riptide Dealer test the Calcium Hardness (CH) of your water and adjust
as per your dealer's recommendation (the correct level of CH depends on your overall water conditions).
4. Test and adjust the Total Alkalinity (TA) to the range of 125-150 PPM (parts per million).
5. Test and adjust the pH to the range of 7.4-7.6.
6. After the water has circulated for approximately a quarter of an hour, retest the chlorine level in your water and add the correct amount to raise the level to between 3—5 PPM.
Start-up water chemistry is now complete. However, it may take several days for the filter to completely
clear the water.
MAINTAINING EXCERISE POOL WATER
Sanitizer and pH Levels:
It is important to test and adjust the sanitizer and pH levels of your exercise pool on a frequent basis. If your
exercise pool is used 0 to 3 times weekly, then we recommend that you test your water a minimum of 2
times that week. For each additional use you should test your water one additional time.
Always test the pH level before you test the sanitizer level. If the pH level is not in the range of 7.4-7.6, then
make the necessary adjustment. Use the dosage prescribed on the label.
With each sanitizer test, use STABILISED CHLORINE GRANULES to maintain the following levels:
With Ozone
Chlorine Level:
3—5 PPM
To maintain the above sanitizer level with CHLORINE, please refer to your authorized Riptide Dealer for
Revised 27th February 2007
Page 12
assistance.
Super-Chlorination:
Once a week, and when the exercise pool is not in use, Super-Chlorinate the Pool water by adding the
following:
•
Five teaspoons of STABILISED CHLORINE GRANULES in the Pool end and Ten teaspoons of
STABILISED CHLORINE GRANULES in the pool end.
Stain & Scale Control:
Use a STAIN & SCALE INHIBITOR as per the instructions on the manufacturer's label.
Foam Control:
As needed, use a FOAM REDUCER as per the instructions on the manufacturer's label. (Not required in
the pool section).
Cloudy Water Prevention & Control:
Use a WATER CLARIFIER as per the instructions on the manufacturer's label.
WATER CHEMISTRY TROUBLESHOOTING
Prior to each exercise pool use, check the water. If the water appears cloudy or off-colour, has significant surface foam or smells of chlorine, then there is a problem with the water and it needs to be treated
or drained. Using the exercise pool in these conditions could result in a skin rash or other irritation.
For assistance in handling water chemistry problems, consult your authorized Riptide Dealer or another
service centre capable of performing a detailed Water Analysis.
Revised 27th February 2007
Page 13
CHANGING YOUR POOL WATER
Depending on usage, 1/3rd of your exercise pool water will need to
be changed approximately every 4 months or whenever your water
becomes difficult to manage.
Steps to Drain Your Trident Pro :
1. Disconnect electrical power supply.
2. Open door to Equipment Compartment.
3. Drain water from Pool by completing the following:
a. Locate drain valve at floor level next (next to large pipe
bend) . (Fig. N ).
b. Using the adaptor connect one end to the valve and 1 1/2”
lay-flat blue hose to the other.
c. Locate the free end of the lay-flat blue hose in a drainage
area.
d. Open drain valve by twisting and then lifting the gate valve
stop.
e. Allow to drain by gravity only.
f. At the end of the procedure recluse the gate valve by reversing the instructions in section d.
Pool Section Drain (Fig N)
Note 1: Drain water to an area that can handle the water volume of
your Exercise Pool.
Note 2: If draining water onto vegetation, make sure that the sanitizer level (chlorine level) of your Pool water is less than .5 PPM.
4. Clean the Exercise Pool shell (refer to "Exercise Pool Shell
Care" in this Owner's Manual).
Steps To Refill Your Trident Pro:
1. Check that the drain valves are fully closed and locked in the
closed position
Pool Section Drain (Fig N)
2. Close door to Equipment Compartment.
3. Refill Exercise Pool with tap water. Fill the Exercise Pool to the
mid-way level of the skimmer in each section. The depth should be
approximately 6-7½” down from top rim of the Exercise Pool.
Note 1: The higher the water level, the fewer Pool users it will take
to cause the water to overflow the top of the Pool.
Note 2: Do not fill your Exercise Pool with soft water unless the
mineral content is raised immediately.
4. Restore electrical power supply.
5. See "Starting Your Exercise Pool with New Water" under "Water
Chemistry" in this Owner's Manual.
Revised 27th February 2007
Page 14
CLEANING YOUR FILTER
Cleaning the Filter Basket: in the skimmer
1. Disconnect the power to the Trident Pro. This will prevent the
pump from activating while cleaning the basket.
2. Remove the basket by opening the gate weir in the skimmer.
This is the white plastic flap hinged at the base of the skimmer .
You will see a white plastic tray with drainage perforations. Simply
lift out through the skimmer opening to remove
3. Carefully clean the basket . Avoid hitting basket against objects
to knock debris loose as this can break basket.
4. Reinstall skimmer basket by reversing above operation.
Cleaning the Filter Cartridge:
It is recommended that your Filter Cartridge(s) be cleaned every 2
weeks or as needed. Replace the Filter Cartridge(s) approximately
every two years or when necessary. To maintain warranty protection, use only Riptide Filter Cartridge replacements.
1. Disconnect power to the Trident Pro . This will prevent the pump
from activating while cleaning the cartridge.
2. Open equipment door to equipment cabin.
3. Locate the filter columns to the right of the compartment.
4. Locate the isolation valves for the filter. There are two, one each
side of the filter. To find these firstly follow the pipe work entering
in the rear of the filter. At the rear follow the pipe work upwards
until you find the first gate valve in this pipeline. Remove the red
valve keeper (if fitted) by pulling off Close and lock in position the
slice handle of the valve. Now follow the same procedure with the
pipe work leaving the front of the filter column. This valve is normally located just before the circulation pump.
5. Unscrew completely the star shaped locking nut on the very top
of the filter column. (See Fig N(a))
6. Lift off the whole of the top cover. It may be difficult to open due
to a suction pressure created in the filter column under normally
running. If so there is a small bleed screw in the side of the lid of
the filter column. Unscrew a few turns until you hear air or water
being released. Do not forget to re-tighten immediately after this
procedure. You will see in the column the blue cap of the filter cartridge element.
7. Grasp cartridge and lift straight up until the whole of the cartridge element clears the stainless steel rod which centres the cartridge in the filter column. With a garden hose and nozzle or other
high pressure device, hose cartridge(s) clean with jet stream of
water. Work top to bottom on each pleat. To remove collected suntan lotions and body oils that hosing will not remove; soak cartridge(s) in warm water with a FILTER CLEANER . To remove calcium deposits (a white chalky material) use HotSpring’s Master
Blaster (patented) high pressure water lance
8. CAUTION: Using a brush to clean a cartridge could damage it.
Commercially available cartridge cleaners may be used and can
be obtained from your authorized Riptide Dealer.
9. Reinstall cartridge(s), basket and skimmer face-plate.
10. After installing cartridges re-open both valves and replace
valve keepers (if fitted). Then unscrew the bleed screw a few turns
until only water is released.
11. Make a visual check that there are no weeps or drips from the
top cover of the filter stack.
12. Re-connect your power supply.
Revised 27th February 2007
Picture of the filter column in the
equipment bay
Filter locking nut ( Fig N (a) )
Filter
Page 15
TRIDENT PRO SHELL CARE
Your Riptide Trident Pro surface is durable and easy to clean:
White LORAN S® Trident Pro Surface:
For normal cleaning, use a mild detergent solution (3% Soap powder in water), Household Ammonia, or
Mineral Spirits. For surface marks, use Methanol. To apply these cleaners, use a soft, damp cloth or
sponge. Rinse well and dry with a clean cloth.
General Cleaning:
With normal use of your Pool, oils, lotions and hairsprays will build up on the surface of the water, sometimes leaving a scum line around the perimeter of your shell. This scum line can easily be removed with
a Pool SURFACE CLEANER or its equivalent.
To remove grease, oil, paint and ink stains, use 25% isopropyl (rubbing) alcohol in water.
For hard water stains consult your authorized Riptide Dealer for acceptable cleaning agents.
To remove light scratches and/or to protect your Pool’s shell, see your Riptide Dealer for an acceptable
repair procedure.
Note 1: Never allow your Trident Pro surface to come in contact with acetone (nail polish remover), nail
polish, dry cleaning solution, lacquer thinners, gasoline, pine oil, abrasive cleaners, or any other harsh
chemical. These chemicals can damage your Trident Pro shell and void your warranty.
Note 2: Avoid using cleaning agents that will leave suds in your exercise pool water.
COVER CARE
Your cover is warranted for 1 Year.
Basic instructions are provided below, it is important that you refer to the Sunstar information that came
with your cover. Sunstar provides detailed information on caring for your cover and what to do to protect
its warranty.
Cleaning & Conditioning Your Cover:
On a monthly basis, complete the following:
1. Remove the cover and lay it down on a flat, clean surface near a garden hose.
2. Rinse the cover to remove any loose debris.
3. Using a soft bristle brush, clean the top (vinyl portion) of the cover with a mild solution of washing up
liquid —about one teaspoon of soap to two gallons of water. Scrub the cover, using a gentle circular motion, being careful not to let any areas of the cover dry before rinsing with water.
4. Rinse the cover thoroughly and then dry with a clean cloth.
5. We recommend the use of 303 Protectant to give your cover a shiny appearance and UV protection.
6. Wipe and/or rinse any dirt from the bottom side of the cover.
7. Replace the cover and secure with cover locks.
Revised 27th February 2007
Page 16
MISCELLANEOUS CARE
Cleaning & Protecting the Headrests:
Clean on a regular basis with soap, water and a clean cloth. Use 303® Protectant or it’s equivalent once per
month. This will maintain water resistance and lustre of the product.
Vacuuming the Trident Pro :
Debris from wind, trees, and Pool users will occasionally accumulate on the bottom of your exercise pool.
Your Exercise Pool's filtration system will remove the smaller debris. Debris that is too large or too heavy for
the filtration system will have to be removed by the use of a Pool vacuum, such as a Pool Buster. If you do
not have a Pool vacuum, please contact your authorized Riptide Dealer.
Cleaning the Scum Line:
With normal use of your exercise pool, oils, lotions and hairsprays will build up on the surface of the water,
sometimes leaving a scum line around the perimeter of your exercise pool shell. This scum line can easily be
removed with waterline cleaner or its equivalent. See your authorized Riptide Dealer for this product.
NO-USE PERIODS
At certain times of the year you may not use your exercise pool as often as expected. For these no-use periods, we recommend the following:
No Use for 1-2 Weeks:
If you plan to not use your Trident Pro for one-two weeks, then we suggest that you not make any changes in
operating your exercise pool .
No Use for 2-6 Weeks:
If you plan to not use your Trident Pro for two-six weeks, then you may wish to lower the temperature setting
to approximately 26°C during the No-Use period.
No Use for Over 6 Weeks:
If you plan to not use your Trident Pro for over six weeks, then it is suggested that you winterise your exercise
pool by taking the following steps:
TRIDENT PRO WINTERIZATION:
1. Drain the water from the Trident Pro (see "Steps to Drain Your Trident Pro " under "Changing Your Trident
Pro Water" in this Owner's Manual).
2. Drain the Trident Pro equipment. This is done by removing the drain plug from the pumps, loosening all
PVC pipe unions and pump air bleed valves in the equipment compartment .On the base of the filter columns
there is a drain plug which you need to unscrew
3. Clean the Trident Pro shell (see "Trident Pro Shell Care" in this Owner's Manual).
4. Remove filter cartridge(s), clean filter (see "Cleaning Your Filter" in this Owner's Manual), allow to dry, and
then store inside your garage or home.
5. Reattach and secure cover to the Trident Pro .
TRIDENT PRO DE-WINTERIZATION:
De-Winterisation is completed by reversing the above procedure and then refilling the Trident Pro (see "Steps
to Refill Your Trident Pro " under "Changing Your Pool Water" in this Owner's Manual).
Note: If your Trident Pro water is not emptied during periods of No-Use, you should test and chemically treat
the water approximately once per week. Not doing so may lead to corrosion, staining and/or scaling to your
Trident Pro and its equipment. If there is no one available to take care of the Exercise Pool on a weekly basis,
then it is recommended that you winterise your Trident Pro as described above.
Revised 27th February 2007
Page 17
SERVICE
Before requesting service from your dealer, refer to the Trouble Shooting Guide in this Owner's Manual
to determine the necessary coarse of action. If you are not able to solve the problem using the Trouble
Shooting Guide, please contact your authorized Riptide Dealer.
GUARANTEE SERVICE
If your Riptide Trident Pro fails within the guarantee period and within the scope of its guarantee, contact
your authorized dealer and schedule a service call. You will be required to show proof of purchase by
provided your dealer with a copy of your original sales receipt.
Note : Damage caused by repairs made by someone other than an authorized Riptide technician will
not be covered by your warranty.
NON-GUARANTEE SERVICE
We recommend having an authorized Riptide technician perform all repairs on Trident Pro that fail outside of warranty coverage or beyond the warranty period. If you are not able to use an authorized Riptide technician, we encourage you to request and use genuine Riptide replacement parts.
If you are not able to obtain service in your area, call us at:
Phone:
0870 429 4222
PURCHASE INFORMATION
——————————————————————–———
YOUR EXERCISE POOL’S SERIAL NUMBER
—————————————————————————–
PURCHASE DATE
—————————————————————————–
DELIVERY DATE
Riptide Limited
11 Bilton Road
Chelmsford
Essex
CM1 2UP
0870 429 4223
Revised 27th February 2007
Page 18
Notes:
Revised 27th February 2007
Page 19
GENERAL OPERATION TROUBLESHOOTING GUIDE
PROBLEM
DOES NOT HEAT;
JETS AND LIGHT OPERATE
(READY, AND POWER INDICATORS ARE BLINKING)
PROBABLE CAUSES
Integrated pressure switch open
Check for clogged filters, integrated pressure switch will
reset when the flow of water
through the heater has been
restored. Call for service if
the heater trips frequently.
Circulation pump thermal cut-off
tripped
Disconnect power to the Pool,
allow circulation pump to
cool. Circulation pump thermal cut-off will reset when
pump has cooled and power
is reapplied. Call for service
if circulation pump thermal
cut-off trips frequently.
Blocked filters
Take filters out and see if bubbles return. If so, thoroughly
clean filters.
Remove compartment door, locate black or red injector (Tpiece), remove thick ozone
pipe and see if bubbles return. If not, unscrew top of
T-piece and clean.
Remove silver ions cartridge
and see if bubbles return.
Replace silver ions if bubbles return or out of date.
Remove check valve. If bubbles
return, buy a new check
valve.
Calcified ozone injector
NO OZONE BUBBLES
Old silver ions cartridge blocking
circulation.
Calcified ozone check valve
Temperature sensor problem
Disconnect power for at least 30
seconds. If blinking continues, call for service.
Pool water level too low
Filters clogged
Comfort Control® level closed
Add water
Clean filers
Open Comfort Control lever
Power failure
RCD tripped
READY INDICATOR BLINKING
JETS WEAK OR SURGING
SOLUTIONS
MOTO-MASSAGE® JET INOPERATIVE OR ERRATIC
Comfort Control valves closed.
Filters clogged
Check power source
Reset, call for service if it will not
reset.
Disconnect power for at least 30
seconds to reset heater high
limit. If it will not reset,
check for clogged filters. If
tripping continues, call for
service.
Deactivate Pool lock
Disconnect power for at least 30
seconds to reset heater high
limit. If it will not reset,
check for clogged filters or
air locks, if tripping continues, call for service
Open Comfort Control levers.
Clean filters
LIGHT INOPERATIVE
Pool lock inactivated
Light wiring or assembly is faulty
Deactivate Pool lock
Replace light assembly.
ENTIRE POOL IS INOPERATIVE
POWER INDICATOR
BLINKING (ENTIRE POOL
INOPERATIVE
Heater
tripped.
high-limit
thermostat
Pool lock activated.
Heater high-limit
tripped
thermostat
Revised 27th February 2007
Page 20
VOLUMES
19”6 Trident Pro Trident Pro
Pool
11500 ltrs
Revised 27th February 2007
Page 21
Revised 27th February 2007
Page 22
Revised 27th February 2007
Page 23