1
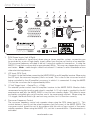
MASS W200
owners manual
Thank you for your purchase of the MASS W200 subwoofer, which has been designed and
constructed using quality systems and materials to provide years of enjoyment, reliability and
pride of ownership.
Music is and should be a natural enhancement of life. It stimulates the imagination, changes
your mood, helps you relax, and provides endless hours of entertainment. At Monitor Audio we
pride ourselves in attempting to make the listening experience as close as possible to the original
‘music’ production.
Please read through this manual to familiarise yourself with any safety advice and how to set up
your subwoofer to achieve the very best listening experience.
Please retain this manual for future reference.
Unpacking
Care must be taken at all times when handling the MASS W200 due to the
weight and the construction of the product. We recommend a two-person lift
wherever appropriate.
A feature of the MASS W200 is the fully encasing grille. Great care must be
exercised at all times to ensure it is not damaged during unpacking and when
finally sited in the room. Any physical damaged caused to the grille by not
complying with this requirement will not be covered by warranty.
The mains power cord(s) and 12 volt trigger lead are contained separately in the packaging and
should be removed prior to unpacking the product.
To remove the MASS W200 from its carton place some protective material on the floor and
having removed any loose items (mains lead(s) and 12 volt trigger lead) from the top of the
packaging, carefully invert the carton. Also see the icons printed on the carton. Gradually pull
the carton upwards to expose the subwoofer, which will be presented with its base uppermost.
Remove fixing tape from bag and expose the base/cabinet.
monitoraudio.com
1
ENGLISH
Introduction
Positioning/Initial Set Up
Leave the MASS W200 unplugged from the mains until the installation
procedure is completed.
The MASS W200 should now be sited in the most suitable position, preferably not directly in the
corner of a room as this may cause excessive bass boom. Once a desirable position is achieved
it is important to check if the cables are long enough to reach comfortably without being under
tension. The optimal control settings will depend entirely on your system configuration, room
environment and personal tastes. For initial trials set the controls as follows:
Volume Control Frequency Control Phase Control Mode Switch 12v Trigger (optional) Input Should be set to about 10 o’clock.
Should be set to the approximate frequency depending on
main speakers when using the L & R Line Level Inputs.
Should be set to zero degrees.
Should be set to ‘on’.
Do not connect at this stage.
Connections from the amplifier can be made at this stage before the power is connected to the MASS W200.
Never connect or disconnect the RCA input/ output leads with the MASS W200
switched on.
Set Up
Once the input cables are connected and the controls are set in accordance with the initial set-up
procedure above, the MASS W200 can be connected to the mains power supply and switched
on at the mains power switch.
Do not play any music or movies at this stage as the auto set up of the AV amp (if using one)
will need to be run. If your amp has an auto set up procedure, run this now with the volume set
to around 10 o’clock. This should be enough for the AV amp to acquire the correct settings. If
you do not have an auto set up or are using a stereo amp connected to the left and right inputs,
set the crossover in accordance with your main speakers. If using the MASS 10’s this should be
around 80Hz, but experimentation is advisable.
When the auto set up is complete, check that the subwoofer settings on the AV amp are correct.
The crossover frequency should be roughly 80Hz and the level should be no more/ less than +/3dB. If not I would suggest adjusting accordingly.
Now play a variety of music/ film excerpts that you are familiar and adjust the level of the MASS
W200 to a point where it integrates with the rest of the system and to where you are happy.
The volume of the amp can then be adjusted to an average listening level once you are sure
everything is working correctly to double check your sub woofer level settings.
2
MASS W200
ENGLISH
Amp Panel & Controls
4
3
INPUT
2
TRIGGER
FREQUENCY
.
LFE
12V DC
R
.
6
BASS
VOLUME
.
.
.
.
.
120 Hz MIN
7
8
PHASE
MODE
IMPACT
.
. .
.
50 Hz
1
5
AUTO
MUSIC
ON
MOVIE
.
MAX
9
POWER
ON
L
10
OFF
MASSW200
UK/EURO
DESIGNED IN UK, MADE IN CHINA
Notes:
1. ICONS/TEXT TO BE SILKSCREENED
1. RCA Stereo Inputs (Left & Right)
PANTONE REFERENCE COOL GREY 3M
2. IMAGE FOR
REFERENCE
PURPOSES ONLY.
This is the method of signal input when using a stereo amplifier
system,
connection
can
be provided by a pair of high-quality signal cables from the pre-out section of an amplifier.
The crossover frequency will need to be set if using this method of connection. If using the
MASS 10’s set the crossover dial to approximately 80Hz. This may vary depending on room
and tastes. Note: - cable lengths should not exceed 10 metres to avoid interference from
other electrical appliances.
2. LFE Input (RCA Type)
This input is to be used when connecting the MASS W200 to an AV amplifier/ receiver. When using
the LFE input, the crossover frequency dial is not used. This is due to the crossover function
being controlled by the AV amplifier/ processor to which it is connected. If using the MASS
10’s set the crossover dial to approximately 80Hz.
3. 12 Volt Trigger Input ~ Centre Pin = +12Vdc
For external power control from AV amplifier/ receiver to the MASS W200. Monitor Audio
recommend using this function and a lead is supplied. A 12 volt signal is supplied by the AV
amp/receiver and tells the MASS W200 to turn on from standby mode. This allows a more
accurately controlled auto on/off function, and is far more energy efficient. When using the
12v trigger, the Mode Switch (8) can be in any position, for it to function correctly.
4. Crossover Frequency Control
The crossover frequency control only operates when using the RCA stereo input (1). This
control feature is used to set the upper frequency limit (low pass) of the MASS W200. The
crossover control should be set in accordance with the size or bass output of the main/
satellite speakers. When using the MASS 10’s, set this to around 80Hz. Experimentation is
advisable.
monitoraudio.com
3
5. Volume Control
This control allows the level or volume to be adjusted in order to achieve a balanced overall
sound. To use this facility you will need to play a selection of familiar music or film excerpts.
Start with the volume at minimum and increase the level control until a balanced sound is
established. If using an AV processor or AV receiver amplifier, the system can be adjusted
by the test tone function within the set-up features. (Refer to the set up section in the AV
processor or AV receiver amplifier user guide.) When the MASS W200 is correctly set-up,
you should not be able to identify its location easily in the room.
6. Bass Switch
This switch tailors the bass response of the MASS W200 to your tastes. There are three
settings: Music, Movies and Impact. In Movie mode, it provides a relative flat response
down to 35Hz. Music mode is -2dB down on Movie mode but goes lower, all the way down
to 30Hz. Impact mode is +3dB up on Movie mode and comfortably goes down to 40Hz.
7. Phase Control Switch
The Phase Control is used to synchronise any delay between the MASS W200 and main/
satellite speakers. When the MASS W200 is in phase with the main/satellite speakers the
sound should be full bodied. Sit in a normal listening position whilst adjusting the phase
switch. Help from another person may be required. When set correctly the location of the
subwoofer should be almost undetectable. Experimentation is advisable in order to achieve
optimum results. However it should be noted that in most cases the phase control switch
should be set to 0 degrees, especially when using a digital AV processor or AV receiver
amplifier.
8. Power Mode Switch with On-Auto Facility
With the switch in the ‘On’ position, the subwoofer is permanently switched on under all
conditions. In the ‘Auto’ position the subwoofer will automatically switch on when an input
signal is received and will remain on for a period of time without receiving a signal before
switching into standby mode until a signal is received once more.
9. Mains Power Switch
The Mains Power Switch should be switched to the ‘Off’ position when the MASS W200 is
unused for extended periods. The switch must be in the ‘On’ position for the subwoofer to
function.
WARNING: Due to the mains switch being located on the rear panel, the apparatus must be
located in the open area with no obstructions to access the mains switch.
10. Figure 8 Mains Power Connector
The MASS W200 is supplied with a two-pin mains input socket for connection to the mains
supply. Use ONLY the appropriate mains lead provided with the product.
The LED on the top of the cabinet indicates whether the unit is in stand-by mode or operational.
It will be illuminated red when in stand-by, and green when operational.
4
MASS W200
ENGLISH
Specification
System Format :-
Active sub-woofer system – Auxiliary (ABR) loading.
18mm MDF cabinet (CARB2 approved)
Low Frequency Limit :-
30Hz (-6dB)
Upper Frequency Limit :-
Variable 40 – 120 Hz @ 24dB/Octave
Amplifier Power Output :-
220 Watts @ 1% THD+N
Amplifier Classification :-
Class D amplifier with Switch mode power supply (SMPSU)
Bass EQ Switch :-
Music/ Movie/ Impact
Phase Control :-
0-180 degrees
Auto Sensing :- Line Level >3.5mV
Input Level Requirements :-
Standby after approximately 20 minutes if no signal sensed
Driver Compliment :-
1 x 10” (250mm) C-CAM® long throw driver
1 x 10” (260mm) Auxiliary bass radiator
Input Impedance :-
> 20K Ohms
Mains Input Voltage :-
100 - 120 Vac / 220 - 240 Vac 50/60Hz
(Factory Region Preset)
Dimensions :- (Including grilles & feet)
420 x 385 x 385mm (H x W x D)
16 9/16 x 15 3/16 x 15 3/16 Inch (H x W x D)
Connections :-
Stereo RCA in, LFE in, 12v Trigger in (3.5mm mono mini-
jack)
12v Trigger Input :-
5 - 12v via 3.5mm mono mini-jack socket
Power Consumption :-
200 Watts / 0.5 Watts in Standby (ErP approved)
Weight (unpacked) :-
15.96Kg (35lb 2oz)
monitoraudio.com
5
Trouble Shooting
Should you experience any technical, or set-up problems with your subwoofer please check the
Trouble Shooting Guide below:
My subwoofer will not turn on/ no power.
• Is the LED illuminated on the top of the unit? If not, then check your mains lead is
properly connected both at the subwoofer and at the mains outlet. Also check the fuse
of the mains plug (where fitted).
• Is the LED red? If so, you have power going to the unit. It could be that there is no
signal, or the 12v trigger is connected and the source not turned on (see below).
• Have you got the 12v trigger connected? If so, the subwoofer will not power up until the
source is powered up.
• Is the unit receiving a signal (12v trigger not being used)? Is the Power Mode Switch in
Auto or On position, and signal source turned on? Try adjusting the volume level of the
source.
If it still does not turn on/ power up, please contact your local dealer/ distributor or Monitor Audio
immediately.
No sound from subwoofer.
• Is the LED on the top red or green? If it is red, then the unit hasn’t actually turned on. See above suggestions. If it is green, then your unit is powered up and turned on.
Check further suggestions below.
• Are the signal leads connected correctly? Check these. If possible, check by replacing
with a second, working set.
• Is the volume level just very low? Try turning the volume on the source up a bit more.
If it still does not output a signal, please contact your local dealer/ distributor or Monitor Audio
immediately.
6
MASS W200
ENGLISH
Owner Information
Product Details
Model MASS W200
Product Serial No …………………………………..
Date of Purchase ……………………………………
Dealer Details
Dealer Name …………………………………………………………………………………………….
Address …………………………………………………………………………………………………
Town, Post code, Country …………………………………………………………………………….
e-mail address …………………………………………………………………………………………
Monitor Audio reserves the right to alter specifications without notice.
monitoraudio.com
7