1
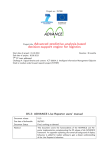
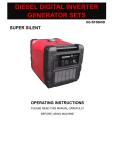
ACJ24, ACJ25, ACJ50
Direct Drive Compressor
Operating Manual
Index
Important Safety Instructions
2
Electrical Safety
2
Use of Extension Cords
2
General Safety Rules
3
Assembly & Operating Instructions
4-5
Automatic On/Off Switch
6
Overload Protection
6
Reset Procedure
6
Pressure Regulator
7
Pressure Gauges
7
Safety Valve
7
Shutting Down Your Compressor
8
Environmental Responsibilities
8
Maintenance
8
The Compressor & Its Components
9
Trouble Shooting
10
1
Important Safety Instructions
When using this product, basic safety precautions should always be followed, including –
DO NOT OPERATE A COMPRESSOR WHEN UNDER THE
INFLUENCE OF ALCOHOL OR DRUGS.
1) Read all instructions prior to using the product.
2) To reduce the risk of injury, close supervision is necessary when the compressor is in use near
children or infirm persons.
3) Know how to stop the compressor and be able to reduce the pressure immediately.
4) Be completely familiar with all the controls.
5) Do not wear loose clothing or jewelry as this could present a hazard.
6) Do not reach over machines with moving parts when in operation.
7) Maintain proper balance and footing at all times.
8) Do not use the compressor if the power cord shows any signs of damage or wear. Repair or replace
the damaged cord before use.
9) Do not yank on the cord to disconnect it from the power point.
10) Keep the cord away from heat sources, oil and sharp ridges.
11) NEVER move the unit by pulling on the air hose. Use the handle provided at the front and on the rear
of the tank.
12) Keep the work area clean and tidy.
13) Keep the work area well lit.
14) Keep the work area well ventilated.
Electrical Safety.
This product should only ever be connected to a properly manufactured, fitted and earthed power outlet.
Use of Extension Cords
Use of an extension cord with this product is NOT RECOMMENDED.
Warning !
To reduce the risk of electrocution, keep all connections dry and off the
ground. Do not touch the plug with wet hands.
2
General Safety Rules.
1) Always wear ear and eye protection when you use this product, or are in the vicinity of the
product when it is use.
2) Do not use the compressor in areas near combustible materials, combustible fumes or dust.
3) Always use a respirator or mask when spray painting or whenever there is a possibility vapors
may be inhaled. Read all instructions provided with the mask to ensure it provides adequate
protection against inhaling harmful vapors.
4) DO NOT ALLOW CHILDREN TO OPERATE THE COMPRESSOR AT ANY TIME.
5) DO NOT MAKE ANY MODIFICATIONS TO THE UNIT OR ANY OF ITS COMPONENTS.
6) UNITS WITH BROKEN OR MISSING PARTS OR WITHOUT THE PROTECTIVE
HOUSING OR COVERS SHOULD NEVER BE OPERATED.
7) Do not leave the compressor unattended while the pressure switch is in the “I” (On) position.
8) Do not add or change oil while the compressor is in operation.
9) Use only the supplied or recommended lubricating oil for the compressor
10) This compressor is fitted with an automatic “On/Off” switch. When the switch is in the “on” position,
the compressor may start operating at any time when the pressure in the tank falls below the preset
level of the pressure switch.
11) Disconnect all tools, fittings, etc and drain tank of remaining air if leaving unattended for prolonged
periods of time.
12) To reduce the risk of fire or explosion, never spray flammable liquids in a confined area.
13) Never directly inhale the compressed air produced by a compressor.
14) Do not use the air from the compressor for charging breathing/scuba tanks.
15) Do not use welding equipment in close proximity to the compressor. Do not weld anything to the air
tank of the compressor: this could dangerously weaken the tank and will void the warranty.
16) To avoid the risk of burns and injury from moving parts, do not operate the compressor with the
safety shield removed. Allow hot parts to cool before handling or servicing.
17) Before transporting the compressor make sure that the pressurised air is bled from the tank and that
the compressor is firmly secured.
18) Protect the air hose and cord set from damage. Inspect for weak or worn spots regularly and replace if
necessary.
19) Never apply the outlet air of this compressor directly on to any part of a person’s body. Do not
attempt to block the air outlet with your finger or any part of your body.
20) The tool must be used only for its prescribed purpose. Any use other than those mentioned in this
Manual will be considered a case of misuse. The user and not the manufacturer shall be liable for any
damage or injury resulting from such cases of misuse.
21) The manufacturer shall not be liable for any changes made to the tool nor for any damage resulting
from such changes.
Warning !
In the event that an air line is cut or broken, the air supply must be turned
off at the compressor.
3
Assembly & Operating Instructions.
1) Remove all parts from the carton and layout in a clear, level and dust free space.
2) Attach wheels and axle assemblies using bolts, washers and nuts supplied.
Wheel Assembly.
3) Handle welded to tank.
Handle Assembly.
4) Attach rubber feet with hardware supplied.
Rubber Foot Assembly
5) Attach air filter supplied (as shown) to air inlet on the side of the pump.
No Air Filter Fitted
Air Filter
Air Filter Fitted
4
6) Ensure oil is added from the bottle supplied until the marker in the sight glass is level with the red
indicator line.
Sight Glass Empty
Sight Glass Overfull
Sight Glass Correct
Sight Glass
7) When the correct amount of oil has been added, screw the BREATHER PLUG SUPPLIED back
into position as shown below. DO NOT OVERTIGHTEN.
Correct Positioning of Breather Plug
8) Before connecting the compressor to the power outlet, check for broken components and any
damage to the power cord.
9) Make sure the pressure switch is in the “On” or “Off” position.
10) Plug the unit into a properly fitted and earthed power outlet.
11) Attach the desired tool to the end of the air hose.
12) Turn the switch to the “I” or “On” position.
5
Automatic On / Off
The compressor is equipped with an automatic On/Off pressure switch. The compressor will only run when
the switch is in the “I” or “On” position. Once the tank has reached the maximum preset pressure, the
pump will automatically shut off. The pump will automatically turn back on once the pressure in the tank
drops below the minimum preset pressure.
The maximum and minimum pressures are set at the factory. Any attempt
by the operator to change them will void the warranty of the product.
Overload Protection
This compressor is equipped with overload protection. In the event of a motor overload, the compressor will
cease to operate.
Possible Causes of Motor Overload are as follows:
1)
2)
3)
4)
Inadequate power supply.
Use of extension leads.
Overheating.
Lack of lubricating oil.
If such a shut down occurs, the Reset Procedure, as detailed below should be followed.
Reset Procedure
This compressor has a thermal cut off switch. If the compressor cuts out in anything other than its normal
duty cycle, you must:
1) Disconnect compressor from power source.
2) Leave the unit to cool down for 30- 60 minutes
3) Restart the compressor as per normal.
6
Pressure Regulator
This compressor is fitted with an Air Pressure Regulator. It allows regulation of the output air pressure.
Some air tools require a higher operating pressure than others. Please refer to the air pressure requirements of
your tools for the proper settings for the regulator.
NOTE. If you do not allow the air to discharge whilst you are setting the regulator, the pressure as indicated on the
regulated outlet gauge will be incorrect. This gauge ONLY indicates the correct pressure while air is being
discharged from the outlet.
Pressure Gauges
The Tank Pressure Gauge supplies the reading of the air pressure inside the tank.
Safety Valve.
The compressor is equipped with a safety valve that will engage when the pressure in the tank exceeds the
maximum pressure setting. DO NOT REMOVE OR ATTEMPT TO ADJUST THE SAFETY VALVE.
7
Shutting Down Your Compressor.
When you have finished using your compressor, follow these steps:
1)
2)
3)
4)
5)
6)
Close the air outlet taps.
Switch off the compressor.
Disconnect tools and/or accessories from the air hose.
Disconnect the air hose.
Locate the drain valve on the underside of the tank.
Open the drain valve to release remaining pressurised air from within the tank. Moisture build up in
the tank is normal with air compressors, so a small amount of water may come out while draining.
(Draining the tank is vital for the longevity and safety of your air compressor).
7) Disconnect unit from power outlet (power point).
8) Close the valve and store the compressor in a cool, dry place.
Environmental Responsibilities.
Please recycle unwanted materials instead of disposing of them as waste. All tools, hoses and packaging
should be sorted, taken to the local recycling centre and disposed of in an environmentally safe way.
Maintenance.
1) The tank will require accumulated moisture to be drained from it on a regular basis. It is
recommended that the tank be drained of moisture after every five hours of use. The drain valve is
located on the underside of the tank.
Drain Valve on underside of Tank
2) Check oil level before use.
3) Wash air filter insert in a mild soapy solution after 50 hours use. Operation in extreme conditions e.g.
dust, paint residue etc, may require more frequent cleaning.
4) Check handle is attached properly.
5) Check tires are inflated correctly.
6) Check power cord for signs of wear and tear before each use.
7) Never use caustic agents to clean plastic parts.
8) Check air filter is free and clean of large objects.
9) Remove dust and dirt regularly. Wipe down compressor with a damp rag. Do not use alcohol, petrol
or other cleaning agent.
8
The Compressor & Its Components
Air Filter
On/Off
Switch
Regulator
Oil
Inlet
Air
Outlet
Tap
Tool
Pressure
Gauge
Tank
Pressure
Gauge
Tank
Drain
9
Trouble Shooting
Trouble
Compressor will not start
Trouble
Motor will not run, running too
slow or becoming excessively
hot
Possible Cause
Not connected to power
supply
Excessive vibration or noise
Trouble
Inability to retain required
operating pressure
Trouble
Oil consumption too high
Check connection
Tank full of air
Motor will restart when pressure
drops below preset minimum
On/Off Switch in "Off" position
Set switch to "On" position
Possible Cause
Possible Remedy
Power fault or supply voltage
too low
Check the power supply
Power cord too long or too
thin
Do Not Use Extension Leads.
Lack of Lubricating oil
Compressor running
constantly without break
Trouble
Possible Remedy
Possible Cause
Check oil level and adjust as
necessary
Reduce air consumption and allow
compressor to cool.
Possible Remedy
Loose part
Tighten component
Wheel or mounting feet loose
Tighten component
Possible Cause
Possible Remedy
Dirty air filter cartridge
Clean air filter
Air leaking
Return to point of purchase for
assessment
Air consumption beyond units
ability to supply
Reduce air consumption
Possible Cause
Possible Remedy
Oil level too high
Maintain the oil at the correct level
Oil filler hole blocked
Check and clean
Wrong grade of oil used
Use only the recommended
lubricating oil
NOTE: CERTAIN PROBLEMS MAY REQUIRE PROFESSIONAL ATTENTION. CONTACT PLACE
OF PURCHASE FOR ADVICE
10