1
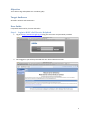
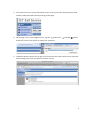
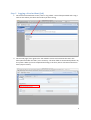
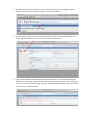
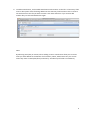
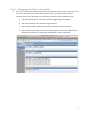
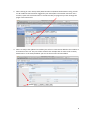
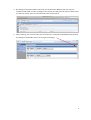
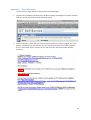
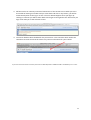
 User Guide Using HGfL’s Self Service Helpdesk 25/08/2011 HGfL ITBM LANDesk Matthew Dyke V1 Objective To be able to log and update Your Incidents (jobs) Target Audience All Staff in Schools and Outstations User Guide Compatible with Firefox, Chrome and Safari Step 1 Login to HGfL’s Self Service Helpdesk 1. Log in at http://selfservice.hgfl.org.uk using the username and password provided. 2. Once logged in you will be presented with our shared welcome screen. 2 3. On the left are links to Home, Notice board, Your Current Calls; Your Group Calls (for Head Teachers and Nominated Contacts) and Log a Fault (job). 4. On the right is the current logged on user, Log Off , Preferences Preferences there is the option to change your password. and Help
. Within 5. The Notice board is where you can get up to the minute information about issues within the Grid including issues that may affect more than one site. 3 Step 2 Logging a New Incident (Job) 1. On the left of the Welcome screen, click on ‘Log a fault’. You will be presented with a Log a Fault screen where you select the Incident you want to log. 2. On the next page / form ignore the ‘Your Details’ section and overwrite the text in the Description field with the fault / issue summary. The other field are automatically filled in by the system. When you have completed the filling in the form, either click Save and Close or Save (stay on Screen). 4 3. By Selecting Save and Close the next screen will present you with your logged Incident Number. Please use this reference number in all correspondence. 4. By selecting Save (Stay on Screen) this will keep the Incident on screen and allow you to either add an attachment/s or add a note with further information. 5. If you need to update an Incident with further information, you can do this by clicking on Add Note. In the Category field, select the Further Information and then enter a description of the note into the Summary Field. Then fill in the Details field to add the extra information. To finish click on Save and Close. 5 6. To add an attachment, click on Add Attachment under Actions on the left. In ‘Summary’ field enter a description of the file being added into the Summary field and then click on Choose File and browse to the file you wish to attach. Click Save and Close. If you need to add another file just click Add Attachment again. Note: By Selecting Save (Stay on Screen) when adding a note or attachment allow you to review what you have added. At the bottom of all Incidents, Notes, Attachments etc you can see when they were created (date/time) and who by. All salmon pink fields are mandatory. 6 Step 3 Managing your Calls or Group Calls 1. Click ‘Your Current Calls’ and you will be presented with the screen below. As you can see in the screen shot that ‘Your Current Calls’ link shows you your Open Incidents that are currently active. These are broken into 3 sections. You also see your Closed Incidents. a. Your Breached Incidents. Calls that have time triggers that have expired b. Your Open Incidents. Calls that are being worked on. c. Your Closed Incidents. Calls that have been resolved in the last 4 months. d. Your Incidents in Pending. Calls that have been placed on hold. This could be due to third party involvement or work being scheduled for a date in the future. 7 2. When clicking on Your Groups Calls (Head Teachers and Nominated Contacts Only) you will see All Incidents that have been logged for your School/Site. The window is broken into 2 sections, Open calls and Closed calls. It records 25 calls per page and you click through the pages in the bottom left. 3. When an analyst has updated an Incident you will see a new section added to the Incident at the bottom of the call. This part of the call will have multiple tabs for items such as Notes, Attachments. In the example below you can see that a note has been added. 8 4. By clicking on the Notes tab this will show you all the notes added to the call. They are numbered and listed in order. Clicking on the relevant line will open the note to allow you to see the time stamp. (You can read the note from the first pane). 5. When viewing ‘Your Current Calls’ you can minimise / maximise the dashboard components by clicking on the double arrows on the right of the page. 9 Appendix Error Messages The lists of error pages below are System Permission Messages. 1. You will see the following message if the Incident is being reviewing by a member of HGfL’s staff; you will be presented with the following screen. 2. Email notifications, which are sent from the system when an incident is logged, are not at present suitable for use with schools, as it is a shared system with the Council. However there is information that is relevant to you, which are the reference number and the summary. 10 3. Self Service has an inactivity timeout of 20 minutes. If the timeout occurs while you are in the middle of viewing an Incident and you come back and click on any button, you will be automatically taken to the log on screen. The error below happens when you login. By clicking on continue you will be taken back to the login screen again but this time when you login it will take you to the welcome screen. 4. The search field has been disabled for the present time. This is because work need to be carried out to make sure that the search only returns information for your schools If you have issues with these instruction please call the HGfL Helpdesk on 01895 675 946 or Ext 6000 if you are on IPT. 11