1
–
Smart Dentin
Grinder™
User Guide
Tissue Engineering Bone Grafting Process
Version 1.2
Smart Dentin Grinder User Guide
About This Guide
Thank you for purchasing the Smart Dentin Grinder™, which enables you to create a
patient’s own autologous bone graft within less than 15 minutes!
Thanks to this solution, extracted teeth are no longer considered to be clinical waste.
Extracted teeth can now be used as an autologous bone graft, which is the golden
standard of grafting. With Smart Dentin Grinder™, a few short steps easily transform
an extracted tooth into a sterile and clean dentin particulate ready for grafting.
We are certain that this autologous graft will provide you with optimal results.
This user guide is intended for dental practitioners. It describes how to use the Smart
Dentin Grinder.
• Chapter 1, Introducing the Smart Dentin Grinder Process, page 7, introduces the
Smart Dentin Grinder and describes its components and how it works.
• Chapter 2, Using the Smart Dentin Grinder, page 13, describes how to transform
an extracted tooth into a sterile and clean particulate dentin ready for grafting.
• Appendix A, Specifications, page 27, describes the specifications for the Smart
Dentin Grinder.
• Appendix B, Labeling, page 28, shows the label that appears on the Smart Dentin
Grinder.
2
Important Notice
Important Notice
Copyright © 2013 by Kometa Bio International. All rights reserved.
All intellectual property rights in this publication are owned by Kometa Bio International. and
protected by applicable copyright laws and international treaty provisions. Kometa Bio
International. retains all rights not expressly granted. No part of this publication may be reproduced
in any form whatsoever or used to make any derivative work without prior written approval by
Kometa Bio International.
Kometa Bio International. reserves the right to revise this publication, and/or make improvements or
changes in the product(s) and/or the program(s) described in this documentation at any time without
prior notice. The information in this document is provided in good faith. However, it is provided without
any warranty that it is accurate or complete and on the express understanding that Kometa Bio
International. shall have no liability whatsoever to other parties in any way arising from or relating to
the information or its use.
Any product described in this publication is furnished under its own license agreement.
All other trademarks or registered trademarks are the property of their respective owners.
Date: 05/2013
Document #: 13-10-01
Document Version: 1.0
Device Version: 1.1
Patent Pending No. US61/752,453
CE Representative: Mr. Kfir Atias
2 Devonshire Place W16HG
London, England
Telephone: 08000842417
3
Smart Dentin Grinder User Guide
Table of Contents
About This Guide.................................................................................................... 1
Important Notice.................................................................................................... 3
Table of Figures ...................................................................................................... 5
Documentation Conventions ....................................................................... 5
Safety Information ................................................................................................. 6
Chapter 1: Introducing the Smart Dentin Grinder Process ........................................ 7
What is the Smart Dentin Grinder? ................................................................. 7
Device Intended Use ................................................................................ 7
Indications for Use.......................................................................................... 7
Contraindications ........................................................................................... 7
Smart Dentin Grinder Components.................................................................... 8
Sterile Disposable Chamber ........................................................................ 9
Basic Cleansing Solution and Containers ................................................... 10
Hot Plate................................................................................... ................. 10
How Does the Smart Dentin Grinder Work? ..................................................... 11
Step 1, Using the Patient’s Own Teeth....................................................... 11
Step 2, Grinding the Teeth ......................................................................... 11
Step 3, Sterilizing the Particulate ............................................................... 12
Chapter 2: Using the Smart Dentin Grinder ............................................................13
Workflow Overview ....................................................................................... 13
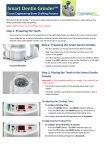
Step 1, Preparing the Teeth........................................................................... 14
Step 2, Preparing the Smart Dentin Grinder ................................................. 14
Step 3, Placing the Teeth in the Smart Dentin Grinder ................................. 17
Step 4, Configuring the Smart Dentin Grinder .............................................. 18
Step 5, Grinding the Teeth............................................................................. 20
Step 6, Cleansing the Particles ...................................................................... 21
Step 7, Drying the Particulate........................................................................ 23
Appendix A: Specifications ....................................................................................27
Appendix B: Labeling ............................................................................................28
4
Table of Figures
Table of Figures
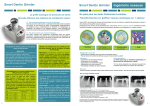
Figure 1: Smart Dentin Grinder Components ...............................................................................................8
Figure 2: Sterile Disposable Chamber ...........................................................................................................9
Figure 3: Grinding Blade and Particulate Sieve .............................................................................................9
Figure 4: Particulate Drawer Compartments ..............................................................................................10
Figure 6: Using the Smart Dentin Grinder – Workflow Diagram .................................................................13
Figure 7: Attaching the Chamber ................................................................................................................15
Figure 8: Aligning the Arrows......................................................................................................................15
Figure 9: Chamber is Locked .......................................................................................................................16
Figure 10: Switching On the Smart Dentin Grinder.....................................................................................16
Figure 11: Power Indicator..........................................................................................................................16
Figure 12: Removing the Chamber Cap ......................................................................................................17
Figure 13: Placing the Teeth in the Smart Dentin Grinder ..........................................................................17
Figure 14: Closing the Chamber Cap ...........................................................................................................18
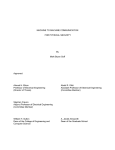
Figure 15: Grinding for 3 Seconds ...............................................................................................................19
Figure 16: Sorting for 20 Seconds ...............................................................................................................19
Figure 17: Pulling Out the Drawers .............................................................................................................21
Figure 18: Pulling Out the Top Drawer Compartment ................................................................................21
Figure 19: Harvesting the Implantable Particles .........................................................................................22
Figure 20: Hot Plate ....................................................................................................................................23
Figure 21: Smart Dentin Grinder Label .......................................................................................................28
Documentation Conventions
NOTE:
Notes provide additional important information.
TIP:
Tips provide shortcuts or special guidance that may enable optimal performance.
WARNING!
Warnings indicate conditions or practices that could result in death or serious injury.
It may also describe potential serious adverse reactions and safety hazards.
CAUTION:
Caution indications relate to conditions or practices that are potentially hazardous
that may result in minor or moderate injury to the user or damage to the equipment
or other property. Caution indications may also be used to indicate practices
necessary for effective use of the device.
5
Smart Dentin Grinder User Guide
Safety Information
WARNINGS!
Adhere to the following warnings and safety information for the use of this device:
•
The Smart Dentin Grinder must only be used with its original parts.
•
No modification of the Smart Dentin Grinder is permitted.
•
The Smart Dentin Grinder must only be operated in accordance with the
instructions provided in this user guide and for the purpose described in this
user guide.
•
Keep the Smart Dentin Grinder away from heat or open flame.
•
To avoid electric shock or device malfunction, liquids must not be allowed to
enter the device.
•
Do not plug in the Smart Dentin Grinder while barefoot or with wet hands.
•
Do not use the Smart Dentin Grinder in an explosive environment or in the
presence of flammable anesthetics or gases.
•
Do not use the Smart Dentin Grinder in an oxygen-rich environment.
•
The Smart Dentin Grinder should not be operated when there is any visible
physical damage, such as cracks, breaks and so on.
CAUTIONS:
•
•
•
•
This device is not defibrillation proof.
The device is intended for non-continuous operation.
Storage and transportation temperature is between -5°C to +55°C.
The Smart Dentin Grinder must only be serviced by an authorized representative.
6
1 Introducing the Smart Dentin
Grinder Process
This chapter introduces the Smart Dentin Grinder™ and describes its components
and how it works.
What is the Smart Dentin Grinder?
The Smart Dentin Grinder provides an innovative solution for autologous dentin
grafting. It enables you to convert extracted teeth into a bacteria-free particulate
dentin ready for transplant within less than 30 minutes.
Device Intended Use
The Smart Dentin Grinder grinds extracted teeth into particles and sorts these
particles according to size. This process creates bacteria-free sterile particulate that is
ready for autologous tissue engineering by grafting it into fresh sockets and bone
defects.
Indications for Use
•
•
The Smart Dentin Grinder is intended to be used by dental practitioners.
The Smart Dentin Grinder is to be used for patients that:
Have one or more non-essential teeth that are specified to be extracted for
autologous grafting by a dentist.
Require bone grafts.
Contraindications
•
Teeth that have undergone root canal fillings should be discarded and not used
for grafting.
7
Smart Dentin Grinder User Guide
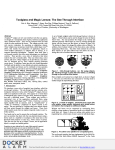
Smart Dentin Grinder Components
The following lists the contents of the Smart Dentin Grinder package.
WARNING!
Check the package contents for damage. If any of the contents of the package are
damaged, do not use the Smart Dentin Grinder and return it to your supplier.
Sterile Disposable
Chamber
Particulate Drawer
Operation panel
Figure 1: Smart Dentin Grinder Components
Each of the components of the Smart Dentin Grinder is described below:
• Sterile Disposable Chamber, page 9
• Cleansing Solution and Containers, page 10
• Hot Plate, page 10
8
Smart Dentin Grinder User Guide
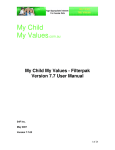
Sterile Disposable Chamber
The Smart Dentin Grinder is provided with three sterile disposable chambers, each of
which must only be used for a single patient during a single session. Each chamber is
provided in a sterilized, sealed packaging.
Removable seethrough cap
Multi-compartment
Drawer
Grinding Blade and
Strainer
Figure 2: Sterile Disposable Chamber
Each disposable chamber has a see-through cap. When the cap is open, you can see
the grinding blade and particulate sieve, as shown below:
Figure 3: Grinding Blade and Particulate Sieve
9
Smart Dentin Grinder User Guide
The Particulate Drawer has two compartments (sub-drawers), as shown below:
Bottom drawer for
unusable particulate
Top drawer for usable
particulate
Figure 4: Particulate Drawer Compartments
NOTE:
Contact your local distributor when you need more sterile disposable chambers.
Basic Cleansing Solution and Containers
The Smart Dentin Grinder package is provided with a bottle of cleansing solution and
three containers to be used during the cleansing process.
Store the cleansing solution at room temperature. Contact your local distributor
when you need more cleansing solution or containers.
WARNING!
Do not reuse the same chamber, solution or containers for different patients or for
the same patient in different sessions. The cleansing solution bottle contains enough
solution for a few patients.
WARNING!
The cleansing solution contains high pH (very basic) Sodium hydroxide in ethanol.
Wear eye protection while handling the cleansing solution.
Hot Plate
After the particulate has been rinsed thoroughly with saline and the saline has been
decanted leaving wet particulate, you can use the hot plate to dry the particulate.
The hot plate can be reused as needed. Be careful!! The glass container is very hot,
do not touch it!
10
Smart Dentin Grinder User Guide
How Does the Smart Dentin Grinder Work?
The Smart Dentin Grinder grinds a patient’s own teeth into dentin particulate,
separates the particulate into specific sized particles and then provides a cleansing
solution that leaves the dentin particles bacteria-free. This procedure transforms any
patient’s tooth into a sterile particulate dentin that is grafting bio-material for a
highly predictable autologous graft.
The following provides an overview of how the Smart Dentin Grinder works. Detailed
operation instructions are provided in Chapter 2, Using the Smart Dentin Grinder on
page 13.
Step 1
Using the Patient’s Own Teeth
Page 11
Step 2
Grinding the Teeth
Page 11
Step 3
Sterilizing the Particulate
Page 12
Figure 5: Stages of the Smart Dentin Grinder Process
Step 1, Using the Patient’s Own Teeth
One or more of the patient’s own teeth are extracted in the usual manner and then
cleaned.
Step 2, Grinding the Teeth
The Smart Dentin Grinder is specially designed for grinding teeth into particulate
dentin. It grinds the teeth into particles and then sorts them according to size.
Dentin particles of suitable size for implanting (between 300 and 1,200 microns) are
automatically stored in the Smart Dentin Grinder’s top drawer compartment.
11
Smart Dentin Grinder User Guide
Large particles can be reground in order to obtain more particles of the proper size
(between 300 and 1,200 microns).
Extremely small dentin particles (below 200 microns) fall into its bottom drawer
compartment for disposal. Efficiency is approximately 95%, meaning that typically
95% of the extracted tooth can be used for dentin bone grafting.
The Smart Dentin Grinder enables you to configure the grinding time of the teeth and
the sorting time of the particulate.
NOTE:
Grinding speed and vibration intensity are predefined and cannot be changed.
Step 3, Sterilizing the Particulate
The Smart Dentin Grinder process provides a special dentin particulate chemical
cleanser that dissolves all the organic debris, resulting in a bacteria-free sterile
particulate ready for transplanting into fresh sockets and bone defects.
12
2 Using the Smart Dentin
Grinder
This chapter describes how to transform an extracted tooth into a sterile and clean
particulate dentin ready for grafting.
Workflow Overview
The following describes the workflow for using the Smart Dentin Grinder.
Step 1
Preparing the Teeth
Page 14
Step 2
Preparing the Smart Dentin Grinder
Page 14
Step 3
Placing the Teeth in the
Smart Dentin Grinder
Page 17
Step 4
Step 5
Configuring the Smart Dentin Grinder Page 18
Grinding the Teeth
Page 20
Step 6
Cleansing the Particulate
Page 21
Step 7
Drying the Particulate
Page 23
Figure 6: Using the Smart Dentin Grinder – Workflow Diagram
13
Smart Dentin Grinder User Guide
Step 1, Preparing the Teeth
Only teeth that have undergone root canal fillings are not suitable. All other teeth
can be used.
WARNING!
Do not use teeth that have root canal fillings.
►
To handle the extracted teeth:
1 Extract one or more of the patient’s own teeth in the usual manner. This should
be done during the same treatment session as the grinding, not before.
2 Use a tungsten bur to remove all cavities and artificial material from the
extracted tooth, so that only the clean tooth dentin remains.
Artificial material to be removed may include fillings, crowns and any prosthetic
materials.
3 Remove all surface debris, especially on the root.
Step 2, Preparing the Smart Dentin Grinder
This step describes how to prepare the Smart Dentin Grinder for a procedure.
CAUTION:
The Smart Dentin Grinder vibrates and therefore must be kept on a stable surface
away from the table’s edges.
CAUTION:
Each chamber comes in sterilized packaging. Do not open its packaging before this
point.
WARNING!
Each sterile disposable chamber must only be used for a single patient and only once.
14
Smart Dentin Grinder User Guide
►
To prepare the Smart Dentin Grinder:
1 Place the Smart Dentin Grinder on a flat and stable surface or tabletop.
2 Plug in the Smart Dentin Grinder into a standard electrical outlet.
3 Open the chamber’s sterile packaging.
4 Put the chamber on the top of the Smart Dentin Grinder, as shown below:
Figure 7: Attaching the Chamber
5 Align the small arrow on the chamber with the one in the center of the grinder,
as shown below:
Aligning the Arrows
Figure 8: Aligning the Arrows
15
Smart Dentin Grinder User Guide
6 Turn the chamber counterclockwise to lock it in position. When locked, the LOCK
indicator arrow on the chamber is to the right of the arrow in the center of the
grinder.
Figure 9: Chamber is Locked
7 Switch on the Smart Dentin Grinder, as shown below:
Figure 10: Switching On the Smart Dentin Grinder
The POWER indicator should light up on the operation panel, as shown below:
Figure 11: Power Indicator
16
Smart Dentin Grinder User Guide
Step 3, Placing the Teeth in the Smart Dentin
Grinder
The Smart Dentin Grinder is a specially designed for grinding teeth into particulate
dentin. The instructions below can be used for between one and six teeth at once.
NOTE:
If you wish to process more than six teeth for the same patient in the same session,
then simply perform this entire process on a few teeth at a time.
►
To grind the teeth:
1 Remove the cap of the sterile disposable chamber, as shown below:
Figure 12: Removing the Chamber Cap
2 Please dry the teeth with air before placing them in the grinding chamber!
3 Place the prepared teeth on the grinding sieve next to the blades, as shown
below:
Figure 13: Placing the Teeth in the Smart Dentin Grinder
The teeth must have been prepared, as described in the Step 1, Preparing the
Teeth section on page 14.
17
Smart Dentin Grinder User Guide
4 Close the chamber cap and twist it counterclockwise so that it clicks into place.
Figure 14: Closing the Chamber Cap
NOTE:
The chamber cap has a safety latch so that the Smart Dentin Grinder stops
immediately when the cap is open.
Step 4, Configuring the Smart Dentin Grinder
The Smart Dentin Grinder enables you to configure its grinding time and sorting time.
TIP:
We highly recommend grinding less time as opposed to more time. The reason is that
grinding too long produces unusable particulate (particles of less than 200 microns).
Therefore, it is much preferable to grind less time and then to repeat the grinding
process by pressing the START button again.
NOTE:
The Smart Dentin Grinder retains the latest configuration that you set (as described
on the next page) unless it is powered off.
18
Smart Dentin Grinder User Guide
►
To configure the Smart Dentin Grinder:
1 Grinding time refers to the number of seconds that the Smart Dentin Grinder
spins its blade in order to break down the dentin material into particles.
To configure Grinding Time:
Press the GRIND button. The GRIND indicator lights up.
Press the UP and/or the DOWN button as many times as needed in order to set
the preferred Grinding Time.
We recommend setting grinding time to 3 seconds, as shown below:
Figure 15: Grinding for 3 Seconds
2 Sorting Time refers to the number of seconds that the Smart Dentin Grinder
vibrates in order to filter the particles through the grinder’s sieve and the
removable chamber’s drawers.
To configure the Sorting time, in seconds:
Press the SORT button. The SORT indicator lights up.
Press the UP and/or the DOWN button as many times as needed in order to
set the preferred Sorting Time.
We recommend setting sorting time to 20 seconds, as shown below:
Figure 16: Sorting for 20 Seconds
TIP:
To display the currently configured Grinding Time, simply press the GRIND button.
To display the currently configured Sorting Time, simply press the SORT button.
19
Smart Dentin Grinder User Guide
Step 5, Grinding the Teeth
►
To start the Smart Dentin Grinder:
1
Press the START button to start the grinding process. The sorting (vibrating)
Process starts automatically afterwards.
Dentin particles smaller than 1,200 microns fall into the top drawer.
The bottom of the top drawer is mesh that allows particles smaller than 200
microns to fall into the bottom drawer. These particles are to be disposed of.
This leaves particles of between 300 to 1,200 microns in the top drawer. The
Resulting particulate dentin in this top drawer may be two to three times the
Volume of the original root.
2 Click the START button again to grind for another 3 seconds and to sort for
another 20 seconds.
3 If large pieces are left in the grinding chamber, then press the START button
again to grind for another 3 seconds and to sort for another 20 seconds.
If the teeth appear to be ground already, but the particulate has simply not fallen
through the grinding sieve holes, then set the Grinding to 0 and then press the
START button again to only perform the sorting procedure.
20
Smart Dentin Grinder User Guide
Step 6, Cleansing the Particles
►
To cleanse the particles so that they are bacteria free:
1 Pull the chamber drawers out of the disposable chamber, as shown below:
Figure 17: Pulling Out the Drawers
2 Pull out/apart the top drawer compartment, which contains particles of between
300 – 1,200 microns, as shown below:
Top drawer compartment
containing particles that
can be used. Between 300
– 1,200 microns.
Bottom drawer
compartment containing
particles that cannot be
used. Smaller than 200
microns.
Figure 18: Pulling Out the Top Drawer Compartment
21
Smart Dentin Grinder User Guide
3 Dump the contents of the top drawer compartment into one of the provided
containers.
Figure 19: Harvesting the Implantable Particles
4 Pour the provided cleanser into the container with the particulate. Fill
approximately half the container. Make sure the cleansing solution covers all the
particulate and a bit more.
WARNING!
The cleansing solution contains high pH (very basic) Sodium hydroxide in ethanol
Wear eye protection while handling the cleansing solution.
5 Close the container’s cap by turning it clockwise. This cleanser dissolves organic
material (including bacteria), and leaves the particulate clean and bacteria-free.
6 Leave the particulate in the cleansing solution for 10 minutes at room
temperature.
7 Gently take out the cleansing solution with dropper.
8 Pour sterile saline or Phosphate Buffered Saline (PBS) into the
container. Fill approximately half the container. Make sure the saline
covers all the particulate and a bit more.
9 Leave the particulate in the Pour sterile saline or Phosphate Buffered Saline
(PBS) for 1 minute at room temperature.
10 Gently stick a small piece of sterile gauze into the top of the container in order to
absorb the remaining saline on top of the particulate or take it out using
dropper.
22
Smart Dentin Grinder User Guide
Step 7, Drying the Particulate
Perform the following if drying is required or if you want to store the particulate for
future use.
►
To dry the Particulate:
1
Plug in the hot plate and turn it on.
2
Place the open container holding the wet particulate dentin on the hot plate.
3
Leave the container on the hot plate for five minutes.
The dentin particulate is now sterile and ready for transplanting into fresh sockets
and bone defects.
4
Close the cap on the container until you are ready to implant the particulate.
WARNING!
The container is hot. Do not touch it.
5
Turn off and unplug the hot plate.
Figure 20: Hot Plate
23
Smart Dentin Grinder User Guide
Electric Hot Plate
Operating Instructions
Rotary Controller (Dial)
LED Indicator Light
Please carefully read the instructions below before operating the electric hot plate.
Only then can we assure problem-free use of this appliance. Improper and careless
use and care of the appliance can cause problems. In such cases, we cannot honor
the warranty.
Technical Data
• 230V~50 Hz
• 500W
How to operate this appliance?
•
Connect the hot plate to a 200V-240V voltage source that meets
official standards.
24
Smart Dentin Grinder User Guide
•
This hot plate is equipped with a 6-level dial. The numbers and dots on the rotary
controller show the specific method for operating the hot plate:
•
•
•
•
•
•
Off = Shut off
1 = 0-50C°
2 = 50-100 C°
3 = 100-150 C°
4 = 150-200 C°
5 = 200+ C°
Note:
• The LED light turns off when the hot plate reaches the desired temperature and
will turn on and off periodically in order to keep the hot plate at the set
temperature. This indicator is only
approximate.
How to dry dentin graft with this appliance?
•
•
•
•
•
•
•
Place a glass container with wet dentin particulate upon the hot plate.
Cover the glass container with its top, because dry granules may pop
up (like popcorn). Keep the top only semi-closed, to allow evaporation.
Turn the hot plate on, by rotating the dial to level 3 (100-150 C°)
Leave the container on the hot plate for up to five (5) minutes, until the
dentin particulate are fully dried out.
Now the dentin particulate is ready for implantation
Turn off the hot plate off, and remove the glass container from it.
Close the container cover until you are ready to implant the pieces.
Note:
• Only use the glass containers supplied by Kometa Bio.
• The hot plate has a thermostat for preventing overheating.
Nevertheless, you should always turn off the appliance at the
appropriate time.
25
Smart Dentin Grinder User Guide
Safety Hints
•
•
•
•
•
•
•
•
Use the hot plate only in enclosed spaces.
Never immerse the appliance in water.
Never use the appliance if the cable is defective or if the hot plate’s
operation is faulty.
Do not place the hot plate next to a wall!
Please prevent the cable from coming into contact with the hot plate.
Place and use the hot plate only on a solid horizontal surface. Please
refrain from using a flammable base (e.g.: fabrics, plastics, etc.).
Do not allow use by minors. Children are not aware of the dangers that could materialize
when using electrical devices. Please take care that children cannot come in contact with
this product.
When the equipment is transferred to a third party, these operating instructions also
need to be transferred with it.
Electricity Schematic
Electric Hot
Note:
* Please do not touch the hot plate when it is in operation, in order to prevent burns!
* Please disconnect the hot plate from the electricity before cleaning it!
26
A Specifications
The Smart Dentin Grinder has the specifications described below.
Table 1: Smart Dentin Grinder Specifications
Specification
Value
Grind Mode
Operation Time (Sec.)
1~99 (Sec.)
Applied Voltage (V)
240 V AC
Frequency (Hz)
50 Hz
No Load Speed (rpm)
16000 rpm ± 10%
Sort Mode
Operation Time (Sec.)
1~30 (Sec.)
Applied Voltage (V)
6 V DC
No Load Speed (rpm)
10000 rpm ± 15%
Other Features
Style
Tabletop
Power Requirements
240 V AC
Machine Dimensions (mm x mm x mm)
120 x 168 x 113
Machine Weight (g)
1228
Cup Dimensions (mm x mm x mm)
76 x 101 x 90
Cup Weight (g)
178
27
B Labeling
This appendix shows the label that appears on the Smart Dentin Grinder.
Figure 21: Smart Dentin Grinder Label
28
Kometa-Bio International
Limited Warranty Certificate
ometa Bio International ("Kometa Bio") warrants that the The Smart Dentin Grinder Products and Kits (the “Devices”),
K
when new, are free of material defects and shall perform in accordance with Kometa Bio’s specifications as outlined in
the attached operation manual (the "Operation Manual").
This Limited Warranty is for a period of two years from the date of purchase of the Devices from Kometa Bio (the
"Warranty" and "Warranty Period" respectively).
This Warranty is personal to the original purchaser and may not be transferred. Any sale, re-sale, rental, or other
transfer or use of the Device covered by this Warranty to or by a party other than the original purchaser shall cause an
immediate termination of this Warranty.
The Warranty will take effect upon providing the invoice for the Devices, as a proof for the time of purchasing and the
name of the purchaser.
Kometa Bio may, at its sole discretion, either repair or replace any components of Devices found to be defective or non
compliant with the Operation Manual specifications within the Warranty Period at no cost to the purchaser (other than
the cost of shipment to Kometa Bio). In the case of a defect or malfunction within the Warranty Period, it shall be the
purchaser’s responsibility to notify Kometa Bio or one of its authorized agents or representatives of any such defect or
non compliance.
This Warranty shall be valid only if the Devices are used in strict compliance with the Operation Manual. This Warranty
shall not apply to damages occurring as a result of breakage, tampering, misuse, neglect, accidents, modification, disassembly or repairs made by parties not authorized by Kometa Bio or to damages during shipping.
Further, this Warranty does not apply:
•
to the replacement of consumable items, supplies or accessories;
•
to damage caused by use with non Kometa Bio approved consumables, attachments or accessories;
•
to damage caused by re-use of the approved single-use consumable items;
•
to damage caused as a result of accidents, theft, abuse, negligence, misuse, vandalism, corrosion, or any causes
other than ordinary use for which the Device was designed;
•
to damage caused as a result of alterations or repairs to the Device by anyone other than Kometa Bio or a
Kometa Bio authorized service provider;
•
to cosmetic damage including but not limited to, marks, scratches, dents, etc.; and
•
If any Kometa Bio serial number has been removed or defaced.
his Warranty is exclusive of any and all other warranties, expressed or implied, including without limitation, the implied
T
warranty of merchantability or fitness for a particular purpose.
Kometa bio shall not be liable to any person for any special, consequential or indirect damages, including, but not limited
to, damages to or loss of property or equipment, loss of profit, loss of use of data, loss of revenues or damages to
business or reputation arising from any cause whatsoever arising from or in any way connected with the manufacture,
sale, handling, repairs maintenance or use of the device, whether or not kometa bio shall have been made aware of the
possibility of such loss provided that it is not otherwise regulated by applicable law.
Notwithstanding any of the foregoing, kometa bio's liability for any claims arising out of or in connection with this warranty, shall in the aggregate, be limited to the total price paid for the device, if such liability does not arise from the
gross negligence or fault of kometa bio.
Without limitation, kometa bio shall have no liability for any death, personal and/or bodily injury and/or damage to property or other loss whether direct, indirect, incidental, consequential or otherwise, in connection with or arising out of
or relating to the use of dentin graft produced by the device (e.g. Dental procedures) and the purchaser of the device
agrees to indemnify kometa bio and hold it harmless from and against any and all claims, damages, losses, liabilities and
expenses which kometa bio may incur or which may be asserted against it in connection with or arising out of or relating
to the use of dentin graft produced by the device.
Contact Information:
Head Office:
3 Maza Street
Holon, Israel
+972-3-6298719
www.kometabio.com
[email protected]