1
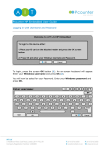
Pcounter Touchpad Terminals User Guide Logging In/Out (Username and Password) 1 To login, press Button for login with Networking ID(1). This will load the QWERTY keyboard screen below. Enter your Network Username and press the Green Tick(2). You will now be asked for your Password. Enter your Network Password and press the Green Tick. 2 Logging in with ID Card 1 To log in with ID card press Button for login with Card(1). You will be presented with the following screen: If your card is a magnetic stripe card: Swipe it through the reader slot on the right of the terminal If you card is a proximity card Slowly run your card along the right hand side of the reader, outside of the slot Card Self-Association To register a new card against your account, follow the Logging in with ID Card instructions. If the card is unrecognised you will see the following: 2 1 Select the Green Tick(1) to associate the card, or press the Red Cross(2) to Cancel. You will be asked for your Network Username. Enter this and press the Green Tick(3). You will be asked for your Network Password. Enter this and press the Green Tick. This card is now assigned to your account and any subsequent scan/swipes will log you in. Main Menu Once logged in you will be presented with the Main Menu. 4 1 2 3 To Copy press the top button Press Button for copying(1).This will activate the photocopier functions To Print press the middle button Press Button for releasing jobs(2). This will load your print queue. The Abort button(3) will log you out of the Touchpad Terminal. Also displayed(4) are: The full name of the currently logged in user (Test2) The Pcounter balance of the logged in user (46.49) Client/Departmental Code Selection If Client/Departmental Codes are enabled, choosing Copy will load the following screen: 3 2 1 5 4 Please note: Touchpad Terminals cannot be used to select Client Codes for Print jobs Choose your desired code from the list(1) and press the green tick(2).The description of the code is displayed in the banner(3). Press Cancel(4) to log out of the terminal. Use the green arrows(5) to scroll through the list of codes Print Release Selecting Print reveals the following screen 3 6 1 5 2 4 Each job is displayed in the list(1) along with the following attributes: Number of pages in the job (e.g. 1) The Pcounter cost of the job (e.g. 0.08) The Filename of the job (e.g. Microsoft Word – Document1) To print a waiting job, select it from the list and hit Print(2). To print all waiting jobs hit Select all jobs(3) followed by Print(2) Jobs can be deleted by selecting from the list and hitting Delete button(4) The Cancel(5) button returns to the Main Menu. Use the arrow buttons(6) to scroll up or down your pages of print jobs Also Displayed: The total number of queued jobs e.g. Print jobs: 5 The Pcounter Balance of the logged in user e.g. Balance 46.49 Copying Selecting Copy on the main menu may load the Client Code selection screen (dependent on settings). Otherwise it will load the Copy screen and unlock the Copier functions on the MFP. 1 The Touchpad Terminal itself does not control copying. Use the physical controls on the MFD itself in order to photocopy. The Touchpad Terminal will reflect the actions performed on the MFD. When finished photocopying press the Cancel(1) button to log out of the device. Also displayed on the Terminal: The username of the currently logged in user (e.g. htucker) The Client Code selected, if any (e.g. 2222) The total number of copies so far performed (e.g. 0)