1
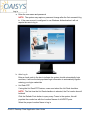
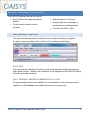
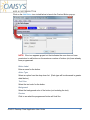
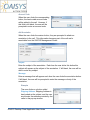
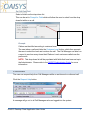
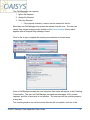
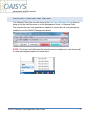
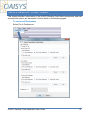
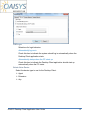
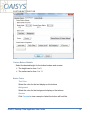
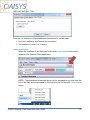
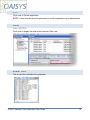
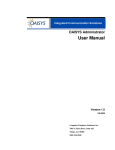
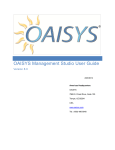
Desktop Client Application User Guide Version 8.x 3/04/2014 Americas Headquarters OAISYS 7965 S. Priest Drive, Suite 105 Tempe, AZ 85284 www.oaisys.com (480) 496-9040 OVERVIEW The OAISYS Desktop Client is a powerful desktop application that dramatically enhances the OAISYS solution experience. This guide provides installation procedures, and details on the available features. OAISYS Desktop Client Application User Guide 1 INSTALLATION Browse to the server URL. The URL may be similar to this: http://ServerName/DesktopClient/ NOTE: Secondary DNs are supported within the Desktop client – this configuration requires the primary extension be configured as the extension for the client. The page shown below will display in the browser. Click on the Get Started button to install the application. NOTE: When starting the Desktop Client for the first time from IE10, the application will be blocked and a Windows Smart Screen message will be displayed noting “Windows protected your PC”. There is an option to Run Anyway; select that option to continue. OAISYS Desktop Client Application User Guide 2 Log in a. Enter the user name and password NOTE: The system may require a password change after the first successful log in. If the user account is configured to use Windows Authentication it will not require the user to log in b. Auto Log In Enter a check mark in the box to indicate the system should automatically login next time; it will use the last populated login information to automatically bypass entering your login credentials c. Hot Desk RTP If using the Hot Desk RTP feature, users must select the Hot Desk checkbox NOTE: The first time the Hot Desk checkbox is selected, the Port combo box will be blank Click the Refresh Ports button to query every Tracer in the system; this will populate the combo box with the Location Names of all HDRTP ports. Select the proper Location Name to log in OAISYS Desktop Client Application User Guide 3 NOTE: Subsequent logins will automatically populate the last selected “friendly” Location Name. Using the Refresh Ports button will populate a complete list of available ports. d. Active Device Your log in must be associated with at least one extension number or agent ID which is configured by the system administrator. If you are assigned multiple extension numbers, or a combination of extensions and an agent ID, the Active Device window will prompt you to select which extension or agent ID is associated with the Desktop Client session. If you have multiple extensions or agent IDs associated with your account, you can select one of the following options: Agent Extension Any This determines which specific agent ID, single extension or “any” extension is associated with the Desktop Client session. Selecting “Any” will allow you to use the Desktop Client when you have calls on any extension associated with your user log in. OAISYS Desktop Client Application User Guide 4 NOTE: When using this feature in conjunction with the Auto Log In option, the Desktop Client will bypass the extension selection and connect with the last selected option. To change your extension selection, you must log out, uncheck the Auto Log In checkbox, and log back in. OAISYS Desktop Client Application User Guide 5 USING THE DESKTOP CLIENT The OAISYS Desktop client can be used to: Stop or Start a recording (permission based) View information about a call in progress Add information to a live call Request help from a manager or participate in a coaching session View the Last Call or Calls RECORDING CONTROL The user must have permission enabled to start or stop a recording in progress. To start or stop a recording, click on the Stop/Start button (circled below). CALL INFO The call information displayed on inbound and outbound calls includes the extension and outside number. Intercom call information is not displayed in the OAISYS Desktop Client for trunk side recording. CALL TAGGING: ADDING INFORMATION TO A CALL Six programmable buttons are available for customization by users with permissions enabled, or a Call Manager can publish buttons per user/user group. OAISYS Desktop Client Application User Guide 6 ADD A CUSTOM BUTTON Click on the Add Button icon circled below to launch the Custom Button pop-up. NOTE: If the icon appears grayed out that indicates the user does not have permission to add buttons or the maximum number of buttons (six) have already been programmed. Button Label Enter a name for the button. Action Type Select an option from the drop down list. (Each type will be discussed in greater detail below.) Text Color Select the text color for the button. Background Select the background color of the button (not including the text). Preview Click to see what the programmed button will look like. OAISYS Desktop Client Application User Guide 4 ACTION TYPES Account Code When the user clicks the corresponding button, the hard coded account code will be added to the call. However, if this field is left blank, the user will be prompted to enter an account code. Add Annotation When the user clicks the custom button, they are prompted to attach an annotation to the call. This information becomes part of the call and is searchable from the OAISYS Management Studio Subject Enter the subject of the annotation. Each time the user clicks this button this subject will appear as the subject of the annotation. If left blank, the user will be able to enter any subject. Message Enter a message that will appear each time the user clicks the annotation button. If left blank, the user will be prompted to enter the message or body of the annotation. Example The user clicks on a button called Shipping Address. Shipping Address is hard-coded as the subject, and the user would enter the address provided by the caller in the pop-up window. OAISYS Desktop Client Application User Guide 5 Navigate to Web Address Enter the URL so when a user clicks this button their browser will launch and they will be taken to the preprogrammed URL. This can also be programmed for a path to an important file on the PC, or a document, etc. Share URL with Coaching Participants Enter the URL so when a user clicks this button during a coaching session the coaching recipient’s browser will launch and they will be taken to the URL programmed here. This can also be programmed for a path to an important file on the PC, or a document, etc. OAISYS Desktop Client Application User Guide 6 Set Call Data Field Select a field from the drop down list. This can be set to Prompt for Field which will allow the user to select from the drop down list while on a call. Example Callers are identified according to customer level. The user takes a call and clicks the Customer Level button, which then prompts the user to select the level and continue the call. The Call Manager can later run a report to see how many times their Platinum Level customers called over the past month. NOTE: This drop-down list will be populated with fields that have been set up in the Administrator. Please refer to the OAISYS Administrator Guide for more information. COACHING The user can request help from Call Managers while on an inbound or outbound call. Click the Request Help button. A message will go out to all Call Managers who are logged into the system. OAISYS Desktop Client Application User Guide 7 The Call Managers can respond: 1. Ignore the Request 2. Accept the Request 3. Deny the Request i. If the request is denied, a reason can be entered for the file. More than one Call Manager may accept the request from the user. The user can cancel their request at any time by clicking on the Cancel Request button which appears after a Request Help message is sent. Click on the + sign to expand the coaching conversation as shown below. Once a Call Manager accepts the user’s request, their name will appear in the Coaching Conversation. The user and Call Manager can send text messages, URLs, screen captures, and files or shortcuts to one another. The user can end the coaching session at any time. The coaching session can continue even after the call is complete, until one of the OAISYS Desktop Client Application User Guide 8 participants ends the session. VIEW LAST CALL/INSTANT RECALL The Desktop Client User can click once on the View Last Call/Instant Recall button to bring up the last call they were on in the Management Studio Historical Calls. This requires the user have permissions enabled to access the call, and permissions enabled to use the OAISYS Management Studio. NOTE: The View Last Call/Instant Recall button can be configured to view the last call or other preconfigured options as shown here: OAISYS Desktop Client Application User Guide 9 OAISYS DESKTOP CLIENT MENU This screen provides customization of the OAISYS Desktop Client Menu preferences; each tab and selection options are discussed in further detail on the following pages. To view or edit Preferences Select File Preferences OAISYS Desktop Client Application User Guide 10 GENERAL TAB Always on Top Check this box to keep the OAISYS Desktop Client application on top of all other applications on the desktop. On New Phone Call Check the radio button to indicate the desired behavior when the user is active on a new phone call. No Visual Notification The application will remain displayed or in the tray. Nothing will change when a new phone call begins. Show Roll up Notification When a new phone call starts, the application will roll up briefly to indicate an active phone call is in progress. It will roll back down automatically. Popup Main Screen When a new call starts, the application will popup on your screen. It will not roll down automatically. Play Audio Tone Play the selected tone when a new call arrives. On New Coach Session Check the radio button to indicate the desired behavior when a new coaching session is active. No Visual Notification The application will remain displayed or in the tray. Nothing will change when a new coaching session begins. Show Roll up Notification When a new coaching session starts, the application will roll up briefly to indicate a coaching session is active. It will roll back down automatically. Popup Main Screen When a new coaching session begins, the application will popup on the screen. It will not roll down automatically. Play Audio Tone Play the selected tone when a coaching session begins. OAISYS Desktop Client Application User Guide 11 On New Coaching Message Check the radio button to indicate the desired behavior when a new coaching message is received. No Visual Notification The application will remain displayed or in the tray. Nothing will change when a new coaching message is received. Show Roll up Notification When a new phone call starts, the application will roll up briefly to indicate a new coaching message arrives. It will roll back down automatically. Popup Main Screen When a new coaching message arrives the application will popup on your screen. It will not roll down automatically. Play Audio Tone Play the selected tone when a new coaching message arrives. Transparency Use the slider bar to indicate the desired percentage of transparency for the Desktop Client application. OAISYS Desktop Client Application User Guide 12 SERVER TAB User Login Selections for login behavior Automatically log me in Check this box to indicate the system should log in automatically when the Desktop Client application starts. Automatically startup when the PC starts up Check this box to indicate the Desktop Client application should start up automatically when the PC starts. Select Active Device Select the device type to use for the Desktop Client: Agent Extension Any OAISYS Desktop Client Application User Guide 13 CUSTOM BUTTONS TAB Custom Buttons Defaults Select the desired height for the button borders and corners. The height can be from 1 to 5 The radius can be from 1 to 11 Button Colors Text Color Select the color for the text display on the buttons Background Select the color for the background display on the buttons. Preview Click Preview to view a sample of what the button will look like. OAISYS Desktop Client Application User Guide 14 INSTANT RECALL TAB Click the Add button to configure additional timeframes for instant recall. Up to four additional time frames can be entered. The timeframe is from 1 to 24 hours. Instant recall button Select the timeframe to be displayed for the main Instant Recall button which appears in the Desktop Client application. NOTE: The timeframes referenced above can be accessed at any time from the icon in the tray, and are available in the drop down list for the main Instant Recall button. OAISYS Desktop Client Application User Guide 15 EXIT Click once to Exit the application. NOTE: Users must be given the permission to exit the application by an administrator. VIEW CALL HISTORY Click once to display the calls in the Historical Calls view. EVENT LOG This is used for troubleshooting purposes. OAISYS Desktop Client Application User Guide 16 TOOLS REGISTER COM INTERFACE Click this once to register the interface that is required for some API integrations. HELP CONTENTS Display the contents of the OAISYS Desktop Client application. ABOUT Display the current version information. OAISYS Desktop Client Application User Guide 17