1
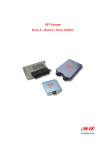
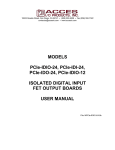
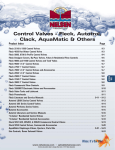
AiM User Guide
GET GP1 EVO and
GET Power ECU for SoloDL
Release 1.00
This user guide explains how to connect GET GP1 EVO and GET Power ECU to AiM SoloDL. These ECUs
are aftermarket products mainly installed on Honda, Suzuki, Kawasaki, Yamaha, Husquarna and KTM
bikes. Please refer to GET website “www.getdata.it” to know supported bike models.
1
Installation notes
To install SoloDL on your bike you can use a bar pad. AiM provides the two optional bar pads shown
below:
• bar pad for handle bar with cross brace – part number: DNKTKPMSOL1 image on the left;
• bar pad for handle bar without cross brace – part number: DNKTKPMSOL0 image on the right.
1
GET GP1 EVO and GET Power ECUs can be connected to SoloDL using an interface cable shown here
below. Its part number is: V02569250.
GET GP1 EVO and GET Power ECUs have a connector used to communicate data to an external device
and highlighted here below.
Please note: GET ECU does not power SoloDL. It is thereby recommended to always ensure that
SoloDL battery is charged.
2
In case GET ECU is already connected to an external device it is possible to maintain this connection
using AiM cable. As explained in the drawing below, GET ECU can be connected to AiM cable male
connector labelled “To the ECU” and the third device can be connected to the ECU through AiM cable
female connector labelled “To other devices”.
ECU connector has a cap on it. If nothing else is connected to the ECU remove the cap and place it on
AiM cable female connector (labelled “to other devices” here above) and connect AiM cable male
connector to the ECU female connector.
3
2
SoloDL configuration
Before connecting SoloDL to the ECU, set it up using Race Studio 2 software. Run the software and
press “Device Configuration” on the software left keyboard: select “SoloDL” in the panel that shows up
as here below.
4
The software shows SoloDL configuration page: press “Configuration Manager” and select the
configuration you want to use or press “New” to create a proper one. In this second case “New
configuration” panel appears: select ECU Manufacturer “GET” and ECU Model “GP1_EVO” as here
below.
Confirm pressing “OK” in both panels and transmit the configuration to SoloDL pressing “Transmit” as
here below.
5
3
GET “GET GP1_EVO” protocol
Channels received by SoloDL connected to GET GP1_EVO protocol are:
ID
CHANNEL NAME
FUNCTION
ECU_1
ECU_RPM
RPM
ECU_2
ECU_TPS
Throttle position
ECU_3
ECU_MAP
Manifold air pressure
ECU_4
ECU_TH2O
Engine coolant temperature
ECU_5
ECU_TAIR
Intake air temperature
ECU_6
ECU_TOIL
Oil temperature
ECU_7
ECU_VBB1
Battery supply 1
ECU_8
ECU_VBB2
Battery supply 2
ECU_9
ECU_BARO
Barometric pressure
ECU_10
ECU_LAMBDA1AVG
Lambda 1 Average value
ECU_11
ECU_LAMBDA1RAW
Lambda 1 raw value
ECU_12
ECU_KLAMBDA1
Lambda 1 correction
ECU_13
ECU_INJ_TIME
Injection time
ECU_14
ECU_SPARK_1
Spark angle 1
ECU_15
ECU_PHASE
ECU phase
ECU_16
ECU_SPEED1
Speed 1
ECU_17
ECU_SPEED2
Speed 2
ECU_18
ECU_MAPPA
Selected map
ECU_19
ECU_GEAR
Engaged gear
ECU_20
ECU_DTPS
Throttle position derivative
ECU_21
ECU_DECAYINJ
Differential injection revs 1
ECU_22
ECU_CINJ_DFARF
Throttle derivative control during injection time
ECU_23
ECU_KINJTH2O
Water temperature correction during injection time
ECU_24
ECU_KINJTAIR
Air temperature correction during injection time
ECU_25
ECU_REVS
ECU revolutions in counts
6