1
PedPal®
User Guide
Version 2.3.02
July 2014
PedPal is a registered trademark of Tenset Technologies Ltd in the United Kingdom.
Table of Contents
Table of Contents
Getting Started
Main Window
Pedigree Data Files
Printing Pedigrees
1
4
5
6
7
Margins
7
Understanding Printer Margins
7
Saving
8
Saving The Pedigree Data File
Saving Data as You Work
Exporting Data
8
8
8
Importing
9
Character Encoding
Column Formatting
Column Data
Import Fields
Data Types
Example Input Data Files
9
9
9
9
10
10
Exporting
Pedigree Design
11
12
Chapter Contents
12
Pedigree Design - Structure
13
Pedigree Background
13
Pedigree Design - Box Settings
14
Box Border
Box Padding
Fill (Box Background)
Box Content
14
14
14
14
Pedigree Design - Form Defaults
Pedigree Design - Ancestors
15
17
Ancestors Box Settings
Ancestor Cell Settings
Setting Text Size in Ancestor Cells
Photos In Ancestor Cells
Ancestor Photos
17
17
17
18
18
Pedigree Design - Text
19
Embedded HTML
Field Codes
19
19
Examples
19
Field Names
Formatting Codes
20
20
Pedigree Design - Text Style
21
Font Face
Font Size
Text Color
Alignment
21
21
21
21
Pedigree Design - Photos
22
Photo Boxes
Embedding Photos In Data Files
Photo Filters
22
22
22
Pedigree Design - Background Photos
Pedigree Design - Photo Cropping
Pedigree Design - Photos With Text
23
24
25
Photos With Text - Worked Example
25
Customization
27
Chapter Contents
27
Customization - Quick Reference
Customization - Data Fields
28
29
System Fields
29
1
Customization - Name Format
FAQs
Product Support
Release Notes
30
31
32
33
System Requirements
33
Revision History
34
2
3
Getting Started
Begin by selecting PedPal from the Windows Start menu, or from an icon on your desktop.
To begin a new pedigree file, choose File|New (i.e., select the New option on the File menu). Or to open an existing file, use File|Open.
PedPal also has some built in example pedigrees for demonstration purposes. To display one of these, choose File|Open Sample Pedigree.
If you have pedigree data from another source that you want to import - such as from a different pedigree program or a spreadsheet - start by creating a new file
and then choose File|Import Data. See Importing.
Once the file is created/opened, the Main Window is displayed.
4
Main Window
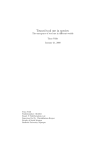
The main window is taken up mostly with a pedigree form you fill in by clicking in the various boxes.
Just follow the on-screen instructions to enter the data.
The pedigree layout can be customized in many ways. Use the buttons and checkboxes above the
pedigree to enable/disable various boxes, such as whether a signature box is to appear beneath the
ancestors, the number of ancestor generations to display, and so on.
To access additional layout options, click the Design option above the pedigree. You will then be
able to change the font and other settings, and you can resize the various elements of the pedigree
by dragging the divider bars that appear.
There are many additional changes you can make, for example you can add extra data fields to
appear in the pedigree. For further information see Customization.
Click Print Preview Pedigree to see how it will appear when printed or use Print Pedigree to
print it without previewing first.
5
The PedPal main window
Pedigree Data Files
The data you enter - names of animals etc. - is stored in pedigree data files. These files have the extension '.ped'. E.g. 'MyData.ped'.
The full version of PedPal has a limit of 10,000 records in a single data file. You can have as many data files as you like.
Typically, you will need just one pedigree data file that stores the details of all the animals you enter. The likeliest reason you might need to have multiple files
would be to store records of different, unconnected, groups of animals. E.g. different breeds or animal types altogether.
After you have started a new pedigree data file - as you do when you first install PedPal - when you try to close the program after entering data you will be
asked for a file name to save it as. Once saved, PedPal will remember the file name you most recently used, and will ask if you want to open that file next time
you start the program.
You should keep your pedigree data file(s) in the same location on your computer as you keep any other documents. Just as it is important to backup your
other documents on a computer, it is important that you backup pedigree data file(s) from time to time: if you lose a pedigree data file you will lose
ALL the information you have ever entered into it.
A pedigree data file stores the name of each animal you enter, along with its associated information such as date of birth, parentage and so on. When you
create a new data file it starts out with a number of predefined data fields, e.g. for Breed and Registration Number. You can however add new data fields. E.g.
you might want to add a field for eye color, or weight. For further information see Customization - Data Fields.
Most of the time when you use PedPal the existence of the underlying pedigree data file is 'hidden', because you don't tend to work with it directly. Probably
you will spend most of your time with the program entering, viewing and printing pedigrees.
6
Printing Pedigrees
To print a pedigree, just click the Print Pedigree button (above the upper left corner of the displayed pedigree). If your computer has more than one available
printer, use the dropdown menu to the right of the print button to select the required printer.
The pedigree that is displayed in the main window is fairly close approximation of how the printed pedigree will look. But for a more exact on-screen display,
click the Print Preview Pedigree button first.
To alter the paper margins and orientation (portrait/landscape) prior to printing, use the buttons to the left of the pedigree in the main window.
Margins
PedPal sets default paper margins depending on your printer and its setup.
In most cases, this should produce a sensible and consistent margin on all sides of the paper.
But if not, you can change this - click the margins button to the left of the displayed pedigree (
).
Understanding Printer Margins
This section contains a more detailed explanation of how PedPal sets paper margins, and how margin settings work with your printer and chosen paper size.
Most printer devices have physical limitations on their printing capabilities. Obviously the supported paper sizes vary. But in addition, most printers are not
physically capable of printing on the entire sheet of paper: there are usually parts of the sheet that the printer simply cannot physically print on. You can
instruct PedPal to attempt to print onto that maximum part of the paper by selecting the Full page option within the Print Margins window.
Your computer will also have a default margin setting for the chosen printer. This should be a sensible default; its actual size is system specific. You can
instruct PedPal to use the default margins by selecting the Use printer default margins option within the Print Margins window. This is the normal setting
and an in ideal world will produce a good result without you having to change anything.
But you can opt to override the default margin selection by disabling both the Full page and Use printer default margins options in the Print Margins
window, and then entering the actual margins you would like. Measurements can be entered in a variety of units including centimeters (e.g. you could enter
1.2cm) and inches (e.g. 0.25in). Note that setting margins smaller than the physical minimum margins that your printer is capable of generally will not
produce acceptable results - you will end up with parts of the printout 'chopped' off. You may find you need to experiment with different sized margins until you
get a pleasing result.
7
Saving
'Saving' can mean several different things with PedPal - saving the pedigree data file, saving data as you work, saving pedigrees as PDF/Image files, or saving
your data in a different format (exporting).
Saving The Pedigree Data File
In normal usage, you don't have to do anything to save the pedigree data file other than to close PedPal when you're done and to confirm to save when
prompted. The first time you do this after creating a new data file, PedPal will ask you for a filename to save as. You should save the file in the normal folder on
your computer you use for your other data, such as documents.
Just as it is important to backup your other documents on a computer, it is important that you backup pedigree data file(s) from time to time: if you lose
a pedigree data file you will lose ALL the information you have ever entered into it.
You can also save the currently open data file under a new name - use File|Save As.
Saving Data as You Work
The way PedPal works is that when it opens a pedigree data file, it reads the entire file into memory and works with the in memory copy. Changes you make
whilst using the program - such as adding/editing records - are made to the in-memory copy. Then when you close the program, you are asked if you want to
save the changes. Assuming you confirm this, the data file is rewritten and the program closes. But if you choose not to save the changes - e.g. as you might
do if you realize you made a lot of changes in error - then your (previously) saved file is left as is. If the program is terminated without saving the file, changes
you have made since opening the file are lost.
If you want to save your data file without closing the program, you can do this by choosing File|Save. PedPal will remain open but all changes you have
entered prior to that point will be saved to the computer's file system.
Exporting Data
This is where you save your pedigree data as a text (CSV) file - usually in preparation for importing your data into some other software. For further information
see Exporting.
8
Importing
PedPal supports import from text/CSV files. This lets you load data created by other applications and spreadsheets.
Choose File|Import Data, then select your import file. The file needs to be a text/CSV file - the kind of file that you might export from a spreadsheet - but
which can also be produced by many database and pedigree programs. You are then taken through a series of windows that let you set options to control the
way PedPal processes the import file. Note that in many cases there will be few if any of these settings that you need to change, because PedPal
inspects the data file and chooses sensible defaults for the file format and its contents.
Character Encoding
The Character Encoding window selects the character set encoding and line ending format. If the options presented here don't mean anything to you, don't
worry because in practice you are very unlikely to need to change these settings. If in doubt simply click Next to proceed.
The character set defines how the bytes in the file are encoded, such as UTF or ISO-8859-1. The line ending format says whether input lines are terminated by
carriage return, line feed, or both.
Column Formatting
The Column Formatting window controls the way that the columns are formatted in the file. This is where you choose whether the file is comma or TAB
separated, whether there is a header line, and whether column values are quoted. Again, it is unlikely you will need to change anything here. Typically you just
need to click Next to proceed.
Column Data
The Column Data window is where you define the meaning of each import column - i.e. where the name, sex, sire etc. are to be found in the input data. It is
likelier that you will need to alter the settings here than in the previous windows.
However, in many cases again PedPal is still able to deduce the correct meaning of columns in your data file. Before it displays the Column Data window,
PedPal inspects the first few lines of the input file and makes a reasonable 'guess' as to which columns contain the main pedigree data - name/id, sire, dam,
sex and date of birth.
To make changes, click the Customize checkbox. It can help at this stage to make the window wider and deeper.
For each input column, the rows shown are as follows:
Row
Meaning
Field
The meaning of the data in this column.
Type
The type of the data, such as Text, Integer, Date, etc. For some fields, e.g. date of birth, the type is implicit and you cannot change it.
Label
The label that is to be used for the field once the data has been imported into PedPal. This is only meaningful for fields that will become
user defined fields in your data file. For columns that map to inbuilt fields (like, sex or name), the label is not set here but can be set
separately. For further information see Customization.
Input Header This will be shown in blue and shows the text from any header line that was found in the input data file. This is displayed purely for your
convenience when checking that the Field and Type have been set correctly.
Input Data
Up to 4 lines of data, again shown in blue, taken from the input data file, for reference.
You should review the Field, Type and Label settings for each input column to be sure they are correct for the particular input data. Ensure that the date format
and male/female sex values are consistent for the input data file, then click Finish to proceed with the import.
Import Fields
The full list of fields is given below.
NOTE: Several of these fields are related to each other and need to be consistent within the input file in order to successfully import data. These are the
Name and ID fields.
Each input record (i.e., each animal) must have an ID field, a Sire ID field and a Dam ID field. These are used by PedPal to construct the ancestral linkages i.e. they are how it works out which parents any given animal is descended from. The ID fields can be numeric or text. Numeric IDs are generally record
numbers/keys as generated by whatever software created the import file.
Optionally, the import data may also contain a Name field. If present, this is used for each animal's name. If not present, the name is set to the ID.
If you are importing data that contains just the name of each animal, its sire and dam, without any kind of record number/key, you should import these
columns as the Animal ID, Sire ID and Dam ID (and not as 'Name' fields). The names will be then set automatically from the ID's.
Obviously the Sire/Dam ID/Name fields need to contain consistent data so that PedPal can work out the ancestral links correctly. In particular, if you don't
have a separate Name field (i.e. the ID's serve as the names), then make sure that titles are presented consistently. I.e. if your data has animal titles
embedded within the names in the ID column then they must also appear in the Sire ID/Dam ID columns. E.g. if your data contains an animal with 'Ch. Fred'
in the ID column, then for another animal's record to reference it as its sire, its sire ID column must be given as 'Ch. Fred' and not 'Fred'. In general it is
always better to have titles stored in a separate Title column where possible. This also has the benefit that PedPal will automatically highlight titled animals
in the pedigree, typically in red.
Meaning
Notes
Animal ID
A unique number or key for this animal. Mandatory if the Name is not given, otherwise optional.
Sire ID
Sire key/number. If present, the Animal ID field must also be included.
Dam ID
Dam key/number. If present, the Animal ID field must also be included.
Name
Animal name.
Sex
Gender. The allowed values for male/female are given in boxes beneath the import definition table.
Date of Birth
The date format is set using a dropdown menu beneath the import definition table.
Date of Death Using same date format as for date of birth.
Sire Name
Name of the sire. If present, the Animal Name field must also be included.
Dam Name
Name of the dam. If present, the Animal Name field must also be included.
User Field
A user defined column. These are for any other columns present in your data file for which PedPal does not have an inbuilt field. PedPal
9
has a limit of 10 user definable fields in a data file.
Title
The animal's title. If you have control over the creation of the import data file it is much better to have the title given in a separate column to
the name. This allows it to be transferred to the dedicated title field, which in turn allows for titled animals to be automatically highlighted in
pedigrees (usually, in red).
Suffix
Suffix that is appended to the animal name when displayed in pedigrees.
Ignore
A column to be completely ignored in the input file.
Data Types
The full list of data types is as follows:
Type
Description
Text
Simple text column.
Date
Date value.
Integer
An integer value (i.e. no decimal point).
Number
A number that may include a decimal point.
Example Input Data Files
Here are some examples of different data formats, all of which are acceptable. For ease of display the examples shown here use comma separated text (CSV)
but you could just as easily use TAB separated or any other separator character.
Example: Very simple structure with a column for the gender and columns for the name, sire name and dam name.
SEX,NAME,SIRE,DAM
M,Comet,Favorite,Young Phoenix
M,Favorite,Bolingbroke,Phoenix
M,Bolingbroke,Foljambe,Young Strawberry
M,Foljambe,R. Barkers Bull,Haughton
F,Young Strawberry,Dalton Duke,Favorite cow
F,Phoenix,Foljambe,Favorite cow
F,Favorite cow,Alcocks Bull,
F,Young Phoenix,Favorite,Phoenix
Example 2: In this case the animal is given by both a name and an id number, and the sire/dam linkage is through the id number.
name,s_id,d_id,id
Arripay Blue Surprise,2,29,1,
Arripay Breaks Everything,26,22,2,
Arripay Brown Beauty,19,5,3,
Arripay Brown Boy,,,4,
Arripay Candy Girl,,,5,
Arripay Champagne Charlie,16,22,6,
Arripay Chocaholic,6,29,7,
Arripay Choccy Chips,,,8,
Arripay Dark Crystal,12,17,9,
Arripay Dark Magician,4,25,10,
...
Example 3: Similar to the above but this time with a column for date of birth.
ID,Sex,DOB,Sire,Dam
Abbots Wisdom,M,30/03/1930,Diver Of Woolley,Sewardstone Tess
Abbotsford Rosa of Tasvane,F,30/04/1986,Tasvane Taraius,Rachenco Sunshine
Alexander of Elsiville,M,15/05/1944,Torrdale Tinker,Zena Of Elsiville
Alexia of Tillwood Rachenco,F,30/04/1973,Spartan of Rachenco,Wayfarer of Tillwood
Alresford Advertiser,M,15/04/1951,Alexander of Elsiville,Alresford Mall
...
10
Exporting
Use this feature to transfer data from PedPal into other programs such as other pedigree programs, or to a spreadsheet.
Choose File|Export Data, then specify the output file to be created. Note this file will be overwritten if it already exists. Select the output file format - which
should be either a 'Text file' (*.txt) for a TAB separated file, or a 'CSV file' (*.csv) for a comma-separated file.
Next, the Export Text/CSV 'wizard' is displayed. This lets you control the format of the export file, such as the character set and line ending style. Note that
in most cases you do not need to change anything here as the defaults are usually suitable - in which case just click Next to proceed.
Finally, the Columns window appears. Here you can choose the fields from your data file that you want to be included in the export. Select whichever fields
you need, then click Finish.
11
Pedigree Design
The pedigree layout may be customized in many ways. You can:
Include or exclude elements such as photos, logo, or pedigree signature
Set a background image (watermark)
Change fonts and text color
Set border thickness, style and color
Set background colors
Change the displayed text, including selection of data fields
Resize form elements, such as photos and ancestor cells
The way to go about changing many of these layout properties is fairly obvious, and you may well find that you do not need to read this section in order to
make those changes. However, reading the information given here will give you a better understanding of how a pedigree is structured, and this will help you
customize the appearance more effectively.
TIP: Be sure to click the Design option (above the displayed pedigree) when making changes. This gives access to more options and causes 'resize bars' to
appear which can be moved to resize pedigree elements.
TIP 2: Many layout settings can be accessed through popup menus. Just point the mouse at whatever you want to change, then right-click to see the menu.
Chapter Contents
1.
2.
3.
4.
5.
6.
7.
8.
9.
10.
Structure
Box Settings
Form Defaults
Ancestors
Text
Text Style
Photos
Background Photos
Photo Cropping
Photos With Text
12
Pedigree Design - Structure
The pedigree layout is made up of one or more elements, referred to as 'boxes' within
PedPal. Several of these boxes are positioned horizontally adjacent to each other in a
'header band' that runs along the top of the pedigree: the Logo, Title, Photo and Fixed
Photo boxes. Beneath the header is the main element of the pedigree: the Ancestors
box. Below the ancestors box is the Signature box.
The two photo boxes differ in that with the 'Fixed Photo' the photo is explicitly set as
part of the box's settings, whereas for the 'Photo' box the photo is taken from the
animal's record. You might use the fixed photo box if you always want to have the
same photo appearing in the right corner of the pedigree. In normal use you are more
likely to use the non-fixed photo, so that the displayed photo tracks the selected
animal.
The ancestors box is always present but the other boxes are optional. Use the check
boxes near the top of the main window to select the elements you want to include.
To resize any of the boxes, first click the Design checkbox (near the top of the main
window), then drag the resize bars that appear in the pedigree.
Pedigree Background
There is also a 'background' box which covers the whole pedigree, and by default is not visible at all because it has no border, padding or content. All other
boxes are superimposed on top of the background. The main use of the background box is for displaying a background (watermark) image. To do this rightclick over the pedigree and choose Background Settings from the popup menu. Typically a faded photo is used so as to not obliterate the pedigree that will
be drawn on top. By adjusting other properties of the background you can achieve other effects, e.g. to set a border which will enclose the whole pedigree.
13
Pedigree Design - Box Settings
Most boxes in a pedigree are laid out in a similar way. Each box has a border that
encloses some kind of content - such as text or a photo (or both). Separating the
border and the content area is a padding gap.
Both border and padding are optional, and can be zero sized in which case the box
comprises solely its 'content' area. E.g. the pedigree 'ancestors box' typically has no
border and zero padding and is entirely filled with the table of ancestor cells.
Box Border
The border is defined by its thickness, color, line type (solid, dotted or dashed) and
corner type (square, or various forms of rounded corner).
In order to have a border appear around any form element, it needs to have a border
style other than None, a non-zero border thickness, and a visible border color. It is not
sufficient to just set just one of these properties.
Box Padding
The padding is simply an amount of space separating the border from the box's content. The thicknesses of the top, left, bottom and right padding are set
separately.
Fill (Box Background)
The Fill Color and Fill Style control the background of the box content and any padding. The style is normally 'solid' but can be set to a pattern in which case
the form background will show through. The default setting is for all boxes to have a transparent fill color, thus allowing anything that is beneath the box (such
as a background watermark) to show through.
You can also set the Fill Opacity, which controls the extent to which anything that is 'underneath' the box is allowed to 'show through' the fill pattern.
Box Content
The content typically comprises text and/or a photo, and some settings that affect their appearance such as font size, text color/alignment and photo
position/alignment.
For further details please see Pedigree Design - Text, Pedigree Design - Text Style and Pedigree Design - Photos.
14
Pedigree Design - Form Defaults
For many boxes all their settings can be set independently and explicitly. The main exception to this are the individual ancestor cells that make up the
ancestors box. For further information see Pedigree Design - Ancestors.
Often, however, you will want to make consistent changes that apply to groups of boxes such as all the header boxes, or to the entire pedigree. E.g. to set all
header boxes to have the same non-white background colour, or to change the font face for the whole pedigree.
To avoid having to make the same, repeated, changes to lots of boxes, the box settings are arranged according to a hierarchical grouping structure. Most
settings for any given box are worked out automatically, usually by 'inheriting' them from their parent group.
At the base of this settings hierarchy is a set of default values known as the Form Defaults. In many cases, the best way to effect a change that applies to
the whole form is to alter the form defaults: just right-click over any part of the displayed pedigree and select Form Defaults from the popup menu.
E.g. the Title box inherits its border style, by default, from the 'Header' settings. But likewise so do the Logo box and Photo boxes. So, you can change the
border style for all boxes in the header by changing the border style in the Header Settings window (right-click over the pedigree and select Header Settings
from the popup menu).
The following table shows the grouping structure.
Group/Box
Property
Automatic Value
Form Defaults
Padding
0.1 inches all round
Border Color
Black
Fill Style
None
Fill Color
Transparent
Font Face
System Default
Font Size
11pt
Box Gap
0.1 inches all round
Text Color
Black
Text Alignment
Horizontally centered, vertically middle
Padding
None
Border Color
Inherits from Form Defaults
Border Style
None
Fill Style
Inherits from Form Defaults
Fill Color
Inherits from Form Defaults
Font Face
Inherits from Form Defaults
Font Size
Inherits from Form Defaults
Text Alignment
Horizontally centered, vertically middle
Text Color
Inherits from Form Defaults
Photo Position
Bleed, 100%, centered
Padding
Inherits from Form Defaults
Border Color
Inherits from Form Defaults
Border Style
Medium rounded solid line, 0.01 inch thickness
Fill Style
Inherits from Form Defaults
Fill Color
Inherits from Form Defaults
Font Face
Inherits from Form Defaults
Font Size
Inherits from Form Defaults
Text Alignment
Inherits from Form Defaults
Text Color
Inherits from Form Defaults
Padding
Inherits from Header Group
Border Color
Inherits from Header Group
Border Style
Inherits from Header Group
Fill Style
Inherits from Header Group
Fill Color
Inherits from Header Group
Font Face
Inherits from Header Group
Font Size
Inherits from Header Group, but made 40% larger
Text Alignment
Inherits from Header Group
Text Color
Inherits from Header Group
Photo Position
Bleed, 100%, centered
Padding
Inherits from Header Group
Border Color
Inherits from Header Group
Border Style
Inherits from Header Group
Fill Style
Inherits from Header Group
Fill Color
Inherits from Header Group
Font Face
Inherits from Header Group
Form Background
Header Group
Logo Box
Fixed Photo Box
Animal Photo Box
Signature
Title Box
15
Ancestors Box
Font Size
Inherits from Header Group, but made 60% larger
Text Alignment
Inherits from Header Group
Text Color
Inherits from Header Group
Photo Position
None
Padding
None
Border Color
Inherits from Form Defaults
Border Style
None
Fill Style
Inherits from Form Defaults
Fill Color
Inherits from Form Defaults
Font Face
Inherits from Form Defaults
Font Size
Inherits from Form Defaults
Text Alignment
Inherits from Form Defaults
Text Color
Inherits from Form Defaults
Photo Position
Bleed, 100%, centered
16
Pedigree Design - Ancestors
The Ancestors box makes up most of the printed page. The settings that control its appearance are
set in two quite different ways.
Firstly, as a 'box' in its own right - just as with other boxes such as the Title box or Logo box - you
can control its border, background, and so on. For further information see Pedigree Design - Box
Settings.
But, separately, you can control the appearance of the individual ancestor cells that the ancestors
box contains.
Ancestors Box Settings
The default settings for the ancestors box itself are that it has no border, no padding, and no fill
color. Which means that, by default, it is made up solely by its content - the grid of ancestor cells.
However it is possible to change these settings at the box level, and this can be used to achieve
effects such as enclosing the grid of ancestor cells within its own border, or to give the grid a different background colour or image. To make any of these
changes, right-click over the ancestors box and select Ancestors Settings from the popup menu.
Apart from the fill color, the settings of the ancestors box itself do not have any effect on the individual ancestor cells. Those settings are controlled quite
separately - see below. The ancestors box fill color only affects the individual ancestor cells in that it usually 'shows through' because, typically, ancestor cells
use a transparent fill color.
Ancestor Cell Settings
In much the same way as box settings are, by default, automatically determined using a hierarchical structure, settings for the individual ancestor cells are
governed by a hierarchical arrangement.
Firstly there is a set of default settings for all ancestor cells, that can be applied to every generation of ancestry.
Next there is a group of settings for each different depth of ancestry. E.g. in a 5 generation pedigree generally there is much less space available on the page
for each ancestor cell than there is with, say, a 3 generation pedigree. And so, it makes sense for groups of settings to be set separately for different depths of
ancestry.
Finally there is a separate group of settings for each distinct generation within a pedigree of given ancestry depth. E.g. for the parents in a 5G pedigree you
might want to use a smaller font scaling than for the parents in a 3G pedigree.
If you right-click over the ancestors box you will see these three different groups of 'Ancestor Cell Settings' you can change. E.g. if you have a 4 generation
pedigree shown, and you right-click over a grandparent cell, you will see a popup menu that includes these options:
- Ancestor Cell Settings - G2/4 Specific - these are the generation-specific settings
- Ancestor Cell Settings - G4 Specific - these are the ancestry-depth-specific settings
- Ancestor Cell Settings - Default - settings common to all depths/generations.
Hierarchy Group
Property
Automatic Value
Ancestor Cell - Default
(common to every
generation for all
ancestry depths)
Border Color
Inherits from Form Defaults
Border Style
Medium rounded solid line, 0.01 inch thickness
Fill Style
Inherits from Form Defaults
Fill Color
Inherits from Form Defaults
Font Face
Inherits from Form Defaults
Base Font Size (Pre-Scaled)
Inherits from Form Defaults
Text Color
Inherits from Form Defaults
Text Alignment
Horizontally centered, vertically middle
Border Color
Inherits from Ancestor Cell - Default
Border Style
Inherits from Ancestor Cell - Default
Fill Style
Inherits from Ancestor Cell - Default
Fill Color
Inherits from Ancestor Cell - Default
Font Face
Inherits from Ancestor Cell - Default
Base Font Size (Pre-Scaled)
Inherits from Ancestor Cell - Default
Text Alignment
Inherits from Ancestor Cell - Default
Text Color
Inherits from Ancestor Cell - Default
Photo Position
None
Box Gap
Set according to ancestry depth
Padding
Set according to ancestry depth
Border Color
Inherits from Ancestor Cell - Gn Specific
Border Style
Inherits from Ancestor Cell - Gn Specific
Fill Style
Inherits from Ancestor Cell - Gn Specific
Fill Color
Inherits from Ancestor Cell - Gn Specific
Font Scaling
Set according to ancestry depth and generation
Text Alignment
Inherits from Ancestor Cell - Gn Specific
Text Color
Inherits from Ancestor Cell - Gn Specific
Photo Position
None
Ancestor Cell - GN Specific
(common to every
generation for a specific
depth 'N' of ancestry)
Ancestor Cell - GX/N Specific
(i.e. specific to
generation 'X' within
ancestry depth 'N')
Setting Text Size in Ancestor Cells
The size of text - i.e. the font height - within ancestor cells is set by combining a base font height (in pts) with a scaling factor (a percentage). The base font
17
height is set within either the 'Default' ancestor cell settings, or the ancestry-depth-specific settings. The font scaling is set within the generation-specific
ancestor cell settings.
TIP: To increase or decrease the text size for all ancestor generations uniformly, change the base font height (i.e., adjust the 'Default' or 'GN Specific'
settings). To increase or decrease the text size for a specific generation, change the font scaling for that generation (i.e., adjust the 'GX/N Specific' settings).
Photos In Ancestor Cells
By default, images are not shown in ancestor cells. But you can change this.
Ancestor Photos
It is possible to display the photo of an ancestor within its cell in the ancestors box.
By default these are not displayed however as it is normal for ancestor cells to display text information only - name, breed etc.
But to display photos in ancestor cells all you need do is to change the photo position settings for the relevant ancestor cells - open the appropriate Settings
window and then adjust the photo positioning. In order to have both text and photo appear you need to reduce the photo size and align both the text and the
photo appropriately. For further information see Pedigree Design - Photos With Text.
18
Pedigree Design - Text
This section describes how the text that is displayed within boxes is constructed. For details on the appearance of text (the font face, size etc.) see Pedigree
Design - Text Style.
All boxes can display a text string. Some boxes - but not all - can also include field codes in the text that are placeholders for data taken from the animal
records. You can do this with the boxes for the pedigree Title, Photo (but not 'Fixed Photo') and Ancestors. All other boxes - such as the Logo, Fixed Photo
and the form background - do not support field codes.
E.g. if you set the text for the Title box to:
Pedigree Of [#Name]
then the [#Name] part will be replaced with the animal's actual name. So, if you had entered a record for an animal called 'Fred', then the pedigree Title box
will contain 'Pedigree of Fred'.
Generally, the text string does not control the formatting such as font face, size and color. However there are some exceptions to this - see Formatting Codes
(below).
It is possible to change all the text within the pedigree boxes. Just right-click over the relevant box and select the appropriate 'Settings' entry from the popup
menu.
Anything that is enclosed in square brackets, such as [#Name] in the above example, represents a data field and will be replaced with data taken or deduced
from the current record. Anything that is enclosed in curly brackets (braces), such as {S 120}, represents a formatting code, which will affect the appearance
of the following text but not the text itself. Field and Formatting Codes are described below.
Embedded HTML
It is possible to use some HTML tags within the text. To have these work as expected you need to check the HTML option that is beneath the text box in the
settings window.
The following HTML tags are supported: <b>, <big>, <br>, <em>, <font>, <i>, <li>, <ol>, <p>, <s>, <small>, <span>, <strong>, <sub>, <sup>, <u>, <ul>.
Some CSS styling is available by setting a 'style' attribute e.g. in conjunction with the <span> tag. The following CSS properties can be used: backgroundcolor, color, font-family, font-size, font-style, font-weight, text-decoration, font.
Field Codes
Field codes act as placeholders for data taken from the animal records. They are always enclosed in square brackets and can take one of 2 formats:
[FIELD-NAME]
[LIST-TYPE FIELDS-SELECTOR LIST-STYLE SCALE-FACTOR]
The first and simpler format is used when a single field value is required, as in the above example. The FIELD-NAME parameter is simply that: a valid field
name (see below).
The second format is used to expand a list of field values. It takes 4 parameters although only the first is actually required; the others are optional. The
parameters are separated by spaces.
Parameter
Description
LIST-TYPE
Used to specify whether the list of field names are to be labelled or not, and whether or not upper/lower case conversion is to be
carried out.
Use $ for a labelled field list, or @ for an unlabelled list. If you want to force the list to be in lower case, add the letter L. Or add U to
force to upper case.
E.g. $L would generate a list of lower cased, labelled, field values.
FIELDS-SELECTOR This specifies which fields are to be included.
In its simplest form it just consists of * - i.e. an asterisk - which causes it to default to an automatically determined list of fields
deemed appropriate for the context in which the text box appears. This is the most commonly used setting for the selector.
Alternatively, to have a specific list of field values, the selector can be given as a comma-separated list of field names. There should
be no spaces in the list; if you cannot avoid this because there are fields whose names include spaces, then you must place the
whole list in single quotes. E.g. 'Breed,Eye Color'.
Finally, the selector may use the syntax !FIELD-LIST, which acts like * except that the fields named in the list are excluded. E.g.
if you wanted to have a field list that included all fields deemed appropriate for the given context, but not the 'Breed' or 'Color' fields,
you could use !Breed,Color.
You can control which fields PedPal deems appropriate to be used in any given pedigree context with the * and !FIELD-LIST
forms of selector by setting the 'Normal Field Usage' options within the Document Settings window. See Customization - Data
Fields. E.g. you might want the 'Color' field to appear in the ancestors box for the parent and grand-parent generations but not
beyond.
You might be wondering how PedPal determines which fields are 'deemed appropriate' for any given context. The answer is that this
is something you can configure on a field-by-field basis. I.e., you control it (though PedPal chooses sensible defaults for all its inbuilt
fields). For further information see Customization - Data Fields.
The FIELDS-SELECTOR defaults to * if not given.
LIST-STYLE
This controls how the fields are separated. Use , for a comma separated list. Use UL for a bullet list, with each field on a separate
line. Use OL for a numbered list, with each field on a separate line. Or use L for a simple list (without bullet or number prefix), with
each field on a separate line.
The LIST-STYLE defaults to , if not given.
SCALE-FACTOR
This is an optional percentage value, by which the text size will be scaled. It defaults to 100 (i.e., unscaled).
Examples
[$ * L]
A labelled list of field values, without case conversion, with each field on a separate line.
[@ * , 70]
A comma-separated list of unlabelled field values, scaled to 70% text size.
[@ !Breed BL] A bulleted list of unlabelled field values, excluding the 'Breed' field.
19
Field Names
Field names are managed separately for user-defined and system fields.
User-defined fields - i.e. ones that you can add and remove to your data file - have names that you set yourself using the User Fields tab of the Document
Settings window. For further information see Customization - Data Fields.
System fields - i.e. those that are built-in by PedPal - have both a hard-coded internal name and also a name derived from the current terminology settings. To
alter these names, use the Terminology tab of the Preferences window. Hard-coded names always begin with the # symbol. E.g. the sex field has the hardcoded internal name #Sex but also a terminology-derived name which, unless you change it, is simply Sex. For further information see Customization.
When PedPal creates a new data file, any system fields that are explicitly used in the pedigree layout are deliberately named using the hard-coded internal
names, such as #Sex, so that they will work correctly irrespective of how you might change the terminology settings.
Formatting Codes
Formatting codes are a means of altering the visual appearance of the text but not the text itself.
Currently there are only 2 formatting codes but more may be added in future releases.
Formatting Code
Description
{S percent}...{/S}
Scales the enclosed text by the given percentage size.
E.g. Apple {S 75}Pear{/S} would output 'Apple Pear' but the 'Pear' would be in a smaller font.
20
Pedigree Design - Text Style
This section covers the appearance of text - font face, font size, text color and alignment.
For details on how the actual text itself (the letters etc.) see Pedigree Design - Text.
Font Face
The font face (i.e., the typeface) requires little explanation other than to say it can be set separately for each box should you want that.
Note that you can set a base font for the pedigree, and often this is the best place to change it: do it this way and you can change the typeface for the whole
pedigree in one place (assuming all the boxes default to their normal, automatic, setting).
Font Size
Font sizes are, by default, set in relation to the base font which is scaled appropriately for different parts of the pedigree.
To set the base font size, be sure to turn on the Design option (near the top of the window). You will then see font size and style controls.
To override the default font size within a specific box, right-click over it and adjust the font size within the relevant settings group. E.g. the font size for the
pedigree title box defaults to 160% of the base font size. To use a fixed point size instead, right-click over the title box, select Title Settings from the popup
menu, turn off the 'Automatic' font sizing, then set the point size as you wish.
Font sizing for ancestor cells is controlled slightly differently. The base ancestors font size can be set in either the settings specific to any ancestry depth (i.e.
any number of generations), or in the settings for a specific no. of generations. E.g. with a 4 generation pedigree, when you right-click over the ancestors you
will see options to set Ancestor Settings - 4G Specific and Ancestor Settings - Defaults. This font size is then further adjusted by a separate font scaling
which is set for each ancestor generation. E.g. when you right-click over the grandparents you will see an option Ancestor Settings - G2/4 Specific.
Text Color
The text color requires little explanation other than to say it can be set separately for each box should you want that. Note that text color can also be set in
the form defaults, and often this is the best place to change it. If you do it this way you can change the text color for the whole pedigree in one place
(assuming all the boxes default to their normal, automatic, setting).
Alignment
The text in a box can be aligned both horizontally and vertically.
The horizontal alignment can be either Left Aligned or Center Aligned.
The vertical alignment can be Top Aligned, Middle Aligned or Bottom Aligned.
21
Pedigree Design - Photos
PedPal makes it easy to include images in the pedigree. You can use photos as background images (watermarks), have a dedicated photo box in the heading
for the subject animal, use a photo as a logo, and you can include photos in the ancestors box.
Commonly used image formats are supported, including JPEG, PNG and TIFF. Whilst often used for images that are actual photographs, they can of course
be images produced in other ways, such as clipart or line drawings.
Photo Boxes
These are the boxes that can appear in the pedigree header that are intended for
photographs or other images. There are several such boxes, all of which are optional.
The Logo box, which on the left side of the header, is intended to hold an image that is
your 'logo' - such as a graphic that promotes your kennel, cattery etc. It displays an
image that does not vary as you move between pedigrees. The Photo box, which is to
the right of the Title box, holds the photo of the subject animal. The photo displayed
here is taken from the current record and so varies as you move between pedigrees.
The Fixed Photo box, at the right hand side of the header, acts like an alternative 'logo'
box. If you prefer your logo to appear on the right of the header, use this instead of the
normal Logo box.
To choose the image thats displayed in any of these boxes, just click the box and use
the Add Photo button to select a file.
By default, these boxes do not include any text, and have the photo positioning
settings set so that the image will completely fill the available space. You can change
this however.
Embedding Photos In Data Files
Photos are normally stored in files such as JPEG files.
When you 'enter' a photo in PedPal, usually all you are doing is choosing the name of a file containing that photo. Then, whenever PedPal needs to show that
photo, it loads the file. This means that you need to ensure that the file remains available whenever PedPal needs it. The information that PedPal saves
(stores) for the photo is the filename.
In typical use this is what you would normally want, and it is what most other applications expect. It has the benefit that if the photo is updated, then the
updated image will automatically show in PedPal next time it is run. But it has the disadvantage that if you copy your pedigree data file elsewhere, or move the
photos on your computer (e.g. to a different hard drive or folder), then the 'link' between your PedPal data file and the photo file is broken. The photo no longer
displays within PedPal until you update the filename.
PedPal offers an alternative way to handle photos, and that is to embed the photos directly within your pedigree data file. Because the photos are now
automatically kept in the same file as the data, they can never be 'lost' due to moving the photo files elsewhere, or by copying the data file to another computer
without also copying the photos. The downside is that your data file can potentially become huge, and the photos cannot be automatically updated by
changing the external photo files.
By default, photo files are not embedded. To change this setting, select Preferences from the File menu and check/uncheck the Embed photos in data file
option.
Note that changing this option only affects photos entered from that point on. E.g. if you turn this setting on, but have previously 'entered' photos in animal
records (i.e., PedPal has 'stored' those photos as the external filenames), they will remain as externally linked. But all photos you add from this point will be
embedded.
Photo Filters
When you enter a photo by selecting a file, there are Brightness, Contrast and Gamma filters you can use to adjust the photo appearance. Brightness and
contrast are self explanatory. Changing the Gamma is a way to adjust the relative proportions of bright and dark areas in the photo.
22
Pedigree Design - Background Photos
You can set an image to be displayed in the background, behind the whole pedigree. This is typically used to display a faded, or watermark, image.
To set the watermark, right-click over the pedigree and select Background Settings from the popup menu. Then click the Add Photo button.
You should generally use a lightly colored image for the watermark, else it will tend to obliterate the pedigree drawn on top. The Brightness and Gamma
settings (also in the Background Settings window) can be helpful here. The 'gamma' is a way to adjust the relative proportions of bright and dark areas in the
photo.
The background image will, by default, be scaled so that it covers the entire page (within the margins) whilst retaining aspect ratio. In practice what this means
is that, unless your background image has the same aspect ratio - i.e. it has the same 'shape' - then parts of the image will be cropped.
Sometimes this is not the behaviour you would like. In this case you can change the Mode within the photo positioning settings. This can be found on the
Layout tab of the Background Settings window.
Alternatively, use a photo editor to adjust the aspect ratio of your image - by cropping it so that it has approximately the same aspect ratio as the page.
NOTE: As far as PedPal is concerned, the background of the pedigree is just another 'box'. It is just special in that it (a) covers the whole page, and (b) it lies
'behind' all the other boxes. But because it is a box it can have its own photo (which is how the watermark is set) but can also have text if you so wanted it.
See Pedigree Design - Box Settings, Pedigree Design - Text, Pedigree Design - Text Style, Pedigree Design - Photos, Pedigree Design - Photo Cropping and
Pedigree Design - Photos With Text.
23
Pedigree Design - Photo Cropping
This help topic explains how to control image sizing and cropping, and how the various photo 'Mode' settings can be used.
To alter how a photo is sized/cropped, there are two main approaches:
Resize the area in which it is displayed to change its aspect ratio to match the image. The aspect ratio of a photo is its width divided by its height. By
resizing the area in which the photo is to be drawn so that it matches the aspect ratio of the photo itself, little or none of it will be cropped. To do this, first
click the Design checkbox (near the top of the main window), then drag the resize bars that appear in the form display. To hide the bars, just click Design
again. This is obviously not possible with a background (watermark) image (although you can adjust the margins).
Or, alter the photo positioning Mode.
When a photo is displayed, the default setting is for PedPal to stretch it so it occupies the entire area in which it is drawn, whilst retaining its aspect ratio. This
is the so-called Bleed setting and what it means is that, unless the aspect ratio of the photo matches that of the area in which it is drawn, some of the photo
will be cropped - i.e. chopped off. Depending on the shape of the image, parts of either the left+right sides, or the top+bottom, will be cropped.
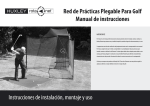
E.g. Say you are doing the pedigree for a dog and have added this photo to a dogs record:
The aspect ratio of this photo is about 1.5: i.e. its width is about 50% more than its height.
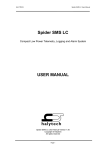
Now, lets say you have decided that you want to set the Photo box in the pedigree to be approximately square. So, you resize the boxes in the heading (by
clicking Design and then dragging the resizing bars) to get the heading looking like this:
Note the Photo box on the right is approximately square, and the image of the dog has been cropped on the left and right sides. The image has been stretched
so it lies snugly against the box's borders.
There are four different settings for the photo Mode. To change it for a box, just right-click over the box and select the appropriate 'Settings' option from the
popup menu. E.g. to change it for the animal Photo box in a pedigree, right-click and select Photo Settings. The Mode setting is found within the 'Photo
Position' group which will be on either the Layout or Photo tabs (it varies from one 'Settings' window to another).
Mode
Description
Setting
Example
Bleed
The photo is drawn so that it entirely fills the box, right up to the border, and it is cropped if its aspect ratio does not match
that of the box.
Stretch
The photo is drawn so that it fills the box, right up to but not including the padding, and it is cropped if its aspect ratio does
not match that of the box. This usually looks better without rounded borders.
Normal
The photo is drawn at the maximum possible size whilst retaining its aspect ratio, but without cropping. This will usually
result in there being space either above/below or left/right of the photo. Padding is respected.
None
No photo is shown at all. Whilst this might not seem very useful, it is often used within ancestor cells so that pictures that
have been stored in the ancestor records do not (normally) show in the ancestors table.
24
Pedigree Design - Photos With Text
The content of most boxes can be made up of text and/or a photo. In many situations a box displays either text or a photo but not both. For this reason most
boxes format both their text and photo content to use all the available space, centered both horizontally and vertically. If both are present they will superimpose
each other, with the text uppermost.
To change this behaviour you can alter the a box's Photo Position settings. Note that when both text and a photo is present, unless you want them to overlap
you need to ensure that you arrange the photo position settings so there is enough space left over for the text.
The Photo Position settings are as follows.
Setting
Description
Mode
Can be one of four modes.
None - no photo is shown at all.
Bleed - the photo is drawn so that it entirely fills the box, right up to the border, and it is cropped if its aspect ratio does not match that of the
box.
Stretch - the photo is drawn so that it fills the box, right up to but not including the padding, and it is cropped if its aspect ratio does not match
that of the box.
Normal - the photo is drawn at the maximum possible size whilst retaining its aspect ratio, but without cropping. This will usually result in
there being space either above/below or left/right of the photo.
Alignment Can be either Centered, or aligned to Left/Right/Bottom/Top.
Scaling
A percentage value, 1-100, that controls how much of the available space (width and/or height) is to be used when sizing the photo for display.
If the Alignment is Top or Bottom, the scaling is applied to the box height.
If the Alignment is Left or Right, the scaling is applied to the box width.
If the Alignment is Center, the scaling is applied to both width and height.
Scaling is ignored in bleed mode.
Gap
The gap - i.e. distance - that is to ideally separate the text from the photo.
Photos With Text - Worked Example
This example shows how to change box settings to display photos within the ancestor cells for the parent generation in a pedigree. The same principle applies
to all boxes that can hold both text and a photo.
1. Choose File|Open Sample Pedigree and select the Cat Pedigree example. Click OK.
2. Display the pedigree for 'Arripay Little Wonder': click the Select Animal button (above the pedigree) and select 'Arripay Little Wonder' from the list (this
button may be labelled Select Cat, or Select Dog, etc. depending on your chosen terminology settings). You should now have his pedigree displayed. His
sire should be 'Arripay Fictitious Beast', with no dam set (in the sample data, 'Arripay Fictitious Beast' has a photo set, so we have deliberately chosen a
pedigree that positions this animal as a parent; if you right-click over the sire in the pedigree, then choose 'Edit Sire' from the popup menu, then click onto the
'Photo' tab you will see the photo).
3. At this point, the ancestor cell for the sire in the pedigree will not show the photo. Thats because the default photo position settings in an ancestor cell have
the photo mode set to 'No Photo':
4. Next, right-click over the sire box, then select Ancestor Cell Settings - G1/4 Specific from the popup menu. Click onto the Layout tab. In the Photo
Position group, uncheck the Automatic box and then set the Mode to Bleed Photo. Click OK. The pedigree now changes, and the sire's photo now
completely fills the ancestor cell, with the text superimposed:
5. But this isn't quite what we want, because we do not want the text on top of the photo. Re-open the same Settings window, but this time change the Photo
Position so that the Mode is set to Normal Photo, the Alignment is set to Photo At Bottom, and the Scaling is set to 50%. Click OK. The pedigree again
changes, and now the sire's photo is smaller and aligned to the bottom. But the text is still the same size, and whilst the text has moved up it still partly
overlaps the photo:
25
6. The problem now is that the text is just too large. By changing the photo alignment so the photo is at the bottom, we have caused PedPal to attempt to put
the text above it, and whats happened is that it has drawn the text centered in the space above the photo but because the text is still too large it has
overflowed the available text space, both above and below. The overflow above has been clipped to the text box boundary, and the overflow beneath has
overlapped the photo. What we need to do is to reduce the text size. Re-open the same Settings window again, but this time stay with the Text tab and set
the Font Scaling to a much smaller value - say 100%. Click OK. The pedigree again changes, and this time we are getting the kind of thing we were after smaller text that is displayed above the photo without clipping or overlapping:
In practice, achieving a 'photo pedigree' style with photos for all the ancestors is quite hard because the ancestor cells at different generation numbers vary
greatly in shape: the deeper ancestors tend to have wide cells that are not at all deep, whereas the parents have cells that are deeper than wide. The best
approach is to always ensure that the photos you use have the same aspect ratio, then carefully customize the pedigree layout to work reasonably well with a
photo of that shape at each generation.
26
Customization
PedPal provides extensive configuration/customization options. These can be accessed using buttons and settings at the top of the main window, with
additional options accessed through the Preferences and Document Settings windows. You can also access many customization options though context
popup menus - right-click over any part of the displayed pedigree then select one of the 'Settings' options.
The Preferences window - is used for settings that are independent of any particular data file. It is accessed through the File menu.
The Document Settings window - is used for all settings that can alter the current data file in some way - such as user defined data fields. It is accessed
through the File menu.
Chapter Contents
1. Quick Reference
2. Data Fields
3. Name Format
27
Customization - Quick Reference
The following table lists all available customization options and how to access them.
Category
See
Date Format
Select Preferences from the File menu, then click on the System tab. Note that the date format used when importing
data is set as part of the import options.
For further information see Importing.
Base Font
First ensure the Design option (at the top of the main window) is turned on. Then adjust the base font style & size using
controls above the immediate top-left corner of the pedigree.
Title Highlighting
Select Preferences from the File menu, then click on the General tab.
Data Fields
Select File|Document Settings, then use the User Fields & System Fields tabs.
Terminology
PedPal uses a number of terms (words) that can appear indirectly in pedigrees e.g. as labels for data fields, etc. These
are words such as 'Sex', 'Male', etc.
To customize these terms select Preferences from the File menu, then click on the Terminology tab. A number of
preset choices are available for English-speaking breeders of cats, dogs, etc. Alternatively, select Custom from the
dropdown menu then can change each term individually.
NOTE: Other terms, such as 'Pedigree', are directly built into the pedigrees. To change these you should alter the
pedigree settings: right-click over the element (box) you want to change, then select the appropriate 'Settings' window
from the popup menu.
Box Sizes
First ensure the Design option (at the top of the main window) is turned on. Then drag the dividers that separate the
pedigree boxes to resize as needed.
For further information see Pedigree Design.
Print Margins
Paper Orientation
In the main window, click the margins icon ( ) which is to the left of the displayed pedigree.
For further information see Printing Pedigrees - Margins.
To switch between Portrait and Landscape layout click the landscape (
the buttons down the left side of the pedigree).
) and portrait (
) icons (these are amongst
Background Photo
(Watermark Image)
Right-click over the pedigree, select Background Settings, then click Add Photo.
For further information see Pedigree Design - Background Photos.
Select Data Fields
E.g. to choose the data fields that are to be included in any given part of a pedigree. Select File|Document Settings,
then edit fields in the User Fields & System Fields tabs to change their usage.
For further information see Customization - Data Fields.
Borders
To access many design options, right-click over the pedigree, then select from the 'Settings' options on the popup menu.
Text Color
See Pedigree Design - Structure and Pedigree Design - Box Settings.
Text Sizes
Background (Fill) Color
& Many Other Layout Options
28
Customization - Data Fields
For each animal record, PedPal stores a variety of information such as sex, name and so on. These are called 'data fields'.
Several data fields are built in - e.g. date of birth. These are known as 'system fields'. They are listed below.
You can extend the standard list of fields by adding your own. Such fields are called 'user defined fields' or simply 'user fields'. PedPal has a limit of 10 user
fields in a data file.
When you create a new data file, PedPal starts it off with a selection of user defined fields that are commonly used - such as registration number, breeder
name and so on. You can delete any of these user fields that you don't need.
Data fields can be customized in a number of ways:
Add, delete and edit the user defined fields: choose File|Document Settings, then select the User Fields tab.
Change the labels used by system fields (by adjusting the terminology settings - see Customization).
Change the default field usage - i.e. select where they appear in pedigrees and windows: choose File|Document Settings, then edit the individual fields on
the User Fields & System Fields tabs.
Change the order in which fields are listed: choose File|Document Settings, select the Field Ordering tab, then adjust the ordering as required.
System Fields
Field
Purpose
Field
The meaning of the data in this column.
Date of Birth
Self explanatory.
Date of Death Self explanatory.
Sex
The animal's gender.
Sire and
Dam
Name of the sire and the dam.
Suffix
The name suffix. There is an option to have this automatically appended to the animal's name when it appears in a pedigree. See
Customization - Name Format.
Title
The animal's title. This is prepended to the animal's name when it appears in a pedigree, and its presence determines whether the name is
displayed with title highlighting applied. See Customization - Name Format.
29
Customization - Name Format
PedPal has options to adjust the formatting of animal names in pedigrees.
To set these options, choose File|Document Settings, then select the General tab.
Title Highlighting - this controls how an animal's name is emphasized when it has a title. It is commonplace in pedigrees for the name of titled animals
such as Champions to be given in red, bold or some other form of emphasis.
Include suffix in names - whether or not the Suffix field (a system field) is to be appended to animal names when displayed in pedigrees.
30
FAQs
Listed here is a selection of some of the more commonly asked questions about PedPal.
Additional questions and answers can be found on our web site.
Q: Where do I change the date format?
A: Select Preferences from the File menu, then click on the System tab.
Note that the date format used when importing data is set as part of the import options.
See Importing.
Q: How do I add/delete data fields?
A: Select File|Document Settings, then click on the User Fields tab. Here you can add/remove/rename the available fields.
See Customization - Data Fields.
Q: How do I change the order of data fields e.g. in the pedigree title?
A: Select File|Document Settings, then click on the Field Ordering tab. Move the fields up and down the list.
See Customization - Data Fields.
Q: How do I choose which fields are included in the pedigree?
A: Select File|Document Settings, then edit the 'usage' for the fields in the User Fields and System Fields tabs.
See Customization - Data Fields.
Q: How do I set up a background image (watermark)?
A: All you need do is right-click over the pedigree, select Background Settings, then click Add Photo.
See Pedigree Design - Background Photos.
Q: How do I get Champions etc. to be highlighted in the pedigree e.g. in red?
A: Make sure that you enter the title part of the name into the separate Title box in the Animal Details window; don't include it as part of the name. This way
PedPal will know to use title highlighting when displaying the name e.g. in a pedigree.
To change the way names are highlighted - e.g. to have them in bold rather than red - select File|Document Settings, then select a different Title
Highlighting option.
See Customization - Name Format.
Q: How do I customize PedPal?
A: Customizations that are not specific to the current pedigree data file - display preferences etc. - are controlled using the Preferences window - select
Preferences from the File menu.
Customization specific to the pedigree data - such as the user defined fields - are controlled using the Document Settings window - select File|Document
Settings.
See Customization.
Q: How do I uninstall PedPal?
A: Windows: Open Control Panel and select 'Uninstall a Program' or 'Add/Remove Software'.
Mac: Just drag PedPal to the trash can.
Q: What extra do I get with the full (paid) version?
A:
It is not limited to 30 days use
It works with data files of up to 10,000 records whereas the free trial is limited to 50
Export and print facilities are enabled
Printed pedigrees do not include a 'trial version' message
Access to support and updates
Q: How do I place an order?
A: See our web site.
Q: My question isn't answered here, where else can I look?
A: Please see the Frequently Asked Questions page on our web site, which we update regularly. This addresses many additional topics and questions to
those listed here.
Q: My question isn't answered in the FAQs, neither here nor on the PedPal web site. How can I contact product support?
A: Please see Product Support on our web site.
31
Product Support
To contact customer service please see the Product Support page on our web site.
Before contacting customer service, be sure to check the FAQ on our web site first. This covers many commonly asked questions, and may well address the
problem or query that you have.
32
Release Notes
System Requirements
PedPal requires Windows 8, Windows 7 or Windows Vista (either 32 or 64 bit).
33
Revision History
VERSION
RELEASE DATE
DETAILS
2.3.02
11 July 2014
Additional options in the Preferences|Terminology selector, and additional sample pedigrees.
User fields, and the DOB field, do not now default to being included in the ancestors of a pedigree on import.
2.3.01
18 June 2014
Internal changes.
2.3.00
27 May 2014
Maintenance release.
2.2.03
April 2014
Bugfix, could cause crash after use of File Settings in certain circumstances.
2.2.02
March 2014
Initial public release.
PedPal® is a product of Tenset Technologies Ltd, © 2014 All Rights Reserved. PedPal is a registered trademark of Tenset Technologies Ltd in the United Kingdom. v2.3.02, July 2014
Apple, Mac and Macintosh are trademarks of Apple Inc., registered in the U.S. and other countries. Microsoft and Windows are registered trademarks of Microsoft Corporation in the U.S. and/or
other countries.
34