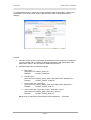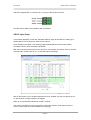
1
HALYTECH
Spider SMS LC User Manual
Spider SMS LC
Compact Low Power Telemetry, Logging and Alarm System
USER MANUAL
Spider SMS LC User Manual Version 1.50
Copyright © Halytech
All rights reserved
Page 1
HALYTECH
Spider SMS LC User Manual
SOFTWARE LICENCE AND COPYRIGHT NOTICE
All software that is supplied as part of this equipment is protected by copyright laws and
international copyright treaties, as well as other intellectual property laws and treaties. This
software is licensed, not sold and is intended for use on this device only.
All title and copyrights in and to the software (including but not limited to any text, instructions,
code, “applets” incorporated into the software, images, photographs, animations, video, audio
and music) are owned by Halytech.
You may not reverse engineer, decompile, or disassemble this software for any purpose. No
part of this software may be copied, reproduced, loaned, rented, leased or transmitted in any
form or by any means electronic or mechanical, without the express written permission of
Halytech.
Warning
This is a Class A product. In a domestic environment this product may cause radio
interference in which case the user may be required to take adequate measures.
Halytech
ABN 20 225 848 758
PO Box 6983
Baulkham Hills Business Centre
NSW 2153 Australia
Tel: +612 8814-5235
E-mail: [email protected]
www.halytech.com.au
Page 2
HALYTECH
Spider SMS LC User Manual
Table of Contents
Introduction ........................................................................................................................................................................... 5 Typical Applications ................................................................................................................................................... 5 System Overview .................................................................................................................................................................. 5 Inputs ......................................................................................................................................................................... 6 System Monitors ........................................................................................................................................................ 7 Controls ..................................................................................................................................................................... 8 Alarms ....................................................................................................................................................................... 9 Logger ..................................................................................................................................................................... 10 Web Server.............................................................................................................................................................. 11 Physical Connections .............................................................................................................................................. 12 Antenna ......................................................................................................................................................... 12 Power ............................................................................................................................................................ 12 Controls ......................................................................................................................................................... 13 Inputs ............................................................................................................................................................. 13 Auxiliary Connectors .................................................................................................................................... 15 Setting up a Spider SMS LC for the first time .................................................................................................................. 16 Setting Location ....................................................................................................................................................... 17 Setting Date and Time ............................................................................................................................................. 18 Setting User and Password ..................................................................................................................................... 19 Configuring Inputs ................................................................................................................................................... 20 Calibrating Analogue Inputs (if present) .................................................................................................................. 21 Calibrating Counter Inputs (if present)..................................................................................................................... 23 Scaling Event, Daily Total and Hydstra Rain Inputs (if present) .............................................................................. 23 Setting Controls ....................................................................................................................................................... 23 Setting up Alarms .................................................................................................................................................... 25 Setting up Network Parameters............................................................................................................................... 27 Setting up E-mail Parameters (if e-mail option installed)......................................................................................... 30 If your server does require authentication, select “ENABLED” and enter a user name and a password. You can
obtain these from your network administrator.Network Glossary ............................................................................ 30 Network Glossary .................................................................................................................................................... 31 Save Settings to Disk .............................................................................................................................................. 32 Load Settings from Disk .......................................................................................................................................... 32 Exiting Change Settings Mode ................................................................................................................................ 32 Normal Operation................................................................................................................................................................ 33 Front Panel Display ................................................................................................................................................. 33 Communicating with a PC ....................................................................................................................................... 34 Alarms ........................................................................................................................................................... 34 Acknowledging Alarms ................................................................................................................................. 35 Inputs ............................................................................................................................................................. 35 Controls ......................................................................................................................................................... 35 History ........................................................................................................................................................... 36 About ............................................................................................................................................................. 37 SMS Alarms ......................................................................................................................................................................... 38 SMS Commands.................................................................................................................................................................. 39 Voice Option (if installed)................................................................................................................................................... 40 GSM units only: ....................................................................................................................................................... 40 Calling a Spider (GSM units only) ........................................................................................................................... 40 Voice Alarm Dialling (GSM units only)..................................................................................................................... 40 CDMA units only: ..................................................................................................................................................... 41 Calling a Spider (CDMA units only) ......................................................................................................................... 41 Voice Alarm Dialling (CDMA units only) .................................................................................................................. 41 Advanced Operation ........................................................................................................................................................... 42 Automatic Reports (if installed)................................................................................................................................ 42 Spider SMS Power Options ..................................................................................................................................... 44 Always-on Operation ............................................................................................................................................... 44 Extra Low Power Operation – Modem Scheduling .................................................................................................. 45 One Spider Controlling Another Spider via SMS ..................................................................................................... 46 Software Upgrade.................................................................................................................................................... 48 Appendix A: Spider Inputs ................................................................................................................................................. 49 Appendix B: Connecting to a Spider ................................................................................................................................ 50 Local Connection ..................................................................................................................................................... 50 Remote Connection ................................................................................................................................................. 51 Appendix C: Local Network Configuration....................................................................................................................... 52 Connecting a PC Directly to a Spider SMS LC........................................................................................................ 52 Connecting to an Existing Network.......................................................................................................................... 53 Appendix D: Remote Access Configuration .................................................................................................................... 55 Appendix E: Logged Data Format ..................................................................................................................................... 57 Appendix F: Filtered Report File Format .......................................................................................................................... 60 Page 3
HALYTECH
Spider SMS LC User Manual
Appendix G: Connection to Mobile Network .................................................................................................................... 61 CDMA Network ........................................................................................................................................................ 61 GSM Network .......................................................................................................................................................... 61 SIM Card Insertion and Removal (GSM units only) ..................................................................................... 62 NextG Network ........................................................................................................................................................ 64 SIM Card Insertion and Removal (NextG units only) ................................................................................... 64 Appendix H: Testing E-mail Connectivity......................................................................................................................... 66 Sending Test e-mails ............................................................................................................................................... 66 Monitoring Test e-mails ........................................................................................................................................... 66 Appendix I: SDI-12 Operation (if SDI-12 interface installed) ........................................................................................... 67 SDI-12 Sensor Preparation ..................................................................................................................................... 67 SDI-12 Physical Connection .................................................................................................................................... 67 SDI-12 Input Setup .................................................................................................................................................. 68 SDI-12 Version Support........................................................................................................................................... 69 SDI-12 Transparent Mode ....................................................................................................................................... 70 Appendix J: Wireless Sensor Operation (if Wireless interface installed) ..................................................................... 72 Wireless Sensor System Overview ......................................................................................................................... 72 Physical Connections .............................................................................................................................................. 72 Wireless Input Setup ............................................................................................................................................... 73 Wireless Input Display ............................................................................................................................................. 75 Wireless Sensor Diagnostics ................................................................................................................................... 76 Page 4
HALYTECH
Spider SMS LC User Manual
Introduction
Halytech Spider SMS LC is an integrated monitoring, control and alarm system designed for
remote, low power, battery powered applications.
It can monitor various inputs, control outputs, generate alarms and log. Spider SMS LC is a
complete system. It includes all software, hardware and a cellular phone module. Setting up
and interrogating a Spider is a simple matter of viewing pages with any standard web
browser. A Spider can be accessed either locally via a direct cable connection or remotely via
a modem or by sending and receiving SMS messages.
NO SOFTWARE MODIFICATIONS ARE REQUIRED TO CATER FOR DIFFERENT
APPLICATIONS.
Spider SMS LC is suitable for use by system integrators and OEM applications. It is housed in
a compact plastic enclosure, which must be mounted inside a dustproof (or if required weatherproof) enclosure provided by the user.
Users requiring a single box solution may consider the Spider SMS LP. It provides additional
functionality in a weather proof, stainless steel enclosure.
Typical Applications
•
•
•
•
•
•
•
•
Security
Access
Air conditioning
Process Control
Waste Management
Irrigation
Rural Applications
Environmental Monitoring
System Overview
Each Spider SMS LC incorporates an industrial controller, input/output interface, a logger, a
cellular phone interface (both CDMA and GSM types are available) and a battery
management system with solar panel / mains charger support.
Spider SMS is capable of:
1. Monitoring up to eight (8) user inputs
2. Monitoring up to three (3) system inputs
3. Controlling up to eight (8) controls
4. Generating up to eight (8) alarms
5. Sending SMS messages
6. Receiving SMS commands
7. Sending e-mails (optional)
8. Synthesised voice alarm dialing and call answering (optional)
9. Logging input, control and alarm activity
10. Sending automatic daily reports via e-mail and FTP (optional)
11. Being configured by the user through a standard web browser
Page 5
HALYTECH
Spider SMS LC User Manual
Inputs
A Spider accepts two different types of inputs – native and intelligent.
Native inputs allow simple switch, voltage and current sensors to be connected directly into
the Spider.
Intelligent inputs are available as an option and are used to interface to intelligent sensors. At
the time of writing, the Spider supports SDI-12 and wireless intelligent sensors. Other
intelligent sensor types will be supported in later versions.
Native Inputs
Native inputs are connected to the Spider SMS LC via two multi-pole connectors. Each multipole connector accepts four inputs. They are labeled INPUT1 to INPUT8 and each is provided
with two screw terminals. Wire sizes up to 1.5 mm2 may be used. Each input can be
configured by the user for operating in one of the following five modes:
1. “SWITCH” – switch closure or voltage free contact.
Switch inputs detect either an active (or “ON”) state or an inactive (or “OFF”) state.
The active state is indicated by shorting the two terminals together, while the inactive
state is indicated by the terminals staying open. A switch state must be stable for a
minimum of 5 seconds to be recognised.
NOTE: There is no galvanic isolation between different inputs or the Spider SMS
internal circuitry.
2. “ANALOGUE”
Analogue inputs are used to monitor industrial sensors such as voltage, current,
temperature, pressure etc.
Most common sensor types are supported, including:
0 – 20 mA sensors
4 - 20 mA sensors
0 - 2.5V sensors
0 – 5V sensors
0 – 10V sensors
NOTE: All analogue signals share a common ground
3. “COUNTER”
Count will increment each time the terminals are shorted. Frequencies up to 10Hz are
supported. The counter will roll-over from 99,999 to 0.
4. “EVENT”
Event inputs are used to record occurrences of pulses. A pulse is generated by
temporarily shorting the input terminals together. Minimum acceptable pulse width is
100 ms. Event inputs are suitable for monitoring pulses that occur less frequently
than once every 30 seconds. Each time an event occurs, the Spider logs the time its
occurrence as well as the total number of events. The total will roll-over from 99,999
to 0.
NOTE: Battery life will be dramatically reduced if a higher frequency signal is
connected to an event input.
Page 6
HALYTECH
Spider SMS LC User Manual
5. “DAILY TOTAL”
Daily total inputs are identical to the “EVENT” inputs described above, except that the
total event counter is reset to 0 every midnight.
6. “UTILITY METER”
This type of input records the number of pulses in a logging period. It is typically used
to record readings from water, electricity and gas meters.
7. “HYDSTRA RAIN” (HYDROGRAPHIC VERSION OF SOFTWARE ONLY)
This type of input is normally used for recording rainfall. Every time the tipping bucket
tips, it will be recorded with a value equal to the tipping bucket size. A single record
with a zero value will be recorded once a day at a time specified by the user. A
separate record showing the total rainfall will be recorded at midnight,
8. “DISABLED”
This mode disables the input. The input is removed from all reports and menus.
The user can tailor the system by assigning application specific input names. So for example
Input 1 may be called “PUMP 3 OK” etc.
All native input types may be logged and/or used to trigger alarms.
Please refer to Appendix A for a summary of native input types, their specifications and
typical uses.
Intelligent Inputs (if installed)
Intelligent sensors are connected to Spider auxiliary connectors. Please refer to “Physical
Connections” section for details.
At this time of writing the Spider supports two types of intelligent inputs: SDI-12 and Wireless.
SDI-12 inputs are described in Appendix I.
Wireless inputs are described in Appendix J.
System Monitors
Each Spider SMS is fitted with 3 System Monitors:
1. System Temperature – measures temperature inside the Spider SMS enclosure
2. Battery Voltage – measures the voltage of an external battery connected to the
battery connector
3. Battery Charger Status – gives current state of battery charger (either ON or OFF)
System monitors can be used in the same way as inputs, i.e. they may be logged and/or used
to trigger alarms.
Page 7
HALYTECH
Spider SMS LC User Manual
Controls
Spider SMS provides 8 controls on two multi-pole connectors. Each multi-pole connector
accepts four controls. Controls are labeled CN1 to CN8 and each is provided with two screw
terminals internally connected to a relay. In inactive state the two terminals are open-circuit.
Upon activation, the relay switches and the terminals are shorted together. Controls can be
activated manually, by an active alarm and/or via a programmable built-in timer. Each control
has a dedicated 7 day / 24 hour timer with an unlimited number of user-programmable
schedules.
The user can tailor the system by assigning application specific names to the controls. So for
example Control 3 may become “VALVE 4 ON” etc.
Controls can be controlled in four ways:
1. By accessing the “Controls” page with a browser and clicking on the ON/OFF buttons
2. By sending control SMS messages to the unit
3. By programming and enabling the timer
4. By programming alarms to activate or deactivate controls
It is possible to use all four forms of control simultaneously. If a timer is enabled and a manual
control command is received either via the browser or by SMS, the manual control will take
priority, temporarily overriding the timer. The override is automatically cancelled when the
programmed timer state matches the manually requested state.
Controls driven by an alarm have the highest priority, overriding both manual control and the
timer. Furthermore, if two or more alarms attempt to drive a control in opposite senses, the
“OFF” command will override the “ON” command.
Page 8
HALYTECH
Spider SMS LC User Manual
Alarms
Spider SMS LC can generate up to 8 alarms.
Upon activation, an alarm can perform any or all of the following:
• send SMS messages
• send e-mails (if e-mail option installed)
• dial any telephone and speak the alarm message in synthesised voice
• activate and deactivate controls.
Each alarm can be programmed with a name, trigger source, 3 separate SMS telephone
numbers, 2 e-mail addresses, 3 separate voice numbers, the text of a message and the
control to be activated. When the trigger becomes active, the alarm is triggered and the alarm
sequence starts.
Alarms are completely independent from inputs. So for example, an input can trigger more
than one alarm, each of which will send its own special SMS to its own special telephone
numbers.
SMS sending
If SMS sending is enabled, an SMS with the programmed text is sent to each telephone
number starting with the first. If sending is successful, the unit waits for 30(*) minutes for the
user to acknowledge the alarm sequence. Acknowledging the sequence stops the sending of
SMS messages.
If sending is not successful, due to network congestion for example, the SMS is sent to the
same number after 1 minute. Up to three attempts are made to each number before
proceeding to the next number.
After the 3rd attempt to the 3rd number (if applicable) the unit will stop sending SMS and wait
indefinitely for the alarm to be reset. This limits the number of SMS transmissions per alarm to
9.
(*) 30 minutes is the default value. Users can change this to a period between 0 and 60
minutes.
E-mail sending (if e-mail option installed)
If e-mail sending is enabled, an e-mail with the programmed text is sent simultaneously to up
to two addresses. If sending is successful, no more e-mails are sent.
If sending is not successful, up to 2 more attempts are made at 3 minute intervals.
Voice alarm dialing (if voice option installed)
If voice sending is enabled, the Spider will dial the first voice number. If the call is answered,
the Spider will identify itself and speak the alarm message. The recipient can acknowledge
the alarm. Acknowledging the alarm will stop all further SMS, e-mail and voice transmissions.
If the alarm call is not acknowledged, not answered or the line is busy, the Spider will call the
second voice number after 2 minutes. If this call is also not acknowledged, not answered or is
busy, the Spider will call the third voice number after 2 minutes.
The whole sequence will be repeated up to 3 times.
Please refer to section “Voice Option” for more details on the Spider Voice Option operation.
Page 9
HALYTECH
Spider SMS LC User Manual
Control activation and deactivation
Alarms can also be used for intelligent control of various systems. So for example, a tank
level can be maintained by monitoring a water level and by controlling a pump. One alarm is
set to trigger when the water level falls below a low level. This alarm is programmed to
activate a control output, which in turn switches on the pump. A second alarm is set to
activate when the water level is above a high level. This second alarm is programmed to
deactivate the same control, in turn switching the pump off. Thus, the tank level is
automatically kept between the two levels.
Alarm acknowledgement
Active alarms can be acknowledged in four different ways:
1. By accessing the “Alarms” page with a browser and clicking on the active alarm
2. By sending an SMS message to the Spider
3. GSM systems only - by acknowledging the alarm with the phone keypad during a
voice call
4. CDMA systems only - by acknowledging the alarm by calling the Spider
5. By using the “Auto Acknowledge” feature
(Please see “Acknowledging Alarms” section for more details).
If an alarm is acknowledged but its trigger source is still in the active state, a new alarm
sequence will NOT commence. Rather, Spider SMS LC will wait for the trigger source to first
go inactive.
Logger
Spider SMS LC incorporates a high capacity solid-state data logger. The logger stores data
into non-volatile memory, maintaining its contents in the event of a total power supply failure.
All records are date/time stamped to a resolution of one second.
Spider SMS logs
1.
2.
3.
4.
5.
6.
7.
8.
9.
Input changes
System monitor changes
Control changes
Alarm activations and resets
SMS transmissions and their outcomes
SMS command reception
E-mail transmissions and their outcomes (if e-mail option installed)
Voice alarm transmissions and their outcomes (if voice option installed)
System messages
Switch inputs automatically log an input change. If a switch input is initially in the “OFF” state
and then goes “ON” for some time and then back to “OFF”, both state changes are logged.
Event, Daily Total and Hydstra Rain (if installed) inputs automatically log a single record per
pulse. If an event input is initially in the “OFF” state and then goes “ON” for some time and
then back to “OFF”, only a single record is logged.
Page 10
HALYTECH
Spider SMS LC User Manual
Analogue input, counter input and system monitor logging is enabled by the user.
These inputs are logged using the “SIGNIFICANT CHANGE” logging method. The user
specifies the minimum logging period and the minimum change that needs to be logged. For
example, the logging period may be set to 1 hour and the minimum change to 100. The input
will be checked every hour and logged if it has changed by 100 from the last logged value. (If
you want to log the data every hour, simply set the minimum change to 0.)
The logging period is shared by all analogue inputs, counter inputs and system monitors,
while each input has its own programmable minimum change setting.
If logging of an analogue input, a counter input or a system monitor is enabled, it will be
logged automatically every midnight. This ensures that at least one sample is recorded every
day, even with slowly varying inputs.
Utility meter inputs are logged every logging period, regardless of by how much they change.
Please refer to Appendix A for a summary of input types.
Automatic reports (if installed)
A Spider SMS can be set up to send periodic reports via e-mail and/or FTP.
E-mail reports are sent to up to three recipients.
FTP reports are sent to a user-specified FTP server.
Each report is a spreadsheet file containing data logged over the required period.
The advantage of automatic reports is in the Spider SMS ability to automatically deliver
logged data without any user intervention.
An automatic report containing all data logged in the current day can be requested at any time
by sending the ‘GET REP’ SMS command to the Spider.
Web Server
A sophisticated web server is built into every Spider SMS LC.
It allows users to communicate with a Spider using the familiar “Internet surfing” approach.
You can use any computer regardless of type and operating system to connect to a Spider.
NO SPECIAL SOFTWARE is required.
The web server is used for:
1.
2.
3.
4.
5.
6.
Setting up a Spider for the first time
Viewing Inputs and System Monitors
Controlling Outputs
Viewing and resetting alarms
Downloading logged data
Software upgrades
All operations are performed by accessing simple web pages.
Page 11
HALYTECH
Spider SMS LC User Manual
Physical Connections
Antenna
Each Spider SMS is supplied with a panel-mount “whip” antenna suitable for most
applications. Directional antennas with higher gains are available for fringe areas.
Attach the antenna to the antenna connector located on the top of the Spider SMS case.
Hand tighten only. Using tools to tighten antenna connectors may damage them, voiding
the warranty.
Power
Spider SMS LC does not have an ON / OFF switch. The unit starts operating as soon as
power is applied.
The unit is fitted with two power connectors:
• Battery – for connection of an external (rechargeable) battery
• Charger – for connection of an external solar or mains charger
Every Spider SMS LC incorporates a battery management system supporting 12V sealed
lead acid batteries with capacities up to 10 Ah.
It provides all facilities required for a sophisticated power system, while requiring a minimum
number of external components. Simply connect a battery to the battery connector and a
solar panel or a mains charger into the charger connector. No external regulator is necessary.
Mains powered chargers must be able to provide a DC voltage between 15 and 24V at a
minimum 1 A.
A range of solar panels, mains chargers and batteries is available from Halytech and its
agents.
Please observe the correct polarity when connecting batteries and chargers to the Spider
SMS LC.
PLEASE NOTE:
If you are using batteries of larger capacities and/or are using your own charging system, do
not use the charger connector. Plug the battery into the battery connector and leave the
charger connector blank.
In this way, you will still be able to monitor the battery voltage, log it, alarm on it etc.
Page 12
HALYTECH
Spider SMS LC User Manual
Controls
Controls are connected to terminals marked CN1 to CN8.
Each control provides normally open relay contacts rated to 30V, 1A resistive loads. External
protection diodes must be installed when driving inductive loads such as power relays.
Inputs
Native Inputs
Native inputs are connected to terminals marked INPUT1 to INPUT8. Wiring depends on the
type of input selected.
1. “SWITCH”, “COUNTER”, “EVENT”, “DAILY TOTAL”, “UTILITY METER” and
“HYDSTRA RAIN types:
+
Spider SMS LC
IN X
Switch
Spider SMS LC system ground
Page 13
-
HALYTECH
Spider SMS LC User Manual
2. “ANALOGUE” type accepts an analogue voltage from 0 – 2.5V. The following
diagrams show wiring details for most common sensor types.
(i) 2-WIRE 0 - 20 mA and 4 – 20 mA current loop sensors require an external 120
Ohm, ¼ W resistor (supplied):
Sensor
-
+
+
+
Power
Supply
Spider SMS LC
IN X
120 Ohm ¼ W
Resistor
-
-
Spider SMS system ground
(ii) 4-WIRE 0 - 20 mA and 4 – 20 mA current loop sensors require an external 120
Ohm, ¼ W resistor:
120 Ohm ¼ W
Sensor
Resistor
Power
Supply
+
+
+
+
Spider SMS LC
IN X
-
-
-
-
Spider SMS system ground
(ii) Voltage inputs may require up to two external resistors:
Rx
+
+
Sensor
Spider SMS LC
IN X
Ry
Spider SMS system ground
SENSOR RANGE
0 – 2.5V
0 – 5V
0 – 10V
VALUE OF Rx
None required
1 Kohm ¼ W metal film
3.3 Kohm ¼ W metal film
-
VALUE OF Ry
Leave out
1 Kohm ¼ W metal film
1 Kohm ¼ W metal film
NOTE: You may be able to use the AUX 1 connector to supply the power to your
analogue sensor. Please refer to the next section titled “Auxiliary connectors” for more
information.
Page 14
HALYTECH
Spider SMS LC User Manual
Intelligent Inputs (if installed)
•
•
SDI-12: Please refer to Appendix I for SDI-12 connection and operation details
Wireless: Please refer to Appendix J for Wireless connection and operation details
Auxiliary Connectors
SPIDER SMS LC AUXILIARY CONNECTORS
Local Area Network (LAN) connector is used for connections to a PC, to a LAN or to a
SpiderWeb radio link.
AUX1 connector can be used to power analogue sensors. The leftmost pin (the pin closest to
the LAN connector) provides a switched source of power. Power is automatically switched off
when the Spider SMS LC enters the “sleep state”, thus greatly reducing system power
consumption. A warm-up period of approximately 4 seconds is provided when the unit reenters active state.
NOTE: Voltage provided by the power pin on the auxiliary connector will be the larger of the
battery voltage and the charger voltage. The pin is able to source up to 500mA of current.
An example of how to connect a two-wire 4-20 mA sensor to the Spider using the switched
power pin on the AUX1 connector is shown below:
Switched power
pin on AUX1
connector
Sensor
-
+
+
120 Ohm ¼ W
Resistor
Spider SMS LC
IN X
-
AUX2 connector is not used in a standard Spider SMS LC. It is reserved for future
enhancements and special applications.
Page 15
HALYTECH
Spider SMS LC User Manual
Setting up a Spider SMS LC for the first time
Depending on the model, a new Spider SMS LC must be connected to a GSM, NextG or a
CDMA mobile telephone network. Please refer to Appendix G for details.
Before proceeding, make sure that both the Spider SMS LC and your computer are set up
with correct, matching network parameters. Please refer to Appendix C and Appendix D for
details.
A new Spider SMS LC is shipped from the factory with a default, generic setup. You may wish
to change this setup and customise the Spider for your application.
Setting up a Spider SMS LC involves one or more of the following steps:
1.
2.
3.
4.
5.
6.
7.
8.
9.
10.
Setting location
Setting date and time
Setting your username and password
Configuring Inputs
Calibrating Analogue Inputs (if present)
Scaling Counter and Event Inputs (if present)
Setting Control names and optionally programming the timer
Setting up Alarms
Setting up Network parameters
Setting up E-mail parameters (if e-mail option installed)
Connect to the Spider as described in Appendix B.
The ALARMS page will be displayed.
Clicking “VIEW SETUP” in the blue menu pane on the left will display the following page:
This page allows inspection of all Spider SMS LC programmable parameters, without making
any changes.
(Depending on the installed options, your page may look different from the one above.)
Page 16
HALYTECH
Spider SMS LC User Manual
To actually make changes, click on “CHANGE SETUP” on the blue menu pane. A
confirmation message will appear. Click “OK” to proceed. The following page will be
displayed:
(Depending on the installed options, your page may look different from the one above.)
NOTE: As indicated by the confirmation message, accessing the “Change Settings” page
automatically disables logging, alarm generation, timers, timer overrides and resets all active
alarms. You can ignore the message here as we are setting up the device for the first time.
Setting Location
It is important to choose a unique location name for each Spider SMS LC. The location name
is sent at the beginning of each SMS and e-mail transmission to identify the particular Spider
device.
If not already displayed, access the “CHANGE SETUP” page as described in “Setting up a
Spider SMS LC for the first time” above.
Click “Change Location / SMS PIN”.
Enter a unique location name for this particular Spider. The name can be up to 16 characters
long. For this example, let’s use “Mudgee STP” as the name. Simply type this into the space
provided.
Page 17
HALYTECH
Spider SMS LC User Manual
You can exit at any time without making changes by clicking the “Cancel” link.
Save the new value by clicking on the “Save” button.
(This page is also used for entering the PIN for SMS control activate/deactivate commands.
Please refer to “SMS Commands” later in this manual for details.)
Setting Date and Time
If not already displayed, access the “CHANGE SETUP” page as described in “Setting up a
Spider SMS LC for the first time”.
Click “Change Date/Time”.
Confirm that the displayed date and time are correct. If you wish to change the date and/or
time simply enter the new values.
You can exit at any time without making changes by clicking the “Cancel” link.
Save the new values by clicking on the “Save” button.
Page 18
HALYTECH
Spider SMS LC User Manual
Setting User and Password
Only authorised users may access a Spider SMS LC. To connect to a Spider you must enter
a valid username and password. Failing to enter them, disables all access to the Spider.
Similarly, if a valid sequence is entered, but no activity takes place for 10 minutes, the access
is revoked and the user must again log in.
The Spider supports two levels of access. Administrators have unrestricted access, while
“normal” users can interrogate the device but cannot make any changes.
Usernames and passwords are programmable. Factory defaults for an administrator are
“user” and “changeme” respectively, while for the normal user they are “user” and “user”. It is
strongly advised that these be changed as soon as possible to prevent unauthorised access.
If you forget your new username or password, you will no longer be able to connect to a
Spider SMS LC. Please contact Halytech or its agent for assistance.
To change the usernames and/or passwords access the “CHANGE SETUP” page as
described in “Setting up a Spider SMS LC for the first time” earlier in this section.
Click “Change User / Password”.
Enter the new names and passwords.
You can exit at any time without making changes by clicking the “Cancel” link.
Save the new values by clicking on the “Save” button.
Page 19
HALYTECH
Spider SMS LC User Manual
Configuring Inputs
Decide how your inputs will connect to the Spider.
As described earlier in “Inputs” every Spider SMS LC input can be configured in one of the
following seven modes: switch closure (digital), analogue, counter, event, daily total, utility
meter and disabled.
Switch, counter, event, daily total, hydstra rain and utility meter inputs accept simple ON/OFF
sensors.
Analogue inputs accept a variety of transducers such as temperature sensors, water level
sensors etc.
For example, you may want to monitor only 3 Inputs. The first two will be switch (digital) type,
monitoring operating status of two pumps. The third will be an analogue input monitoring a
tank level. Let’s assume that “Pump status 1” will connect to Input 1, “Pump status 2” to Input
2 and “Tank level” to Input 3.
The remaining 5 inputs will be disabled.
If not already displayed, access the “CHANGE SETUP” page as described in “Setting up a
Spider SMS LC for the first time” earlier in this section.
Click “Change Input Setup”.
Select “Switch” Input Type for the first two inputs and “Analog” for the third one. Select
“Disabled” for the remaining five inputs.
Enter “Pump status 1” as the Input 1 Name, “Pump status 2” as the Input 2 Name and “Tank
level” as the Input 3 Name.
Switch (digital) inputs are logged automatically when their state changes. A switch input must
be stable for a minimum of 5 seconds for a new state to be recognised.
Event, daily total and Hydstra Rain (if installed) inputs automatically log every event (or
pulse).
Analogue and counter inputs, allow you to set their measurement units, whether you wish to
log them and if so, the minimum change required to be logged.
Page 20
HALYTECH
Spider SMS LC User Manual
The minimum change for each input works in conjunction with the “Scan period” which is
common to all inputs and is also settable from this page.
Please refer to Appendix A for a summary of input types and their capabilities.
In the example above, “Tank Level” is measured in millimeters (“mm”). It is checked for
change every 30 minutes and logged if it changes by more than 50 mm. (If you want to log
the level every 30 minutes regardless of by how much it changes, simply set the minimum
change to 0.)
The same page also determines the logging of the 3 System Monitors. These are 3 additional
system inputs which monitor the battery charger status, battery voltage and system
temperature. System monitors logging is configured in a similar manner as described above.
You can exit at any time without making changes by clicking the “Cancel” link.
Save the new values by clicking on the “Save” button.
NOTE: Please refer to Appendix I or Appendix J if you are operating a Spider fitted with an
optional SDI-12 or Wireless Sensor interface respectively.
Calibrating Analogue Inputs (if present)
Analogue inputs should be calibrated prior to being used.
The system offers a choice of calibration methods:
1. 2-point calibration
2. Manual calibration
3. Offset change only
2-point calibration
Let’s continue with the previous example and calibrate a 4-20 mA water level transducer with
a 0 – 1000 mm range connected to Input 3. We will firstly use the “2-point” calibration method.
If not already displayed, access the “CHANGE SETUP” page as described in “Setting up a
Spider SMS LC for the first time” earlier in this section. Select ”Calibrate Tank level” from
“Select Input to Calibrate or Scale”. A page giving calibration choices will be displayed. Select
“2-point calibration” and click on “Proceed”.
The following page will be displayed:
Page 21
HALYTECH
Spider SMS LC User Manual
Follow the instructions step by step.
NOTE: The two calibration points can be any two values within the transducer range.
However, they must be at least a half of the transducer range apart.
You can exit at any time without making changes by clicking the “Cancel” link.
Save the new values by clicking on the “Save” button.
Manual calibration
User inputs are calculated with the following formula:
Calibrated value = Scaler x (Raw Value) + Offset
Manual calibration allows direct entry of the “Scaler” and “Offset” quantities.
(The same formula is used in the 2-point calibration. The 2-point calibration procedure
automatically calculates the “Scaler” and the “Offset”.
Offset change only
It is sometimes desirable to change the required reading slightly, without performing a
complete calibration. This option allows you to do just that. It lets you increase or decrease
the reading by the required amount. Internally, the Spider takes the entered amount and adds
it to the Offset described in the previous section.
Page 22
HALYTECH
Spider SMS LC User Manual
Calibrating Counter Inputs (if present)
You can calibrate Counter Inputs in two ways:
1. You can scale them and
2. You can pre-set the counter to a particular reading
Scaling is useful to make the counters read engineering values. For example, your water
meter may be producing one pulse per 5 litres of water flow. Hence, to make the counter
register in litres, you would set the scaler to 5.
NOTE: A Spider counts internally from 0 to 99,999 before it “wraps around” to 0. The actual
range will be multiplied by the “Scaler”. So, a scaler of “5” will produce an effective counter
range of 0 to 499,995.
It is sometimes required to pre-set the counter to a particular value. For example, you may
wish to connect a water meter to a Spider and want to make the Spider’s starting point the
same as the reading on the meter.
To do that, simply enter the required reading in the “Offset” field.
Scaling Event, Daily Total and Hydstra Rain Inputs (if present)
You can scale Counter and Event Inputs by specifying a “Scaler”. A new scaled value
obtained by multiplying the raw counter reading by the “Scaler” will be used for all functions
including logging, alarms etc.
If scaling is not required, simply leave it set to “1”.
NOTE: Scaled inputs will no longer wrap around from 99,999 to 0. The “wrap-around” value
will be affected by the “Scaler”.
To change scaling for an input, firstly access the “CHANGE SETUP” page as described in
“Setting up a Spider SMS LC for the first time” earlier in this section. Select ”Scale <your
input>” from “Select Input to Calibrate or Scale”. Enter the new “Scaler” value on the newly
displayed page.
You can exit at any time without making changes by clicking the “Cancel” link.
Save the new values by clicking on the “Save” button.
Setting Controls
Decide how your controls will connect to the Spider.
For example, you may want to control only 2 outputs.
(Spider SMS LC Controls need not be used sequentially. Unused controls may be
interspersed with used controls.)
Let’s assume that “AUX PWR ON” will connect to Control 1. It will be activated manually
either via the browser or by sending an SMS command to the Spider. Therefore the timer will
not be required for this Control Output.
“SPRINKLER” will connect to Control 2. It will turn on the sprinkler every weekday at 9 AM
and turn it off at midday. On weekends the sprinkler will come on at 6 PM and turn off at 8
PM. We will use the timer for this.
Page 23
HALYTECH
Spider SMS LC User Manual
If not already displayed, access the “Change Settings” page as described in “Setting up a
Spider SMS for the first time” earlier in this section.
Select “Change Control 1” from “Select Control to Change”.
Enter “AUX PWR ON” into the Name: field and select Timer “Off” radio button. (As the Timer
for this control is disabled, you can ignore the timer schedule on the bottom half of the page.)
You can exit at any time without making changes by clicking the “Cancel” link.
Save the new values by clicking on the “Save” button.
After saving the values for Control 1, select “Change Control 2”.
Enter “SPRINKLER” into the Name: field and select Timer “On” radio button. Program the
timer by ticking the times when the sprinkler should be on. To tick/un-tick a time, simply click
on the appropriate square.
Page 24
HALYTECH
Spider SMS LC User Manual
Setting up Alarms
Decide how many alarms will be used. Each alarm has a programmable name, trigger source,
SMS text, 3 telephone numbers and the ability to activate or deactivate a control.
E-mail option adds 2 e-mail addresses to the alarm configuration.
Voice option adds 3 voice telephone numbers to the configuration.
For example, let’s set up Alarm 1 as follows (assumes e-mail and voice options are installed):
Alarm Name:
Trigger Source:
Trigger Level:
Control Action:
SMS / E-mail / Voice Text:
Pump 1 fail
Pump status 1
“ON” i.e. trigger when source is “ON” or active
Control 1 ON - continuous
Pump 1 has failed
SMS Sending:
1st SMS Phone #:
2nd SMS Phone #:
3rd SMS Phone #:
enabled
0414111111
0414222222
0414333333
E-mail sending:
1st Email Address:
enabled
[email protected]
Voice sending:
1st Voice Phone #:
enabled
029123456789
If not already displayed, access the “Change Settings” page as described in “Setting up a
Spider SMS LC for the first time” earlier in this section.
Select “Change Alarm 1” from “Select Alarm to Change”.
Fill in the form with the details above.
The “SMS acknowledge time” is the period of time (in minutes) during which an alarm must be
acknowledged and to stop the Spider from sending SMS to the next number on the list. It can
be set to 0 to 60 minutes.
You can exit at any time without making changes by clicking the “Cancel” link.
Save the new values by clicking on the “Save” button.
Page 25
HALYTECH
Spider SMS LC User Manual
NOTES:
1. Trigger source is selected from the drop-down list. The list will display all available
inputs identified with their user-programmed names. All unused alarms should be
disabled by selecting “DISABLED” from the list.
2. Control action may be specified as continuous or pulsed. For example, the setting
“Control 1 ON” in the continuous mode will turn Control 1 on and leave it on. The
pulsed mode will turn Control 1 on for approximately 1 second and then turn it off.
3. Enabling “Auto Acknowledge” will automatically acknowledge an active alarm after a
user settable amount of time. (In other words, a user need not acknowledge the alarm
manually by sending an SMS or by using a browser.)
NOTE: Even with “Auto Acknowledge” enabled, the alarm will not start sending a new
series of messages unless the alarm goes inactive as well.
4. When entering phone numbers, enter digits only i.e. do not use spaces, brackets or
hyphens.
5. If you don’t need all 3 telephone numbers or both e-mail addresses, simply leave the
appropriate fields blank.
6. Available trigger conditions will change depending on the type of input used to trigger
the alarm.
For example, switch (or digital) inputs can trigger on the “ON STATE” or the “OFF
STATE”, while analogue inputs will allow triggering on “ABOVE”, “BELOW” or a rate
of change.
Please refer to Appendix A for details on input types and their triggering ability.
7. Alarms can initiate sending of Automatic reports (if installed). Please refer to
Advanced Operation – Automatic Reports for more information.
Page 26
HALYTECH
Spider SMS LC User Manual
Setting up Network Parameters
Spider SMS can connect to local area networks (LAN) and wide area networks (WAN).
LAN connections are primarily used for communications with local computers.
The Spider uses WAN connections to access the Internet in order to send e-mails and FTP
reports.
LAN settings
Please refer to Appendix C for more information about initial connection of a Spider SMS LC
to a Local Area Network (LAN).
To set up Network parameters, access the “Change Settings” page as described in “Setting
up a Spider SMS LC for the first time” earlier in this section.
Click on “Change Network Settings”.
Fill in the form with details appropriate for your network.
You will need to obtain this information from your network administrator.
Easy Connect settings:
• Select “ENABLED” for stand-alone Spiders (Spiders not connected to a local area
network (LAN)
• Select “DISABLED” for Spiders connected to a local area network (LAN)
NOTE: New settings will take effect after the device is powered down and then powered
up.
Page 27
HALYTECH
Spider SMS LC User Manual
WAN settings (if e-mail option installed)
WAN parameters need to be entered only if you wish to send e-mails or FTP reports.
Spider SMS LC can connect to the Internet using one the following three methods:
1. Local Area Network (LAN)
2. GPRS (for GSM and NextG models only)
3. Dial-up Internet
Select the desired WAN connection method. The page will change accordingly.
LAN:
You can use this option if the Spider is connected to a LAN which allows Internet access.
You will need to obtain the Gateway, Primary and Secondary DNS from your network
administrator
GPRS:
Use this option for remote Spiders fitted with GSM and NextG modems.
Page 28
HALYTECH
Spider SMS LC User Manual
Access Point Name (APN) is provided by the mobile phone company which supplied your
SIM card. At the time this manual was issued, the correct settings for common Australian
networks were:
Telstra APN:
Optus APN:
Vodafone APN:
telstra.internet
internet
vfinternet.au
IMPORTANT NOTE: Above settings are given in good faith. Halytech or its agents accept no
responsibility for their accuracy.
Dial-up Internet:
Use this option for remote Spiders fitted with CDMA modems.
Telephone #, User name and Password are supplied by your Internet Service Provider (ISP).
Users of Spider SMS units fitted with CDMA modems connected to the Telstra network with
1X access and within 1X coverage should use the following settings:
Telephone #:
User name:
Password:
#777
[email protected]
telstra
Users of Spider SMS units fitted with CDMA modems connected to the Telstra network
without 1X access should use the following settings:
Telephone #:
User name:
Password:
#777
qncuser
ssqnc
IMPORTANT NOTE: Above settings are given in good faith. Halytech or its agents accept no
responsibility for their accuracy.
Page 29
HALYTECH
Spider SMS LC User Manual
Setting up E-mail Parameters (if e-mail option installed)
E-mail parameters need to be entered only if you wish to send e-mails.
To set up E-mail parameters, access the “Change Settings” page as described in “Setting up
a Spider SMS LC for the first time” earlier in this section.
Click on “Change E-mail settings”.
Fill in the form with details appropriate for your network.
You will need to obtain this information from your network administrator or your mobile service
provider.
At the time this manual was issued, the correct settings for common Australian mobile
networks were:
Telstra SMTP mail server for both CDMA and GSM(GPRS):
Optus SMTP mail server for GSM (GPRS):
Vodafone SMTP mail server for GSM (GPRS):
mail.bigpond.com
mail.optusnet.com.au
smtp.vodafone.net.au
My e-mail address: In the process of sending an e-mail, the Spider SMS must identify itself to
the mail host computer with a valid e-mail address. Set this parameter to a known valid
address, acceptable to your mail host. This address is shown in the e-mail as the “From”
address.
NOTE: if the e-mail is accepted by the host but cannot be delivered, the failure notice will be
sent to this address. (Perhaps if you set this to your own e-mail address, you can monitor emails that can’t be delivered!!)
Test e-mail address: Test e-mails are sent to this address.
This is a special feature of the Spider SMS allowing a rapid and user friendly way of setting
up and verifying Spider SMS e-mail connectivity. Please refer to Appendix H for details.
SMTP authentication:
Most SMTP servers do not need authentication and hence this field should be left
“DISABLED”.
If your server does require authentication, select “ENABLED” and enter a user name and a
password. You can obtain these from your network administrator.
Page 30
HALYTECH
Spider SMS LC User Manual
Network Glossary
The Network and E-mail sections used several networking terms. All of these are standard
network parameters as used in IT. Detailed explanations are beyond the scope of this
document. However, here is a brief explanation of each parameter noting any special
relevance to the Spider SMS LC implementation:
My IP Address (*): current IP address of Spider SMS LC. This is the same as the value
shown on the LCD display.
Network Mask (*): Network mask. This is the same as the value shown on the LCD display.
Gateway (*): IP address of a computer allowing access from the local network to the Internet.
Primary DNS (*): IP address of the primary domain name server. The server performs
translation from domain names such as “halytech.com.au” to ‘dotted ip’ format such as
“192.168.0.187”.
Secondary DNS (*): IP address of the secondary domain name server. The server performs
the same function as the Primary DNS. It is contacted only if there is no reply from the
Primary DNS.
SMTP mail server: address of a computer serving as a mail host. Spider SMS LC will contact
this computer to send the actual e-mail. The address may be given as a name e.g.
“mail.somewhere.com.au” or as a ‘dotted IP’ address e.g. “203.16.222.34”.
NOTE: You must power down and then power up the Spider before the new values marked
with (*) take effect.
Page 31
HALYTECH
Spider SMS LC User Manual
Save Settings to Disk
Once you have configured a Spider SMS for your application you can save all the settings on
your computer. This is useful as a backup or if you have multiple Spiders and you wish to
save a “template” that can be uploaded to other Spiders with very similar settings. Then,
instead of entering all parameters from scratch you can simply edit the ones that need to be
changed.
To save the settings simply click on the “Save Settings to Disk” link. The computer will prompt
you whether to open or save the configuration. Choose “Save” and when prompted enter the
name of a file which will hold your settings.
Load Settings from Disk
Once you have saved system settings as described above, you can upload them to any other
Spider.
To load the settings click on the “Load Settings from Disk” link. The computer will prompt you
to enter the name of a file containing the settings. Enter the name of the file or select a file
anywhere on your computer by clicking on “Browse”.
NOTE: Loading settings from disk will overwrite your current settings.
Exiting Change Settings Mode
Logging, alarm activation, timers and timer overrides are all disabled while in the change
settings mode.
To exit change settings mode click “EXIT CHANGE SETTINGS” link on the bottom of
“Change Settings” page.
This will immediately restart logging, alarm generation and all enabled timers.
NOTE: any timer overrides active prior to entering the “Change Settings” page are not reinstated on exit.
Setup change mode is automatically exited after 10 minutes of inactivity.
Page 32
HALYTECH
Spider SMS LC User Manual
Normal Operation
Front Panel Display
Spider SMS LC is equipped with a two-line display and a one-key keypad. They are used for
quick operational checks and basic setup. Their convenience lies in the fact that using them
requires no external equipment such as laptop computers or mobile phones.
Normally, the display shows:
SPIDER SMS
Signal: G65%
“Signal: G65%” indicates the current cellular phone signal strength. The higher the number,
the stronger the signal. As a rough rule-of-thumb, a value of 41% and above is acceptable.
Signal strength is updated every 5 seconds. The letter preceding the percentage value
indicates the type of mobile network used by the particular Spider SMS. A “G” represents the
GSM network, an “N” represents a NextG network and a “C” represents a CDMA network.
Value “??“ or “—“ indicates that there is no mobile phone coverage in the present location,
there is no valid SIM card inserted (GSM models only) or that the cellular phone module
inside the Spider is not responding. (Is the antenna plugged in?) It is a normal indication
during power-up and immediately following remote access. It typically lasts less than 60
seconds.
If however, this display persists, contact Halytech or its agent.
During a telephone call (remote access) the display shows:
SPIDER SMS
Remote Access
Different display screens are accessed by briefly pressing the keypad key. Each key press
will display a new screen. Different screens are:
1.
2.
3.
4.
5.
6.
7.
8.
9.
10.
Current date and time
Current state of inputs
Current states of battery charger and battery voltage
Current value of system temperature
Current state of Alarms 1 – 4 (AL1 – AL4)
Current state of Alarms 5 – 8 (AL5 – AL8).
Active alarms are indicated by “Axx” where xx is the current alarm status code –
Please refer to section “SMS Alarms” for additional information on the status codes.
Inactive alarms are indicated by an “I”.
Disabled alarms are indicated by a “D”.
Current state of Controls 1 to 4 (CN1 – CN4). Active Controls are indicated by a “1”
and inactive ones by a “0”
Current state of Controls 1 to 4 (CN1 – CN4). Active Controls are indicated by a “1”
and inactive ones by a “0”
Current LAN IP address and IP Mask
Sending of test e-mail messages. (Refer to Appendix H for additional information)
Page 33
HALYTECH
Spider SMS LC User Manual
Communicating with a PC
Spider SMS LC uses an intuitive, user-friendly, web-browser system. You can use any
standard browser on any computer to communicate with the Spider. No special software is
required.
Communicating with the Spider is identical to “Surfing the Internet”. Information is displayed
by clicking links and buttons.
You can connect to a Spider SMS LC either locally via a cable or remotely via a modem.
Once connected, operation is identical regardless of connection. The only difference you may
notice with a remote connection is a slightly slower response.
Connect to the Spider as described in Appendix B.
A successful log-on will automatically display the Alarms screen.
Alarms
Current alarm states are displayed automatically following a successful log-on. The same
screen can be displayed at any time by clicking “ALARMS” on the blue menu pane on the left.
All alarms are identified by their user-programmed names.
The display shows the state of all alarms at the time the page was displayed. The page
automatically updates every 10 seconds.
Active alarms provide additional information about the progress of the alarm sequence by
displaying a numerical code. Please refer to section “SMS Alarms” for the key to the code.
Page 34
HALYTECH
Spider SMS LC User Manual
Acknowledging Alarms
Active alarms can be acknowledged individually by contacting the Spider and clicking the
particular alarm.
ALL active alarms may be acknowledged at once by clicking on the link at the bottom of the
main pane.
If there are no active alarms, the command will be ignored.
Alarms with “Auto Acknowledge” enabled will be acknowledged automatically after the set
period of time. You may still manually acknowledge such an alarm, if desired.
Inputs
Current input states are displayed by clicking “STATUS” on the blue menu pane on the left.
All Inputs signals are identified by their user-programmed names.
The display shows the state of all Inputs at the time the page was displayed. The page
automatically updates every 10 seconds.
Controls
Current Controls and their associated Timer and Timer Override states are displayed by
clicking “CONTROLS” on the blue menu pane on the left. All Controls are identified by their
user-programmed names.
The display shows the state of all Controls at the time the page was displayed. You can
change as many outputs at once as you wish by clicking “ON” or “OFF” selectors as required
and then clicking the “Save” button. The page will be updated to reflect the new Control
states.
Page 35
HALYTECH
Spider SMS LC User Manual
History
Spider SMS LC logs:
1.
2.
3.
4.
5.
6.
7.
8.
9.
Input changes
Control changes
Alarm activations and resets
SMS transmissions and their outcomes
SMS command reception
E-mail transmissions and their outcomes (If e-mail option installed)
Voice transmissions and their outcomes (If voice option installed)
Daily report outcomes (If e-mail option installed)
System messages
Each log record consists of a date and time stamp to a resolution of 1 second, numeric record
identifier and a short text describing the record. You can selectively download logged data.
Logged data is downloaded by first clicking “HISTORY” on the blue menu pane on the left.
Next, specify the period of interest and the number of records to download by filling in the
form.
Data is downloaded “backwards” in time. In other words, the most recent records are
downloaded first. In order to minimise amount of data being transferred, you can specify the
date and the time of the first record and the maximum number of records to download.
Page 36
HALYTECH
Spider SMS LC User Manual
Click “Get History” button to start the download.
Data is downloaded as a “CSV” file. Download can automatically start Microsoft Excel
program on your computer (if installed) to show, edit or store the data.
About
“About” screen displays system information such as software version as well as the contact
details for Halytech.
Page 37
HALYTECH
Spider SMS LC User Manual
SMS Alarms
When an input triggers an alarm with SMS sending enabled, an alarm sequence will start.
Current state of an active alarm is shown on the LCD display and the ALARMS page as a
code. The code has the following meaning:
ALARM
CODE
RST
1
2
3
4
5
6
7
8
9
10
MEANING
Alarm has been acknowledged, but the trigger source is still
active. Trigger source must go inactive before another
alarm sequence can be started.
Spider is attempting to send 1st SMS to 1st phone number.
Spider is attempting to send 2nd SMS to 1st phone number.
Spider is attempting to send 3rd SMS to 1st phone number.
Spider is attempting to send 1st SMS to 2nd phone number.
Spider is attempting to send 2nd SMS to 2nd phone number.
Spider is attempting to send 3rd SMS to 2nd phone number.
Spider is attempting to send 1st SMS to 3rd phone number.
Spider is attempting to send 2nd SMS to 3rd phone number.
Spider is attempting to send 3rd SMS to 3rd phone number.
Spider has made a maximum of 9 SMS send attempts
without receiving a reset command. No more send attempts
are being made.
Transmitted alarm SMS messages have the following format:
Location: SMS text (Send ‘RST Alx’ to reset)
Where:
“Location” is the programmed Spider SMS location
“SMS text” is the programmed SMS text for this particular alarm
“x” is this particular alarm number (1 – 8)
So, if we use the examples programmed in the section “Setting up a Spider SMS for the first
time” the first alarm SMS will be sent to 0414111111 and will be:
Mudgee STP: Pump 1 has failed (Send ‘RST AL1’ to reset)
The alarm sequence may be reset simply by replying with the received message (no typing
required !!), or by replying with RST AL1 or by connecting to the Spider with a PC and
resetting the alarm as described in “Resetting Alarms”
NOTE: Alarms will be registered while in the Remote Access mode, but SMS messages will
not be sent until Remote Access mode terminates.
Page 38
HALYTECH
Spider SMS LC User Manual
SMS Commands
Spider SMS can receive and respond to specially coded SMS commands. The commands
may:
1. Get the current state of all status signals
2. Get the current state of all controls
3. Reset an active alarm
4. Reset all active alarms
5. Activate and deactivate controls - can be protected with a 4 digit PIN
6. Request Daily Report containing all of current day’s data (if e-mail option installed)
The following SMS commands are recognised:
Command
HELP
GET ST
GET SYS
GET CN
RST ALx
RST ALL
ON CNx
yyyy ON CNx
OFF CNx
yyyy OFF CNx
PULSE CNx
yyyy PULSE CNx
GET REP
Comment
Request list of supported commands
Get current state of all status signals
Get current state of system monitors
Get current state of all controls
Reset Alarm x (x is 1 – 8)
Reset all active alarms
Activate control x (x is 1 – 8) (no PIN)
Activate control x (x is 1 – 8) (PIN =yyyy)
Deactivate control x (x is 1 – 8)
Deactivate control x (x is 1 – 8) (PIN =yyyy)
Pulse control x for 1 second (x is 1 – 8)
Pulse control x for 1 second (x is 1 – 8)
(PIN =yyyy)
Request Daily Report
(available only if e-mail option installed)
Example
HELP
GET ST
GET SYS
GET CN
RST AL6
RST ALL
ON CN2
1234 ON CN2
OFF CN4
1234 OFF CN4
PULSE CN4
1234 PULSE CN4
GET REP
After a Spider SMS LC receives an SMS command it will interpret it and act on it. Invalid
commands will be ignored. Valid commands will be acknowledged with a return SMS:
Location: OK SMS command
Where:
“Location” is the programmed Spider SMS location
“SMS command” is the SMS command
So once more using the programmed example, the acknowledgement SMS will be:
Mudgee STP: OK RST AL1
Control activation and deactivation commands may be protected with a 4 digit PIN. If the PIN
is set to “0000” it is effectively disabled. Any other 4 - digit number will enable the PIN. You
can change the PIN at any time by accessing the Spider SMS either remotely or locally with a
computer and entering the PIN as described in “Setting up a Spider SMS LC for the first time”,
“Setting Location” earlier in this manual.
NOTES:
1. Commands may be in lower or upper case or a combination of both
2. There must be only one space between the words of a command
3. SMS commands will be ignored while in the Remote Access mode. Therefore if an
SMS command is not acknowledged by a return SMS within approximately 1 minute,
send the command again after a short period of time.
Page 39
HALYTECH
Spider SMS LC User Manual
Voice Option (if installed)
Spider SMS units fitted with the voice option can make and receive calls from any telephone
and speak to the user. The Spider utilises text-to-speech technology with unlimited
vocabulary - requiring no recordings or word downloads. The Spider simply reads what is
written.
Due to differences in mobile networks, the voice option operates slightly differently depending
on what type of modem is installed in your Spider.
GSM units only:
The communication is intuitive and interactive. The user makes requests through the
telephone keypad and the Spider talks back. The keypad commands are arranged in a
“TV-remote” like fashion.
Main menu keys 2, 5, and 8 can be pressed at any time to immediately listen to active alarms,
inputs and controls respectively.
If you want to repeat or skip a reading, simply use CHANNEL+ (6) and CHANNEL– (9) keys.
Volume can be changed with VOLUME+ (4) and VOLUME- (7) keys.
Calling a Spider (GSM units only)
You can call a Spider from any telephone. Simply dial the Spider’s voice number. The Spider
will answer the call and identify itself. It will then read the menu. Press the number
corresponding to the information you want and listen to the response.
You can hang up at any time.
Voice Alarm Dialling (GSM units only)
If you enabled voice alarm dialing for a particular alarm and the alarm triggers, the Spider will
attempt to dial the programmed voice numbers.
Page 40
HALYTECH
Spider SMS LC User Manual
If a call is answered, the Spider will identify itself and repeat the programmed alarm message
three times.
The user can acknowledge all active alarms and / or request current inputs and controls by
pressing appropriate numbers on the telephone keypad.
CDMA units only:
The CDMA network does not allow interaction with the Spider by using your telephone
keypad.
Consequently, Spiders fitted with CDMA modems support simplified voice option operation,
requiring no user input from the telephone keypad.
Calling a Spider (CDMA units only)
You can call a Spider from any telephone. Simply dial the Spider’s voice number. The Spider
will answer the call and identify itself. It will then read a list of active alarms (if any) followed
by the current readings of all enabled user and system inputs.
You can hang up at any time.
Voice Alarm Dialling (CDMA units only)
If you enabled voice alarm dialing for a particular alarm and the alarm triggers, the Spider will
attempt to dial the programmed voice numbers.
As soon as the dialing attempt is made, the Spider will start speaking. It will identify itself and
repeat the programmed alarm message three times.
You can acknowledge all active alarms by waiting for the Spider to finish speaking and then
calling it back.
Page 41
HALYTECH
Spider SMS LC User Manual
Advanced Operation
Automatic Reports (if installed)
Spider SMS LC can be set up to automatically send reports. A report can be sent by e-mail
and/or by File Transfer Protocol (FTP).
There are 3 types of automatic reports, all operating independently of each other:
•
•
•
Daily reports
Periodic reports
Ad-hoc reports
Daily reports are sent once per day, at a user selectable start time. They contain all data
collected in the previous 24 hour period. So, for example, if the user sets the Daily report start
time to 4:00, the report will contain the data between 4:00 AM the previous day to 03:59 AM
on the current day.
Periodic reports can be sent every hour, every 3 hours, every 6 hours or every 12 hours, as
selected by the user. They are always “lined-up” with real time. So, 6-hourly periodic reports
will be sent at 06:00, 12:00, 18:00 and midnight. Each report contains the data collected in the
previous reporting period.
Ad-hoc reports are initiated by a user SMS command or by an active alarm with “send
Report” setting set to YES.
Ad-hoc reports initiated by alarms contain data collected in the current day.
User can request an ad-hoc report containing data for a single day up to 7 days in the past.
For example, sending the command “GET REP” will request a report with the current day’s
data. A command “GET REP3” will request all data collected in the single day, 3 days ago.
(NOTE: there is no space before the digit ‘3’)
Each e-mail report has a spreadsheet file attached to it. The file contains all data logged over
the applicable period. Reports can be sent to up to three different recipients. Up to three
attempts will be made to send an e-mail report. All attempts are logged.
An FTP report automatically delivers the logged data file to an FTP server. Up to three
attempts will be made to send an FTP report. All attempts are logged.
Report files are available in two formats: raw and filtered.
Raw format is identical to the Spider logged file format described in Appendix E. It contains all
logged data including system information such as reception of SMS messages, outcome of
alarms, reports etc.
Filtered format provides data in a simpler form. It contains only logged input data. The filtered
file format is described in Appendix F.
You can also choose the time order in which data is given. Data may be presented in
ascending or descending time order.
The Spider makes up to three attempts to send each report – maximising the transmission
success rate even under difficult communications conditions.
Daily reports are provided with “Daily report recovery”. This feature is especially useful for
automated data collection systems. If a daily report transmission fails three times as
described above, the next day’s report will contain the data for that day and the previous day.
This process is repeated for up to 7 days in the past. The maximum size of such a multi-day
report is 24,000 records.
Page 42
HALYTECH
Spider SMS LC User Manual
To configure daily reports, access the “Change Settings” page as described in “Setting up a
Spider SMS LC for the first time” earlier in this document. Click “Change Daily Report
Settings”.
NOTES:
1. Automatic report function requires that both Network and E-mail option be configured
correctly. Please refer to “Setting Up Network Parameters” and “Setting Up E-mail
Parameters” earlier in this document for additional instructions.
2. Automatic report files are named as follows:
a. Daily report:
(first 8 chars of Location)_(date).csv
Example:
Location_291205.csv
b. Periodic report:
(first 8 chars of Location)_(date)_(time of first transmission attempt)P.csv
Example:
Location_291205_1105P.csv
c.
Ad-hoc report (for current day):
(first 8 chars of Location)_(date)_(time of first transmission attempt).csv
Example:
Location_291205_1105.csv
d. Ad-hoc report (for x days ago), where x is between 1 and 7:
(first 8 chars of Location)_(date x days ago)_2359.csv
Example:
Location_271205_2359.csv
Blanks in the Location part of the filename will be replaced by ‘-‘ characters
Page 43
HALYTECH
Spider SMS LC User Manual
Spider SMS Power Options
Spider SMS LC is designed specifically for low power, battery operated applications. The
standard battery complemented with a solar panel can provide sufficient power for many
months of unattended operation.
Two user selectable options provide advanced power management for special applications.
IMPORTANT NOTE:
Advanced power settings should only be changed by experienced users. Selecting the
“wrong” option can result in inability to remotely connect to a Spider SMS, in drastically
reduced battery life or even a complete battery failure.
Always-on Operation
Spider SMS LC is normally in the “sleep” state. This state is indicated by a blank LCD display.
The system automatically “wakes-up” as required to scan analogue inputs, log, receive &
send SMS, e-mails etc. It remains “awake” for the shortest possible time and the goes back to
“sleep”.
The main advantage of the LP (Low Power) mode is greatly reduced power consumption and
increased battery life. The LP mode is the default mode, recommended for most applications.
The disadvantages of the LP mode are:
1. Ethernet (Local Area Network- LAN) port is not available during “sleep”
2. Analogue channels are not scanned during “sleep”
It is possible to keep the system continuously “awake” by selecting the “Always-on” power
mode.
NOTE: Always-on mode should only be selected for mains-powered applications when
continuous LAN access or faster analogue input scanning is desired. At all other times
the default LP mode should be used.
To change the operating mode, access the “Change Settings” page as described in “Setting
up a Spider SMS LC for the first time” earlier in this document. Click “Change Power
Settings”.
In “System Power:” select “LOW POWER (default)” or “ALWAYS ON” as desired.
Page 44
HALYTECH
Spider SMS LC User Manual
Extra Low Power Operation – Modem Scheduling
Spider SMS LC power consumption may be drastically reduced by scheduling the times
during the day when the internal modem is powered up. The modem consumes
approximately 90% of the power while the unit is in its normal mode i.e. when the display is
blank.
This dramatic improvement in power consumption comes at the cost of the ability to remotely
connect to the Spider SMS LC. Modem scheduling lets you customise your application by
finding an optimal combination of remote access times and power consumption.
NOTE: During the scheduled modem OFF times, only the remote access is unavailable.
Alarm initiated SMS and e-mail transmissions will operate normally.
Modem scheduling is disabled by default, i.e. the modem is always turned on.
To enable modem scheduling, access the “Change Settings” page as described in “Setting up
a Spider SMS LC for the first time” earlier in this document. Click “Change Power Settings”.
The following page is displayed. (If the “Daily Power Schedule” is not shown, click on
“CONTROLLED BY SCHEDULE”).
To control the hours of the day when the modem is on, simply click on the relevant box. In the
example above, the modem will be on between 10:00 AM and 11:59 AM every day.
Page 45
HALYTECH
Spider SMS LC User Manual
One Spider Controlling Another Spider via SMS
Spider SMS units fitted with software versions 1.33 or higher can control other Spiders via
SMS.
This is accomplished by using alarms which send specialised SMS commands.
The three supported SMS commands are:
ON REMx
OFF REMx
PLS REM x
- to turn control x on the remote Spider ON
- to turn control x on the remote Spider OFF
- to pulse control x on the remote Spider ON and then OFF after 1
second
(x is the control number between 1 and 8 on the remote Spider).
As an example, we will consider a system comprising two Spiders. The local Spider is
measuring a water level. Depending on the water level the local Spider sends SMS
commands to the remote Spider to start and stop a pump controlled by the remote Spider.
There is no special setup required for the remote Spider. We will assume that the pump is
controlled by CONTROL 3.
Lets assume that the remote pump should be on when the local water level is below 1m and
should be off if the level is at or above 1m.
Setup a local Spider input to measure the water level.
Set an alarm to perform the pump activation as follows:
Operation:
1. When the water level goes below 1m the alarm will trigger.
2. The local Spider will send a special message to the remote Spider requesting that the
remote Spider’s CONTROL 3 be turned ON.
(NOTE: The local Spider does not send ‘On rem3’, rather it sends a specially coded
Page 46
HALYTECH
Spider SMS LC User Manual
command containing its own time, alarm number and the desired action.)
3. If the remote Spider receives the special command and it is within 10 minutes of its
own time, it will turn CONTROL 3 ON. It will then send a response SMS to the local
Spider acknowledging the command and stopping further sending attempts by the
local Spider. Go to step 6.
4. If the remote Spider does not receive the special command or the command is not
within 10 minutes of its own time it will ignore the message but still send the
acknowledgement command.
5. The local Spider’s SMS acknowledge time is set to 3 minutes. If it does not receive an
acknowledgement from the remote Spider within that time, it will re-send the special
command. This process is repeated up to three times.
6. Auto Acknowledge time on the local Spider alarm is set to 60 minutes. Hence, 60
minutes after the alarm trigger, the alarm will be auto acknowledged (if not already
acknowledged by the remote Spider). This will allow the alarm to send a new series
of SMS commands if the water level goes inactive (above 1m) and the again goes
active (below 1m).
The Auto Acknowledge Time of 60 minutes ensures that remote SMS commands are
not sent more often than every 60 minutes, which could happen with water levels that
change quickly.
Using the same logic, setup another alarm on the local Spider to turn the pump off. Its trigger
should be Water level ABOVE 1m and the Message should be ‘Off rem3’, with all other
setting identical to the alarm described previously.
NOTES:
1. All alarm settings discussed above are examples only. You will need to adjust these
as appropriate for your application.
2. The transmitted SMS commands are time stamped and acted upon by the receiving
Spider only if the reception time is within 10 minutes of the command time stamp.
This minimises the possibility of false commands caused by network delays, SMS
delivery failures etc.
3. Reception of all remote SMS commands, whether within the allowed period or not are
logged by the remote Spider.
Remote control via SMS is supported only if both Spiders are fitted with software
version 1.33 or higher.
Remote control is supported only with the ‘On remx’, ‘Off remx’ and ‘Pls remx’ SMS
commands.
Attempting to use remote control with earlier software versions or other commands
may result in endless loops, excessive SMS transmissions and very large phone
bills!
Page 47
HALYTECH
Spider SMS LC User Manual
Software Upgrade
Spider SMS operating software can be upgraded both locally and remotely. Detailed upgrade
instructions are provided with new software.
Page 48
HALYTECH
Spider SMS LC User Manual
Appendix A: Spider Inputs
INPUT
TYPE
LOGGING
METHOD
LOGGING
RESOLUTION
ALARM
TRIGGER
CHOICES
TYPICAL
USE
SWITCH
AUTOMATIC
Within 5 s of change
ON STATE
OFF STATE
EVENT
AUTOMATIC
Within 5 s of pulse
RATE OF CHANGE
DAILY TOTAL
AUTOMATIC
Within 5 s of pulse
RATE OF CHANGE
HYDSTRA RAIN
(if installed)
AUTOMATIC
Within 5 s of pulse
RATE OF CHANGE
Switches, Status indicators, level
(float) switches
Tipping bucket rain gauge, any
sensor outputting less than 1 pulse
per 30 s with a minimum pulse width
of 0.1 s
Tipping bucket rain gauge, any
sensor outputting less than 1 pulse
per 30 s with a minimum pulse width
of 0.1 s
Tipping bucket rain gauge, any
sensor outputting less than 1 pulse
per 30 s with a minimum pulse width
of 0.1 s
COUNTER
SIGNIFICANT
CHANGE
AS SET BY USER
(SCAN PERIOD)
RATE OF CHANGE
UTILITY METER
EVERY SCAN
PERIOD
AS SET BY USER
(SCAN PERIOD)
RATE OF CHANGE
ANALOGUE
SIGNIFICANT
CHANGE
AS SET BY USER
(SCAN PERIOD)
ABOVE
BELOW
RATE OF CHANGE
Most voltage and current sensors:
temperature, pressure, signal
strength etc.
SYSTEM MONITORS
SIGNIFICANT
CHANGE
AS SET BY USER
(SCAN PERIOD)
ABOVE
BELOW
Built-in system monitors: battery
charger status, battery voltage and
system temperature
DISABLED
-
-
-
Page 49
Pulse type flow meters, any sensor
with a low frequency (<= 10Hz)
output
Water, electricity or gas meters. Any
pulse type meter with a low
frequency
(<= 10Hz) output
-
COMMENT
Must be stable for a minimum of 5 s.
Current state recorded every
midnight.
Logs time of pulse and pulse counter
that rolls over from 99,999 to 0.
Current count recorded as a special
event every midnight
Logs time of pulse and pulse counter
that rolls over from 99,999 to 0.
Current count cleared and recorded
as a special event every midnight
Logs time of pulse and scaled value
of input. Every midnight, the current
total count is recorded as a special
event. Once a day at a user specified
time, a value zero is recoded.
Counter rolls over from 99,999 to 0.
Current count recorded every
midnight.
Each logged data point is the number
of pulse in the previous scan period.
12-bit resolution.
Current value recorded every
midnight.
10-bit resolution.
Current value recorded every
midnight.
Disabled inputs are removed from all
display screens.
HALYTECH
Spider SMS LC User Manual
Appendix B: Connecting to a Spider
Local Connection
Ensure that the Spider SMS and your PC have matching network parameters. (Please refer to
Appendix C for details.)
Turn on the Spider SMS LC by pressing the button on the front panel. (The unit must be
turned on, i.e. the display must be showing something before you can establish a local
connection.)
Connect the Spider SMS to your network. If you want to connect your PC directly to the
Spider SMS, you can use the red “cross-over” network cable supplied with the Spider.
Start an Internet browser program such as “Microsoft Internet Explorer” on your PC.
Type:
192.168. 0.187
as the web address and press the return or enter key.
(If you changed the default IP address as described in Appendix C, then enter the new IP
address instead.)
The Spider SMS log-on page will be displayed on your PC. Enter your username and
password in the spaces provided. (Default values are “user” and “changeme” respectively.)
Click on the “Log in” button.
Alarms page will be displayed immediately following a successful log-on. You can now
examine other pages as described in “Connecting to a PC”
IN CASE OF DIFFICULTY
If you cannot connect to a Spider, check the following settings in your browser (Internet
Explorer 6 is described here, other browsers are similar):
1. Disable automatic dialing (In IE6: Tools->Internet Options->Connections, select
“Never dial a connection”)
2. Disable proxy servers (IN IE6: Tools->Internet Options->Connections->LAN Settings,
uncheck “Use a proxy server for your LAN”)
3. If you changed any browser settings, quit and restart your browser
If you still cannot connect to a Spider, refer to Appendix C for more information.
Page 50
HALYTECH
Spider SMS LC User Manual
Remote Connection
Ensure that you have set up a dial-up connection as described in Appendix D.
Double click the connection icon.
Leave “User name” and “Password” blank and click “Dial”.
Wait for the connection to be established. It may take up to 1 minute. Various messages will
be displayed on the PC screen indicating progress e.g. Dialing, Verifying Username and
Password, Connecting to network etc.
Once the connection is established, start an Internet browser program such as “Internet
Explorer” on your PC.
Type:
192.168. 0.187
as the web address and press the return or enter key.
(This address does not change – even if you changed the default IP address as described in
Appendix C.)
The Spider SMS log-on page will be displayed on your PC. Enter your username and
password in the spaces provided. Click on the “Log in” button.
Alarms page will be displayed immediately following a successful log-on. You can now
examine other pages as described in “Connecting to a PC”.
When finished, make sure you terminate the link (hang up the call) as appropriate for your
operating system.
Page 51
HALYTECH
Spider SMS LC User Manual
Appendix C: Local Network Configuration
Spider SMS uses standard TCP/IP protocols for all communications. No special procedure is
required to contact a Spider SMS except to ensure that the Spider and your network and/or
PC have matching network parameters.
This Appendix describes two most common ways of network connection.
Your computer must have a network adapter installed. The following procedure assumes that
the adapter is present and installed correctly. If this is not the case, install a network adapter
by following its manufacturer’s instructions.
Connecting a PC Directly to a Spider SMS LC
The following procedure assumes that the following is true:
•
•
•
You will be connecting your PC directly to the Spider using the supplied “cross-over”
cable
“EASY CONNECT” on the Spider is enabled. (Spiders are shipped from the factory
with EASY CONNECT enabled.) You can check the setting by pressing the front
panel switch repeatedly until the EASY CONNECT page is displayed.
Your PC is setup to automatically get an IP address from the network. (Most PC’s are
set up in this way by default.) You can check this setting by following the
AUTOMATIC IP ADDRESS checklist later in this section.
If any of the above are not true, proceed as described in the section “Connecting to an
Existing Network” later in this Appendix.
Do NOT connect the Spider to your computer yet.
Turn on the Spider SMS by pressing and holding the button on the front panel for two
seconds. (The unit must be turned on, i.e. the display must be showing something before you
can establish a local connection.)
Use the supplied red “cross-over” network cable to connect your computer LAN port to the
Spider LAN port.
Wait 10 seconds.
Start an Internet browser program such as “Microsoft Internet Explorer” on your PC.
Type:
192.168. 0.187
as the web address and press the return or enter key.
The Spider SMS log-on page will be displayed on your PC. Enter your username and
password in the spaces provided. (Default values are “user” and “changeme” respectively.)
Click on the “Log in” button.
Alarms page will be displayed immediately following a successful log-on. You can now
examine other pages.
Page 52
HALYTECH
Spider SMS LC User Manual
AUTOMATIC IP ADDRESS SETTING CHECKLIST FOR YOUR PC
1. Click on “Start”->”All Programs”->”Accessories”->”Communications”->”Network
Connections”
2. If in the newly opened window you don’t have an item called “Network Bridge” go to
step 3.
If you do, right click on it and select “Properties”. Go to step 4.
3. Right click on the item “Local Area Connection” and select “Properties”.
4. Near the bottom of the new window click on “Internet Protocol (TCP/IP)” and then
click on “Properties”
5. Select “Obtain an IP address automatically”
6. Select “Obtain DNS server address automatically”
7. Click OK
8. Click OK
9. Close the Network Connections window
Connecting to an Existing Network
Before connecting the Spider SMS to an existing network, contact your network administrator
and obtain a free static IP address and a corresponding mask.
Change the Spider SMS default IP address and mask to the new values as follows:
1. Keep on briefly pressing the keypad key until the display shows
I192.168.000.187
M255.255.255.000
2. Press the keypad key and hold it pressed for more than 3 seconds. Release the key.
The display will show
Change IP addr ?
192.168.000.187
3. Press the keypad key and hold it pressed for more than 3 seconds. Release the key.
A flashing cursor will appear over the first digit on the second line.
4. A brief key press will increment the digit under the cursor, while a long press (longer
than 3 sec) will move to the next digit
5. After the last digit is entered, the display will again show the message in step 2.
6. Briefly press the key. The display will show
Change net mask?
255.255.255.000
7. If you need to change the mask enter the change mode with a long press and then
change digits in the same manner as described in step 4. above.
8. After the last digit is entered, the display will again show the message in step 6.
Briefly press the key until the display shows
Save ?
9. A long press will save the new values of IP address and mask and return the display
to normal operation.
10. If you change your mind and don’t want to change the values, exit the change mode
(indicated by the flashing cursor) by waiting for 20 seconds, then briefly pressing the
key until the display shows
Cancel ?
A long press now will cancel all changes and return the display to normal operation.
11. You must power down and then power up the Spider for the new values to take
effect.
Page 53
HALYTECH
Spider SMS LC User Manual
You can connect the Spider SMS to your network with a standard RJ-45 network cable.
Cables of various lengths are available from Halytech and most electronics and computer
retailers.
Once connected, you can connect to the Spider from any computer on your network as
described in Appendix B – Local Connection.
NOTE: You should also disable the EASY CONNECT network setting on the Spider as
described in the section “Setting up a Spider SMS LC for the First Time -> Setting Up Network
Parameters” on page 27.
Page 54
HALYTECH
Spider SMS LC User Manual
Appendix D: Remote Access Configuration
Spider SMS uses standard PPP and TCP/IP protocols for remote access via telephone.
Internet access is NOT required. Your computer will call a Spider SMS directly.
A dial-up connection to the Spider is set up identically to setting up a dial-up connection for a
typical Internet Service Provider (ISP). No special procedure is required apart from specifying
the telephone number of the particular Spider SMS.
Your computer must have a modem and Dial-up Networking installed. The following
procedure assumes that the both are present and installed correctly. If this is not the case,
install a modem by following its manufacturer’s instructions and then install Dial-up
networking using instruction supplied with your operating system.
Dial-up networking configuration varies with different operating systems. Here is a brief guide
for Windows XP and Windows 98. (Other operating systems will be similar.)
Windows XP:
1. Click on “Start”->”All Programs”->”Accessories”->”Communications”->”Network
Connections”
2. Click on “Create a new connection” in the top left corner of the new window; “New
Connection Wizard” will open
3. Click “Next”
4. Select “Connect to the Internet” and click “Next”
5. Select “Set up my connection manually” and click “Next”
6. Select “Connect using a dial-up modem” and click “Next”
7. Select your modem from the list and click “Next”
8. Type a name for this Spider connection e.g. “Spider at Greenwood” and click “Next”
9. Type the Spider telephone number into the “Phone number” field and click “Next”
10. Leave “User name:”, “Password:” and “Confirm password:” blank, deselect “Make this
the default Internet connection” and click “Next”
11. Select “Add a shortcut to this connection to my desktop” and click “Finish”
Windows 98:
1.
2.
3.
4.
5.
6.
7.
8.
9.
10.
11.
12.
13.
14.
15.
Double click on the My Computer icon on your Windows Desktop
Double click on the Dial-up Networking folder
Double click on Make New Connection
Type a name for this connection e.g. Spider at Greenwood
Select your modem from the drop down list
Click Next
Leave Area Code field blank and type the Spider telephone number into the
Telephone Number field
Click Finish
Right click on the new connection icon just created, then select properties
Make sure that the phone number is correct and that the Area code is blank
Click on Server Types
The type of Dial Up Server should be set to PPP, Internet, Windows NT, Windows9x
Under Advanced Options only Log on to Network and Enable Software Compression
should be ticked
Under Allowed network protocols only TCP/IP should be ticked
Click TCP/IP Settings button
Page 55
HALYTECH
Spider SMS LC User Manual
16. Make sure that Server assigned IP address, Server assigned name server
addresses, Use IP header compression and Use default gateway on remote network
are selected.
17. Click OK
18. Click OK
You can now call the remote Spider SMS by clicking on the newly created connection icon as
described in Appendix B – Remote Connection.
NOTE: If your organisation operates more than one Spider SMS, you will need a separate
connection icon for each Spider.
Page 56
HALYTECH
Spider SMS LC User Manual
Appendix E: Logged Data Format
Spider SMS LC logs data internally in an efficient binary format.
The internal binary format is converted into a standard “CSV” (Comma separated values) file
before each download. A CSV file is readable by most spreadsheet and database programs.
This appendix provides information about the structure of the “CSV” file.
Each record in the file consists of four fields:
1. record date e.g. 14/05/03
2. record time e.g. 12:34:15
3. record numeric identifier
4. record text description or in the case of analogue and counter inputs, the value of the
input
The following table lists all possible values for the numeric identifier and the text fields.
Numeric Identifier
32768
32769
32770
32771
32772
32773
0 + IN#
Range
32768
32769
32770
32771
32772
32773
0 – 10
20 + IN#
20 - 27
50 + 2*IN# + STATE
50 – 65
80 + IN#
80 - 87
100 + 2*CNT# + STATE
140 + IN#
100 – 115
140 - 147
160 + IN#
160 - 167
180 + IN#
180 - 187
200 + AL#
280 + AL#
300 + 10*AL# + SEQ
200 – 207
280 - 287
300 - 379
Text
New File
NORML ST
PHONE ST
MODM ON
MODM OFF
RING DTC
Numeric value of
analogue / system input
Numeric value of
counter input
STx=y
Numeric value of event
counter at the time of
the event
CNx=y
Numeric value of event
counter at midnight
Numeric value of daily
rain total at the time of
the event
Numeric value of daily
rain total at midnight
Alarm x
Almx RST
SMSxy OK
500 + 10*AL# + SEQ
500 - 579
SMSxy NG
700 + AL#
700 – 707
SMS ALxK
718
718
SMS ALLK
719
SMS AL?K
719
720 + 2*CNT# + STATE
720 – 735
SMS CxOF or
SMS CxON
Page 57
Comment
New log file created
Normal program start
Phone program start
Modem came on-line
Modem went off-line
Incoming ring detected
Analogue / system input
log record
Counter input log record
Digital input change
Event input log record +
event counter
Control change
Event input midnight check
(no event occurred)
Daily rain input log record
+ total
Daily rain input midnight
check (no event occurred)
Alarm activation
Alarm reset
SMS alarm transmission
OK
SMS alarm transmission
failed
SMS command –
acknowledge an alarm
SMS command –
acknowledge all active
alarms
SMS command –
acknowledge an invalid
alarm #
SMS command – (de)
activate a control
HALYTECH
Spider SMS LC User Manual
758
758
SMS BPIN
759
759
SMS C?OF or
SMS C?ON
760
760
SMS GTST
761
761
SMS GTCN
762
762
SMS HELP
763
763
SMS GTSY
764
764
SMS GTRP
797
797
SMS ROK
798
798
SMS RNG
799
800 + 2*CNT# + STATE
799
800 – 815
820 + 2*CNT# + STATE
820 – 835
860 + CNT#
860 – 867
SMS ????
RMG CxOF or
RMG CxON or
RMG CxPL
RMB CxOF or
RMB CxON or
RMG CxPL
SMS CxPS
900 + IN#
900 – 907
1000 + 10*AL# + TRY
1000 1073
1200 1273
1300 1302
1310 1312
1320 1322
1330 –
1332
1600 1673
1800 1873
2000 2007
1200 + 10*AL# + TRY
1300 + TRY
1310 + TRY
1320 + TRY
1330 + TRY
1600 + 10*AL# + TRY
1800 + 10*AL# + TRY
2000 + IN#
2020 + IN#
2020 2027
Numeric value of utility
meter input
EMLxz OK
SMS command – (de)
activate a control – invalid
PIN
SMS command – (de)
activate a control – invalid
control #
SMS command – get
inputs
SMS command – get
controls
SMS command – get help
SMS command – get
system inputs
SMS command – get daily
report
SMS command
acknowledgement sent OK
SMS command
acknowledgement send
failed
Unknown SMS command
SMS remote command –
(de) activate a control
SMS remote command –
(de) activate a control –
outside allowable time
SMS command – pulse a
control
Utility meter input log
record
e-mail sent OK
EMLxz NG
e-mail sending failed
EMREP OK
VOCxz OK
Automatic e-mail report
sending successful
Automatic e-mail report
sending failed
Automatic FTP report
sending successful
Automatic FTP report
sending failed
Voice alarm sent OK
VOCxz NG
Voice alarm sending failed
EMREP NG
FREP OK
FREP NG
Scaled numeric value
of input
OR
zero event at a time
specified by user
Hydstra rain input log
record + scaled value of
input
OR
Record with 0 value
(no event occurred)
Numeric value of
Hydstra rain counter at
midnight
Hydstra rain total record
(no event occurred)
Page 58
HALYTECH
Spider SMS LC User Manual
Table decode:
IN#
-
STATE
CNT#
AL#
x
SEQ
y
TRY
z
-
input number:
0 – 7 are user inputs
8 is battery charger status
9 is battery voltage in V
10 is system temperature in deg C
digital input state ( 0 = OFF, 1 = ON)
control number ( 0 – 7 )
alarm number ( 0 – 7 )
alarm number ( 1 – 8 ) (equals AL# + 1)
alarm sequence step ( 0 – 10 )
alarm sequence number ( 1 – 9 ) ( equals SEQ + 1)
e-mail sending attempt ( 0 – 2 )
e-mail sending attempt ( 1 – 3 ) (equals TRY + 1 )
Page 59
HALYTECH
Spider SMS LC User Manual
Appendix F: Filtered Report File Format
The filtered file format is a simplified version of the logged file.
It contains only logged input values in a standard “CSV” (Comma separated values) format.
A CSV file is readable by most spreadsheet and database programs.
This appendix provides information about the structure of the “CSV” file.
Each record in the file consists of four fields:
1. input name e.g. Temperature
2. record date and time e.g. 23-Jan-06 13:00:00
3. input value e.g. 123.445
Page 60
HALYTECH
Spider SMS LC User Manual
Appendix G: Connection to Mobile Network
A Spider SMS is fitted with a GSM, NextG or a CDMA modem. You will need to connect to an
appropriate mobile telephone network by following the procedure applicable to the modem
fitted in your Spider.
CDMA Network
Spider SMS units fitted with an internal CDMA modem must be connected to a CDMA
network to make them fully operational.
To connect your unit to the CDMA network, contact your telecommunications provider. You
will need to supply the Spider’s “ESN number” which is printed on a sticker attached to the
unit. (Every Spider has a unique ESN number.)
The connection procedure is typically a two- step process. Firstly a standard voice connection
is required. It comes with a VOICE telephone number. You will also need a DATA telephone
number. This number is sometimes called “a data terminating number” or “a data service”,
depending on carrier. The data number usually requires an additional monthly charge.
You must also request that ALL ancillary services such as “Call Waiting”, “Call Diversion”,
“Message Bank” etc. be turned off.
CDMA units do not require a SIM card. You will simply be issued with two mobile telephone
numbers.
If your Spider SMS LC is fitted with the e-mail option and you wish to send e-mails by using
the faster 1X service, request that 1X support be enabled.
You can use either the voice or the data number to send SMS commands to the Spider.
Use the data number to dial a Spider with your computer and a modem.
Use the voice number to listen to the synthesised voice (if voice option installed).
GSM Network
Spider SMS units fitted with an internal GSM modem must be connected to a GSM network to
make them fully operational.
Contact your telecommunications provider and request a connection. This is typically a twostep process. Firstly a standard voice SIM card is required. It comes with a VOICE telephone
number. You will also need a DATA telephone number. This number is sometimes called “a
data terminating number”, “a data service” or a “circuit-switched data number”, depending on
the carrier. The data number usually requires an additional monthly charge.
The data service type required is “NON-TRANSPARENT, ASYNCHRONOUS”.
If your Spider SMS LC is fitted with the e-mail option and you wish to send e-mails by using
GPRS, request that GPRS be enabled.
You can use either the voice or the data number to send SMS commands to the Spider.
Use the data number to dial a Spider with your computer and a modem.
Use the voice number to listen to the synthesised voice (if voice option installed).
Insert the SIM card into your Spider SMS as described in the next section.
Page 61
HALYTECH
Spider SMS LC User Manual
SIM Card Insertion and Removal (GSM units only)
Before inserting a SIM card into a Spider SMS LC, insert it into a standard GSM mobile
telephone. Turn the telephone on and ensure that any PIN protection is turned off and that
you can make and receive normal calls.
(PIN protection can usually be turned off in the Security Menu of your phone.)
You can now remove the SIM card from the mobile phone and insert it into a Spider SMS LC
as follows:
1. Locate the modem access cover located on the top of the Spider SMS case, next to
the antenna connector. Using a small Phillips screwdriver, undo the single screw and
gently pull out the cover. The modem inside the Spider will now be visible through the
exposed access slot.
2. By looking through the slot, you will see the SIM card slot with a black locking lever to
the left of it.
Holding the SIM card level with the locking lever, gently push the SIM card into the
exposed slot until it locks in. The notched end should be inserted first, with the gold
contacts facing up – as shown in the illustration.
IMPORTANT: You should feel slight resistance while pushing the card into the slot. If you
do not or you can freely move the SIM from side to side by more than 1 mm you have
missed the slot. You must remove the SIM and try again!
Page 62
HALYTECH
3.
Spider SMS LC User Manual
Using a small flat screwdriver, slide the locking lever to the right – as far as it will go.
UNLOCKED POSITION
LOCKED (WORKING) POSITION
4. Replace the access cover.
To remove the SIM card:
1. Remove the modem access cover as previously described.
2. Using a small flat screwdriver, slide the SIM locking lever to the left as far as it will go.
3. Gently push the SIM card into the modem – it will unlock and partially pop out.
4. Pull out the SIM card completely.
Page 63
HALYTECH
Spider SMS LC User Manual
NextG Network
Spider SMS units fitted with an internal NextG modem must be connected to a NextG network
to make them fully operational.
Contact your telecommunications provider and request a connection. This is typically a twostep process. Firstly a standard voice SIM card is required. It comes with a VOICE telephone
number. You will also need a DATA telephone number. This number is sometimes called “a
data terminating number” or “a data service”, depending on carrier. The data number usually
requires an additional monthly charge.
The data service type required is “CODE 2620”.
If your Spider SMS LC is fitted with the e-mail option and you wish to send e-mails by using
GPRS, request that GPRS be enabled.
You can use either the voice or the data number to send SMS commands to the Spider.
Use the data number to dial a Spider with your computer and a modem.
Insert the SIM card into your Spider SMS as described in the next section.
SIM Card Insertion and Removal (NextG units only)
Before inserting a SIM card into a Spider SMS LC, insert it into a standard NextG or a
GSM mobile telephone. Turn the telephone on and ensure that any PIN protection is
turned off and that you can make and receive normal calls.
You can now remove the SIM card from the mobile phone and insert it into a Spider SMS LC
as follows:
1. Remove the connector panel by undoing two screws shown in the picture.
Page 64
HALYTECH
Spider SMS LC User Manual
2. Eject the SIM card holder by pushing the yellow button with a pen or a small
screwdriver.
3. Insert the SIM card into the holder so that the gold pins are on top.
4.
Insert the SIM card holder back into the modem.
5. Push the SIM card holder as far as it will go.
6. Re-install the connector panel and secure it with the screws removed in step 1.
Page 65
HALYTECH
Spider SMS LC User Manual
Appendix H: Testing E-mail Connectivity
Spider SMS units fitted with e-mail options provide a quick and simple way of confirming
proper e-mail operation.
You can send test e-mails at any time by using the built in keypad and display. E-mails are
sent to the “Test e-mail address” as configured in the E-mail Settings browser screen.
Sending Test e-mails
Once you set up a new Spider and enter all required Network / E-mail parameters ensure that
it is connected to the appropriate network as selected by the E-mail sending method.
Repeatedly and briefly press the keypad key until the display shows:
Send test email?
Press and hold the key for longer than 3 seconds.
The unit will display:
Sending email…
The keypad will not respond to key presses while the above message is displayed. After a
period of time (usually less than 30 seconds) the outcome will be displayed as
Email sent OK !
OR
Email failed !
A successful outcome verifies full e-mail connectivity. Otherwise, you may wish to Monitor
Test e-mails to find the reason for the failure.
Monitoring Test e-mails
Equipment required:
1. Spider SMS with e-mail option, initialised Network / E-mail settings and connected to
the appropriate network (LAN or mobile network)
2. PC running a terminal program such as Hyperterminal
3. cross-over serial cable
Procedure:
1. Set your terminal program to 9600 bps, 8 data bits, 1 stop bit and no parity
2. Connect your PC serial port to Spider SMS AUX2 port (the DB-9 connector on the
outside of the enclosure).
3. Send a test e-mail as described above in “Sending Test e-mails”
4. Your PC will display diagnostic messages for each step of the sending process
5. The last message will usually indicate where the problem lies
Most diagnostic messages are self-explanatory. Here are some additional tips:
•
•
“Unable to resolve ‘your smtp host address’” message when using LAN e-mail
sending method – ensure that the gateway and the primary and the secondary DNS
are set correctly and that there is connectivity to the internet or to your SMTP mail
host computer.
Messages starting with 3-digit numeric codes are generated by the SMTP host
computer and will indicate invalid sender, recipient etc. Your network administrator or
ISP can supply correct settings.
Page 66
HALYTECH
Spider SMS LC User Manual
Appendix I: SDI-12 Operation (if SDI-12 interface installed)
SDI-12 Sensor Preparation
Do not connect your SDI-12 sensor to the Spider at this time.
Refer to your SDI-12 sensor Instruction Manual and set up the sensor as follows:
•
•
•
•
Enable your sensor’s SDI-12 Interface
Assign an SDI-12 address between 0 and 7 to the sensor and record it
Select a suitable SDI-12 delay (warm-up) time and record it for future use
Determine the number of parameters provided by the sensor and the order in which
they are given. Once again, record this information for future use.
For example, let’s assume that you are using a popular water quality instrument providing
eight parameters in this order: temperature, pH, specific conductivity, salinity, ORP, depth,
turbidity and LDO. You have assigned SDI-12 address 0 to the sensor and decide to use a
delay (warm-up) period of 30 seconds.
SDI-12 Physical Connection
The SDI-12 interface is a separate electronics module. It connects to the Spider LC via two
cables: a ribbon cable and an integral power cable. The ribbon cable connects to the Spider’s
AUX2 port and the power cable connects to the Battery Connector. A typical connection is
illustrated below:
(If you are using an optional external rechargeable battery, simply connect the battery across
the same terminals. Observe the correct polarity - +ve terminal is on the left when viewing the
unit as shown in the illustration.)
Page 67
HALYTECH
Spider SMS LC User Manual
Attach the supplied SDI-12 connector to your sensor cable as shown below:
Plug the sensor cable into the Spider’s SDI-12 interface.
SDI-12 Input Setup
If not already displayed, access the “CHANGE SETUP” page as described in “Setting up a
Spider SMS LC for the first time” earlier in this manual.
Click “Change Input Setup”. The following page will be displayed. Enter the information
recorded in section “SDI-12 Sensor Preparation”.
TIP: Add 3 seconds to the sensor warm-up time. In our example, the sensor warm-up was set
to 30 seconds; we will enter 30+3 = 33 seconds into the web page.
SDI-12 inputs allow you to set their measurement units, whether you wish to log them and if
so, the minimum change required to be logged.
Warm-up is automatically selected for all SDI-12 inputs.
The minimum change for each input works in conjunction with the “Scan period” which is
common to all inputs and is also settable from this page.
Page 68
HALYTECH
Spider SMS LC User Manual
The same page also determines the logging of the 3 System Monitors. These are 3 additional
system inputs which monitor the battery charger status, battery voltage and system
temperature. System monitors logging is configured in a similar manner as described above.
You can exit at any time without making changes by clicking the “Cancel” link.
Save the new values by clicking on the “Save” button.
NOTES:
1. You can mix Spider’s native inputs with the SDI-12 inputs as required. To do that,
simply select the required channel type from the drop-down list in the “Type” column.
2. A channel reading of -99999 indicates that the Spider is not able to communicate with
the sensor. Check SDI delay (warm-up) time, SDI address set to 0 and all physical
connections.
SDI-12 Version Support
The Spider supports two different versions of the SDI-12 standard: V1.1 and V1.2 (and
above) from here-on referred to as V1.2+.
V1.2+ Support
This is Spider’s default option suitable for most applications. It supports multiple sensors on
different SDI-12 addresses. It is the most flexible and power efficient option provided that all
attached SDI-12 sensors support it.
With V1.2+ selected, the Spider obtains sensor readings using the ‘concurrent measurement’
method. It firstly tells all sensors to warm-up and then extracts the reading from each one in
turn. Thus the warm-up time is applied to all sensors simultaneously, minimising power
consumption.
V1.1 Support
Some older sensors do not support the ‘concurrent measurement’ method which was
introduced with SDI-12 standard version 1.2.
The Spider supports V1.1 sensors by using the ‘immediate measurement’ method.
NOTES:
• With V1.1 support selected, only a single device SDI-12 device is supported.
• Even though only a single SDI-12 device is supported, it may be a multi-sensor
device such as a combined wind speed/direction sensor.
Page 69
HALYTECH
Spider SMS LC User Manual
SDI-12 Transparent Mode
SDI-12 Transparent Mode is provided as an interactive tool for direct communications with
attached SDI-12 sensor(s). It allows users to interrogate sensors, verify their operation etc.
To enter the SDI-12 Transparent mode, access the “CHANGE SETUP” page as described in
“Setting up a Spider SMS LC for the first time” earlier in this manual.
Click “SDI-12 Transparent Mode”. The following page will be displayed:
NOTE: This page is not available unless you have enabled at least one SDI-12 sensor in the
“Change Inputs” menu.
Enter an SDI-12 command and click “Send query”. A progress page will be displayed next:
Page 70
HALYTECH
Spider SMS LC User Manual
Click “Update” to read the sensor response:
Page 71
HALYTECH
Spider SMS LC User Manual
Appendix J: Wireless Sensor Operation (if Wireless interface
installed)
Wireless Sensor System Overview
Wireless sensor system comprises of two components: a wireless receiver and one or more
wireless transmitters.
The receiver connects directly to a Spider SMS. The Spider supplies all necessary power to
the receiver. The receiver is supplied with a standard, compact whip aerial. Higher gain
aerials with extension cables are available from Halytech or its distributors.
A Spider fitted with a wireless receiver can communicate with up to eight wireless
transmitters.
Each transmitter is a self-contained, waterproof module that connects directly to a water
meter. A non-replaceable battery fitted inside the transmitter is designed to last for several
years.
In order to maximise the transmitter battery life, a Spider polls each transmitter only when
required.
Regular polls are done at every logging period. Manual polls can be initiated by the user as
required to facilitate installation and servicing.
Physical Connections
Wireless Receiver:
The Wireless Receiver is a separate electronics module. It connects to the Spider LC AUX2
connector via a single cable. A typical connection is illustrated below:
Page 72
HALYTECH
Spider SMS LC User Manual
Wireless Transmitter:
Every wireless transmitter has a unique 15 digit address. The address is located on a sticker
attached to the transmitter. Record the address for the next step.
EXAMPLE: Address of the device shown above is 00278-04-03153276
Connect the yellow and the black wires to your water meter:
Using a suitable cable tie secure the transmitter to the water meter.
Wireless Input Setup
Two types of wireless inputs are supported:
• Wireless Counter
• Wireless Utility
Both of these use the same type of wireless transmitter, but record data in a different format.
In each case, an internal Spider counter is incremented with each water meter pulse.
Wireless Counter type logs the counter total at the logging time.
Wireless Utility logs number of pulses in the previous logging period. This is sometimes
referred to as “consumption”.
Wireless Counter and Wireless Utility are analogous, perform and log data identically to the
Spider native input types “Counter” and “Utility Meter” respectively. Please refer to Appendix
A “Spider Inputs” for an overview and capability of different input types.
Page 73
HALYTECH
Spider SMS LC User Manual
If not already displayed, access the “CHANGE SETUP” page as described in “Setting up a
Spider SMS LC for the first time” earlier in this manual.
Click “Change Input Setup”. The following page will be displayed. Enter required information.
Address is the transmitter address recorded in the previous step.
Warm-up is automatically selected for all Wireless inputs.
The same page also determines the logging of the 3 System Monitors. These are 3 additional
system inputs which monitor the Spider battery charger status, battery voltage and system
temperature. System monitors logging is configured in a similar manner as described above.
You can exit at any time without making changes by clicking the “Cancel” link.
Save the new values by clicking on the “Save” button.
NOTES:
1. You can mix Spider’s native inputs with the wireless inputs as required. To do that,
simply select the required channel type from the drop-down list in the “Type” column.
2. Both wireless input types can be calibrated to match the resolution of different water
meters, and can be preset to match the meter reading. Please refer to “Calibrating
Counter Inputs” section earlier in the body of the document.
3. Wireless and SDI-12 inputs cannot be mixed in a single Spider SMS system. You can
use either one type or the other, but not both together.
Page 74
HALYTECH
Spider SMS LC User Manual
Wireless Input Display
Current input readings are displayed by canceling out of the setup mode and clicking
“STATUS” on the blue menu pane on the left.
The display shows the state of all Inputs at the time the page was displayed. The page
automatically updates every 10 seconds. Spider’s native inputs are automatically refreshed,
but Wireless inputs are not. This is done in order to maximise the wireless transmitter battery
life.
To manually refresh the Wireless inputs click on the “Update Wireless Readings” button. It
may take up to a minute for the Spider to poll all remote transmitters and update the wireless
input readings.
NOTES:
1. A negative wireless input display indicates that the Spider is not able to communicate
with the remote transmitter. If that happens, check all connections. If problem still
persists, please refer to the next section – Wireless Sensor Diagnostics.
2. An alternative way of manually refreshing all wireless input readings is to use the
Spider’s built in display and keypad. Press the keypad switch repeatedly until a
wireless input is displayed. Pressing and holding the switch for approximately five
seconds will activate a manual refresh.
Page 75
HALYTECH
Spider SMS LC User Manual
Wireless Sensor Diagnostics
Wireless Sensor Diagnostics is provided as an interactive tool for direct communications with
the wireless receiver and the wireless transmitter(s). It allows users to interrogate them, verify
their operation etc.
To enter the Wireless Sensor Diagnostics mode, access the “CHANGE SETUP” page as
described in “Setting up a Spider SMS LC for the first time” earlier in this manual.
Click “Wireless Sensor Diagnostics”. The following page will be displayed:
NOTE: This page is not available unless you have enabled at least one wireless input in the
“Change Inputs” menu.
Select the wireless sensor to be interrogated and then select the query (command).
Click on the “Send query” button.
Some commands will provide an immediate response, while others may take a few seconds.
If the response is not yet available, the following screen will be displayed:
Click “Update” to check if the response is available. Repeat if necessary.
Page 76
HALYTECH
Spider SMS LC User Manual
Wireless Diagnostics are useful for new installations and troubleshooting.
Available Queries (Commands) and their application is as follows:
1. Raw count & battery status
To confirm that the wireless receiver is connected to the Spider and that it is working
properly.
2. Raw count & cattery status
To confirm connectivity with a remote transmitter and to check its battery status.
NOTE: the “raw” count is different and separate from the Spider internal counter used
by the particular wireless input. The “raw” count increments with every pulse. It is not
scaled or preset.
3. Local signal strength
Provides the radio signal strength from a remote transmitter as received by the
receiver unit connected to the Spider.
4. Remote signal strength
Provides the radio signal strength from the local receiver as received by the remote
transmitter.
NOTE:
Difficult installations with low signal strengths may be improved significantly by using a higher
gain antenna available from Halytech and their distributors.
Such an antenna is fitted with a length cable enabling it to be installed in a more favourable
position – elevated, in front of a wall etc.
Page 77