1
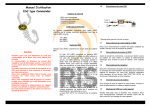
Scorpion
User guide for
Commander Series ESC’s
2.
3.
The Commander 26V SBEC series feature a inbuilt switching BEC
that will convert the voltage from your battery pack to 5.7 volts to
power your receiver and servos. The Commander SBEC will deliver
3 amps of continuous current with 4 amp bursts. With a Switching
type BEC, you do not need to de-rate the BEC as the input voltage
increases. The full 3 amps of BEC current is available for any input
between 2-cell and 6-cell Li-Po operation.
The Commander 50V OPTO series of ESC’s have no inbuilt BEC so
you will need to use a separate BEC or receiver battery to power
your receiver and servos.
1.0 Connecting your ESC
Written By Aidan Kelly
SAFETY
Scorpion and their re-sellers are not responsible for
your use of this product, or any damage or injuries
you may cause or sustain as a result of it’s usage.
Understand that an electric motor that is connected
to a battery and speed control may start
unexpectedly and cause serious injuries. Always treat
them with necessary respect. Keep the propeller
away from your body and others at all times.
We suggest that you remove the propeller when you
are working on the plane with the battery connected.
We suggest that you remove the pinion when
working on a Helicopter with the battery connected
Please observe all local laws regarding the flying of
remote control aircraft.
Never fly over others or near crowds.
Included in the BOX
1
1
1
1
x
x
x
x
Scorpion Commander Series ESC
IR Program card
IR Receiver
Instruction Manual
Commander Series
The Scorpion Commander Series of ESC;s are made up
of three different types of ESC’s classified by the
maximum voltage they can handle and the type of BEC
they possess. Please identify which ESC’s you are using
as it will help you with setup in the manual.
1. 15V LBEC
2. 26V SBEC
3. 50V OPTO
Battery Eliminator Circuit (BEC)
Each of the three Commander series above has its own type of BEC.
1. The Commander 15V LBEC series feature a Linear BEC that will
convert the voltage from your battery pack to 5.0 volts to power
your receiver and servos. The Commander LBEC will deliver 4
amps of continuous current. Please note that the more voltage you
input into a linear BEC the lower the available current will be so if
running 4S with more then 2 servos we recommend the use of a
seprate BEC. The Linear BEC will operate from 6 to 15 Volts.
Please note: the 15V 60A LBEC Heli ESC will supply 6v to your
receiver and servos upto 3S or 11.1v from you main battery.
*for larger picture refer to back of this manual
1.1. Add your battery connector
You must attach a quality battery connector of your choice to
the red (+) and black (-) power wires. Solder the battery
connector to the wires. ENSURE THAT THE POLARITY IS
CORRECT (red wire to battery red wire, black wire to battery
black wire). Follow the instructions provided with the battery
connector.
1.2 Connect Motor to ESC
Cut the three (red, yellow & black) motor wires coming off
the ESC to the length you require. We recommend using
bullet connectors to connect your esc to your motor as
scorpion motors come with pre-installed bullet connectors
that include a female set for your ESC. Solder the
corresponding connectors for your motor to the wires coming
from the ESC, or solder the motor wires directly to the motor
leads. You may find it convenient to temporarily connect the
motor leads to the ESC and test for proper rotation before
you permanently solder them. See “Reversing Rotation”
below. Once connected DO NOT allow any exposed wire or
connectors to contact each other, insure that proper
insulation around each of the three wires is achieved, Heat
shrink is the best material for this job.
1.3 Connect to your receiver
Connect the receiver lead (the three colored small wires with
a black plastic connector on the end) to the throttle channel
on your receiver. Do not connect a receiver battery pack to
the receiver, as the Scorpion ESC will supply power to the
receiver and servos through the receiver connector. Only the
50V OPTO Speed Controller does not supply power to your
receiver
1.4 Reversing Rotation (if necessary)
Bench test the motor and speed control after the
connections are made to determine the rotation of the motor.
To change the rotation of the motor, swap ANY two motor
wire connections, or use the scorpion programming card
included with your esc to change the rotation direction.
1.5 Mounting the ESC
Current Limiting
Mount the ESC with the Heatsink side of the controller facing
outward. We recommend using Velcro to attach the ESC to
the airframe for easy removal. Double sided tape is also
acceptable. If zip ties are used, do not place them over any of
the components on the ESC. Instead, zip tie around the
motor and battery wires, leaving some slack to allow for
movement. The 50V OPTO Series have mounts that allow you
to screw the ESC into a frame or something similar.
2.0 Using your scorpion ESC
2.1 Ensure that the ESC is connected to the proper channel
Thermal Protection
on your receiver.
2.2 Turn your transmitter ON and set the throttle stick to
zero throttle.
2.3 Connect the main power battery to the speed controller.
2.4 The ESC will beep the motor (4 tones) to indicate that it
is armed.
The ESC will not provide any power to the motor, if the throttle
stick is anywhere higher then zero throttle when the main battery
is plugged in. To arm the esc ready for use you, You must move
the throttle stick to zero then disconnect and re connected the
battery.
Always power your radio transmitter before powering up the
receiver and/or the ESC. Some receivers with failsafe features or
Spektrum receiver units that are not bound on receiver power up
are entirely capable of causing the arming sequence to occur and
command the ESC to drive the motor. Always keep the aircraft
restrained and clear of body parts when the ESC is powered.
If your ESC cannot sense any radio signal it will beep the motor
and flash orange on the LED continuously
3.0 Scorpion Commander features
ALL Scorpion ESC programming features are available
though the use of the ESC programming card included with
your ESC. So there is NO need to purchase any other cables
or cards to allow you to program your ESC properly
Scorpion ESC’s come with default or factory settings which
are recommended for most applications. Programming
options can be changed at the discretion of the user. See
section 6.0 for programming instructions
Features:
Safe Power up
Loss of signal
(fail safe)
LED (Only on 26V
and 50V Series)
Low Voltage Cutoff
To arm the controller, the throttle must be
held in the “Brake/Zero” position (all the way
down). If throttle is not at zero at startup, the ESC
will not provide any power to the motor regardless
of where the throttle stick is positioned when first
powered up.
The Scorpion will stop the motor as a safety
feature when the throttle signal is lost or
corrupt for 3 seconds. If a signal is regained the
user will have instant control again.
The LED is used for programming/startup
confirmation of your scorpion esc. Once armed
the LED can be set to give an indication of low
battery conditions
You can choose for your ESC to stop or reduce
power when the input battery voltage drops to a
preset/programmed cutoff voltage.
Brake
Throttle
Electronic timing
Amp output limit, the output is rated at 10% over
the rated Amp. At approximately 10% over the
rated Amps it will automatically limit the output to
the motor, as long as the motor is not rated too
much over the ESC spec limits, this safety
mechanism will prevent a over load to the ESC but
if you install a motor for example rated at 100
amp on a ESC that are rated for only 60Amp, this
mechanism will not work properly due to the
instant surge of power demand from the motor, it
may shutdown too early or simply fry the ESC, the
only solution to this is to never use a Motor that
has a rating bigger then the ESC, don’t even think
you can use it if you run the motor at a slower
RPM or load, it will not work!!
At 95 degree C, the ESC will slowdown the power
output to the motor by 50% ( the on board LED
will flash red), to re initiate full throttle you need
to move the throttle stick to idle position and then
the ESC will resume normal output once you
throttle up again. If your ESC is over 60deg on
startup it will not arm red LED will flash and a DI
DI DI sound will be played.
Stops rotation of the motor when the
throttle signal is moved to the lowest
position.
Airplane, Car and Heli modes come pre
programmed and can be selected by the user
Manual settings that may improve the efficiency of
the system for some motors are available. The
standard Scorpion setting is to automatically
detect and adjust for the motor it is driving.
4.0 Initial setup
You MUST perform throttle range setup before the first use of
the ESC. Remove propeller/pinion from motor while
performing initial throttle range setup.
4.1 Throttle range setup (full throttle and stop)
4.2 Turn on transmitter and set throttle to maximum
position be sure that your throttle is set at 0%
minimum throttle and 100% at maximum throttle
4.3 Place the switch on the IR Receier to IRS (see section
5.0) Connect battery to ESC.(On 50V OPTO ESC’s you
will need to apply power to the receiver before
connecting the battery to the ESC). After few seconds
you will hear 3 beeps come from the motor to
indicate you are in programming mode. Check that
your throttle is at its maximum postion then push the
IR switch to PPM, After approximately 3 seconds you
will hear 2 beeps from the motor confirming the
maximum throttle position has been set. (If at this
time, you leave the throttle stick at maximum
position for over 10 seconds, the ESC will reset itself
to Factory default throttle settings)
4.4 Move throttle to minimum position within 10 seconds
and hold throttle at minimum position. Then you will
hear 2 beeps indicating minimum throttle position is
set and confirmed. Your ESC will also arm after you
have set the minimum position. You only need to do
this once as throttle range will be stored in the
memory of the speed controller. You can reset the
throttle range by performing steps 4.1 to 4.4 again
5.0 Connecting your Scorpion
SBEC to the programming card
Function Button
Numeric
Value
What it does
Your Scorpion ESC is programmed using the Infrared (IR) Program card and
Receiver included with this ESC. First you must connect your IR Receiver to
your ESC. Ensure the brown wire from your esc is facing outwards
Example from
Above
095
LVC 15V ESC
050-138
1*
2
3
4
5
1*
Sets Low Voltage Cut to
9.5Volts
Low Voltage Cut 050 (5V) to
138(13.8V) in 0.2 V increments.
*6V
Low Voltage Cut 050 (5V) to
230(23V) in 0.5 V increments.
*6V
Low Voltage Cut 050 (5V) to
480(48V) in 0.5 V increments.
*6V
* No brake
Very soft brake
Soft Brake
Hard Brake
Very Hard Brake
Activate Airplane mode
1*
2
3
Cut 50% of maximum power
No Cut just LED warning
Pulse warning
1*
2
3
4
5
Disabled
0.15 second
0.3sec
0.45sec
0.7sec
1.3 sec
Disabled
1*
2
Protection on
Protection off (this option will
void warranty
Drive Frequency
1*
2
3
8khz (recommended for most
Brushless motors)
18khz (for use with low
inductance motors)
32khz (for use with VERY low
inductance motors)
SS
1
2
Heli mode with soft start,
variable throttle* adjustable
soft start.
Heli mode with soft start and
governor. (See Govenor
Section)
1*
2
Clockwise
Counter clock wise
1*
2
3
4
5
6
1
2*
3
4
5
6
1*
2
3
1
2*
3
Auto Timing
5°
15°
20°
25°
30°
Soft
Medium
Hard
Soft
Medium
Hard
Soft
Medium
Strong
Short 10 Seconds
Medium 15 Seconds
Long 20 Seconds
Enter value send signal to ESC
(Low Voltage Cut)
LVC 26V ESC
050-230
(Low Voltage Cut)
LVC 50V ESC
050-480
(Low Voltage Cut)
BRK
(Brake Setting)
5.1 Once you have plugged in the IR Receiver push the switch across to
IRS.
5.2 Now connect a battery to the ESC. Your motor will emit 3 beeps and for
26V and 50V Controllers the LED will flash 3 times red .
5.3 Your IR Receiver is now ready to receive a signal from the program
card.
please note that IR will be interfered in direct sunlight so to
program your model we suggest doing it indoors in the shade out
of direct sunlight
before flying you will need to place the switch back to PPM mode
AIR
PCT
Program Cut Type
(LVC type)
MAT
Motor
Acceleration Time
Delay
CAR/B
Car/Boat mode
6.0 Using the Programming Card
All parameters of the esc can be changed via the
program card.
COP
Current Overload
Protection
FREQ
Soft Start
RO
Motor Rotation
direction
TIM
Motor Timing
GOV
To program any function on the card you must follow the
following procedure:
6.1 Press a function button
6.2 enter a numeric value
6.3 Enter to complete
Example Low Voltage Cut to enter 9.5V Press “LVC” Press
“0” Press “9” Press “5” then “ENTER” If successful a DI
DOO sound will come from the motor and the LED will
Flash RED. An invalid option will not get any confirmation
sound from the motor and the LED will not flash
Please note that there is a time limit from when you press a
function button the numeric values and enter if you go over this
time limit no sound of flashes will come from the esc
Governor Correction
See section 9.0
SB
Motor Start Booster
★
Soft Start Duration
ENTER
OTHER
*Factory Default
All other keys are reserved for
future programming options
7.0 Lights and Sounds
Your ESC will emit different lights and sounds according to
the function it is applying below is a table of the following
conditions:
No Signal from
receiver at startup
LED light will flash orange with constant 2
warning tone. If Using program card, the LED will
flash red and emit 3 beep tones then you will
enter setup mode
Loss of signal during
operation
Over temperature
during power up
(>60°C)
LED will flash red with a 2 beep warning tone
Over heat during
operation (>85 °C)
Power reduced to half throttle , red LED will flash.
To reset throttle must be put into idle position
Power on low
voltage warning
LED will flash red quickly with beep warning tone
when voltage is low than the preset cut-off
voltage.
Low voltage cut
warning
When voltage is lower than preset cut off voltage,
red LED will flash rapidly red.
Over Amp Protection
Is only activated at over 50% throttle during overamp protection, LED will flash red rapidly
Governor Limit
Warning
If governor reaches 100% throttle, orange LED
light turn on.
Soft start indication
Orange LED light will turn off automatically when
soft start has been deactivated.
LED will be constant red with 2 beep warning
tone. To restart, disconnect power source, wait
for cool down then re-connect.
What it allows you to do
•
Push 3D performance to the limits by giving you more power when
you need it while keeping the rotor speed constant at other times
•
Give you consistent flight feel from start to finish; unlike some ESC
governors, RPM does not drop as battery voltage drops (as long
battery can provide enough power)
•
Takes the Guesswork out of setting up Throttle Curves
Programming the Governor
Before programming the governor you must perform the Initial Setup in
section 4.0 in this manual first
Items you will require
Head Speed Tachometer
1.
2.
3.
4.
5.
6.
Radio Setup
1.
2.
3.
4.
8.0 Trouble Shooting
•
•
•
•
•
•
•
If you hear a pulsed warning tone and/or see a continuous orange
flashing LED after powering up the ESC: Check your transmitter. Is
it on? If yes.
Check that your throttle is at its minimum position. Your esc will
not arm if you throttle is anything other then zero at startup
Check the ESC servo connection? Connection good? If yes.
Check the motor connection to the ESC, reconnect them if
necessary. Check your battery. Fully charged? Replace battery if
necessary. Try another receiver.
Disconnect battery and then reconnect battery and start at step
2.0 again
Motor does not shut off with throttle hold set throttle hold position
to 0%
After initiating esc with throttle hold on motor spins slowly when
turned off > Set throttle hold to 0%
9.0 Governor Function for
helicopters
Scorpion has developed a inbuilt governor that uses complex mathematics
and fast processor speeds to provide one of the most user friendly and
advanced governors on the market today.
Please follow the below steps to setup the governor on your ESC.
What it does
A Governor is designed to Govern the speed of your main rotor blades. In
basic terms this means that the ESC will try to keep the same rotor blade
speed (set by you) regardless of the amount of pitch on the main blades and
load on the motor. To do this the ESC tracks the motors speed and will
automatically increase or decrease the power to the motor to maintain
constant rpm or headspeed.
Insure you have the IR Receiver Plugged in Refer to Section 5.0 of
this manual
Remove the motor pinion
Power ESC (50v OPTO series Power Receiver then Power ESC)
Move Switch of IR Receiver to Program mode see section 5.0
3 beeps will sound you are now in program mode
Press SS > 2 > Enter. 2 beeps will sound confirming SS 2 mode
selected
Startup
1.
2.
3.
4.
5.
6.
7.
8.
9.
10.
Set your throttle hold position in your radio to 0%
In your radio you need to set your throttle curves to the % of
throttle you wish to operate your governor at. It is a good idea to
use a head speed calculator first to find out an estimated target HS
you wish to achieve.
Once you have estimated the amount of throttle needed to achieve
your target head speed enter it into a throttle curve so that it is the
same % of throttle across the entire range eg I would like 80%
throttle for all points across the curve you should have flat line at
80%. You can only select values from 50-90% throttle
You can have different throttle values for each flight mode and you
can flick between them in mid flight with no effect on the governor
as long as it has been set properly at initial startup
Procedure (Read all steps before attempting)
Turn on your radio and place throttle hold switch to ON
If using the 50V OPTO ESC you will need to power your receiver
Plug your ESC to the main power battery
Wait for it to arm (4 beeps di di dee do)
Select the flight mode you wish to fly in
Insure your blades are at 0 degrees pitch (If your blades are not at
0 deg your governor will not set itself properly
Turn throttle hold switch OFF
Soft start will initiate – Depending on the soft start duration you
have set 10,15 or 20 seconds wait on this amount of time for the
blades to stabilize speed. (if you have the 26V SBEC or 50C OPTO
esc’s the LED will glow orange during startup and will turn off once
the headspeed has been set and stabilized)
Measure the blade speed at 0 deg pitch with a tachometer or
similar device to see if you are achieving the desired headspeed.
If the Head speed is to high go back into your throttle curve and
reduce the throttle or if it is to low increase your throttle curve
Auto Rotation Bail out Feature for Soft start and Governor modes
If you attempt an autorotation once you have switched your throttle hold
switch you have a 12 second time window where if you feel you cannot make
the auto rotation you can switch the throttle hold off and your helicopter will
instantly regain throttle to either your stick position in Soft start mode or
your set governor throttle %.
Governor Correction (GOV) button
Modes 1-3 will not compensate for no load conditions. For example if you
are hovering and pitch down (negative pitch) the power needed to keep the
motor at the set RPM will be less the ESC will allow the rotor blades to fall
the to right speed under their own weight
Modes 4-6 Will compensate for no load conditions. For Example if you are
hovering and pitch down (negative pitch) the power needed to keep the
motor at the set RPM will be less the ESC will apply a slight amount of brake
to will allow the rotor blades to fall the to right quickly.
What does this all mean?
In modes 1-3 your main blades may have a tendency to over speed so you
may get a less consistent headspeed. In modes 4-6 your main blades will be
governed more actively giving you a more consistent headspeed. But this will
also make your gyro will have to compensate for the reduction in torque on
the tail blades more quickly If you are using a high end gyro this will not be
an issue.
Connecting your ESC Diagram
Notes:
Abbreviated Terms
ESC = Electronics Speed Controller
LED = Light Emitting Diode
V = Volts
IR = Infra Red
RPM = Revolutions Per Minute