1
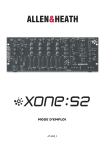
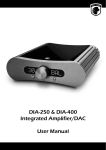
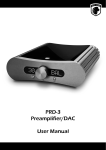
High Performance 24-bit 192kHz Audio Output Interface
Windows Vista
User Guide
Version 1.1
August 20th, 2009
www.cantatis.com
Cantatis
Overture 192 Windows Vista User Guide
Contents
1
Introduction ........................................................................3
1.1
1.2
Key Features ................................................................................................ 3
Product Tour ................................................................................................ 4
2
Installation..........................................................................5
2.1
System Recommendation ........................................................................... 5
2.1.1
2.1.2
2.2
2.3
2.3.1
2.3.2
Windows PC ...................................................................................................................5
Other Systems................................................................................................................5
Hardware Installation .................................................................................. 5
Software Installation.................................................................................... 8
Windows Vista................................................................................................................8
Older Versions of Windows ........................................................................................15
3
Windows Vista Sound System........................................15
3.1
3.2
Background................................................................................................ 15
Windows Vista Sound Panel..................................................................... 16
4
Overture 192 Control Application...................................18
4.1
4.2
4.3
4.4
Fundamentals ............................................................................................ 18
Starting Up ................................................................................................. 18
System Tray Icon ....................................................................................... 20
Popup Menu ............................................................................................... 20
4.4.1
4.4.2
4.4.3
4.5
4.5.1
4.5.2
4.5.3
4.5.4
Show / Hide Overture Control .....................................................................................21
Start with Windows......................................................................................................21
Exit ................................................................................................................................21
Panels......................................................................................................... 21
Sample Rate Panel.......................................................................................................22
Levels Panel .................................................................................................................26
Control Panel................................................................................................................29
Help Panel.....................................................................................................................31
4.6
Uninstalling ................................................................................................ 32
5
Making the Most of the Overture 192 .............................33
5.1
5.2
5.3
Cables......................................................................................................... 33
Music Player Applications ........................................................................ 33
ASIO Compatibility .................................................................................... 33
6
Notes.................................................................................35
© Cantatis, 2009
Page 2 of 35
Cantatis
Overture 192 Windows Vista User Guide
1 Introduction
Many thanks for your purchase of the Cantatis Overture 192 High Performance 24-bit 192kHz
Audio Output Interface.
This product is one of the very highest quality audio output interfaces available, allowing your
computer to become one of the best pieces of reference Hi-Fi in your home. To achieve this, we
have used some state-of-the-art components and advanced designs, based on many years
experience in the audio field, to create a soundcard that delivers exceptional audio performance.
Throughout the design of the Overture 192 we have endeavoured to reduce the usual
complexities and instead focus on quality of performance and ease of use. We believe that
everything should be simple to install, simple to configure and simple to operate, allowing you to
focus on the reason for purchasing this product – the audio performance.
Sounds too good to be true? Well trust your ears, you’ll be pleasantly surprised.
1.1 Key Features
The Overture 192 is the first computer audio product available with Texas Instruments Burr
Brown PCM1794 Digital to Audio Converters (DACs) operating in “dual mono mode” – giving
Industry leading performance, ideal for Hi-Fi purists, home studios, professional and broadcast
applications.
The Burr Brown DACs and audiophile op-amps throughout give stereo analogue outputs on
studio grade gold RCA connectors at up to 192kHz sample rate in fantastic detail and audio
clarity.
The card also provides digital AES/EBU (S/PDIF) on both optical (TOSLINK) and co-axial (RCA)
outputs at up to 192kHz to match pro-audio systems. The sample rate is software selectable to
consumer standards including 44.1kHz, 48kHz, 96kHz and 192kHz thereby giving certainty of
system compatibility.
The Overture 192 also provides a specialist headphone amplifier circuit designed to suit the
widest range of headphone types (30Ω to 600Ω) giving distortion and noise free listening via a
3.5mm jack socket and pin header for internal PC connection to a front panel headphone socket.
The Overture 192 is PCI v2.2 compliant and comes with WDM drivers for Microsoft Windows®
98SE, 2000, XP and Vista. The drivers may function in other operating systems – see our
website for additional details.
The Windows drivers are ASIO 2.0 compatible, allowing use with suitable software.
A simple, intuitive control application avoids additional digital processing in the signal path for the
ultimate ease of use.
© Cantatis, 2009
Page 3 of 35
Cantatis
Overture 192 Windows Vista User Guide
1.2 Product Tour
C
G
B
A
F
D
E
A. Analogue Left / Right RCA Connectors
Analogue audio is provided via these studio grade gold RCA connectors at 2.3V rms for
connection to an external audio amplifier or AV system. Make sure that you use high
quality audio cables to preserve the exceptional audio quality from the Overture 192, such
as those available from our website (www.cantatis.com).
B. 3.5mm Headphone Socket
Connect your headphones directly to the Overture 192 to listen to music via the high
quality on-board headphone amplifier. If your headphones have a ¼” jack rather than a
3.5mm jack then you can purchase an adapter from our website (www.cantatis.com).
C. Front Panel Audio (FPA) Connector
If your computer has a front panel headphones socket then you can attach the internal
cable to this connector so that you can plug your headphones into the front of your
computer rather than the headphone socket on the Overture 192 card.
D. Optical S/PDIF Connector
Digital S/PDIF audio is provided via this optical connector for connection to a digital
amplifier or AV system. Cables are available from our website (www.cantatis.com).
© Cantatis, 2009
Page 4 of 35
Cantatis
Overture 192 Windows Vista User Guide
E. Electrical S/PDIF Connector
Digital S/PDIF audio is also provided via this RCA connector for connection to a digital
amplifier or AV system. Cables are available from our website (www.cantatis.com).
F. PCI Connector
The PCI connector is the interface that the Overture 192 uses to communicate with your
computer. This must be plugged into a suitable free PCI slot inside your computer (see
section 2.2 below).
G. Expansion Ports
The three expansion ports are provided for connection to other Cantatis products. Please
visit our website (www.cantatis.com) for information about new products and offers.
2 Installation
2.1 System Recommendation
2.1.1 Windows PC
It is recommended that your Windows PC has at least the following specification although there
are no restrictions during the installation process.
•
•
•
•
•
Intel Pentium III, AMD or compatible CPU
At least 256Mbytes of RAM
One available PCI slot
CDROM drive
Microsoft Windows® 98SE, 2000, XP or Vista
Note that there is a separate Windows XP User Guide to make installation and use
straightforward for Windows XP users. If you are using Windows XP then please see the
Cantatis Overture 192 Windows XP User Guide.
2.1.2 Other Systems
Check the Cantatis website (www.cantatis.com) for updates on how to use your Overture 192 on
systems that are not running Microsoft Windows.
2.2 Hardware Installation
The following instructions describe a typical installation in a standard personal computer. Your
experience of installing the Overture 192 might vary slightly from these instructions but the
general process should be the same.
© Cantatis, 2009
Page 5 of 35
Cantatis
Overture 192 Windows Vista User Guide
1. Switch off your computer and remove the power cable from your computer power supply.
2. Remove the cover from your system following the instructions provided when you purchased
your computer, so that you have access to the inside of the computer and the PCI slots.
3. Identify the first available PCI slot in your system and if there is a blanking plate present in the
slot then remove it using a suitable screwdriver.
© Cantatis, 2009
Page 6 of 35
Cantatis
Overture 192 Windows Vista User Guide
4. Remove all four of the nuts from both audio connectors on the Overture 192 Audio Interface
card.
5. Insert the Overture 192 card into the PCI slot carefully and push the card firmly until it is
seated securely, then screw the Overture 192 bracket to the chassis of your computer.
6. Screw the washers and four nuts back onto the audio connectors at the rear of your computer
being careful not to over-tighten.
© Cantatis, 2009
Page 7 of 35
Cantatis
Overture 192 Windows Vista User Guide
7. If your computer has a front panel headphone socket then unplug the front panel audio cable
from your motherboard and plug it onto the connector marked FPA on the Overture 192 card
(check left and right are the correct way round and ground is connected).
L G R
8. Replace the cover on your system, reconnect it to the mains power and switch it on. When the
computer has started up then log on as usual.
2.3 Software Installation
2.3.1 Windows Vista
When you log on to Windows Vista, you may see the Found New Hardware wizard:
If this window appears then do not attempt to install the software using the wizard. The software
must be installed from the CD that was provided with your Overture 192 so click on “Cancel”.
© Cantatis, 2009
Page 8 of 35
Cantatis
Overture 192 Windows Vista User Guide
Insert the Overture 192 software CD into the CD drive of your computer and wait for the
installation program to start (if it doesn’t start automatically then run the Setup.exe program on
the CD manually).
When you insert the Overture 192 installation CD, Windows Vista might display the following
window:
If this window does appear then you should click on “Run Setup.exe” to proceed with the
installation.
Tip: If you always want AutoPlay CDs to run on your computer automatically then you can tick
the “Always do this for software and games” box before clicking on “Run Setup.exe” and this
AutoPlay panel will not appear again.
Windows Vista contains more security features than Windows XP so after running the AutoPlay
CD you might see the following window:
You should simply click on “Allow” to proceed with the installation.
© Cantatis, 2009
Page 9 of 35
Cantatis
Overture 192 Windows Vista User Guide
The Overture 192 Control Application Installer will then start:
Click on “Next >” to start the installation.
You will then be asked to confirm or modify the location to install the application and whether you
want to install the software for everyone that uses your computer or just you:
It is normal just to leave these at the suggested settings but you can modify them if you want to.
Then just click “Next >” to start and you will see the progress of the installation.
© Cantatis, 2009
Page 10 of 35
Cantatis
Overture 192 Windows Vista User Guide
When the Overture 192 Control Application has been installed you will see the following window:
When you click on “Close” to close this window the Overture 192 Driver Installer will start
automatically using the InstallShield Wizard (this provides protection for your installation and
ensures that the driver software can be uninstalled cleanly should you wish to do so in future):
© Cantatis, 2009
Page 11 of 35
Cantatis
Overture 192 Windows Vista User Guide
When the InstallShield Wizard has finished its preparations then the driver installer will start:
Click on “Next >” to start installing the Overture 192 driver.
A license agreement window will be displayed that shows the license that is granted for you to
use the driver software. Read the text then select the “I Agree” option and then click on “Next >”
to continue.
You will then be asked to confirm that you wish to install the driver:
Make sure the “Cantatis Overture 192 Audio Driver V1.00” item is ticked and then click on
“Next >” to continue.
© Cantatis, 2009
Page 12 of 35
Cantatis
Overture 192 Windows Vista User Guide
You will then be asked to make a final confirmation that you want to install the driver:
If you want to review any of the previous windows to check your settings then you can use the
“< Back” button, otherwise click on “Next >” to proceed with the installation.
The Overture 192 driver will then be installed.
During the driver installation you might see the following window:
This is normal with drivers that have not been created by Microsoft so there is no need to worry
as we have tested the Overture 192 drivers thoroughly. Just click on “Install this driver software
anyway” to proceed with the installation.
© Cantatis, 2009
Page 13 of 35
Cantatis
Overture 192 Windows Vista User Guide
When the driver installation process has finished you will see the following window:
The text should appear as above, stating that the items that failed to install were “None”
i.e. there were no components that failed to install.
If anything other than “None” is shown then you should contact our support team via the
Cantatis website (www.cantatis.com).
Click on “Next >” and you will be prompted to restart your computer:
Remove the Overture 192 installation CD from your CD drive and then click on “Finish” to restart
your computer so that that the driver starts up properly and is ready to use.
© Cantatis, 2009
Page 14 of 35
Cantatis
Overture 192 Windows Vista User Guide
2.3.2 Older Versions of Windows
Installing the software on older versions of Microsoft Windows should be very similar to the
process described above for Windows Vista.
Note that there is a separate User Guide for Windows XP that describes the installation process
on Windows XP in detail.
If you have any problems with your installation then please contact our support team via the
Cantatis website (www.cantatis.com).
3 Windows Vista Sound System
3.1 Background
When Microsoft created Windows Vista the sound system architecture was completely
redesigned and no longer works in the same way as previous versions of the Windows operating
system such as Windows XP.
Note that in this section we discuss the “sample rate”, which is partly what determines the
“quality” of the sound, the higher the sample rate the better the quality. Sample rate is normally
measured in “kHz” (pronounced “kilo-hertz”) which means “thousands of samples per second”
e.g. 96kHz means 96 thousand samples per second. A “sample” is a “snapshot” of audio taken at
a particular instant of time so the more samples there are the more of the original sound can be
reproduced.
In previous versions of Windows, when a sound file was played then Windows attempted to play
the sound at the sample rate of the audio data in the file. If the sound card driver did not support
that sample rate then Windows would up-sample or down-sample to match the sample rate
supported by the driver.
This had some drawbacks. In particular, if a sound was played at a low sample rate e.g. 22kHz,
and then a sound with a much higher sample rate e.g. 96kHz was played at the same time then
the Windows mixer would down-sample the higher sample rate sound to the lower rate, thereby
degrading the quality of the sound output for the higher sample rate file.
In Windows Vista, Microsoft decided that the user (and only the user) should be in full control of
both the current audio output device and the sample rate that is used at all times.
So, for example, if the user sets the sample rate to 96kHz then all sounds that are played are upsampled or down-sampled to 96kHz, regardless of the sample rate set in the file. This gives the
user the flexibility to set the sample rate that is suitable for their system and to rely on all sound to
be reproduced at the level of quality they have selected.
© Cantatis, 2009
Page 15 of 35
Cantatis
Overture 192 Windows Vista User Guide
3.2 Windows Vista Sound Panel
At the heart of the new Windows Vista sound system is the Sound Panel, which can be accessed
easily from the popup menu on the “speaker” icon in the system tray:
By selecting the “Playback Devices” menu option you can display the playback devices in the
Sound panel:
Note that the Cantatis Overture 192 Audio Controller device is described as “Digital Output
Device (SPDIF)”. This is because the Overture 192 combines analogue and digital outputs into
one device that provides fantastic audio quality on both analogue and digital outputs at the same
time and it is therefore classed as a digital output.
© Cantatis, 2009
Page 16 of 35
Cantatis
Overture 192 Windows Vista User Guide
By selecting the Cantatis Overture 192 Audio Controller device and clicking on “Properties” (or by
simply double-clicking on the device icon) you can display the properties of the Overture 192
device:
Most of the functionality provided in this panel can be left unchanged but if you change the
sample rate that the Overture 192 is set to then you must always come back to this panel and
select the “Advanced” tab so that you can set the same sample rate for Windows Vista to use:
© Cantatis, 2009
Page 17 of 35
Cantatis
Overture 192 Windows Vista User Guide
The sample rate is set using the drop down menu for the Default Format and then you should
click on “OK” or “Apply” to set the sample rate you have selected.
Tip: You must always make sure that the sample rate set in the Windows Vista Sound
panel is exactly the same as the sample rate that is set in the Overture 192 Control
Application or you may find that you can’t hear any sound. Don’t worry though; the
Overture 192 Control Application will help you to do this at the appropriate time.
4 Overture 192 Control Application
4.1 Fundamentals
When we designed the Overture 192 Audio Output Interface one of the fundamental objectives
was to keep it simple to install and simple to use.
So, no bundles of cables hanging out of the back of your computer and no complicated control
applications with volume controls, graphic equalisers and dynamic effects that can all be
achieved by using the operating system and applications on your computer anyway.
Instead, the Overture 192 Control Application simply focuses on the essentials.
4.2 Starting Up
After you have logged onto your PC you will find a shortcut to the Overture 192 Control
Application on your desktop, which you can double click to start the application:
Tip: If you don’t want the Overture 192 shortcut on your desktop then it is safe to delete it.
© Cantatis, 2009
Page 18 of 35
Cantatis
Overture 192 Windows Vista User Guide
You will also find the Overture 192 Control Application in the “Cantatis” group in the
“All Programs” menu in your Start menu:
When the application starts up you will see the following window:
This window is used to control the Overture 192 Audio Output Interface.
© Cantatis, 2009
Page 19 of 35
Cantatis
Overture 192 Windows Vista User Guide
Tip: You can click on the “www.cantatis.com” link at any time to go directly to the Cantatis
website to find out about all of the latest products and offers or to get help and support.
4.3 System Tray Icon
When the Overture 192 Control Application starts up it also places an icon in the Windows
system tray:
Tip: By clicking on this icon with the left button of your mouse you can hide or show the Overture
192 Control Application window.
4.4 Popup Menu
The system tray icon also has a popup menu, which you can see when you click on the icon with
the right button of your mouse:
This popup menu is also available by clicking with the right mouse button on the Overture 192
Control Application window:
© Cantatis, 2009
Page 20 of 35
Cantatis
Overture 192 Windows Vista User Guide
4.4.1 Show / Hide Overture Control
The popup menu also has a means to hide or show the Overture 192 Control Application window
(as well as by simply clicking on the system tray icon). This is in bold text because it is the default
action that is taken when you simply click on the system tray icon.
4.4.2 Start with Windows
If you select the “Start with Windows” menu option then the menu item will be ticked and the
Overture 192 Control Application will put a shortcut in the “Startup” group of the “All Programs”
menu in your Start menu so that the application is started automatically when you log onto
Windows:
When the application starts automatically when you log on it will be shown briefly and will then
hide itself automatically. You can show the Overture 192 Control Application window again by
clicking on the system tray icon or using the popup menu.
If you select the “Start with Windows” menu option when it is ticked then the tick will disappear
and the “Startup” shortcut will be removed so that the application will no longer start up when you
log on.
4.4.3 Exit
The Overture 192 Control Application popup menu also provides an “Exit” menu option for exiting
the application:
4.5 Panels
The Overture 192 Control Application window provides access to four “panels” that allow you to
do different things:
Sample rate
Levels
Control
Help
© Cantatis, 2009
Allows you to control the audio playback sample rate.
Allows you to view and test the audio levels.
Allows you to control Overture 192 features.
Provides application version and access to help information.
Page 21 of 35
Cantatis
Overture 192 Windows Vista User Guide
These panels are selected by moving your mouse pointer over the panel name so that the name
turns from white to gold and then clicking with your left mouse button.
The selected panel will then be displayed.
4.5.1 Sample Rate Panel
The “Sample rate” panel allows you to control the audio playback sample rate used by the
Overture 192 Audio Output Interface:
The panel shows the “Current sample rate” that the Overture 192 is playing at (if there is nothing
playing then this will show the sample rate that was last played).
It also shows the “Selected sample rate”, which is the sample rate that the Overture 192 Audio
Interface is currently set to use.
© Cantatis, 2009
Page 22 of 35
Cantatis
Overture 192 Windows Vista User Guide
If you want to change the sample rate that the Overture 192 is set to then you can move your
mouse pointer over the existing “Selected sample rate” until it turns from white to gold and then
click with your left mouse button to display the sample rate menu:
You can then use your mouse to highlight the sample rate you want and click with your left
mouse button to set it.
Tip: When you change the sample rate that the Overture 192 uses you must also tell
Windows Vista to use the new sample rate.
To remind you of this the Overture 192 Control Application displays the following message:
© Cantatis, 2009
Page 23 of 35
Cantatis
Overture 192 Windows Vista User Guide
It also opens the Windows Vista Sound panel for you automatically so that you can change the
sample rate:
Follow the instructions by double-clicking on the Cantatis Overture 192 Audio Controller device,
select the Advanced tab of the properties panel and then select the corresponding sample rate
from the Default Format drop down menu:
© Cantatis, 2009
Page 24 of 35
Cantatis
Overture 192 Windows Vista User Guide
When you have done this, click on “OK” to close the properties panel and then on “OK” to close
the Sound panel and Windows Vista will now use the new sample rate you have set.
If you go back to the “Sample rate” panel you will note that the “Current sample rate” does not
change immediately:
The “Current sample rate” will only change to reflect the new setting when you next play some
audio:
After you have changed the sample rate all music and audio clips will be played at your selected
sample rate, so any music recorded at a lower rate will be “up-sampled” and any music recorded
at a higher rate will be “down-sampled”.
© Cantatis, 2009
Page 25 of 35
Cantatis
Overture 192 Windows Vista User Guide
Tip: If you are using the digital outputs of the Overture 192 then you might want to set the
“Selected sample rate” to the maximum sample rate supported by your digital receiver (typically
48kHz or 96kHz). This will ensure that you always play at a sample rate that your digital receiver
will understand and you will never end up in the situation where you are playing audio that your
digital receiver will not be able to play.
4.5.2 Levels Panel
The “Levels” panel allows you to view the audio levels playing out of the left and right channels of
the Overture 192 Audio Interface.
When you are setting up your system you can also click on the “Test left” button to play a test
tone on the left channel:
The button text will change to “Stop left” and if you click on the button again then the test tone will
stop playing.
© Cantatis, 2009
Page 26 of 35
Cantatis
Overture 192 Windows Vista User Guide
Or you can use the “Test right” button to play a test tone on the right channel:
Again, clicking on the same button will stop the test tone playing.
Tip: You can use the test buttons to help diagnose problems with Windows Vista sound playback
as follows...
If Windows Vista is not set up correctly to play audio through the Overture 192 then a few
seconds after clicking on one of the test buttons the Overture 192 Control Application will display
the following message:
The two most likely reasons for audio not to play are that you have not selected the Cantatis
Overture 192 as the default audio device or there is a mismatch between the sample rate that
Windows Vista is trying to use and the current “Selected sample rate” in the Overture 192 Control
Application “Sample rate” panel.
© Cantatis, 2009
Page 27 of 35
Cantatis
Overture 192 Windows Vista User Guide
To help resolve these problems the Overture 192 Control Application opens the Windows Vista
Sound panel automatically:
You should make sure that the Cantatis Overture 192 Audio Controller device has the green
“blob” with a tick next to it to indicate that it is the current default sound playback device and if not
then highlight the device and click on “Set Default” then click on “Apply”.
© Cantatis, 2009
Page 28 of 35
Cantatis
Overture 192 Windows Vista User Guide
Then double-click on the Cantatis Overture 192 Audio Controller device to display the properties
panel, then select the Advanced tab and check that the Default Format is set to the same sample
rate as the Overture 192 Control Application:
Then click on “OK” to close the properties panel then on “OK” to close the Windows Vista Sound
panel.
Go back to the “Levels” panel in the Overture 192 Control Application and use the test buttons to
make sure that you have resolved the problem.
4.5.3 Control Panel
The “Control” panel allows you to control some of the features of the Overture 192.
© Cantatis, 2009
Page 29 of 35
Cantatis
Overture 192 Windows Vista User Guide
Ticking the “Mute all outputs” option turns off audio output on both the analogue “line” outputs
and also the headphone output:
Ticking the “Disable line outputs” option turns off the analogue RCA outputs:
Note that this is performed by turning on and off the hardware “relay” circuits so when you tick or
un-tick this option you will hear a small click from the Overture 192 – this is normal and is nothing
to worry about!
© Cantatis, 2009
Page 30 of 35
Cantatis
Overture 192 Windows Vista User Guide
Ticking the “Disable headphone output” option turns off the headphone output:
Again, you might hear a small click from the Overture 192 when you tick or un-tick this option.
Tip: You can leave your headphones plugged into the Overture 192 headphone jack at the rear
of your computer and just disable the headphone output using this tick box to avoid hearing audio
from your headphones at the same time you are listening to music playing from the Overture 192
through your Hi-Fi system.
4.5.4 Help Panel
The “Help” panel provides application version information and a convenient link to the Cantatis
website where you can find further information about the Overture 192, other Cantatis products,
Frequently Asked Questions etc:
© Cantatis, 2009
Page 31 of 35
Cantatis
Overture 192 Windows Vista User Guide
4.6 Uninstalling
If you find that you don’t need to use the Overture 192 Control Application and you want to
uninstall it then you should exit the application using the “Exit” option on the popup menu:
Then use the “Uninstall Overture 192 Control Application” shortcut in the Cantatis group in your
Start menu:
This will uninstall the Overture 192 Control Application from your system but will leave the
Overture 192 drivers intact so that the Overture 192 Audio Output Interface continues to operate
as required.
© Cantatis, 2009
Page 32 of 35
Cantatis
Overture 192 Windows Vista User Guide
5 Making the Most of the Overture 192
5.1 Cables
Your Overture 192 Audio Output Interface provides you with one of the highest quality audio
outputs available for your computer.
It would be a shame to compromise that quality of sound after it leaves your computer; therefore
we recommend that you use very high quality audio cables to get the Overture 192 sound to your
Hi-Fi or AV system without any loss of quality.
We provide a wide range of cables and adapters on our website (www.cantatis.com) that have
been specially selected to operate with the Overture 192 so please visit our site and browse
round the shop to find what you need.
5.2 Music Player Applications
Whatever application you prefer to use for playback of your digital music, the Overture 192
provides you with exceptional audio quality. Whether you use Windows Media Player, iTunes,
WinAmp or another music player you can be confident that your music will be reproduced
faithfully and with the utmost detail and clarity.
To get the latest tips and tricks for using the Overture 192 with your favourite music player
application please visit the support area of our website (www.cantatis.com) and check the
Frequently Asked Questions list.
5.3 ASIO Compatibility
The Audio Stream Input/Output (ASIO) architecture addresses the needs a professional audio
recording solution might have. Created and trademarked by Steinberg Media Technologies
GmbH, it does this by supporting variable bit depths and sample rates, multi-channel operation
and synchronization. As a result, the user gets low latency, high performance, easy set up and
stable audio recording across a variety of high-end software applications, particularly those that
are compatible with Virtual Studio Technology (VST).
With ASIO, the entire audio system becomes deterministic, controllable and offers complete and
immediate access to the audio system's capabilities. Since its introduction, ASIO (and now
ASIO2) has become a supported standard by many leading audio hardware manufacturers.
As the Cantatis Overture 192 utilises standard WDM driver design techniques, it is fully
compatible with a wide variety of 3rd party ASIO drivers to allow ultra low latency for those who
need it, particularly for musicians who rely heavily on software synthesis.
Take the scenario of a keyboard player using a controller keyboard over MIDI to their computer
running a software synthesiser. Hit a note on the keyboard and the sounds needs to happen
FAST. A delay of a mere tenth of a second can render the system utterly unusable, especially
where you are playing fast - you can easily play 20 notes in a second - and it's useless if the
audio happens with a 3-4-5 note delay.
© Cantatis, 2009
Page 33 of 35
Cantatis
Arguably, the most popular
(http://www.asio4all.com):
Overture 192 Windows Vista User Guide
3rd
party
ASIO
driver
comes
from
Michael
Tippach
ASIO4ALL is a hardware independent low latency ASIO driver for WDM audio devices. It uses
WDM Kernel-Streaming to achieve its objectives, bypassing the plethora of software layers more
normally found in an operating system.
ASIO4ALL allows the Overture 192 to achieve some quite remarkably low latency figures –
measured in audio samples rather than seconds.
© Cantatis, 2009
Page 34 of 35
Cantatis
Overture 192 Windows Vista User Guide
On a powerful computer, and when higher sample rates are selected, we've been very successful
in reliably achieving great results. With a lower sampling rate of 44.1kHz and even with a big
buffer size of, say, 256 samples, the delay through the Audio output device can be a mere 5
thousandths of a second! After a few tweaks of the settings, 2 milliseconds can very often be
achieved:
Perfect for all budding Rick Wakemans everywhere!
For more information about using the Overture 192 with software synthesiser applications and
computer generated music please visit our website (www.cantatis.com).
6 Notes
All specifications are subject to change without prior notice.
Microsoft and Windows® are registered trademarks of Microsoft Corporation. Other product and
brand names are trademarks of their respective owners.
Copyright © Cantatis, 2009
www.cantatis.com
© Cantatis, 2009
Page 35 of 35