1
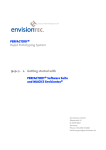
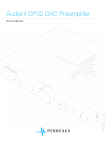
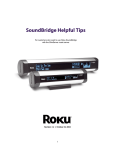
DIA-250S Integrated Amplifier/DAC User Manual Gato Audio DIA-250S - Integrated Amplifier/DAC Contents Contents 2 Don’t be a stranger 3 Package contents 3 Safety first! 4 About the amplifier General design Class-D Output Stage Analogue Input Stage D/A Converter USB Versatility Connectivity LED Display 5 5 5 5 5 5 5 5 Setting up your amplifier Basic connection Overview Connecting to a Bluetooth device Connecting a computer to USB Connecting an Apple iPad to USB Connecting an Apple iPhone to USB 6 6 6 7 7 7 7 How does it work? Power on Standby Adjusting the volume Muting Input selection Display dimming Sample rate read-out Direct Protection warnings 8 8 8 8 8 8 8 8 9 9 RC-3 remote control How to insert/replace the battery Functions 10 10 10 Installing USB Driver Requirements Windows PC Installation and Set-Up Mac Installation and Set-Up 11 11 11 12 USB audio troubleshooting 13 Make it last! 14 If all else fails… 14 Technical specifications 15 Page 2 User Manual Don’t be a stranger Thank you for purchasing the Gato Audio DIA-250S. We are absolutely confident that it will bring you many hours of listening pleasure. We hereby cordially invite you to join the Gato Audio family by registering your product online. You may also consider signing up for our newsletter to receive information about exciting new products, events and technical updates. All this and more on www.gato-audio.com Our very best, Gato Audio Package contents Please check that the following is included in the package: • 1 Gato Audio DIA-250S integrated amplifier • 1 Mains cable • 1 Gato Audio RC-3 remote control • 1 CR2032 3 V battery • 1 CD-ROM with USB driver for Windows • 1 Bluetooth antenna • This manual - which you should be reading now Page 3 Gato Audio DIA-250S - Integrated Amplifier/DAC Safety first! Mains plug and cable: • Insert the mains plug fully into the mains outlet socket • Do not use any mains cable other than the one provided with this amplifier • Do not defeat the ground connection • Do not move the amplifier around while it is connected to mains • Do not place heavy objects on the mains cable or place the cable near high-temperature objects • Do not use damaged mains plugs or socket outlets Liquids: Electricity and liquids are not a safe combination, therefore: • When cleaning the amplifier, remove the mains plug • Do not handle the mains plug with wet hands • Do not spray any liquid directly onto the amplifier • Do not place liquid containers above or near the amplifier • Keep liquids away from the amplifier …And: • This is not a toy and should not be handled like one (by children OR adults) • Do not remove the covers of the amplifier (for service see page 14) • Do not attempt to put foreign objects inside the amplifier (for service see page 14) • Do not cover the amplifier with cloth • Do not place the amplifier on sloped or unstable surfaces • When the amplifier will not be used for a long time, remove the mains plug • Never connect or disconnect cables when the amplifier is switched on • Do not short the amplifier outputs • This unit is made for indoor temperature (15-25O C or 59-77 OF). If it has been exposed to cold temperature, let it adjust itself to indoor temperature before use • Make sure that your amplifier is able to breathe by securing a minimum safe distance around the heat sinks of 100 mm or 4 inches • The amplifier can get hot during use. Normal operating temperature is from room temperature to 50O C or 122O F 100 mm / 4” 100 mm / 4” Standby Page 4 DIA-250S Input User Manual About the amplifier General design The Gato Audio DIA-250S Class-D integrated amplifier are designed and built to a vision of combining technology, power, sonic performance, connectivity, versatility, stunning looks and compact design. The amplifier features built-in D/A converters with electrical, optical, USB and aptX Bluetooth inputs. High quality analogue input is via RCA connectors or via XLR connectors for true balanced signals. Both balanced and unbalanced line outputs are provided. The DIA-250S offers 250 watts per channel into 8 ohm loads and doubles its power output into 4 ohm loads. Modern Class-D technology enables extremely high efficiency, thereby providing both enormous power and huge voltage swing. Besides the obvious benefit of having this much power, the huge voltage swing from these powerhouses gives effortless dynamic headroom without clipping, all in the service of bringing you stunning musical performance. Class-D Output Stage The DIA-250S amplifier offers state of the art Class-D output stages with dedicated and optimized switch mode power supplies. The multiple stage power amplifier is built around proven technology from International Rectifier, optimized with a precision high frequency oscillator and PWM modulator. A pair of precision switching MOS-FET transistors, with super low on-resistance ensures the high frequency switching is done perfectly and with as little loss as possible. The output filters are made from quality PP capacitors and low DCR coils, converting the high power PWM signals back into detailed and smooth analogue music. Analogue Input Stage The analogue input stage is where everything begins. It not only connects external inputs and the built-in D/A converter with the output stage, it adapts impedances, adjusts levels and switches signals. A super-gentle embrace of the delicate analogue signals is important for the total performance of the amplifier. At Gato Audio we have utilized our many years of experience in “voicing” analogue amplifiers to make this particular stage perform at its very best. We tuned the input stage to perform with a natural and lifelike sound, affecting the original signal as little as possible. D/A Converter The built-in D/A converter offers real high end performance, enabled by the use of a dedicated power supply, a balanced-driven Burr-Brown PCM1794 D/A converter, an optimized high bandwidth I/V converter, and an analogue stage with low-Q, low pass filters. All digital inputs are upsampled to 24bit/192kHz. This D/A converter will upgrade any digital source - such as wired or wireless streaming from your computer or CD drive - to a high end level of detail and musical performance. USB Versatility The true 24bit/192kHz digital input via the state of the art asynchronous USB circuit is especially worth highlighting. It enables the possibility of a sonic performance vastly above that of any CD. It is the key note of making these amplifiers a quality-enhancing connection point for your Mac, PC or even your iPhone and iPad. Connectivity We had our eye on versatility and connectivity when designing the DIA-250S. The amplifier offers not only a wide range of digital and analogue inputs, but also line outputs, a trigger signal for external power amplifiers, and a configurable home theater input. The HT input can turn the amplifier into a fixed level power amplifier for use in a surround setup, without compromising the sonic performance. LED Display By choosing a large high contrast white LED dot matrix display, we gave the DIA-250S a distinct appearance, easy to understand, easy to see and operate – even at remote control distance. In addition to displaying output level and selected input, it also displays the sample rate of the digital input – revealing the quality. The LED display is fully dimmable by the remote control. Page 5 Gato Audio DIA-250S - Integrated Amplifier/DAC Setting up your amplifier Basic connection Follow these steps for setting up your system in this sequence: 1. Place the DIA-250S as per the instructions on page 4 2. Connect inputs to the amplifier 3. Connect your loudspeakers to the amplifier 4. Connect mains power cable to the amplifier and turn it on 5. Select input and volume setting. Enjoy! Overview Mains switch Mains socket Fuse compartment Right speaker terminals Bluetooth Connect button Bluetooth Antenna Left speaker terminals Speaker R Mains Speaker L Antenna BT Connect + + Made in Denmark Neutral Coax Input 1 Input 2 R Balanced Line out L L L L R R R R Balanced out L USB Link Dim Toslink Live DO NOT REMOVE COVER. NO USER-SERVICEABLE PARTS INSIDE. REFER SERVICING TO QUALIFIED PERSONNEL. TO REDUCE THE RISK OF ELECTRICAL SHOCK OR FIRE, DO NOT EXPOSE THIS APPLIANCE TO MOISTURE OR RAIN. 12 V trigger Toggle On/Off External Equipment USB input Optical input Coaxial input Analogue inputs Bluetooth Balanced input Balanced output Display setting iPad Apple AirPort Express Sonos Phono Preamp Phone High End CD-Player Power Amp Mac AppleTV Squeezebox Surround Preamp/Receiver Tablet Professional Audio Equipment Active Speaker PC Harddisk-Player CD / DVD / BD-Player TV Mac Laptop Streaming-Player Docking Station CD / DVD / BD-Player PC Docking Station Laptop TV or Sat/Cable Receiver Volume read-out Standby Standby button Page 6 Analogue output Input / Sample rate read-out DIA-250S Input Volume control knob Input selection button Subwoofer User Manual Connecting to a Bluetooth device Before connecting the DIA-250S to a Bluetooth device, you will need to mount the antenna to the back of the amplifier. Then go to the settings of the Bluetooth device and connect to “Gato Audio DIA-250S”. To switch a connected device to another, either go to the Bluetooth settings of the connected device and disconnect the amplifier or press the BT Connect button on the back of the DIA-250S. Then connect the new device. The BT Connect buton on the back of the amplifier will blink when it is ready but not connected to a device. The button will light up continuesly when the amplifier is connected to a device. Connecting a computer to USB Before connecting the DIA-250S to your computer via USB, please read installation instructions on page 11. Connecting an Apple iPad to USB It is possible to stream music from an iPad to the USB port of the DIA-250S. An Apple Camera Connection Kit is required for this feature. The kit is available from the Apple online store or other Apple accessory shops. Plug the camera connector into the iPad dock connector and connect it to the DIA-250S with a USB cable. Simply start your music app and enjoy the music. Connecting an Apple iPhone to USB Like the Apple iPad it is possible to stream music from an iPhone to the USB port of the DIA-250S. The procedure is exactly the same as for the iPad, however it is only possible for iPhones with IOS 7 and later. Page 7 Gato Audio DIA-250S - Integrated Amplifier/DAC How does it work? Power on Use the mains switch on the back of the amplifier to turn it on. The amplifier is now in standby mode. Only the microprocessor and the standby LED are powered during standby. Therefore, the DIA-250S has an ultra-low standby power consumption of less than 1W. Standby Activate the amplifier by pressing on the remote control or the Standby button on the front panel. When the amplifier enters standby mode again it will remember the selected input channel and volume level. If the volume level is higher than 50, it will be reduced to 50 when the amplifier exits standby mode. Standby DIA-250S Input Standby Adjusting the volume Turning the volume control knob clockwise increases the volume. Turn it counter-clockwise to decrease the volume. The volume can also be adjusted by pressing the + or button on the remote control. Muting For complete silence simply press the button on the remote control. Press the mute button once more to return to the previous volume level. Standby DIA-250S Input Mute Input selection Use the Input button on the front panel to select between the different input channels. Inputs can also be selected with the remote by pressing the direct input selection buttons or the or buttons. The input will switch the channels in this order: IN1IN2BALUSBRCAOPTBT Display dimming The display can be dimmed by a pressing the Display button on the RC-3 remote control or the Dim button on the back of the amplifier. The display is now turned off except for two LEDs indicating the dimmed display state. Whenever a change is made to the settings of the amplifier, such as adjusting volume or changing input, the display will light up for 4 seconds, showing the change that is being made. Press either of the buttons again to exit display dimming mode. Standby DIA-250S Input Display dim Sample rate read-out The DIA-250S can read and display the sample rate of the USB, RCA, OPT and BT digital input channels. The DIA-250S can be set to display this in two different ways: Standby 1. The display on the right shows the selected input channel, eg. USB. Press the USB button on the RC-3 remote control, and the sample rate will be shown in kHz instead of selected input channel name for 4 seconds. DIA-250S Input Sample rate read-out 2. The display on the right only shows the sample rate. When changing input channels the channel name will be shown for 4 seconds, and then return to display the sample rate. Standby To switch between the two read-out modes, press and hold the Dim button on the back of the amplifier for 2 seconds. Page 8 DIA-250S Input No sample rate available User Manual Standby DIA-250S Input Home Theater direct Direct The Direct function bypasses the volume control turning this amplifier into a fixed level power amplifier. This can be very useful in surround setups. To activate this mode, select input IN1 and press and hold the Input button on the front panel of the amplifier for 4 seconds. The left display will read HT. To disable the function, press and hold the Input button on the front panel of the amplifier for 4 seconds. The amplifier remembers this setting in standby mode and when the DIA-250S is switched off. Protection warnings The DIA-250S is equiped with a sophisticated protection circuit to protect the amplifier and/or the connected equipment in case of failure. The DIA-250S features two warning signals: Standby DIA-250S Input A HOT sign will blink in the right display due to temperature problems: If this happens, turn off the amplifier mains switch and wait about 10 minutes for the heat sinks cool down before turning on the mains again. If a lot of heat is generated within a short period of time, please check the following: • The ventilation around the amplifier HOT warning • The speaker cable and cable connections • The specifications of the connected loudspeakers An OFF sign will blink in the right display: Turn off the amplifier mains switch and please check the following before turning the mains on again: Standby DIA-250S OFF warning Input • The speaker cable and cable connections • The connected equipment • That you are not playing above the clipping area of the amplifier If the amplifier keeps blinking after the powering up routine, please turn off the amplifier and contact your dealer or the national distributor. Page 9 Gato Audio DIA-250S - Integrated Amplifier/DAC RC-3 remote control The RC-3 is an infrared remote control for the Gato Audio DIA-250S. How to insert/replace the battery The RC-3 runs on a standard CR2032 3 V button battery. 1. Remove the small lid on the bottom side of the remote 2. Insert or replace the CR2032 3 V button battery 3. Reinstall the small lid on the bottom side of the remote Functions Display Standby - Press the button to put the amplifier in standby Press it again to turn it on Display - Press the button to dim the display Press it again to restore the display to normal Mute - Press the button to mute the amplifier Press it again to return to the previous volume level USB - Press the button to select the digital USB input channel RCA - Press the button to select the digital coaxial input channel Optical - Press the button to select the digital optical input channel Input 1 - Press the button to select the analogue Input 1 channel Input 2 - Press the button to select the analogue Input 2 channel Balanced - Press the button to select the analogue balanced input channel BT - Press the button to select the digital Bluetooth input channel + - Press the button to increase the volume Volume down - Press the button to decrease the volume Volume up Next input channel Previous input channel Page 10 - Press the button to select next input channel - Press the button to select previous input channel USB RCA Optical Input 1 Input 2 Balanced BT + User Manual Installing USB Driver Requirements Minimum computer configuration required for USB audio streaming: • Intel Core 2 @ 1.6 GHz, or AMD equivalent with 1 GB RAM • USB 2.0 interface • One of the following operating systems: • Windows XP with SP3 (32 bit) • Windows Vista with SP2 (32 bit & 64 bit) • Windows 7, 8 and 10 (32 bit & 64 bit) • Apple OS X 10.6.4 (Snow Leopard) or higher Because there are so many PC configurations out there, we cannot guarantee that you will be able to stream audio on USB even if your system meets the requirements above. Windows PC Installation and Set-Up Before you are able to stream audio from USB on your Windows PC the first time, you will have to install the Gato Audio USB driver. A CD-ROM with a USB driver is supplied with the DIA-250S, but we recommend to go online to www.gato-audio.com and download the latest driver for your specific Windows version. You will find it in the download section in the bottom of the DIA-250S product page. Connect your DIA-250S to a free USB port on your computer and start setup.exe, either from the CD-ROM or the downloaded driver. Click Next to start installation Choose your prefered destination for the installation and click Install Click Finish to complete the installation During the installation process on Windows XP, yyou mayy see this message. g Please jjust click Continue anyway Page 11 Gato Audio DIA-250S - Integrated Amplifier/DAC After the installation, follow these steps to setup Windows to stream to your Gato Audio device: Click Start open Control panel Select Hardware & sound click on Sound Select Gato Audio DIA-250 as playback device and click Set Default Mac Installation and Set-Up No driver installation is needed on the Mac. The driver will be installed automatically when the DIA-250S is connected to your Mac for the first time. To set up your Mac to stream audio to the DIA-250S: Open Finder Choose Utilities Open Audio MIDI setup In Audio MIDI setup select the Gato Audio USB 2.0 device and then choose Use this device for sound output. Set your prefered sample rate and bit resolution at Format. Page 12 To adjust output format, click Properties and select the Advanced tab User Manual USB audio troubleshooting USB audio devices have stronger requirements for both USB hardware and software than other USB devices. The following section describes the most common issues that may rise and their possible solutions. Known hardware issues and possible solutions A faulty hardware component, e.g. USB cable or USB port, may not have an impact on standard USB devices such as a FLASH drive or a printer but can be catastrophic for a USB audio device. • USB cables Quite often, the USB cable (or its connectors) is the cause for USB signal distortions. Some cables available in the market are not suited for USB 2.0 high-speed communication (480 Mbps). Also the maximum allowed cable length of 5 meters should not be exceeded. Try using a different cable. Try a shorter cable (less than 2 meters). Stay away from special USB cable offerings optimized for audio, or cables which include additional functionality such as status LEDs. • PCB mounted USB ports On some PC main boards (or laptops) signal quality of some USB ports is insufficient for USB audio streaming. The cause could be that on the PCB USB signals are routed close to a switching voltage regulator, for example. Try using a different USB port to connect the audio device. • USB hubs and front panel mounted USB ports External USB hubs and ports (mounted on a front panel or elsewhere in the PC case) are a possible source of USB signal distortion. Quality of cables or connectors used to connect the external USB port with the main board could be insufficient, or internal cables are placed close to the power supply or other sources of electrical noise. Try using a USB port that is mounted directly on the main board. Known software issues and possible solutions Due to the real-time nature of USB audio streams there are also requirements for the operating system and third party software components installed on the system. Software components that make real-time behavior of the operating system worse are not compatible with audio streaming applications in general. • Conflicting drivers Generally it can be stated that the set of device drivers that ships with Windows behaves well. If problems occur then they are typically caused by third party drivers that are to be installed for hardware which Windows does not support by default. So if a hardware component is supported by an in-box driver then this driver is to be preferred and a third party driver should not be installed. • W-LAN or Ethernet device drivers Quite often it can be observed that device drivers for W-LAN adapters monopolize the computers CPU causing clicks and drop outs when streaming audio to USB. A few Ethernet drivers also have such issues. Try to find an updated W-LAN driver, or try an older version of the driver. If no suited driver can be found, disable W-LAN (or Ethernet) while audio streaming is running. • Virus scanners or personal firewall software Normally, this kind of software includes some components to perform filtering or scanning work in the computers CPU. Often, such components keep the CPU busy for long periods which can cause clicks and drop outs when streaming audio to USB. Try to pause or disable the software while streaming audio to USB. Try uninstall the software and use a different product with similar functionality. Page 13 Gato Audio DIA-250S - Integrated Amplifier/DAC Make it last! Please apply simple common sense to maintain the sound quality and lifespan of your new Gato Audio amplifier. Here are a few guidelines: • Regular care: wipe the surfaces carefully by using a clean soft dry cloth • Cleaning: if necessary, wipe the hard surfaces clean using a soft cloth dampened only with clean water. • Grease stains or finger marks can be removed carefully with a clean soft cloth lightly dampened in a mix of clean lukewarm water and a single drop of dish-washing liquid. Then wipe the surfaces dry using a soft dry cloth • Be careful never to use hot water or any type of concentrated detergent, solvent, thinner, or any other volatile substance on the surfaces, or you may cause permanent damage to the surface coating • Keep the cabinet away from prolonged contact with rubber or PVC materials • Do not expose the amplifier to direct sunlight or other heat sources If all else fails… …don’t panic! Every Gato Audio product comes with a minimum 2-year warranty. See our website for details. This warranty does not cover damage or wear directly or indirectly caused by improper use, violence, tampering with or unauthorized access to or servicing of any part of the product. If you are in need of service or repair, please do not hesitate to contact us at [email protected] or visit our website www.gato-audio.com for more information. Page 14 User Manual Technical specifications Output power 2x 250 W / 8 Ω - 2x 500 W / 4 Ω Frequency response 20 Hz-20 kHz - 0.5 dB, and 2 Hz-70 kHz - 3 dB Total Harmonic Distortion < 0,01% at rated power Signal to noise ratio > 110 dB Line out maximum level 13 V balanced, 6,5 V unbalanced Total Harmonic Distortion < 0,001 % pre out Input impedance 20 kΩ RCA or 40 kΩ Balanced Line output impedance 75 Ω Voltage gain 26 dB (+10 db headroom) Recommended speaker load 4 Ω -16 Ω Connectors Balanced analogue inputs 1 pair gold plated XLR Neutrik Unbalanced analogue inputs 2 pairs of gold plated RCA stereo Digital inputs 1 USB type B, 1 Toslink, 1 RCA coaxial, 1 Bluetooth Balanced analogue outputs 1 pair gold plated XLR Neutrik Unbalanced analogue outputs 1 pair of gold plated RCA Stereo Speaker output 2 pairs of gold plated safety banana Trigger, 12 V 1 mini jack Size & Power Power Requirements 115 VAC or 230 VAC, 50 Hz/60 Hz, 1000W max Fuse 20 mm sand-filled, 6.3 AT Power consumption stdb/idle/max < 1W/23W/1000W Dimensions (WxHxD) 325 x 105 x 420 mm / 12.8 x 4.1 x 16.5” Weight 10 kg / 22 lb Page 15 Gato Audio Marielundvej 28 DK-2730 Herlev Denmark www.gato-audio.com [email protected] 510016 GA DIA-250S MAN 1.0 1509 Phone: +45 4095 2205