1
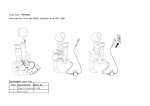
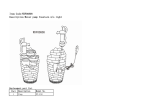
Chocolate Fountain
User Guide
This manual covers the use of the following
commercial fountain models:
SQ1 - SQ2 - SQ3
Fountain Specifications
SQ1
SQ2
SQ3
Total Fountain Height
61 cm
78.5 cm
122 cm
Chocolate Capacity
3 Kg
7 Kg
15 Kg
Total Fountain Weight
8 Kg
16.4 Kg
28.6 Kg
0.7 Kg
1.6 Kg
2.8 Kg
Base Weight
6 Kg
10 Kg
13.4 Kg
Top Section
2 Kg
-
-
SQ1
SQ2
SQ3
230V - 50Hz
230V - 50Hz
230V - 50Hz
250W
450W
500W
Tier Set Weight
THIS PAGE IS INTENTIONALLY BLANK
Fountain Electrical Requirement
Electrical Supply
Rated Power
WARNING
Please refer to important information regarding bearing servicing of this Chocolate Fountain contained
in your user manual and warranty.
In essence this requires that the Chocolate Fountain has it’s bearings serviced every 800 hours or one
year, whichever comes first. Failure to do this may result in the invalidation of your warranty.
General Information
The main problem of insufficient servicing is:
• The seals (located in the removal bowl) may fail which will allow chocolate to leak into the motor compartment
and cause the motor and other components to fail.
To reduce the risk of problems and to test whether the machine requires a service. Please take note of the
following points:
• Never wash the removable bowl in the dishwasher. The steam and hot water can cause premature failure of the
seals and rusting of the bearings. Always wash in the sink and do not fully submerge.
• Every time you clean the fountain and remove the bowl try turning the spindle by hand. This should move freely,
if it does not then machine needs to be serviced.
• Once the bowl has been removed check the underside, and also in the motor compartment for any signs of
leaking chocolate (this can resemble thick black grease). If there is any evidence of this stop using the machine
immediately and book a service.
• For the avoidance of doubt, any machine that is returned to us where the bearings have seized will
be deemed to be out of warranty.
2
3
INTERNATIONAL FIVE YEAR LIMITED WARRANTY
WARRANTY LIMITATIONS AND EXCLUSIONS
Subject to the limitations below, JM Posner warrants that the JM Posner Chocolate Fountain you have purchased
will be free from defects in materials and workmanship under normal and proper use and service and if properly
maintained, will perform its intended function for at least a period of five years from the date of purchase. If you
are not completely satisfied with the quality of the materials or the workmanship of the Fountain you receive you
may return it UNUSED within 21 days from the date you received the Fountain and we will provide a replacement
Fountain.
This limited warranty replaces all other warranties, express or implied including, but not limited to, the implied
warranties of merchant ability, non-infringrent, and fitness for a particular purpose. JM Posner makes no express
warranties, beyond those stated here.
This limited warranty DOES NOT extend to those parts of the Fountain that are subject to wear and tear.
Components which are generally subject to wear and tear and which are not covered by this warranty may include
but are not limited to bearings and seals. The motor has a two year warranty. This limited warranty applies only
to the original purchaser and is not transferable. Use other than normal usage is not covered under this warranty.
The limited warranty provided herein is specifically for the providing of replacement components which have
been determined to have been defective in materials or workmanship during the five year warranty period and
does not cover the costs of labour that may be associated with the repair of the Fountain. Notwithstanding the
foregoing, labour charges are covered for a period of five years only if the Fountain is serviced within the United
Kingdom. Should a replacement component be needed before end of the initial five year period. The Purchaser will
be responsible for all shipping costs required to obtain Warranty Service.
This Warranty is void and of no force or effect if the Fountain purchased has been tampered with, repaired,
disassembled, changed, altered, or modified by you or any other persons who have not been authorized in writing
by JM Posner to make such repairs. This warranty is also void if a voltage converter device is unused. Excluded
from this warranty are damages or defects which resulted from: Other than normal and proper use, normal
wear and tear, abuse, damage, accident, impact, misuse, negligence, improper maintenance, non-performance of
schedule operator maintenance items or storage contamination and deterioration due to water or other liquids,
sand, insect infestation, or acts of God.
JM Posner disclaims all other warranties, expressed or implied, including without limitation implied warranties of
merchantability, non-infringement, and fitness for a particular purpose. The JM Posner limited warranty and any
implied warranties that may apply, extend only to the original purchase of the specific JM Posner products, as
identified by serial number and remain in force only as long as such purchaser owns the fountain.
Some countries do not allow the exclusion of implied warranties so this limitation may not apply to you. If these
laws apply, then all express and implied warranties are limited in duration to the limited warranty period, no
warranties apply after that period. Some countries do not allow limitations on the duration of an implied warranty,
so this limitation may not apply to you.
LIMITATION OF LIABILITY
JM Posner’s responsibility under this or other warranty, implied or express, is limited to the providing of replacement
components for repair of the product purchased, as set forth above. These remedies are the sole and exclusive
remedies for any breach of warranty. You, the purchaser, agree and acknowledge that JM Posner has no liability
and shall not be responsible for any damage you may incur from non receipt of the fountain or its construction,
or any other cause, whether liability is asserted in contract, tort, or otherwise. JM Posner is not responsible for
indirect, special, incidental, or consequential damages of any kind resulting from any breach of warranty or under
any other legal theory including, but not limited to, lost profits, downtime, goodwill, or damage to or replacement
of equipment and property.
In order to ensure optimum performance of your JM Posner Fountain it must be serviced by an authorized
service center after approximately 800 hours of operation or one year from the date of purchase. This service
schedule should be followed every 800 hours the fountain has been in use. This scheduled maintenance service
IS NOT covered by the warranty and there is a charge associated with this service. The service will include the
replacement of those parts subject to normal wear and tear that are described above. Failure to adhere to the
scheduled maintenance plan may void the warranty on the motor should it be damaged due to failure of the other
components that have been worn through use.
4
5
HOW TO OBTAIN WARRANTY SERVICE
IMPORTANT SAFEGUARDS
If any component of the Fountain proves to be defective during the warranty period applicable to such component,
contact our Customer Service Department to make arrangements for warranty service and for the location of the
nearest certified JM Posner repair service provider. Please be prepared to provide (1) your name, address, and
telephone number (2) Proof of Purchase (3) a description of the defect believed by you to be covered by this
Limited Warranty (4) JM Posner Fountain model and serial number. To reach a Customer Service Center, please call
(020) 8421-9482 (UK) or E-mail [email protected].
When using our Chocolate Fountain, safety precautions should always be followed including the
following:
After you have contacted our offices and discussed the nature of the claimed warranty defect JM Posner may
require you to return the Fountain to a specified authorized service center for inspection and Warranty Service,
or may authorize you in writing to obtain service from an authorized technician in your area. JM Posner or its
designated service center, in its sole discretion, will determine after inspection, if the defect developed under
normal and proper use and the availability of coverage under this warranty. Provided the defective component(s)
are catered we reserve the right to use reconditioned or refurbished serviceable used parts which meet JM
Posner’s’ quality standards for warranty repair, replacement, or adjustment of the defective components shall
be JM Posner’s sole obligation and the customer’s sole remedy hereunder. The Warranty Service provided will
restore the Fountain to normal operating condition and JM Posner has no liability to update any Fountain
presented for Warranty Service with any internal or external design or modification which JM Posner had made
to its Fountains after the date you purchased the Fountain covered by this warranty. You are responsible and
shall pay for all shipping costs required to obtain Warranty Service. You are responsible for ensuring that the
Fountain is packaged and shipped in such a way that it arrives to JM Posner or the service center undamaged.
You are responsible for any damage incurred in shipping. We strongly recommend packing your Fountain in your
JM Posner Carry Case with inner packing shipping material.
This warranty is complete and exclusive statement of warranty which JM Posner Ltd agrees to provide with respect
to the Fountain and it shall supersede all prior and contemporaneous oral or written agreements, understandings,
proposals and communications pertaining to the subject matter hereof. Representations and warranties made by
any person, including dealers or distributors, which are inconsistent or in conflict with the terms of this warranty,
shall not be binding upon JM Posner unless in writing and approved by an expressly authorized officer of JM
Posner.
1. READ ALL INSTRUCTIONS BEFORE USING THIS FOUNTAIN.
2.When the fountain basin is removed, the top of the fountain base can be extremely hot. AVOID ANY CONTACT
WITH THE TOP OF THE FOUNTAIN BASE IF IT IS EXPOSED as the heating element is located directly
beneath.
3. Avoid all other surfaces that have become hot during use.
4.To protect against electrical shock and damage to the fountain, do not put the fountain base in water or
other liquids. Never allow liquid to enter the fountain base through the bottom grate, vent holes, or other
openings.
5.When basin is removed, take extra caution to keep liquid or other objects from entering into the exposed
opening at the top of the fountain base.
6.Avoid contact with moving parts, such as the auger in the cylinder or the spindle in the center of the basin.
7. Close supervision is necessary when the fountain is used near children.
8.Do not operate the fountain if you observe damage to the electrical cord or plug or if the base of the fountain
has been dropped or damaged in any manner. The fountain must be returned to JM Posner or a designated
repair facility for examination and repair as specified in the “Warranty” section of this manual.
9.Always unplug the fountain from the electrical outlet when it is not in use, especially before putting on or
taking off parts, and before cleaning.
10.Do not allow the electrical cord to come into contact with hot surfaces. An extension cord may be used if
necessary. Care should be taken to position the electrical cord so that it does not create a hazard by hanging
over a table or counter edge in such a way where it might be tripped on or pulled by those around the
fountain.
11.Never place any object, especially your fingers, inside the central cylinder while the fountain is in use. Doing so
may cause severe injury to persons or damage to the fountain it self.
12.The use of accessory attachments, other than those made available specifically for use with this fountain, is
not recommended by the manufacturer, and may cause injury, and will void your warranty.
13.Extreme caution must be used when moving a fountain or fountain components containing hot liquid. Always
move the fountain by lifting the drum. If you lift the basin it might come off from the drum.
14. Use of the fountain outdoors is not recommended unless used with a Wind Guard.
15. Do not use this fountain for other than its intended use.
16. The Fountain must be on a level surface to operate properly.
17. Observe and follow customary sanitation guidelines when using this machine.
6
7
FOUNTAIN ASSEMBLY INSTRUCTIONS
FOUNTAIN COMPONENTS
2d
1
1. Top Hat – Fits on top of the center column and holds the metal screw in the middle.
2. Tiers – 3 different sizes, slides down the center column to rest into place.
a.) Small Tier (Top)
b.) Medium Tier (Middle)
c.) Large Tier (Bottom)
d.)Extension Tier (Smallest), supplied with 5” extension; purchased separately.
3
2c
3.5” Extension Piece. You have to purchase this separately,
4
4.Center Column extension – Rests on top of the centre column. Where the middle & top tiers sits.
5. Center Column – Rests on top of the 4 pins in the middle of the basin.
6.Auger Extension - Sits on top of the metal screw inside the center column extension.
2b
6
7. Auger – Sits on the square metal shaft in the middle of the basin inside the center column.
8. Steady Pins – Supports center column. Fixed to fountain basin.
9. R
emovable Basin – Which sits on top of the drum and holds the center column and screw. Do not place it in
the dish washer.
10. Drum – This is the bottom of the fountain. Has all the electrical components, including the motor unit. Only
to be opened by a qualified person.
a.)The vent holes allow hot air produced by the motor and heating elements to escape, cooling the
electrical components. Vent holes should not be covered during use.
11.Membrane Switch (SQ1) – The control panel system maintains heater temperature to between 45 to 55
degrees Centigrade and switches the motor on and off as required. The Heater on the SQ1 is preset and you
cannot change the temperature There are 3 LED indicators. The Heater light comes on when you switch on
the fountain and it will stay on until the temperature reaches 55 degrees and it will go off as the control
panel cuts off the heater and it will comes on again when the temperature reaches 45 Degrees. This cycle
will continue till you switch off the switch. The Motor light will come on when the motor is switched on.
Please note the motor will only turn on once the Indictor stops flashing. The membrane switch panel has a
push-button command the ON/OFF state of the motor.
Membrane Switch (SQ2 & SQ3) – The control system switches the chocolate heater on and off to maintain
the temperature at a pre-set level, and switches the motor on and off as required. There is a two digit LED
display to indicate the temperature in degrees Centigrade, and also two individual LED indicators which
light when the heater and motor respectively are ON. The membrane switch panel has a pair of push-button
switches for UP and DOWN control of the temperature, and a third push-button commands the ON/OFF state
of the motor.
12. Fuse – The machine has 3 fuses. 1st fuse is in the power cord. 2nd fuse is in the power socket on the drum
and the 3rd fuse is on the PCB board inside the drum. Only a qualified electrician should replace the fuse in
the PCB board.
13.Adjustable Feet – Screw into the bottom of the base. These may be tightened or loosened to raise or lower
a particular side of the fountain for leveling.
8
5
2a
7
8
9
10
11
13
9
FOUNTAIN ASSEMBLY SQ1
FOUNTAIN ASSEMBLY SQ2
Step 1
Step 1
Remove fountain components from their box and place
fountain drum on a sturdy, level surface. Make sure the drum
is level so that the chocolate will flow properly (Fig. 1).
Remove fountain components from their cases and place
fountain drum on a sturdy, level surface. Make sure the drum
is level so that the chocolate will flow properly.
Step 2
Step 2
Place metal screw on top of the square center shaft in the
middle of basin (Fig. 2).
Place the center column on the four pins in the center of the
fountain base (Fig. 3).
Place the basin on top of the drum at an angle and push
down and turn clockwise 45 degrees to lock the basin with
drum. To check the fountain is level place a spirit level on the
basin rim at various locations (Fig. 1). If leveling is needed,
raise or lower a particular side of the fountain by adjusting
the feet.
Step 4
Step 3
Step 3
Fig. 1
Place the Tiers on the center column. Large one first and the
small dish last (Fig. 4).
Fig. 1
Place metal screw on top of the square center shaft in the
middle of basin (Fig. 2).
Step 5
Step 4
Place the top hat on top of the center column making
sure that the metal screw pin sits in the middle of the top
hat ring.
Place the center column on the four pins in the center of the
fountain base (Fig. 3).
Fig. 2
Fig. 2
Step 5
Place the Tiers on the center column. Large one first then the
medium dish and the small dish last (Fig. 4).
Step 6
Place the top hat on top of the center column making sure that
the metal screw pin sits in the middle of the top hat ring.
Fig. 3
Fig. 3
»
10
»
Fig. 4
11
»
Fig. 4
FOUNTAIN ASSEMBLY SQ3
FOUNTAIN OPERATING INSTRUCTIONS
Step 1
Step 1
Remove fountain components from their cases and place
fountain drum on a sturdy, level surface. Make sure the drum
is level so that the chocolate will flow properly.
Preheat the fountain by turning on switch on the power socket set the heat level to 70 degrees by pressing
key. Allow fountain to preheat for at least 10 minutes (for SQ1, please wait until the indicator
the
light stops flashing).
Step 2
Step 2
Place the basin on top of the drum at an angle and push down
and turn clockwise 45 degrees to lock the basin with drum.
To check the fountain is level place a spirit level on the basin
rim at various locations (Fig. 1). If leveling is needed, raise or
lower a particular side of the fountain by adjusting the feet.
JM Posner Fondue chocolate can either be pre-melted or melted directly in the fountain. To pre-melt, follow the
instructions on the microwave below. To melt in the fountain, add 1kg of chocolate at a time, stirring occasionally
until completely melted.
Fig. 5
Step 3
To add chocolate to the fountain during use, either pre-melt the chocolate or pour 1 cup of chips at a time directly
in to the basin. Allow chips to melt before adding more.
Important Note: Do not overfill the fountain; see fountain capacities below.
Place metal screw on top of the square center shaft in the
middle of basin. (Fig. 2)
Fountain Capacities
Step 4
Place the center column on the four pins in the center of the
fountain base (Fig. 3).
Step 5
Place the large tier on the center column (Fig. 5).
Step 6
Fig. 6
Place the Metal screw extension on top of the metal screw by
inserting the male part in to the female part and turning it till
the pin drops in the slot (Fig. 6).
Model
Min. Amt (Kgs)
Max. Amt (Kgs)
SQ1
2kg
4kg
SQ2
3kg
6kg
SQ3
8kg
15kg
Step 3
Once the chocolate is completely melted, lower the heat by pressing the
) to “ON”.
turn the motor switch (
»
Step 7
Place the center column extension on top of the center
column and turn it until it sits properly (Fig. 7).
key to the operating temperature and
Temperature Settings
Step 8
Place the 2nd and the 3rd tiers on top of the extension piece
(Fig. 7).
Step 9
Chocolate Type
Melting (°C)
Operating (°C)
Dark
70
65
Milk
70
65
White
65
65
Fig. 7
Place the top hat on top of the extension making sure that
the Metal screw pin sits in the middle of the top hat ring.
To increase the height of the fountain, just remove the top
hat and insert the extra extension piece and the 4th Tier.
Replace the top hat on the top of the extension. The metal
screw should remain the same as before. This will not affect
the flow of the chocolate (Fig. 8).
Important information about the Control Panel
SQ1
»
The control panel system maintains heater temperature to between 45 to 55 degrees Centigrade and switches the
motor on and off as required. The Heater on the SQ1 is preset and you cannot change the temperature
»
There are 3 LED indicators. The Heater light comes on when you switch on the fountain and it will stay on until
the temperature reaches 55 degrees and it will go off as the control panel cuts off the heater and it will comes on
again when the temperature reaches 45 Degrees. This cycle will continue till you switch off the switch.
The Motor light will come on when the motor is switched on. Please note the motor will only turn on once the
Indictor stops flashing. The membrane switch panel has a push-button command the ON/OFF state of the motor.
12
Fig. 8
13
SQ2 and SQ3
SAFETY PRECAUTIONS
The control system switches the chocolate heater on and off such as to maintain the temperature at a pre-set
level, and switches the motor on and off as required.
• DO NOT TOUCH HOT SURFACES. SOME FOUNTAIN COMPONENTS BECOME HOT DURING USE.
• WHEN MOVING THE FOUNTAIN MAKE SURE THAT YOU LIFT THE DRUM. IF YOU LIFT THE BASIN IT MIGHT COME
OFF FROM DRUM.
• NEVER ALLOW LIQUID TO ENTER THE FOUNTAIN BASE THROUGH THE BOTTOM GRATE OR VENT HOLES
• ADULT SUPERVISION IS NECESSARY WHEN APPLIANCE IS USED IN PRESENCE OF CHILDREN.
• AVOID CONTACT WITH ALL MOVING PARTS
• ALWAYS UNPLUG THE FOUNTAIN FROM THE ELECTRICAL OUTLET WHEN IT IS NOT IN USE, BEFORE PUTTING
ON OR TAKING OFF PARTS, AND BEFORE CLEANING.
• NEVER COVER VENT HOLES ON THE FOUNTAIN BASIN. DOING SO MAY CAUSE THE FOUNTAIN TO OVERHEAT.
There is a two digit LED display to indicate the temperature in degrees Centigrade, and also two individual LED
indicators which light when the heater and motor respectively are on. A membrane switch panel has a pair
) and DOWN (
) control of the temperature, and a third push-button
of push-button switches for UP (
commands the ON/OFF state of the motor.
1) Setting the Temperature
When either of the
or
push-buttons is pressed the system enters the temperature setting mode and the
display shows the existing unchanged set point temperature. The two display decimal points flash on alternately
or
push-buttons cause
to confirm that the temperature setting mode is enabled. Further presses of the
the temperature to be increased or decreased respectively by 1°C at a time, but if either push-button is held for
longer than two seconds the temperature is raised or lowered continuously at a rate of 3°C per second for as long
push-button cannot alter the
as the push button is held. If the temperature reaches 99°C, further use of the
push-button will note have any effect (note that
temperature further nor if the temperature reaches 0°C the
setting a temperature below the ambient temperature is irrelevant as the system only has a heater).
If neither push-button is operated for longer than three seconds, the system automatically comes out of the
temperature setting mode and the flashing decimal points turn off. At the same time the final set temperature
value (TSET) is stored in non-volatile memory; this value will be retrieved and subsequently used when the fountain
is next switched on.
2) Temperature Control
When the fountain is switched on, the heater is always in the ON state initially, and the Heater LED is illuminated.
When the temperature has risen to T > TSET, the heater and its indicator LED are switched OFF. When the
temperature then falls to T < (TSET – 1), the heater and indicator are switched ON again. Thus the hysteresis band
is 2°C. If the temperature sensor fails, or is un-plugged from the control board, the heater and the motor are both
switched OFF, and the display shows ‘SF’ (Sensor Fault).
CHOCOLATE PREPARATION
We strongly encourage you to use JM Posner Fondue Chocolate, available in Dark, Milk, and White varieties.
JM Posner chocolate is specially formulated to melt down to the correct viscosity to flow perfectly through the
fountain every time. Our unique fondue chocolate is exquisite in taste and aroma and your guests and clients are
sure to be delighted.
Before using the chocolate, store it in a cool, dry place. Do not freeze or refrigerate as moisture could affect the
chocolate’s consistency.
You may melt the chocolate directly in the fountain basin, in a double boiler, or in microwave according to
the instructions on the bags. WHEN MICROWAVING CHOCOLATE, ALWAYS USE HALF – POWER TO PREVENT
SCORCHING.
Melting the chocolate directly in the fountain basin takes approximately 60 minutes. Add chocolate 1kg at a time
to expedite the melting process. Stir chocolate occasionally, scraping it from the basin with a spatula as you go,
this will prevent scorching. Milk and White chocolate are more susceptible to burning so be sure to stir more
frequently (every 2-3 minutes) and use appropriate temperature settings.
Melting Chocolate in Fountain Basin
3) Motor Control
When the fountain is switched on, the motor is always in the OFF state initially, and the Motor LED is off. The
push-button is pressed, and the Motor LED is illuminated. Subsequent
motor subsequently runs ON when the
push-button toggles the motor and indicator between the ON and OFF states.
operation of the
However, if, when the motor is commanded to be ON, the chocolate bowl temperature, T, is less than 10°C, the
motor is inhibited and does not start. In this event, the display shows ‘LT’ (Low temperature) for two seconds
before it reverts to the normal temperature indication. This is to minimize possible overheating of the motor
winding, as there is a risk of the Auger being locked due to solid chocolate.
Temperature Settings
Chocolate Type
Heat Setting
Dark
Approx. Melting Time
SQ1
SQ2
SQ3
70°C
45 mins
60 mins
75 mins
Milk
70°C
45 mins
60 mins
75 mins
White
65°C
45 mins
60 mins
75 mins
The motor also has a built-in thermal switch which opens if its temperature exceeds a safe limit. This switch
connects back to the controller to override normal motor operation. Whenever the thermal switch is open the
motor drive is set to OFF, and the display shows ‘OL’ (Over-Load) until the motor has cooled sufficiently to reset
push-button.
the thermal switch. The motor can then be re-started manually by using the
CAUTION: The heat setting should never be higher than 70 degrees when melting White chocolate.
Overheating White or Milk chocolate causes it to thicken or become clumpy and it will not flow properly. To help
correct this problem see “ TROUBLESHOOTING” item #2.
14
15
STARTING THE FOUNTAIN
HELPFUL TIPS
Before Starting The Fountain:
1.Always provide each guest with a plate and skewers. (Guests should use a separate skewer for each food
item). Wooden and plastic forked skewers may be ordered online at www.jmposner.co.uk It is also a good
idea to have a generous supply of napkins available.
1. Ensure that the fountain is on a sturdy, LEVEL surface.
2.The fountain it self must be level in order to operate and curtain properly. Please see “FOUNTAIN ASSEMBLY”
for instructions on leveling the fountain.
3. Check to see that fountain basin is securely tightened.
2.Guests should never “double dip”, placing a food item that has been bitten back into the fondue flow. Food
item should only be dipped in the fondue once.
3.Cut all dipping items into bite-size pieces so they can easily be placed on the skewers.
4.Ensure that the fountain vent holes and the bottom of the base housing are not covered. These areas allow
heat to escape from the motor and heating element during use. Obstruction of the air flow will cause damage
to the motor and internal electrical components.
4.Never allow water to come into contact with chocolate as it can thicken and ruin the chocolate. This includes
water-based flavorings and food colorings. Use oil based products instead.
5. Fill the basin with chocolate according to the “CHOCOLATE PREPARATION” instructions.
5.Keep chocolate in a cool, dry place. Do not freeze or refrigerate it as moisture may adversely affect
the chocolate.
Once The Chocolate Is Melted:
6.Always reduce the temperature setting from the melting temperature to the operating temperature once the
chocolate is completely melted in the basin. Failure to do so may cause the chocolate to scorch.
1.Place the auger into the cylinder and turn it clockwise to check that it is locked in place over the center
spindle. Place the crown on the top of the cylinder.
2.Press the On switch to START. The auger will turn and carry the chocolate up through the cylinder, causing it
to flow over the Top Hat and Tiers and back into the basin. As the cylinder fills with chocolate, there may be
a brief knocking noise from the auger spinning against the cylinder.
Adding Additional Chocolate to the Fountain:
10 Kg of chocolate will serve approximately 200 people. Additional chocolate can be added using the following
methods:
Adding Melted Chocolate:
To add a large amount of chocolate, melt it prior to adding it to the basin. You can melt it in microwave or in a
double boiler.
7.Do no add more than the maximum amount of fondue chocolate to the fountain basin. If too much is added,
it will overflow the basin when the fountain is turned off.
8.Air is often trapped, in the cylinder and at the bottom of the Top Hat when the fountain is initially turned
on. This can cause uneven chocolate flow. To correct this, simply turn the fountain off, wait 15-30 seconds to
allow the air to escape, and turn it again. Repeat until flow improves. If air pockets are present at the base of
the crown, take a rubber spatula and scrape around the area to release the air.
9.If you are not using JM Posner Fountain Chocolate, you will likely need to thin your chocolate according to the
directions under “CHOCOLATE PREPARATION”. Cocoa butter may also be used.
10.When cleaning up after an off-site event, place fountain parts in plastic bags and return them to the storage
cases until they can be properly cleaned.
Chocolate temperature may be affected by the addition of chocolate or by environmental factors, such as operating
the fountain in a cold area. In such conditions the fountain temperature may need to be adjusted accordingly.
16
17
CLEANING THE FOUNTAIN
TROUBLESHOOTING
Recommended Cleaning Supplies:
1. Chocolate does not curtain properly:
a.Fountain is not level: The base of the fountain must be level in order for chocolate to curtain properly.
If the fountain is flowing heavily on one side, raise that side of the fountain using the adjustable feet until
it flows evenly.
• Food handler gloves
• Paper towels and soft cloth
• Spatula(s)
• Large container or sturdy plastic bag(s) for leftover chocolate
• Ladle
• Washing up liquid
• Large sponge • Small brush or toothbrush
• Stainless steel polish
Before cleaning:
Always unplug the power cord form the electrical outlet before cleaning the fountain. Never permit the electrical
cord to come into contact with water.
b.Air bubbles: Air is often trapped inside the cylinder when the fountain is initially turned on or if the chocolate
level in the basin becomes too low. This causes gaps in the chocolate curtain. To resolve this, simply turn the
fountain off, allow it to sit for 15-30 seconds, and turn it back on. Repeat this procedure until the fountain is
flowing at full capacity.
c.Not enough chocolate: Refer to the “RECOMMENDED CHOCOLATE AMOUNTS” table to ensure that you are
meeting the minimum capacity requirement.
Do not use abrasive scouring pads or powders to clean the stainless steel basin or other components. Doing so
will mar the finish.
d.Chocolate is too thick: Chocolate will not flow correctly if it is at the wrong temperature. Generally, for Dark
chocolate, the temperature should be increased. For White and Milk chocolate, the temperature should be
decreased. Please see “CHOCOLATE OPERATING TEMPERATURES” for appropriate temperatures.
To clean:
e.Food blocking fondue flow: Turn the motor off and use a spatula to check for food items that may have
become lodged between the bottom of the cylinder and the basin.
1.Wearing food handler gloves, scrape excess chocolate from the top hat and top & middle tiers with a spatula.
Remove remove top hat and top & middle tiers and place them directly in the sink.
2.Pull out the extension center column out of the center column, scrapping the excess chocolate off with a spatula
or gloved hand as you go so that it falls back into the Basin. Place the extension center column in the sink.
3. Remove the Auger extension and scrapping the excess chocolate off. Place them directly in the sink.
4.Use a spatula to scrape excess chocolate from the bottom tier, auger and center column. Remove the tier,
center column and metal screw and place them in the sink.
5.All removable fountain parts are dishwasher-safe. They may also be hand-washed with warm, soapy water
and a large sponge. Use a degreasing agent when washing components in the sink. Make sure the chocolate
is broken up by warm, soapy water before it goes down the drain. Chocolate poured directly down the drain
may harden in the pipes and damage the drain system.
6.Twist off the removable basin and pour the leftover chocolate into a bag-lined container for easy disposal.
Scrape the remaining chocolate out with a spatula. Never pour chocolate directly down the drain.
7.Clean the basin of the fountain by hand with warm, soapy water and a large sponge. Carefully clean around
the collar and center pin in basin. If necessary, use a soft toothbrush to remove all chocolate.
8. Spray the outside of the fountain base with stain less steal cleaner and polish with a soft cloth.
f.Small food particles in the fondue: Small pieces of food flowing in the fondue may cause gaps as the pieces
flow over the tiers. Turn the motor off and try to remove the food with a spatula or strainer.
2. Chocolate is thick and lumpy:
White and Milk chocolate are especially susceptible to overheating. When over heated, chocolate thickens and
becomes lumpy. To correct this, stir small amounts of vegetable oil or cocoa butter into the chocolate until it
reaches the appropriate consistency. Chocolate may also be placed in a blender and mixed with the thinning
agents. Consult “CHOCOLATE OPERATING TEMPERATURES” to ensure you are using the appropriate temperature.
To avoid scorching, stir the chocolate occasionally with a spatula, scraping it from the bottom of the basin as you
stir. Chocolate will also become lumpy if it has come into contact with water.
3. The fountain will not heat properly:
a.Electrical problem: Make sure that the fountain is plugged into a working electrical outlet and that the switch
is in the ON or PREHEAT position. If you have another appliance plugged into the same outlet, the fountain
may not be receiving enough electricity.
b.Sensor Fault: Check the fountain display if it says SF’ Please call our JM Posner Customer Service Department
for further assistance.
c.Loose wiring: Unplug the fountain, turn it over, and remove the protective base net. Check to see that all of
the wires and contacts are firmly in place.
18
19
TROUBLESHOOTING
(cont.)
FREQUENTLY ASKED QUESTIONS
4. The fountain will not turn on:
Q:Are the fountain components dishwasher-safe?
a.Bad electrical connection: Power may have been interrupted by an electrical breaker being tripped. Check
power is being received by the fountain.
A:Yes, all removable fountain tier set parts and components may be washed in a dishwasher. However please
note DO NOT wash the bowl in the Dishwasher as this will cause damage.
b.Fuse has blown: Replace the fuse. The machine has 3 fuses. 1st fuse is in the power cord. 2nd fuse is in the
power socket on the drum and the 3rd fuse is on the PCB board inside the drum. You will need a qualified
electrician to replace the fuse in the PCB board.
Q: What temperatures should the fountain be set to suite the different types of chocolate?
A: Please see the “CHOCOLATE OPERATING TEMPERATURE” table.
c.Low Temperature: Check the fountain display if it says LT, this means the temperature of the fountain is not
enough to start the motor. Wait till the fountain temperature to raise to the set limit and then turn on the
fountain.
Q: Can leftover chocolate be re-used?
A: Yes, but for sanitation reasons it is not recommended.
5. The fountain makes a knocking noise.
a. Upon starting the fountain, the metal screw may knock for about 30 seconds before the chocolate has
completely coated the inside of the Center column.
b. If knocking is coming from the cylinder: When the fountain starts up, the auger may knock against the cylinder
momentarily until the chocolate has coated the inside cylinder walls and auger. If knocking continues, make sure
the stabilizer is correctly positioned at the top of the cylinder around the auger knob so the auger is held in the
center of the cylinder. Also check to see that the cylinder is resting firmly in the basin collar.
c. Chocolate is too thick. If you are using JM Posner Fondue Chocolate, make sure you are running it at the
correct temperature. If you are not using JM Posner chocolate, you will need to thin it out with oil.
For any further troubleshooting questions or concerns, please contact JM Posner’s Customer
Service Department at Tel: 0044 (0) 20 8421 9482
Q: Can JM Posner Fondue Chocolate be ordered online?
A: Yes! Please visit us online at www.jmposner.co.uk for simple online ordering of chocolate and accessories.
Q: Can I use Chocolate other than JM Posner Fondue Chocolate in the fountain?
A:Yes, other chocolate may be used, but it will most likely need to be thinned to the correct consistency to flow
through the fountain. See instructions under “CHOCOLATE PREPARATION”.
Q: What are the power requirements for the fountain?
A: JM Posner fountains require a single phase 450W for SQ1 & 500W for SQ2 230V / 5Amps power outlet.
Q: Does the JM Posner fountain temper chocolate?
A: No, but the chocolate itself can be tempered using standard tempering procedures.
Q: Can fondues other than chocolate run through the fountain?
A:Absolutely! Any fondue that is the appropriate consistency can through the fountain. This includes caramel,
cheese, and barbecue sauce. Use a thinning agent consistent with the fondue’s flavor.
Q: What do I do if the chocolate is not curtaining completely over the fountain tiers?
A: Please see “TROUBLESHOOTING” item # 1.
Q: How do I store my JM Posner chocolate?
A:Chocolate should be stored in a cool, dry place. Do not freeze or refrigerate chocolate as condensation may
alter the chocolate’s consistency.
20
21
FREQUENTLY ASKED QUESTIONS
(cont.)
Q: How much chocolate does the fountain hold?
A: Please see the “RECOMMENDED CHOCOLATE AMOUNTS”.
HEALTH AND SANITATION GUIDELINES
JM Posner is committed to helping its customers provide the public with a healthy and sanitary environment in
which to enjoy the JM Posner Chocolate Fountain at their special events. JM Posner encourages its customers to
comply with the following recommended Health and Sanitation Guidelines:
A:10 Kg of chocolate will serve around 200 people. Buy adding one extra bag of 2.5Kg chocolate you can serve
and extra 200 people ( Based on single dippings) see Fountain Capacities above.
1.Sanitary Use of the Chocolate Fountain: A healthy and sanitary environment must be ensured with each use
of the chocolate fountain. A trained attendant must accompany the chocolate fountain at every event. The
attendant’s responsibility is to operate the fountain and ensure that each guest at the event follows the
proper Health & Safety procedures below:
Q: Do I need to melt the chocolate before adding it to the fountain?
a.Everyone involved in the handling and preparation of food items should be Food Handler Certified by the local
health agency. The attendant must also be Food Handler Certified.
A:Depending on how much chocolate you are adding, it may need to be pre-melted. Please see “ADDING
ADDITIONAL CHOCOLATE TO THE FOUNTAIN”.
b.The attendant should serve each guest by dipping the requested food item into the flowing chocolate and
then serving the item to the guest on a plate.
Q: The chocolate is purchase in a 2.5Kg bags. How may people will that feed?
c. A separate skewer is to be used with each food item.
Q: Does the fountain need to be serviced regularly?
A: Yes. Please see “MAINTENANCE” Servicing is required every 800 hours use or 1 year.
d.Food items should never be doubled dipped in the chocolate after coming into contact with a guest’s hand
or mouth.
e. Guests should never touch the chocolate with their hands, etc.
Q: Where do I go for replacement parts?
f.Guests should never introduce anything into the chocolate other than that which has been provided by
the caterer.
A: Please call JM Posner on +44 (0)208 421 9482.
g.Leftover chocolate remaining in the fountain at the end of each event should be disposed of and
not reused.
2.Cleanliness: All JM Posner Chocolate Fountain components are made of high quality, 304 food grade stainless
steel. Any components that come into contact with chocolate must be cleaned thoroughly after every use.
The tier set components (Center columns, tiers, top hat, and screws) are all dishwasher- safe and should
first be washed with warm, soapy water after each use, with care to avoid getting water on or inside the
fountain housing. It is also recommended that a sanitizing agent be used after the fountain components
have been washed.
22
23
24