1
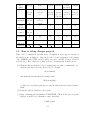
The Practical User Guide to
DGOM-PlankTOM or: How to survive the
fight against the dragon
Meike Vogt
[email protected]
adapted for cluster1.uea.ac.uk by Erik Buitenhuis
April 28, 2008
1
Contents
1 Structure of THE CODE
1.1 Web-Info . . . . . . . . . . . . . . . . . . . . . . . . . . . . . . . . . .
1.2 Important routines . . . . . . . . . . . . . . . . . . . . . . . . . . . .
1.3 Tracers . . . . . . . . . . . . . . . . . . . . . . . . . . . . . . . . . . .
3
3
3
4
2 NEMO-PlankTOM on cluster1
2.1 Filesystem . . . . . . . . . . . . . . . . . . . . . . . . . . . . . . . . .
2.2 Architecture . . . . . . . . . . . . . . . . . . . . . . . . . . . . . . . .
5
5
6
3 How to run NEMO-PlankTOM
3.1 Compilation . . . . . . . . . . .
3.2 Submission . . . . . . . . . . .
3.3 Quest for errors during a run .
3.4 How to do a small test . . . . .
7
7
7
9
9
.
.
.
.
.
.
.
.
.
.
.
.
.
.
.
.
.
.
.
.
.
.
.
.
.
.
.
.
.
.
.
.
.
.
.
.
.
.
.
.
.
.
.
.
.
.
.
.
.
.
.
.
.
.
.
.
.
.
.
.
.
.
.
.
.
.
.
.
.
.
.
.
.
.
.
.
.
.
.
.
.
.
.
.
4 How to modify the output variables
10
5 How to check the model results
10
6 How to add a tracer to the DGOM
6.1 The restart file . . . . . . . . . . .
6.2 Adding the tracer only . . . . . . .
6.3 Tracer calculation and Equations .
6.4 How to name variables properly . .
6.5 How to debug changes properly . .
11
11
12
12
13
14
.
.
.
.
.
.
.
.
.
.
.
.
.
.
.
.
.
.
.
.
.
.
.
.
.
.
.
.
.
.
.
.
.
.
.
.
.
.
.
.
.
.
.
.
.
.
.
.
.
.
.
.
.
.
.
.
.
.
.
.
.
.
.
.
.
.
.
.
.
.
.
.
.
.
.
.
.
.
.
.
.
.
.
.
.
.
.
.
.
.
.
.
.
.
.
7 How to regrid the output files from the ORCA grid onto a regular
grid
15
2
1
Structure of THE CODE
Ok. So you have the courage to try to master DGOM (Dynamic Green Ocean
Model) PlankTOM (Plankton Types Ocean Model). Great. Get yourself a cup of
herbal tea, a boxing bag and some aspirin. You will need all of this. Then start
with the following:
1.1
Web-Info
A more or less comprehensive description of the PlankTOM model can be found in
http://lgmacweb.env.uea.ac.uk/green ocean/model/model.shtml
A flow diagram of the NEMO + PlankTOM model can be found here:
http://lgmacweb.env.uea.ac.uk/green ocean/model/
code description/flow nemo.html
To get a description on what the single subroutines do, see:
http://lgmacweb.env.uea.ac.uk/green ocean
/model/code description/subroutines.html
You can find a lot of information on the web in the ’model’-folder. Have a look, but
dont worry, you do not need to learn everything by heart. For a start, get a campus
card/login at UEA, get a user account on cluster1. Next, get the code, see:
http://lgmacweb.env.uea.ac.uk/green ocean/model/internal/cluster1.shtml
and Chapter 2. It will all work out in the end, hopefully!
1.2
Important routines
It is impossible here to describe all the subroutines, so I will assume you are an
ocean biogeochemist and that you are working only on the biogeochemistry of the
DGOM. Also, I assume you are not a nerd, so explanations will be as basic as I
needed them when I got started.
The biogeochemical model is embedded in the GCM (General Circulation Model)
NEMO (Nucleus for European Modelling of the Ocean). The GCM code is stored
in:
˜/TOM5/modeles/NEMO/OPA SRC (NEMO physical model)
Don’t look inside! Also embedded in NEMO is a sea ice model:
˜/TOM5/modeles/NEMO/LIM SRC (Louvain La Neuve ice model)
and then the passive tracers of the biogeochemical model need to be transported:
˜/TOM5/modeles/NEMO/SRC TRC (passive tracer transport model)
3
you don’t need to concern yourself in detail with what is inside, you just need to
know that it’s there. Here, all you want to know about tracers is stored in
˜/TOM5/modeles/NEMO/TOP SRC/SMS (PlankTOM biogeochemical model)
i.e. here the sources and sinks for each biogeochemical tracer are calculated in the
files
bgcbio.F90
bgclos.F90
bgcpro.F90
bgcsnk.F90
It is very convenient to have a link to a directory called ’WORK’ in the file ˜/.tcshrc
alias work ’cd ˜/TOM5/modeles/NEMO/WORK’
In this folder links to all other relevant files that you may have to modify are stored.
This will be the folder you will use the most.
In case you really have to modify your code, it is good to know the following
main files that call a lot of other subroutines. Switching those subroutines on and
off (by commenting them) might help you find bugs in your model, and believe me,
there will be bugs....
step.F90
trcstp.F90
bgcprg.F
1.3
Tracers
Tracers are the variables predicted by the model. The tracers in the biogeochemical
model are also referred to as passive tracers, whereas temperature and salinity, the
two tracers in the physical model, are active tracers, because they influence the
currents in the ocean. The tracer concentrations and temporal and spatial changes
due to transport, production or loss processes are simulated by the model. DIC is
such a tracer, or phytoplankton biomass. All passive tracers in the model are stored
in an array called ’trn’ of the following form:
trn(ji,jj,jk, jptal) in
mol
l
or
equiv
l
where ’ji,jj,jk’ are the coordinates and ’jptal’ is the tracer index, that means, the
label of the tracer, its ’name’. Rates, i.e. changes in tracers are stored in variables
of the form
tra(ji,jj,jk, jptal) in
mol
l·s
and are calculated per timestep.
Names and units of tracers can be found in
4
or
equiv
l·s
namelist.passivetrc.start
namelist.passivetrc.continue, and
namelsit.passivetrc
namelist.passivetrc.start is the namelist used for the first year of your calculations.
namelist.passivetrc.continue is the namelist used for subsequent years. Remember
to always modify all the three files when you need to change parameters.
2
NEMO-PlankTOM on cluster1
To login on cluster1 type
ssh -X [email protected]
or make an alias in your .cshrc file with this command. Upon first login, get a .cshrc
from one of us and just copy it. (In such a file you can store all sorts of abbreviations
for commands you often use).
On cluster1 everything is done in the same filesystem. Store the code in:
˜/TOM5/modeles/NEMO/TOP SRC/SMS
and so on, the output is saved in ˜/scratch, which is not backed up. The structure
available here is exactly the one specified in ’Structure of the Code’ above.
2.1
Filesystem
On cluster1 there are two filesystems: esdata and esscratch. Your home directory is
in esdata and is backed up. Store the code in your home directory:
˜/TOM5/modeles/NEMO/TOP SRC/SMS
and so on. The structure available here is exactly the one specified in ’Structure of
the Code’ above.
Save the output in esscratch, which is not backed up. By default, your home
directory is set up with a link to esscratch: scratch Each run will get its own folder
in the scratch folder. The rule for naming folders is:
Version YourInitials SimulationName
e.g. TOM5 MV TEST
in which you replace 5 by the number of PFTs, replace MV by your initials, and
replace TEST by four characters that describe your simulation. Inside these folders
there will be the following files:
opa
forcing files
namelists
5
’opa’ is the executable that you have generated for this particular run. For each new
run choose a new folder name. If you do not want to use the standard namelist files
(in ˜/TOM5) put the run specific ones in the run folder. If a namelist or other file
has to be modified for this particular run, then you have to copy this namelist from
the global folder ˜/TOM5, and modify it. It is important to know that the running
script will copy a namelist from the ˜/TOM5 folder only if there isn’t already that
namelist in your run folder.
2.2
Architecture
To summarize, you will need the following folders to run the model
• the code in
˜/TOM5/modeles/OPA/WORK
containing links to all FORTRAN files.
• ˜/TOM5, with namelists, e.g
namelist.passivetrc.*
namelist.trc.sms
EMPave.PISCES.P42 1
• ˜/Input, with restart files for each submodel, e.g.
restart.PlankTOM5.P42.trc.nc
restart.ice.P42
restart.NEMO.P42.nc
• and with a running script
dgom
• a script to run one or more years:
˜/run
• optional output, e.g.
˜/scratch/TOM5 MV TEST/
with the executable and/or specific namelists
opa (after compilation, chapter 3)
6
3
3.1
How to run NEMO-PlankTOM
Compilation
In order to run the model, you first have to compile it. So, log onto cluster1,
go to the WORK-directory and type ’gmake’. It takes a bit of a while till the
compilation is completed (some minutes) and you will see that the compilation is
successful when ’OPA is ready’ is written in your shell. Here, during compilation
all programming errors are indicated. You can check and change your code from
the WORK-directory. This procedure will follow a certain routine: open a file with
’vi’ or ’emacs’ , make changes, compile typing ’gmake’, see if the compilation goes
through, eliminate programming errors etc, etc. All is done in ’WORK’. Please note
that the line number of the error is not always reported accurately, if you can’t find
an error in the reported line, look at the lines immediately above and below.
3.2
Submission
Once your compilation was successful you can run the model.
On cluster1 you don’t have to worry about which queue to use, only if you change
the number of processors in par oce.F90 this also has to be changed in the submit
script (“run”).
run is a script that calls the script dgom. run makes links to or copies all
necessary namelist, restart and other input files. It is important to check all the
paths when you copy these two files from someone. Best option: use big files that you
are unlikely to change from Erik (the forcing files: ˜e031/Input/ncep* tau* runoff*)
and have copies of the namelist and restart files on your own account.
Once you have these two files ready, you can submit a job with the following
command
run ’start year’ ’end year’ ’run name’
or, for example
run 1948 1948 TOM5 MV TEST
’start year’ stands for the first year that you want to calculate. ’end year’ stands
for the last year of your calculation. The name of your run has to correspond to the
corresponding folder in ˜/scratch. If you want to use files that are specific to your
run, you can first create the folder yourself, copy the standard files from ˜/Input or
˜/TOM5, and change them. If you do not make the folder the run script will do this
and use all standard input files. The results of the calculations will be stored in the
same folder. If you need realistic values for your biological tracers in the surface,
make sure to run your model for more than 3 consecutive years, as it needs some
time to equilibrate. If you want surface CO2 fluxes and nutrient fields in the top
100 m. run the model for at least 30 years, and if you want to get the model in
quasi steady state run the model for ˜200 years (we haven’t done that yet).
Once you have launched your calculation, you can view the status of it by typing
7
qstat -u <username>
add an alias in your .tcshrc: alias que ’qstat -u <username>’
The output can be found in:
Version YourInitials SimulationName
However, only if the calculations have been successful, you will find the output there.
If the calculations have been aborted, there will be no, or empty, output files. Read
the end of your log files to find the error(s).
Assuming you are lucky and got results in your output folder, you may wish to
view them. If things went well, the output files from each processor will have been
combined into one global file. If not:
combine ORCA2 1m 1948*dia2d* SimulationName 1948 dia2d.nc
Then view them using ferret, a program that can visualize and handle large data
sets. There are three files that you will want to check first, to see (a) if the tracers
look like real fields (b) if you have saved all diagnostics (additional info that you
want to read from the model). These files will be called
SimulationName 1948 dia2d.nc
SimulationName 1948 dia3d.nc
SimulationName 1948 ptrc T.nc
ptrc T.nc contains all the tracers. dia2d.nc and dia3d.nc all the additional variables
you may wish to check. To run ferret on cluster1, you will need to get a slave node.
If you’ve copied somebody else’s .tcshrc, you can do that by typing
slave
. Otherwise, or if you are at BAS and are having trouble with the firewall, use
lgmacsvr1 to look at the files:
ssh -X [email protected]
If you are using windows, install and run Exceed. If you still get an error from
ferret, go to Control Panel, Windows Firewall, Exceptions, and tick X Server, OK.
Then type the following commands
’ferret’
’use ORCA2 1m 199001 199012 ptrc T.nc’ (file name)
’show data’ (gives you all the variable names and coordinates)
’shade VARIABLE[k=1, l=@ave]’
(paints a map with the average annual (l=@ave) surface (k=1) values for, lets say,
the biomass of coccolithophorids).
just to get an impression.
8
3.3
Quest for errors during a run
You can monitor your job with qstat. qstat also gives you the jobs other people
are running, which normally you don’t want to know about. Therefore, it is easiest
if you add an alias to your ˜/.tcshrc: alias que ’qstat -u your username’ If the job
finishes early, that means that something went wrong in the calculation, that was
not a coding error only (this would have shown during compilation).
See http://lgmacweb.env.uea.ac.uk/green ocean/model/internal/cluster1.shtml
On the cluster, the model continues running if the biogeochemical model produces invalid numbers (nan). For other types of error, the error file
(PlankTOM<year>.e<job id>) will state the file and line number where the error
occured. In addition, error messages are contained in the file (ocean.output.*). Look
at the file with ’vi’ and check the line with the number given in the error file (:<line
number>). It is easiest to search the file for keywords such as “error”, “quit”, “exit”
or “cannot”, in order to be pointed at the faulty lines directly, rather than going
through the file from top to bottom.
For numerical errors, find the error with a combination of looking at the output,
introducing write statements in the code (e.g. write (*,*)) to find the error, and
then fix the error in
˜/TOM5/modeles/NEMO/WORK
. Recompile the code and dont forget to transfer the new executable to your run
folder. Restart the run.
3.4
How to do a small test
Sometimes it may be useful to calculate just the first timesteps to see where an error
first occurs. Then you can decrease nitend in namelist and the output frequencies
nwrite* in the namelists.
You have to edit very few files so that this can be done:
cd ˜/scratch/Version Initials RunName/
and put
namelist
there. Change the variables
nitend (the total number of timesteps, e.g. from 5475 to 15)
nstock (the frequency with which the physical restart is written, e.g from 5475 to
15)
nwrite (the frequency with which the grid output is writtten, e.g from 456 to 3)
in this file.
Then edit
9
namelist.passivetrc
Change the variables responsible for the output frequencies of tracers and additional
diagnostics:
nwritetrc (the frequency with which the ptrc output is written, e.g from 456 to 3)
nwriteadd (the frequency with which the dia3d output is written, e.g from 456 to 3)
nwritead2 (the frequency with which the dia2d output is written, e.g from 456 to 3)
Rerun the model.
4
How to modify the output variables
You may need several additional diagnostics to check or evaluate your simulations.
These can be changed in
˜/TOM5/modeles/NEMO/WORK
Modify
bgcbio.F90
In this file you will find a line stating ’Save additional tracers’. Hereafter, change
the numbers of additional tracers in the array
trc3d(ji,jj,jk, )
i.e. modify the last number in this array if it is a 3D variable that you need to
output. Then go to
par trc trp.F90
and change
INTEGER, PUBLIC, PARAMETER :: jpdia3d = ...
Recompile the code. Finally, go to
namelist.passivtrc
and change the descriptions and units of additional tracers, add or remove new
diagnostics. Copy the modified namelist into the run specific folder that you have
on ˜/scratch/.
5
How to check the model results
Once you have output, check all the tracers with ferret and compare them to output
of unmodified versions. Corinne has a nice script in
/pf/b/b340003/dgom/work/check global.jnl (This is on the previous computer)
that you can load in ferret. Also, the files
/pf/b/b340003/temp/check dia.jnl
/pf/b/b340003/temp/check flux.jnl
are helpful to check the individual tracer fields and fluxes.
10
6
How to add a tracer to the DGOM
6.1
The restart file
Usually, when adding a tracer to the model, you will have to change the restart file
first that contains some values for the initial conditions. Initialize the tracer with
observational data or use the minimum value to start with.
(a) login to lgmacsvr1.uea.ac.uk
go to archive/model/Restart make backup copies of make restart obs.f and
restart.OBS 1948 NCCL9 2101.trc.nc
(b) Edit make restart obs.f, so that the new tracer is set to 1e-9 or any other value.
Your tracer should have a logical name, i.e.
trndms(jpi,jpj,jpk) (trn var name)
All tracers in the restart are composed of 2 variables
trn ...(jpi,jpj,jpk)
trb ...(jpi,jpj,jpk)
(c) compile:
fnet make restart obs.f
and once the compilation was sucessful, type
./a.out
(d) on cluster1 get the file by
cp /home/lgmacvol1/lequere/greenocean/model/Restart/<file> .
(e) Test DGOM with the new restart file only and check if all the tracers still are
identical to the runs with unmodified restart file.
(f) Add the names of the new tracers to namelist.passivetrc. A tracer called e.g.
’TRNDMS’ will have to be named ’DMS’ in the namelist. Attention: Case
sensitivite tracer names!
11
6.2
Adding the tracer only
Now the tracer can be added to the model. Go to the WORK directory and
(a) in par trc trp.F90 change the number of tracers to jptra= ... (the right number).
(b) In par sms.F90 add a jpxxx for the new tracer, normally BEFORE the tracers
13c and o18, so that the model will still work if key trc biohamocc13 is off.
(c) Compile and run the model, all tracers except the new one should be identical
to before the change.
6.3
Tracer calculation and Equations
Now you can implement the complete set of calculations needed for your tracer.
(a) Add the tracer evoltion to bgcbio.F90.
Add the production terms to bgcpro.F90
Add the loss terms to bgclos.F90
(b) Declaration of new variables:
Declare all variables and parameters needed for your calculation in
sms.F90
Add all parameters (dim[p] = 0) to your
namelist.trc.sms
Now the parameters have to be read from the namelist. This will be done in
/TOM5/modeles/NEMO/WORK/trclsm.dgom.h90
Add all extra parameters for your calculation here in alphabetical order or
make a separate namelist block for all your variables. In case you want to
do that, see later section for explanation on how to do that. At the end of
trclsm.dgom.h there is a section with print statements, where you should add
your values.
(c) Compile and run a test. Compilation errors will show you mistakes with the
syntax of your added lines, run errors will indicate errors with the reading of
the namelist. Make sure all new parameters with their corresponding values
are printed out in the ocean.output.<year> file.
12
(d) Now you need to edit bgcnul.F90. This file prevents tracer concentration from
going negative by calculating the changes that will be made during the actual
timestep being calculated. If the changes in concentration are greater and of
opposite sign than the tracer concentration, loss terms will be set to 0. Insert
the equations for the tracer evolution (copy from bgcbio.F) here and save them
to a new variable, e.g. ’varname2’. Check with the ’xcond’ condition, if tracer
goes negative during this timestep and for all i,j,k. In that case ’xcond’ will
give a value of 0, otherwise a 1. Multiply the degradation terms (bgclos.F) with
’xcond’. bgcnul.F90 is called by bgcbio.F90, after bgcpro.F90 and bgclos.F90
are calculated and before the tracer is written to the array in bgcbio.F90.
(e) Adding a tracer to the model you will want to check your results step by step,
resulting in new output variables. Change the additional diagnostics according
to Section 4 ’How to modify the output variables’.
6.4
How to name variables properly
Ok. There are two different naming conventions. Please stick to them. In both
conventions prefix letters are used to classify model variables accoring to their type
and usage in the code. You will find a table with the prefix letters at the end of this
section.
If you have names to give to new variables, please respect the following guidelines:
Variable names should be long enough to efficiently seek for them with ’grep’. Dont
name your variables ’a’ or ’en’. In the old naming convention, we mostly use six
lettered variables in the code. The first (two) letter(s) is(are) the prefix, i.e. describes
the type and status of the variable. The second 2-3 letters stand for the process in
which the variable is involved. The last 2-3 letters stand for the name of the tracer
that is involved in the process. E.g., a variable named
xaggdoc
is a global real describing the aggregation of dissolved organic carbon (DOC).
In the second, new, naming convention, some variable names have been changed to
make the code more understandable. So far, all variables appearing in namelist.trc.sms
have been renamed to start with nn or rn , so that their origin is clear. Some old
variables from earlier versions of the code do not comply with either naming convention. These ones will not necessarily be tracked and renamed :-(.
13
type:
status:
global
dummy
argument
local
variable
loop
control
parameter
statement
function
namelist
6.5
integer
real
mn
a b e f g h o q-x
but not
but not
nam
sf
logical
character
l
but not
lp ld ll
double
precision
d
but not
dp dd dl
complex
y
but not
yp yd yl
dd
yd
k
but not
kf
i
p
but not
pp pf
z
ld
c
but not
cp cd cl
com cim
cd
ll
cl
cd
yl
j
but not
jp
jp
pp
lp
cp
dp
yp
kf
sf
nn
rn
ln
How to debug changes properly
There can be compilation and run errors. Compilation errors appear directly in
the shell you are working in. Run errors can be found grepping for the strings
’exit’, ’ERROR’ and ’STOP’ in the log-files and can be tracked down as described
in Section 3.3. Here a little bit of help on how to systematically identify errors:
(a) Mark modifications in the code for testing purposes with a comment line, e.g.
start the first line before the altered bit of code with
!(your initials)
and mark the last line after the changes with
!E(your initials)
so that you can always just grep for any modifications and retrieve/remove
them.
(b) Print the critical variables to the log-file.
(c) Bugs containing the information ’UNSTABLE’: Check if the error is in the
physics or in the biogeochemistry - run a test with
CALL trcsms
14
commented in trcstp.F. Bug persists: problem with the physics, bug does not
persist, check the biogeochemistry, then comment
bgcprg.F
to further narrow down the error location.
7
How to regrid the output files from the ORCA
grid onto a regular grid
If you want ferret to recognize the grid of your output files and superimpose the
land mask properly, you should change the output file, so that they are on a regular
grid. Type
regrid <file>
in the output folder containging the file you wish to regrid. This will create the file
Version YourInitials SimulationName year TYPE.nc, in which TYPE is ptrc, dia2d,
etc..
15