1
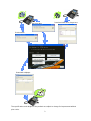
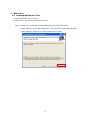
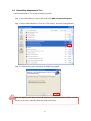
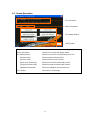
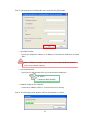
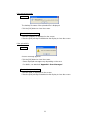
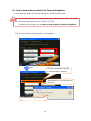
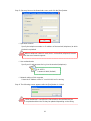
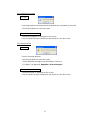
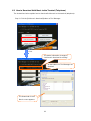
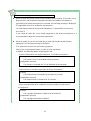
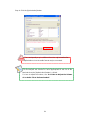
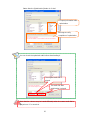
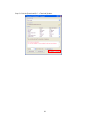
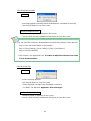
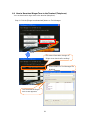
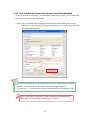
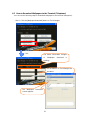
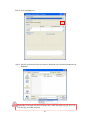
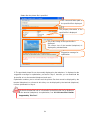
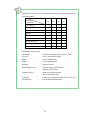
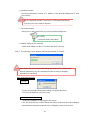
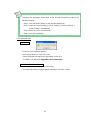
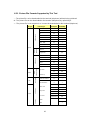
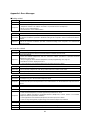
DT700 Series Data Maintenance Tool User's Guide A50-018219-001 Ver. 1.0 June 2009 Notice (1) Information in this guide is subject to change without notice. (2) If you find any unclear or incorrect description or lack of information, please contact us. (3) NEC Infrontia Corporation is not responsible for any direct or indirect damage caused by a defect in this guide. (4) NEC Infrontia Corporation is not responsible for any solely economic loss such as damages due to a loss of communication caused by any failure/error/trouble of this product or any external factor in power outage. Microsoft and Windows are registered trademarks of Microsoft Corporation in the United States and/or other countries. © NEC Infrontia Corporation 2009 The content of this guide shall not be copied or altered without the prior written permission of NEC Infrontia Corporation. I Contents 1 Preface ................................................................................................ 1 1.1 Overview .................................................................................................... 1 2 Operating Environment ..................................................................... 3 3 Notes ................................................................................................... 3 3.1 Model ......................................................................................................... 3 3.2 Usage Restrictions ................................................................................... 3 4 Before Use .......................................................................................... 4 4.1 Installing Maintenance Tool ..................................................................... 4 4.2 Uninstalling Maintenance Tool ................................................................ 6 5 Tool Manager ...................................................................................... 7 5.1 5.2 Start and Termination ............................................................................... 7 5.1.1 Starting Tool Manager ..........................................................................7 5.1.2 Terminating Tool Manager....................................................................7 Screen Description ................................................................................... 8 6 Data Maintenance Tool ...................................................................... 9 6.1 How to Back Up Data for Terminal (Telephone) ..................................... 9 6.2 How to Restore Backup Data of the Terminal (Telephone).................. 14 6.3 How to Download Hold Music to the Terminal (Telephone) ................ 18 6.4 How to Download Ringer Tone to the Terminal (Telephone) ............... 29 6.4.1 6.5 How to Adjust the Volume of an Audio File to Be Downloaded .......31 How to Download Wallpapers to the Terminal (Telephone)................. 32 6.5.1 Picture File Formats Supported by This Tool ...................................43 Appendix I: Error Messages ................................................................. 44 II 1 Preface Thank you for using our "DT700 Series Data Maintenance Tool" (hereinafter referred to as "Maintenance Tool"). Maintenance Tool provides functions to back up and restore DT700 Series terminal (telephone) data. It can be used to download hold music, ringer tones and wallpapers from a PC to a DT700 over a local area network. 1.1 Overview Maintenance Tool is composed of Tool Manager and Data Maintenance Tool. These components have the following functions respectively: [Tool Manager] ・ Activate Data Maintenance Tool. [Data Maintenance Tool] ・ Back up data in terminal (telephone). ・ Restore backup data of terminal (telephone). ・ Download hold music to terminal (telephone). ・ Download ringer tones to terminal (telephone). ・ Download wallpapers to terminal (telephone). Download hold music/ringer tone Back up data Restore data Download wallpaper The specifications and designs of the product are subject to change for improvement without prior notice. 2 2 Operating Environment The following table shows the operating environment of the Maintenance Tool: OS 3 Version Windows XP Professional with SP2 or later, Windows Vista Business Language Japanese, English Notes 3.1 Model • Maintenance Tool is dedicated to the DT700 series. 3.2 Usage Restrictions • Installing Maintenance Tool requires administrative privileges. • Maintenance Tool cannot be used with "DT700 Series Web Programming" simultaneously. Maintenance Tool may not function normally on a PC on which another tftp server application is running. • PCs, where screen resolution is set to other than "Normal Size (96 DPI)", may be unable to display screens normally. You can check screen resolution (DPI setting) from screen properties. 3 4 Before Use 4.1 Installing Maintenance Tool Install Maintenance Tool on your PC. Confirm the PC environment, and start the setup. Step 1: Double-click "setup.bat” of Data Maintenance Tool for DT700 Series. When "Welcome to the Data Maintenance Tool for DT700 Series Setup Wizard" screen appears, follow the on-screen instructions to install. 4 If "Microsoft .NET Framework 2.0" or "Visual C++ Runtime Library (x86)" is not installed on the PC in which you want to install Maintenance Tool, the following screen appears during installation of Maintenance Tool. Proceed with installation according to the instructions on the screen. (1) Microsoft .NET Framework 2.0 (2) Visual C++ Runtime Library (x86) ver.2.0.50727.42 5 4.2 Uninstalling Maintenance Tool Uninstall Maintenance Tool by the following procedure. Step 1: Open the Windows Control Panel and select Add or Remove Programs. Step 2: Select "Data Maintenance Tool for DT700 Series", and click [Change] button. Step 3: Follow the on-screen instructions to delete the program. After uninstallation, the folder in which Maintenance Tool was installed or its files may still remain. In this case, manually delete the folder and its files. 6 5 Tool Manager The Tool Manager provides tool information, status information and an interface for performing Data Maintenance functions. This section describes how to start and stop Tool Manager and describes the Tool Manager screen. 5.1 Start and Termination 5.1.1 Starting Tool Manager There are two ways to start Tool Manager. 1. Start Tool Manager by double-clicking the [Tool Manager for DT700 Series] icon. 2. Start Tool Manager from the start menu of Windows by clicking [Start] -> [All Programs] -> [NEC] -> [Maintenance Tool for DT700 Series] -> [Tool Manager for DT700 Series]. 5.1.2 Terminating Tool Manager There are two ways to terminate Tool Manager. 1. Click the [Exit] button located at the bottom right of the screen. When the termination confirmation appears, click the [OK] button to terminate Tool Manager. 2. Click the [×] button located at the top right of the screen. When the termination confirmation appears, click the [OK] button to terminate Tool Manager. 7 5.2 Screen Description Tool information Status information Tool startup buttons [EXIT] button Tool information Displays the tool name, version, and copyright. Status information Displays the current tool startup status. Tool startup buttons Starts each function of Data Maintenance Tool. [Backup Data] Starts the data backup function. [Restore Data] Starts the data restore function. [Hold music download] Starts the hold music download function. [Ringer tone download] Starts the ringer tone download function. [Wallpaper download] Starts the wallpaper download function. [EXIT] button Terminates Tool Manager. 8 6 Data Maintenance Tool This section describes how to use Data Maintenance Tool functions. 6.1 How to Back Up Data for Terminal (Telephone) You can back up data for terminal (telephone). The data that can be backed up depends on the terminal (telephone) model as shown below: DT750 DT730 DT710 User Setting ○ ○ ○ Hold music ○ ○ ○ Ringer tone 1 ○ ○ × Ringer tone 2 ○ ○ × Ringer tone 3 ○ ○ × Wallpaper ○ × × To back up data: Step 1: Click the [Backup Data] button on Tool Manager. Click 9 The status information changes to "Backup Data is working." All the buttons on Tool Manager are disabled. The Data backup screen appears. Step 2: Click the folder icon on the Data backup screen. Step 3: Select a folder to save the backup data, and click the [OK] button. 10 Backup files are saved as "PersonalData_yyyymmddhhmmss.tgz". It is recommended that you create a folder for each terminal to easily find the source terminal. You can create a new folder. Step 4: Click the [Backup (Terminal -> PC)] button. The path of the selected directory is displayed. 11 Step 5: Set every item on the Upload screen, and click the [Run] button. Specified Terminal Specify the telephone number or IP address of the terminal (telephone) to obtain data. When a telephone number is used, the PC and terminal (telephone) must be on the same network segment. User authentication Specify an ID and password to log in to the terminal (telephone). ID: USER Password: 0000 (Default) Network setting of this computer Select the IP address of the PC on which this tool is running. Step 6: The following screen appears after the [Run] button is clicked. 12 If the upload succeeds PC side The backup file name of the uploaded file is displayed. Click the [OK] button to close the screen. Terminal (telephone) side "Upload Complete!" is displayed on the screen. Press the [Exit] soft key located below the display to close the screen. If the upload fails PC side An error message appears. Click the [OK] button to close the screen. * Some displayed messages vary depending on the error. For details, see attached “Appendix I: Error Messages.” Terminal (telephone) side "Upload Failed" is displayed on the screen. Press the [Exit] soft key located below the display to close the screen. 13 6.2 How to Restore Backup Data of the Terminal (Telephone) To restore backup data to the terminal (telephone), follow the steps below. Do not restore data that has been backed up for another terminal model. (Example: Restoring data backed up for a DT730 to a DT750.) For data to be backed up, see "6.1 How to Back Up Data for Terminal (Telephone)." Step 1: Click the [Restore Data] button on Tool Manager. Click The status information changes to "Restore Data is working." All the buttons on Tool Manager are disabled. The Data restore screen appears. 14 Step 2: Click the folder icon on the Data restore screen. Step 3: Select the backup data to be restored. Step 4: Click the [Restore (PC -> Terminal)] button. The path of the selected file is displayed. 15 Step 5: Set every item on the Download screen, and click the [Run] button. Specified Terminal Specify the telephone number or IP address of the terminal (telephone) to which the data is uploaded. When a telephone number is used, the PC and terminal (telephone) must be on the same network segment. User authentication Specify an ID and password to log in to the terminal (telephone). ID: USER Password: 0000 (Default) Network setting of this computer Select the IP address of the PC on which this tool is running. Step 6: The following screen appears after the [Run] button is clicked. When download is cancelled, the file transfer to the terminal may be completed and then the file may be updated depending on the timing. 16 If the download succeeds PC side A message appears indicating that the download was completed successfully. Click the [OK] button to close the screen. Terminal (telephone) side "Download Complete!" is displayed on the screen. Press the [Exit] soft key located below the display to close the screen. If the download fails PC side An error message appears. Click the [OK] button to close the screen. * Some displayed messages vary depending on the error. For details, see attached “Appendix I: Error Messages.” Terminal (telephone) side "Download Failed" is displayed on the screen. Press the [Exit] soft key located below the display to close the screen. 17 6.3 How to Download Hold Music to the Terminal (Telephone) The instructions below explain how to download hold music to the terminal (telephone). Step 1: Click the [Hold music download] button on Tool Manager. Click. The status information changes to "Hold music download is working." All the buttons on Tool Manager are disabled. The Download of Hold Music screen appears. 18 Step 2: Click the folder icon. Step 3: Select an audio file to be downloaded to the terminal (telephone) as the hold music. 19 With optimization, convert an audio file that cannot be played into a format playable on the terminal. The path of the selected audio file is displayed. The property information on the selected audio file is displayed. Suggestion message for optimization With optimization by this tool, you can convert audio files of "PCM" or "u-Law" format into an audio file playable by the terminal. Wave sounds such as "ADPCM" are not supported. 20 The following information is displayed as the property information: File format File size Bitrate Audio sample size Channel Audio sample rate Audio format Time Add data * Not displayed when no addition information is available. Copyright information The following information is displayed if there are appropriate. * Not displayed when no copyright information is available. - Archival Location - Dots Per Inch - Product - Artist - Engineer - Subject - Commissioned - Genre - Software - Comments - Keywords - Sharpness - Copyright - Lightness - Source - Creation date - Medium - Source Form - Cropped - Name - Technician - Dimensions - Palette Setting 21 Explanation about suggestion messages for optimization When an audio file whose format (u-Law 8.000kHz 8 bit monaural, 32 seconds or less playback time, and file without copyright information and addition information) is supported by the terminal (telephone) is selected, the following message is displayed: "The appointed voice file is enabled to use telephone." For audio files provided for the terminal (telephone), no optimization is necessary. Go to Step 5. If you create an audio file of the format supported by the terminal (telephone), it is recommended to adjust the volume with optimization. When the audio file can be converted into an audio file playable by the terminal (telephone), the following message is displayed: "The appointed voice file has the following problems. Please click an optimization button, in order to solve a problem." In addition, the following details are displayed in red. “Since the format does not support telephone, it is unable to play back.” [Cause] The format is not "u-Law 8.000kHz 8 bit monaural". [Optimization process] The format is converted into "u-Law 8.000kHz 8 bit monaural". "Play back time is over the longest play back time of telephone." [Cause] The playback time of the audio file exceeds 32 seconds. [Optimization process] The playback time is shortened to 32 seconds. "Since copyright information is added, it may be normally not play back on the telephone." [Cause] The copyright information is attached to the audio file. [Optimization process] The copyright information is deleted. 22 "Since there is addition information, it is not normally play back on the telephone." [Cause] The addition information is attached to the audio file. [Optimization process] The addition information is deleted. When the audio file cannot be converted into an audio file playable by the terminal (telephone), the following message is displayed: In addition, the following details are displayed in red. "In order to download to telephone, please change into the following audio format." "Correspondence audio format: PCM/u-Law" [Cause] The audio format is not supported. (This message is displayed when the audio format such as "ADPCM" is selected. [Optimization process] None * Optimization cannot be performed since the format is not supported by this tool. Select the file whose audio format is "PCM" or "u-Law" format. 23 Step 4: Click the [Optimization] button. The sound quality may be different from the original audio after optimization since the audio format may be converted. This tool adjusts the volume to a level appropriate for the use of the terminal when the [Optimization] button is clicked. For how to adjust the volume, see “6.4.1 How to Adjust the Volume of an Audio File to Be Downloaded." 24 Status after the [Optimization] button is clicked Property information after optimization Message to notify completion of optimization You can check the optimized audio before downloading it. The original audio file is played. The audio file after optimization is played. Note that the volume may be heard differently when the same audio file is played on a PC or terminal. 25 Step 5: Click the [Download (PC -> Terminal)] button. 26 Step 6: Set every item on the Download screen, and click the [Run] button. Specified Terminal Specify the extension number or IP address of the terminal (telephone) whose audio file is to be sent. When a telephone number is used, the PC and terminal (telephone) must be on the same network segment. User authentication Specify an ID and password to log in to the terminal (telephone). ID: USER Password: 0000 (Default) Network setting of this computer Select the IP address of the PC on which this tool is running. Step 7: The following screen appears after the [Run] button is clicked. When download is cancelled, the file transfer to the terminal may be completed and then the file may be updated depending on the timing. 27 If the download succeeds PC side A message appears indicating that the download was completed successfully. Click the [OK] button to close the screen. Terminal (telephone) side "Download Complete!" is displayed on the screen. Press the [Exit] soft key located below the display to close the screen. You can check the hold music downloaded to the terminal by playing it on the terminal. Step 1: Press the [Menu] button on the terminal. Step 2: Select [Setting] -> [User Setting] -> [Talk] -> [Hold Music]. Step 3: Select [Download]. * If the volume is not appropriate, see “6.4.1 How to Adjust the Volume of an Audio File to Be Downloaded." If the download fails PC side An error message appears. Click the [OK] button to close the screen. * Some displayed messages vary depending on the error. For details, see attached “Appendix I: Error Messages.” Terminal (telephone) side "Download Failed" is displayed on the screen. Press the [Exit] soft key located below the display to close the screen. 28 6.4 How to Download Ringer Tone to the Terminal (Telephone) You can download a ringer tone to the terminal (telephone). Step 1: Click the [Ringer tone download] button on Tool Manager. Click. The status information changes to "Ringer tone download is working." All the buttons on Tool Manager are disabled. The Download of Ringer tone screen appears. 29 Step 2: Click on the [Download type] box, and select a ringer tone you want to download from 1 to 3. For subsequent operations, see Step 2 and after in “6.3 How to Download Hold Music to the Terminal.” On the terminal, you can play and hear the ringer tone downloaded to the terminal. Step 1: Press the [Menu] button on the terminal. Step 2: Select [Setting] -> [User Setting] -> [Incoming Call] -> [Ringer tone] -> [External Call]. Step 3: Select "Download 1". * Select "Download 2" when "Ringer tone 2" has been downloaded. Select "Download 3" when "Ringer tone 3" has been downloaded. * If the volume is not appropriate, see “6.4.1 How to Adjust the Volume of an Audio File to Be Downloaded." 30 6.4.1 How to Adjust the Volume of an Audio File to Be Downloaded On the "Download of Hold music" or "Download of Ringer tone" screen, you can adjust the volume of an audio file to be downloaded. Step1: Set your desired value in the [Volume] field in the lower left part of the screen (using the [↑] (up-arrow) and [↓] (down-arrow) buttons, or by direct input), and click the [Optimization] button. Set a value from -100 to 100. The audio file adjusted to the standard volume level is re-adjusted by the specified quantity. You can specify it in the range of -100dB to 100dB (decibels). For example, if "-5" is specified, the volume of the audio file is decreased by -5dB. If an invalid value is specified for volume adjustment, the optimization fails with an error message "Invalid range of volume." 31 6.5 How to Download Wallpapers to the Terminal (Telephone) You can use the following steps to download wallpapers to the terminal (telephone). Step 1: Click the [Wallpaper download] button on Tool Manager. Click The status information changes to "Wallpaper download is working." All the buttons on Tool Manager are disabled. The Wallpaper Download screen appears. 32 Step 2: Click the folder icon. Step 3: Specify the picture file that you want to download to the terminal (telephone) as wallpaper. Selectable file formats are BMP file (bmp, dib), JPEG files (jpeg, jpg, jpe, jfif, jif, jfi), GIF file (gif), and PNG file (png). 33 Status after the picture file is specified The name and folder path of the specified file is displayed. The property information of the specified file is displayed. The picture image of the specified file is displayed. The screen size of the terminal (telephone) is displayed by a dotted frame. Suggestion message for optimization If "The appointed picture file can be normally displayed on the telephone." is displayed as the suggestion message for optimization, proceed to Step 5 because you can download the picture file as is to the terminal (telephone) and use it. Optimization enables you to convert even the picture files that cannot be displayed by the terminal (telephone) to a format in which they can be displayed by the terminal (telephone). Perform optimization in Step 4. For the file formats that can be converted to picture files that can be displayed on the terminal (telephone) via optimization, see "6.5.1 Picture File Formats Supported by This Tool." 34 Property information items to be displayed depend on the file formats shown in the table below. BMP JPEG GIF PNG Property Information File File File File File format ○ ○ ○ ○ File size ○ ○ ○ ○ Width ○ ○ ○ ○ Height ○ ○ ○ ○ Bit depth ○ ○ ○ ○ Data storage format ○ - - - Drawing format - ○ - - Color type - ○ - - Transparency - - - ○ File Format [Explanation of each item] File format … Format of specified file (e.g., BMP, JPEG) File size … Size of specified file (byte) Width … Picture width (pixel) Height … Picture height (pixel) Bit depth … Depth of bit (bit) Data storage format … Storage format of picture data (Bottom up/Top down) Drawing format … Drawing format of pictures (Baseline/Progressive) Color type … Display color element (RGB/CMYK/YCCK, etc.) Transparency … Transparent/nontransparent 35 Explanation about suggestion messages for optimization ●If a picture file that can be displayed by the terminal (telephone) is specified, the following message is displayed: "The appointed picture file can be normally displayed on the telephone." * The picture files that can be displayed by the terminal (telephone) are those which meet the following conditions: ・Files whose formats can be displayed by the terminal (telephone) (File formats marked by in "6.5.1 Picture File Formats Supported by This Tool") ・Files where the picture size is less than or equal to the screen size (240 pixels x 320 pixels) ●If a picture file that can be displayed by the terminal (telephone) via optimization is specified, the following message is displayed: "The appointed picture file has the following problems. Please click an optimization button, in order to solve the problems." The following details of the problems are also displayed in red. “The part of picture which over the dotted line, is Not displayed on the telephone.” [Cause] The picture file exceeds the screen size (240 pixels x 320 pixels) of the telephone. [Optimization process] The portions outside the dotted frame displayed in the picture image are deleted. “The picture data storage form as Top down cannot be displayed on the telephone.” [Cause] The data storage format of the bitmap picture file is Top down. [Optimization process] The data storage format is converted to Bottom up. “Bit depth is 32bit or more cannot be displayed on the telephone.” [Cause] The bit depth of the bitmap picture file is greater than or equal to 32 bits. [Optimization process] The bit depth is converted to 24 bits. 36 “The drawing form of Progressive cannot be displayed on the telephone.” [Cause] The drawing format of the JPEG picture file is Progressive. [Optimization process] The drawing format is converted to Baseline. “The color type for CMYK or YCCK cannot be displayed on the telephone.” [Cause] The color type of the JPEG picture file is CMYK or YCCK. [Optimization process] The color type is converted to YCbCr. “The picture file with Transparent information cannot be displayed on the telephone.” [Cause] Transparent information is added to the PNG picture file. [Optimization process] Transparent information is deleted. ●If a file that cannot be optimized is specified, the following message is displayed: "This picture file was not downloadable." [Cause] The file format is not supported or the file is corrupted. [Response] Specify a picture file of a file format supported by this tool. For detail on supported picture files, see "6.5.1 Picture File Formats Supported by This Tool." 37 Step 4: Click the [Optimization] button. 38 Status after the [Optimization] button is clicked Property information after optimization is displayed. The picture image after optimization is displayed. Optimization completion message If the screen size is optimized, the part outside the dotted frame is cut with reference to the original picture. The black part outside the dotted frame displayed after the picture image is optimized is not included in the optimized picture image. If a picture with transmittance 100% is used, the transparent part becomes black in the tool and telephone. If a picture whose transmittance is less than 100% is used, transparency becomes invalid. Windows picture and FAX viewer Transmittance 100% Transmittance less than 100% Transparent part Transparent part 39 This tool or telephone Transparent part Transparent part Step 5: Click the [Download(PC -> Terminal)] button. Step 6: Set each item on the Download screen and click the [Run] button. 40 Specified Terminal Specify the telephone number or IP address of the terminal (telephone) to send the voice file. When a telephone number is used, the PC and terminal (telephone) must be on the same network segment. User authentication Specify an ID and password to log in to the terminal (telephone). ID: USER Password: 0000 (initial value) Network setting of this computer Select the IP address of the PC on which this tool is running. Step 7: The following screen appears after the [Run] button is clicked. Even if you click the Cancel button during downloading, file transfer to the terminal (telephone) may be completed and the file may be updated, depending on the timing. If the download succeeds PC side The above message is displayed showing successful download. Click the [OK] button to close the screen. Terminal (telephone) side "Download Complete!" is displayed on the screen. Click the [Exit] soft key located below the display and check that the wallpaper downloaded to the terminal (telephone) is displayed on the Home screen. 41 Displaying the wallpaper downloaded to the terminal (telephone) requires the following settings: Step 1: Click the [Menu] button on the terminal (telephone). Step 2: Open the screen [Setting] -> [User Setting] -> [Screen Setting] -> [Other Setting] -> [Wallpaper]. Step 3: Move the cursor to [Download]. Step 4: Click [Accept] button. If the download fails PC side The above error message appears. Click the [OK] button to close the screen. * Some displayed messages vary depending on the error. For details, see attached “Appendix I: Error Messages.” Terminal (telephone) side "Download Failed!" is displayed on the screen. Click the [Exit] soft key located below the display to close the screen. 42 6.5.1 Picture File Formats Supported by This Tool ○…The picture file can be downloaded to the terminal (telephone) without being optimized. Δ…The picture file can be downloaded to the terminal (telephone) by optimizing it. ×… The picture file is not supported, so it cannot be downloaded to the terminal (telephone). File Type Format Type Format type JPEG Drawing format Color type Data storage Animation GIF format BMP Bit Depth Availability JFI 24 ○ JFIF 24 ○ JIF 24 ○ JPE 24 ○ JPG 24 ○ JPEG 24 ○ JPEG 2000 24 × JPEG-LS(Lossless) 24 × JPEG XR 36 × Baseline - ○ Progressive - Δ RGB 24 ○ CMYK 24 YCCK 24 Δ Δ YCbCr 24 ○ YUV 24 ○ Grayscale 8 ○ 32 Δ Δ 2,4,8,24 ○ 32 Δ Without animation 8 ○ With animation 8 × 1,2,4,8 ○ Transparent Δ 2,4,8,16,32 ○ Transparent Δ 24,48 ○ Transparent Δ 24,48 × 2,4,8,24 Top down Bottom up Index color Color type Grayscale PNG True color Animation APNG MNG × 43 Appendix I: Error Messages ■Setting-related Message There is invalid parameter. Explanation Some items are not yet entered on the Upload or Download screen. Response Check if the following items are correctly entered: ・Telephone number or IP address selected in "Specified Terminal (Telephone)" ・ID set in "User authentication" ・Password set in "User authentication" Message There is invalid network setting. The terminal (telephone) with the IP address specified in "Specified Terminal (Telephone)" and the Explanation PC with the IP address specified in "Network setting of this computer" cannot communicate with the network. Check if the terminal (telephone) with the IP address specified in "Specified Terminal (Telephone)" Response and the PC with the IP address specified in "Network setting of this computer" can communicate with the network. ■Connection-related Message Can not find specified telephone. Connection will be closed. Explanation The terminal (telephone) with the specified extension number was not found. Check the following: ・ Does the terminal (telephone) with the extension number specified in "Specified Terminal (Telephone)" really exist? Response ・Are you logging in to the terminal (telephone) in Web programming? If so, log out. ・If the Menu screen is displayed, close it. ・Is the application of the terminal (telephone) (local IPM port) set to 3530? Message There is duplicate telephone. Connection will be closed. Explanation Several terminals (telephones) with the specified extension number were found. Response Contact your system administrator. Message There is authentication error. Connection will be closed. Explanation An attempt to log in to the terminal (telephone) failed. Response Check the following: ・Check if the ID or password specified in "User authentication" on the Download or Upload screen is correct. Message There is connection error. Connection will be closed. Explanation There is no response from the terminal (telephone). Check the following: ・Is this terminal (telephone) a model supported by Maintenance Tool? ・Is the IP address specified in "Specified Terminal (Telephone)" correct? (There is no terminal Response (telephone) with the specified IP address) ・Is the application of the terminal (telephone) (local IPM port) set to 3530? ・Is the security setting (Web programming) of the terminal (telephone) enabled? Message Can not proceed, because there is active connection. Please wait for a while. Explanation Communication with the terminal (telephone) is now terminating. Response Wait for a while and then retry. 44 Message Explanation There is session error. Connection will be closed. An attempt to acquire session information (communication ID) with the target terminal (telephone) has failed. Response Check the following: ・When you are logging in to the terminal (telephone) in Web programming, log out. ・If the Menu screen of the terminal (telephone) is displayed, switch it to the Standby screen. Message There is session timeout. Connection will be closed. Explanation A timeout occurred during communication with the terminal (telephone). Response Check the following and then retry: ・Are the terminal (telephone) and PC connected via the network? (The network connection may have been disconnected during communication.) ・Is the network line congested? Message There is undefined HTTP error. Connection will be closed. Explanation An error occurred during HTTP communication. Response Check the following: ・Is the IP address specified in "Specified Terminal (Telephone)" correct? (The IP address of a device that is not a terminal (telephone) may have been specified.) ・If this error still occurs despite this response, restart the tool and then retry. ■Directory folder-related Message Explanation Response Message Can not make temporary directory. An attempt to create a work directory used to exchange data with the terminal (telephone) has failed. Check the following: ・Does the drive where the tool is installed have free space of at least 10 megabytes? Can not make temporary file. Explanation An attempt to create the file to be sent to the terminal (telephone) has failed. Response Check the following: ・Does the drive where the tool is installed have free space of at least 10 megabytes? Message Folder access error occurred. Explanation An attempt to access the specified folder during data backup has failed. Response Check the following: ・Does the specified folder exist? ・Does the drive where the tool is installed have free space of at least 10 megabytes? Message Failed to save backup. Explanation An attempt to save a backup file during data backup has failed. Response Check if the drive where the tool is installed has free space of at least 10 megabytes, wait for awhile, and then retry. 45 ■Terminal (telephone) error-related Message There is error notification from telephone, that means "Download is failed." Explanation An error message was sent from the terminal (telephone) during the download. Response The file specified for the download may be incorrect or may have been corrupted. Message There is error notification from telephone, that means "Backup is failed." Explanation An error message was sent from the terminal (telephone) during the backup. Response If this error cannot be corrected, contact the distributor. Message There is error notification from telephone. Explanation An error notification was received from the terminal (telephone). Response Wait for a while and then retry. ■Tool-related Message It is not corresponded in the specified telephone. Explanation The model of the specified terminal (telephone) does not support the executed function. Response Executable functions depend on a terminal (telephone) model. For details, refer to the manual. Message This voice file cannot be optimized. Explanation An attempt to convert the voice file format has failed. Response The specified voice file may have been corrupted. Message This voice file was not downloadable. Explanation An attempt to read the specified voice file has failed. Response The specified voice file may have been corrupted. Message This picture file was not downloadable. Explanation An attempt to read the specified picture file has failed. Response The specified picture file may have been corrupted. Message Tool manager starting error. This tool is not able to run more than one. Explanation An attempt was made to start Tool Manager several times. Response Check if Tool Manager was started several times. Message The application illegally started. Please start from a Tool manager. Explanation The tool was started illegally. Response Start the tool from Tool Manager. 46 Message Tool starting error Explanation An attempt to start each tool has failed. Response The Data Maintenance Tool may have been destroyed. Repair or reinstall the tool. 47 DT700 Series Data Maintenance Tool User's Guide The specifications and designs of the product are subject to change for improvement without notice. NEC Infrontia Corporation A50-018219-001 Ver. 1.0 June 2009