1
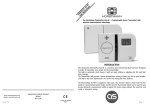
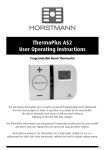
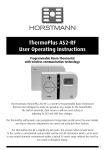
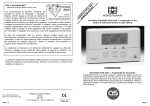
T
US HER
ER M
IN OP
ST LU
RU S
CT AS1
IO
NS
The Horstmann ThermoPlus AS1 - Programmable Room Thermostat Offers a
number of pre-installed heating profiles which are simple to set-up by the
installer or user to provide maximum comfort. Once complete, user
operations are kept to a minimum by using the +/ - and Warm/Cool buttons
on the front of the unit.
PLEASE NOTE: The ThermoPlus contains a selection of five pre-set and one
adjustable profile options, one of these profiles should have been set by the
Installer to meet your heating requirements. Care should be taken to
ensure the correct profile is selected that most suits your lifestyle. Details
on how to change the selected profile are located on page 5 of this guide.
Email: [email protected]
Website: www.horstmann.co.uk
PAGE 12
Horstmann Controls Limited
Bristol
BS4 1UP
LEAFLET No P82312
ISSUE 1
PAGE 1
INTRODUCTION AND OPERATING GUIDE
INDEX
INTRODUCTION AND OPERATING GUIDE
The ThermoPlus AS1 has been designed to be a simple to use thermostat,
requiring minimal user intervention. The normal day-to day operation is
taken care of by the pre-set heating profiles, any temporary adjustments
are simply made by using the + and - buttons. The indicator lights
react to any temporary user adjustments made, the LED indicators work
in the following way;
Warm is shown by two red lights (6) and Cool is shown by a single blue
light (5). The centre button (3) marked 'Warm / Cool' allows you to
toggle between warm and cool settings.
PAGE 2
WARM / COOL TEMPERATURE ADJUSTMENT PAGE 3
PROGRAMMING MODE
PAGE 4
TIME AND DATE CHECK
PAGE 4
SETTING PROFILES
PAGE 5
HEATING PROFILES 1 - 5
PAGE 6
PROFILE 6 - USER ADJUSTABLE
PAGE 8
RESET PROCEDURE
PAGE 9
GENERAL INFORMATION
PAGE 10
SPECIFICATION
PAGE 10
When one or more red lights are on, you can increase the temperature by
pressing the '+' button (1). For example, press once to go up by 1 degree
or press twice to go up by 2 degrees.
When the two or three red lights are on, the temperature can also be
lowered by using the '-' button (2). For example, press once to go down
to the warm setting temperature and press again to go down to one
degree below warm setting temperature.
The Blue light means the unit is working to the lower temperature and the
'+' or '-' buttons do not work when this blue light is on. To change to the
warm setting press the ‘Warm/Cool’ button.
Under the flap (7) is a Blue button (4). During the summer, or when you
want your central heating off for long periods, for example if you go on
holiday, press the Blue button and close the flap. When you want to
go back to normal operation, open the flap and press the Blue button
again, remembering to close the flap once finished.
Both the Warm and Cool temperature settings can be fully adjusted, this
operation is detailed opposite
PAGE 2
SPECIFICATION THERMOPLUS AS1
Contact type: Micro dis-connection
(Voltage Free)
Contact rating: 3(1)Amps 230-240V AC
Power supply: 230-240V AC 50Hz
Operating Temperature range: 0oC to 40oC
Temperature Control Range: 5oC to 30oC
Standby Temperature: 5oC to 30oC
Double insulated.
Dirt protection: Normal situations.
Enclosure protection: IP30
Purpose of control: Electronic thermostat
Reserve Battery Type: Lithium
Case material: Thermoplastic, flame retardant
Dimensions: 120mm x 90mm x 32mm
Display: User - LED
Programming - Liquid crystal, Backlit
Clock: 24 hour
Display time adjustment: 1 Minute steps
Switched time adjustment: 15 Minute steps
Programme selection: Auto, Standby
Operating periods per day (Warm): 3
Override: Instant Warm/Cool
Backplate: Industry Standard Backplate
PAGE 11
FROST PROTECTION
6
The Blue button situated under the flap will initiate the frost protection mode when pressed,
the word ’STANDBY’ will appear on the display, the thermostat has been pre-programmed with
a frost protection temperature level of 7oC, this can be adjusted by using the up and down
arrow buttons.
BATTERY
1
The programmer is fitted with a non-rechargeable, long life battery, which will maintain the
programmed time settings for a minimum of 12 months with the supply disconnected.
THIS SHOULD BE SUFFICIENT TO COVER POWER INTERRUPTIONS DURING THE LIFE OF THE UNIT.
During power interruptions the LCD display and LED indicators will not function.
SERVICE AND REPAIR
The ThermoPlus AS1 is NOT user serviceable. Please do not dismantle the unit.
In the unlikely event of a fault developing please refer to the RESETTING THE THERMOSTAT
section of this user guide located on page 9. If this fails to resolve the problem please contact
a local heating engineer or a qualified electrician.
2
3
5
4
8
7
WARM AND COOL TEMPERATURE ADJUSTMENTS
The ThermoPlus has two preset temperature levels, these are known as
‘Warm’, higher level temperature(21oC) and ‘Cool’, lower or set back
temperature(15oC). The preset temperatures have been selected to give a
comfortable, safe, yet efficient temperature level in the home.
In certain installations it may be necessary to adjust either the
‘Warm’ and / or ‘Cool’ temperatures to meet the specific needs of the
user. This can be achieved by following the simple steps below;
(Additional information is also contained within the General
Information section of this guide)
PAGE 10
PAGE 3
THERMOPLUS PROGRAMMING MODE
The ThermoPlus AS1 has been designed for minimal user intervention, however should any
changes be required please press buttons 4 and 8 simultaneously to enter the programming
mode, this will allow you to;
- Check the current time/date/year
- Check the current profile
4
- Set a new pre-set profile or
- Set a user defined profile
8
PLEASE NOTE; Upon completion of the instructions
above, please ensure that you exit the programming
mode by pressing button 4 and 8 simultaneously.
TIME AND DATE CHECK
The ThermoPlus thermostat has been pre-set with the current time and date during
manufacture. No alteration should be required to the time and date, however if any
modification is required please refer to the flowchart below.
GENERAL INFORMATION
RESETTING THE THERMOPLUS AS1
Electronic equipment can in some circumstances be affected by electrical interference. If the
display becomes frozen or scrambled; or if you wish to revert back to the default settings please
use the following procedure.
RESET PROCEDURE
PLEASE NOTE; Using this procedure will restore the ThermoPlus to the original factory
programme settings, the time setting will also default to 1st January 2005.
RESETTING THE THERMOPLUS AS1
- On the ThermoPlus AS1 press the ‘UP’ and ‘DOWN’
arrow buttons together:
- Then release the buttons and the thermostat will
return to preset factory settings.
TO RESET PRESS
WARM AND COOL TEMPERATURE ADJUSTMENT
The Warm and Cool target temperature settings on the ThermoPlus
AS1 are fully adjustable. To change a target temperature it is first
necessary to press the the centre button to bring up the ‘Warm’ or
‘Cool’ setting (Indicated by the red or blue LED indicators). By using
the up/down keys under the flap the ‘Warm/Cool’ temperature can
be increased or decreased to the desired temperature setting
PLEASE NOTE - it is not possible to set the warm
setting to below that of the cool setting or vice
versa.
Once a new temperature has been set on either
the Warm or Cool setting the AS1 will continue
to use this setting until the next manual
adjustment.
PAGE 4
(DETAILS GIVEN ABOVE)
PLEASE NOTE - The AS1 will display any
temporary change the user has made by
pressing the + or - buttons, this does not
indicate a permanent change in either the
Warm or Cool settings, the temperature will
return to the pre-set levels at the next
switching period. During an override the
‘Warm’ or ‘Cool’ setting will not be displayed on
the LCD.
Press
Here Select
To Increase
Press
To Decrease
Press
PAGE 9
PROFILE SIX
USER DEFINABLE - 7 DAY PROGRAMMING
PROFILE
Profile six will allow you to set up a profile to your exact requirements. By using the flow
chart below you can adjust the Warm/Cool timing periods on each day of the week.
6
7 DAY
SETTING HEATING PROFILES
The ThermoPlus contains a selection of five pre-set and one user definable profile options, one
of these may have been set by the Installer. Care should be taken to ensure a profile is
selected that suits the lifestyle of the user concerned.
The flow chart below is designed to easily guide you through the process of setting the required
profile.
Profiles one to five are detailed on page 6 and 7.
COPY FEATURE
The copy feature can be used to
apply changes made from one
days programming to the next.
This is achieved by pressing the
down arrow button when ‘SET’
is displayed on the screen.
‘SET’ is displayed after the last
cool period is confirmed on
each day.
If none of the pre-set profiles meets your requirements it is possible to set a user defined
profile, full details are given on page 8.
Profiles one to five have fixed programmes, they can be reviewed by
pressing the set button once the selection process detailed above has
been completed. To set a custom profile please refer to the instructions
on page 8.
PAGE 8
PAGE 5
HEATING PROFILES
PROFILE
1
PROFILES ONE TO THREE
24 HOUR - SAME PROFILE EACH DAY
PROFILE ONE - DEFAULT
EVERY DAY
24 HR
Time
1
2
3
4
5
6
7
START
06:00
22:00
STATUS
WARM
COOL
TIME PROFILE
8 9 10 11 12 13 14 15 16 17 18 19 20 21 22 23 00
PROFILE
The ThermoPlus has six heating profiles, five are fixed and one is adjustable.
ONE’ has been set as the default and is detailed below. During installation a heating
Profile ‘O
profile should have been set to best match your requirements, illustrations of the pre-set
profiles are shown below.
PROFILES FOUR AND FIVE
5 DAY / 2 DAY - DIFFERENT WEEKDAY / WEEKEND PROFILE
4
PROFILE FOUR
MON - FRI
START
06:00
08:00
11:30
13:30
17:00
22:30
5/2 DAY
Time
Profile
1
2
3
4
5
6
7
STATUS
WARM
COOL
WARM
COOL
WARM
COOL
SAT/SUN
START
07:00
22:00
STATUS
WARM
COOL
TIME PROFILE
8 9 10 11 12 13 14 15 16 17 18 19 20 21 22 23 00
MON-FRI
SAT / SUN
Profile
TEMPERATURE PROFILE
TEMPERATURE PROFILE
MON-FRI
Warm
Cool
Warm
Cool
2
PROFILE TWO
EVERY DAY
24 HR
Time
1
2
3
4
5
6
7
START
06:00
08:00
17:00
22:30
STATUS
WARM
COOL
WARM
COOL
TIME PROFILE
8 9 10 11 12 13 14 15 16 17 18 19 20 21 22 23 00
Profile
Warm
Cool
PROFILE
PROFILE
SAT / SUN
5
PROFILE FIVE
MON - FRI
START
06:00
08:00
17:00
22:30
STATUS
WARM
COOL
WARM
COOL
SAT/SUN
START
07:00
22:00
STATUS
WARM
COOL
5/2 DAY
TEMPERATURE PROFILE
Time
Profile
Warm
Cool
1
2
3
4
5
6
7
TIME PROFILE
8 9 10 11 12 13 14 15 16 17 18 19 20 21 22 23 00
PROFILE
MON-FRI
PROFILE THREE
EVERY DAY
3
24 HR
Time
1
2
3
4
5
6
7
START
06:00
08:00
11:30
13:30
17:00
22:30
STATUS
WARM
COOL
WARM
COOL
WARM
COOL
TIME PROFILE
8 9 10 11 12 13 14 15 16 17 18 19 20 21 22 23 00
SAT / SUN
TEMPERATURE PROFILE
MON-FRI
Warm
Cool
SAT / SUN
Warm
Cool
Profile
TEMPERATURE PROFILE
Warm
Cool
PAGE 6
Profiles one to five have fixed periods, no alteration to the Warm/Cool times can be made,
if it is necessary to make any alterations then profile six must be used. Profile six will allow
you to set up a profile to your exact requirements. Please refer to the flowchart on page 8.
PAGE 7