1
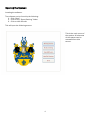
Shelley Academy Room
Booking System
User Guide
Contents
Purpose of this guide: ...................................................................................................................................... 2
Frequently Asked Questions............................................................................................................................ 3
Getting Started ................................................................................................................................................. 3
Opening the System: ........................................................................................................................................ 4
Closing the System: ......................................................................................................................................... 5
Booking Checker: ............................................................................................................................................. 6
Checking the Bookings by Rooms and Dates ................................................................................................ 7
Printing the results: .......................................................................................................................................... 9
Checking the Bookings by a Specific Teacher: ............................................................................................ 10
Making a Booking: ......................................................................................................................................... 12
Using the View/Edit Rooms section: ............................................................................................................. 16
Adding a new room: ....................................................................................................................................... 17
Editing an existing room: ............................................................................................................................... 18
Deleting a room: ............................................................................................................................................. 19
Using the “View/Edit Teachers” section: ...................................................................................................... 23
Error Messages .............................................................................................................................................. 24
Glossary .......................................................................................................................................................... 25
1
Purpose of this guide:
The main purpose of this guide is to cover every aspect of the Room Booking System to inform the user
on how to use each and every element of the system.
2
Frequently Asked Questions
What is the purpose of the software?
The main purpose of the Room Booking Software is to allow Shelley Academy Teachers to create
bookings for the various facilities within the Shelley Academy Campus.
It is software which has been tailored around the exact needs of the school, and should allow the
teachers to successfully make bookings, and check their existing ones.
Where can the software be used?
The software can be used on campus on all computers. It will be located on the school network under
Room Bookings, and accessible via every computer on campus.
What stops pupils in the school from accessing this software?
The software is located in the staff area of the network, and therefore pupils do not have access to this
location.
Getting Started
Locating the software:
Currently, the software can be found by the following:
1. Click “Start”
2. Click on the “Room Booking” folder
3. Click on roombookings.mdb
3
Opening the System:
Locating the software:
The software can be found by the following:
1. Click “Start”
2. Click on the “Room Booking” folder
3. Click on db1.96.mdb
This will open the following screen:
This is the main menu of
the system. All elements
of the system can be
accessed from this
screen.
4
Closing the System:
Once the system is open, the only way to close the system completely is by using the big “Close” button
on the main menu
This will close the entire application.
The smaller Close buttons located around the different screens of the system will normally take the
user back to the previous screen you saw before you opened the current screen.
5
Booking Checker:
To open the Booking Checker, click on the “Booking Checker” button on the main menu.
Clicking this button will enable the user to see the following screen:
The user now has two options.
There are two ways of checking bookings already made.
1. Rooms and Dates
- This method requires the user to enter a specific room and a specific date, and will
return the results of the periods for that date for each booked room and the teacher who
has booked the given room.
2. Specific Teacher
- This method requires the user to enter a specific teacher’s initial, and will return the
results of all the bookings made by the given teacher.
6
Checking the Bookings by Rooms and Dates
Clicking the “Rooms and Dates” button on the booking checker screen,
Will return the following screen:
The user now has to enter a specific date and a specific room to see which periods have been booked
for that specific date and room, and by which teacher.
The date needs to be manually typed. The room can be selected from the drop down menu, or by typing
in the room reference manually.
To close this screen and return to the booking checker menu, the user should press the “Close” button,
located at the bottom right of the screen.
See below for an example of this:
7
As can be seen, on the 11th December 2009, periods 2, 3, 4 and 6 of the day have been booked by
various teachers in the ITK room. Therefore, bookings cannot be made at these times within ITK.
8
Printing the results:
To print the results of the Rooms and Dates checker, the user should press “CTRL” and then “P” on the
keyboard.
The following menu should then be shown:
The user should select the printer they want to print to, and press the “OK” button.
9
Checking the Bookings by a Specific Teacher:
Clicking the “Specific Teacher” button on the booking checker screen,
Will return the following screen:
The user now has to enter a specific teacher’s initial.
This will then return the bookings made by that given teacher in the white box below the input box.
The user can either type the initials manually, or use the drop down menu and select that way.
To close this screen and return to the booking checker menu, the user should press the “Close” button,
located at the bottom right of the screen.
See below for an example of this screen in use:
10
As can be seen, the teacher “KET” has made multiple bookings since 6th December 2009. The
bookings are just for example use however.
To print this information, the user should press “CTRL” and then “P” on the keyboard.
This will bring the following screen:
The user should then select the printer they wish to send this information to, and click the “OK” button.
11
Making a Booking:
Once the software is open, follow the instructions below:
STEP ONE
This is the screen
which should be
presented to the
user.
Click on “Make a
Booking”, which is
the second button
from the top.
12
STEP TWO
This is the screen which you should now see.
Click on the button at the top right of the screen, titled “New Booking”.
The button should become non-clickable once it has been clicked, and boxes around the button will
become available to edit.
13
STEP THREE
This is the screen which you should now see.
Go on to select a date using the calendar at the top left of the screen.
Now select a period for which you wish to make the booking for on that selected date.
Now select the room which you wish to book, from the drop down list under “Select Room”.
Type in your initials into the box under “Teacher”, and press “Enter” on the keyboard.
Finally, click on “Save Record”.
14
The Blue Box:
The blue box is a way of confirming that your booking has successfully been made.
Above is a screenshot of a booking which is nearly ready to complete by pressing “Save Record”:
15
Using the View/Edit Rooms section:
Use the View/Edit Rooms section of the system to view the current rooms in the system, and edit the
details of the rooms, and even add new rooms.
Open the system.
Click on the “View/Edit Rooms” button on the main menu.
Because this section is password protected, the following screen should appear:
For the demonstration of the system, the prompt tells the user what the password is.
Type in the password into the box at the bottom:
Click the “OK” button.
This is the screen you should be presented with now. If this is not the screen you can see, then the
wrong password was entered. See the Troubleshooting Section of the user guide for help with this.
Headings:
ID
Location
RoomBuildingID
Computers
Projector
I-Whiteboard
RoomReference
The unique ID of the room
Where the room physically is on campus
The unique building ID for which the room is located
The number of computers in the room
Whether the room has a projector or not
Whether the room has an interactive whiteboard or not
The reference for which the room is referred to by the users
16
Adding a new room:
To add a new room, open the “View/Edit Rooms” section.
Click the box at the bottom of the screen, under the location column. In this column, enter the name of
the building for which the room is located. For this example, I will make up a building.
Automatically, the new room will be given an ID.
Now progress to the next box, which asks for the rooms building ID. As this is a new room in a new
building, I will make up a building ID, but I will keep to the numerical order which has been used so far.
After giving the RoomBuildingID a value of 6, progress to the next box.
This is where the number of computers within this room needs to be inputted.
For this example, I have decided that the new room has 50 computers in.
The new room has an interactive whiteboard but not a projector.
Therefore for the next two boxes, I will only click on the one which is under the I-Whiteboard column.
Now I need to give my new room a reference, by which all the users will remember the room as when it
comes to making a booking.
For this example, I will use WEN as my room reference.
I am nearly finished saving my new room into the system.
Finally I need to exit this screen using the cross at the top right.
A prompt to save the changes made will then be required, and I will click “Yes”.
17
Editing an existing room:
You might need to change the information about the rooms because more computers are added to a
room, or some are taken away. Alternatively, the computer room might change its name, or some event
may occur for the user to have to change some details.
To edit an existing room, open the “View/Edit Rooms” section.
Once the “View/Edit Rooms” section is open, locate the room which you wish to change details for.
For this example, I will change the number of computers in BS5 from 24 to 30.
The original figure under the “Computers” column shows a figure of 24.
To change this, simply, I click the box which has the 24 in and highlight the 24 as shown below:
Using the keyboard, I change type in the numbers 3 and then 0.
I am nearly finished editing this existing room.
Finally I need to exit this screen using the cross at the top right.
A prompt to save changes made will then be required, and I will click “Yes”.
18
Deleting a room:
[Not recommended for the beginner user]
To delete a room completely from the system, the user must open the system first.
Upon opening the system, the user must click on View and then Design View:
The user must then go on to click the cross on the top of the design screen of the main menu:
19
The following menu will be shown:
Now the user must go to Tables, located on the left of this small screen.
20
The user should now select “tbRooms”, as highlighted above.
The above screen will then be shown.
To delete a room completely, the user should select the grey box to the left of the record:
Right click this area, and select “Delete Record”.
The following prompt will then be shown:
Click “Yes”.
The room is now deleted completely.
21
NOTE TO THE ADVANCED USER:
Changes to the information about Rooms can be done via this method.
22
Using the “View/Edit Teachers” section:
Use the View/Edit Teachers section of the system to view the current teachers in the system, and edit
the details of the teachers, and even add new teachers
Open the system.
Click on the “View/Edit Teachers” button on the main menu.
Because this section is password protected, the following screen should appear:
For the demonstration of the system, the prompt tells the user what the password is.
Type in the password into the box at the bottom:
Click the “OK” button.
This is the screen you should be presented with now. If this is not the screen you can see, then the
wrong password was entered. See the Troubleshooting Section of the user guide for help with this.
Headings:
Initials
Name
Dept
Title
Forename
Surname
The initials of the teacher
The full name, including title, of the teacher
The department the teacher belongs to
The title of the teacher
The forename of the teacher
The surname of the teacher
Adding a new teacher is similar to adding a new room. The only differences are the details entered.
Please see the section on adding a new room for more information.
Editing an existing teacher requires the user to go through the list and made amendments.
Amendments can also be made using the tables in the database for the advanced user.
23
Error Messages
You may see some error messages when you use the system. This section tells you how to respond to
them.
Error Message:
When it occurs
Solution
Attempt to make a
booking without
selecting a teacher
Click OK and
ensure you have
selected a
teacher on your
booking
Attempt to make a
booking without
selecting a date
Click OK and
ensure you have
entered a date
for your booking
Attempt to make a
booking without a
period selected
Click OK and
ensure you have
selected a
period for your
booking
Attempt to make a
booking without
entering a room
24
Click OK and
ensure you have
entered a room
on your booking
Glossary
Booking
Booking Checker
Clickable
Delete
Design Screen
Edit
Exit
Form
ID
Initials
Location
Main Menu
Menu
New Booking
Period
Printing
Record
Save Record
Table
This allows you to book a room
This section of the system enables you to check whether a room is free
at a certain time.
This is a place in any menu or form where you can click to select. If a
part of the form can not be selected by clicking it is ‘unclickable’ for
security reasons
This will remove an item from a form or table in the system
A form viewed in the design screen can be edited. For example the
design of a form can be changed.
Editing means you can make changes to one of the tables in the system.
For example you could add a new room or a new teacher by editing
This will take you out of the form or section of the system you are
working on
This is any of the screens for making and amending bookings. It is a user
friendly interface with buttons and drop down lists
This is the unique reference for a particular booking
This is the initials of the teacher as set out by the school admin system
This is where a room will be found on the school campus
The menu you see on the opening page of the booking program. This
leads you to all other sections of the room booking database
This is a place with options for you to select from
This is where you can make a booking for a particular room
This is one lesson in the school day
This allows you to print any of the forms in the system
This is one row of data in a table.
This allows you to save the changes you have made when editing
This is a design feature and is where different fields can be added to the
various areas of the system.
25