1
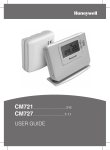
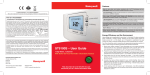
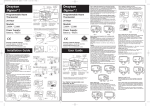
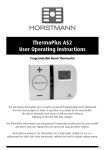
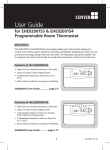
CM707
Programmable Room Thermostat with
Optimum Start, Optimum Stop and Delayed Start
User Guide
WHAT IS A PROGRAMMABLE ROOM THERMOSTAT?
An explanation for householders...
A programmable room thermostat is both a programmer and a room thermostat. A
programmer allows you to set ‘On’ and ‘Off’ time periods to suit your own lifestyle.
A room thermostat works by sensing the air temperature, switching on the heating
when the air temperature falls below the thermostat setting, and switching it off
once this set temperature has been reached.
So, a programmable room thermostat lets you choose what times you want the
heating to be on, and what temperature it should reach while it is on. It will allow
you to select different temperatures in your home at different times of the day (and
days of the week) to meet your particular needs.
Turning a programmable room thermostat to a higher setting will not make the room
heat up any faster. How quickly the room heats up depends on the design of the
heating system, for example, the size of boiler and radiators.
Neither does the setting affect how quickly the room cools down. Turning a
programmable room thermostat to a lower setting will result in the room being
controlled at a lower temperature, and saves energy.
The way to set and use your programmable room thermostat is to find the lowest
temperature settings that you are comfortable with at the different times you have
chosen, and then leave it alone to do its job. The best way to do this is to set low
temperatures first, say 18°C, and then turn them up by one degree each day until you
are comfortable with the temperatures. You won’t have to adjust the thermostat further.
Any adjustments above these settings will waste energy and cost you more money.
If your heating system is a boiler with radiators, there will usually be only one
programmable room thermostat to control the whole house. But you can have
different temperatures in individual rooms by installing thermostatic radiator
valves (TRVs) on individual radiators. If you don’t have TRVs, you should choose
a temperature that is reasonable for the whole house. If you do have TRVs, you
can choose a slightly higher setting to make sure that even the coldest room is
comfortable, then prevent any overheating in other rooms by adjusting the TRVs.
The time on the programmer must be correct. Some types have to be adjusted
in spring and autumn at the changes between Greenwich Mean Time and British
Summer Time.
You may be able to temporarily adjust the heating programme, for example, ‘Override’,
‘Advance’ or ‘Boost’. These are explained in the manufacturer’s instructions.
Programmable room thermostats need a free flow of air to sense the temperature, so
they must not be covered by curtains or blocked by furniture. Nearby electric fires,
televisions, wall or table lamps may prevent the thermostat from working properly.
2
CM707 - USER GUIDE
Description
The Honeywell CM707 is a programmable room thermostat designed to control
your heating system efficiently, providing comfortable temperatures when you are
at home and energy savings when you are away. The following instructions explain
how to program and use the thermostat to provide the most home comfort at the
least cost.
Features
•
•
•
•
•
Ergonomic user interface featuring an ‘OK-button’.
Large LCD (Liquid Crystal Display) Screen with backlight.
7-day heating program to match your lifestyle, whilst maximising energy savings.
4 independent temperature levels per day (from 5°C to 35°C).
Holiday button saves energy by letting you reduce the temperature for 1 to 99
days.
• Automatic Summer/Winter Time Change.
• Optimum start, optimum stop and delayed start to enhance energy saving
potential.
• Built-in Memory holds the user program indefinitely.
Contents
SETTING-UP THE CM707
Controls Layout.................................................................................................... 4
STEP 1: Installing the Batteries............................................................................ 4
STEP 2: Setting the Date and Time...................................................................... 5
STEP 3: Running the Built-in Heating Program.................................................... 5
PROGRAMMING THE CM707
The Built-in Heating Program............................................................................... 6
Reviewing the Heating Program.......................................................................... 6
Modifying the Heating Program........................................................................... 6
Disabling / Enabling Time Periods....................................................................... 7
OPERATING THE CM707
Operating Modes................................................................................................. 8
Temperature Enquiry/Adjustment......................................................................... 8
Time Adjusting..................................................................................................... 8
Holiday Function.................................................................................................. 9
Special Features.................................................................................................. 9
TROUBLESHOOTING THE CM707
Troubleshooting Guide....................................................................................... 10
3
SETTING-UP THE CM707
Controls Layout
LCD
Screen
Optimisation
Enabled
Indicator
Battery Low
Indicator
Time
Change
Buttons
1
2
Burner On
Indicator
3
4
DATE/
DAY
5
6
Temperature
Display
7
CM707
Temperature
Change
Buttons
AUTO
OPT
Set Date/
Day Button
Day
Indicator
Time
Display
Temperature
Enquiry
Button
COPY
DAY
AUTO
Copy Day
Button
MAN
OFF
PROGRAM
1..4
Operating
Mode
Buttons
Holiday
Function
Button
Battery
Cover
Program
Buttons
Green OK
Button
Battery
Compartment
This section shows you how to setup and run the thermostat in 3 simple steps:
STEP 1: Installing the Batteries
Note: Please follow the instructions in this section only if the thermostat screen
is blank (no symbols or digits are displayed). If the room temperature is already
displayed move on to Step 2: Setting the Date and Time.
To install the Batteries:
a.Lift up the front cover of the thermostat to reveal the battery cover and product
controls.
b.Remove the battery cover by pressing down and sliding out.
c. Insert the 2 x AA LR6 Alkaline Batteries supplied with the thermostat, ensuring the
correct orientation (see ‘Controls Layout’ above).
4
SETTING-UP THE CM707
d.After a short pause the thermostat will display information on the screen and is now
ready for use.
e. Replace the battery cover by sliding it firmly back into the front of the thermostat.
STEP 2: Setting the Date and Time
To set the Date and Time:
a.Press the DATE/DAY button to begin setting the date. When you set the date
for the first time after the batteries are inserted, the
display will show:
or buttons to set the current day of
Press the
the month (e.g. d 01 = 1st day of the month) then press
the green
button to confirm.
or buttons to set the current month of
b.Press the
the year (e.g. m 01 = January) then press the green
button to confirm.
or
buttons to set the current year
c. Press the
(e.g. yr 13 = 2013) then press the green
button to
confirm.
The date is now stored and the Day Indicator will be
displayed under the current day of the week (e.g. 1 =
Monday, 2 = Tuesday, etc.)
or buttons to set the correct time then
d.Use the
press the green
button to confirm. Each press of
the buttons will change the time by one minute and
holding them down will change the time slowly at first
and get progressively quicker.
AM
Note: If this mode is entered accidentally then press the AUTO, MAN or OFF
buttons to exit.
STEP 3: Running the Built-in Heating Program
The thermostat is now ready for operation. Press the AUTO button and the built-in
heating program will start running. Note: The built-in heating program has been
designed to provide normal comfort requirements, but if you want to customise the
settings please see the next section ‘Programming the CM707’.
5
PROGRAMMING THE CM707
The Built-in Heating Program
The built-in heating program has 4 temperature level changes per day that can be
set between 3.00am and 2.50am the following day - allowing you to maintain the
evening temperature after midnight. Each temperature level can be set between
5°C and 35°C, and adjusted in 0.5°C increments. The factory default program for
heating is as follows.
Monday to Friday
(Day 1 to 5)
Saturday & Sunday
(Day 6 & 7)
1
2
3
4
Time
Period
6:30
8:00
18:00
22:30
Temperature
20°C
16°C
20°C
14°C
1
2
3
4
Time
Period
8:00
10:00
16:00
23:00
Temperature
20°C
18°C
20°C
14°C
Reviewing the Heating Program
To review or edit the heating program use the PROGRAM
or
buttons to
navigate between the 4 individual programming periods for that day. Use the DATE/
DAY button to step through each day of the week, so the complete 7 day heating
program can be reviewed or edited.
Modifying the Heating Program
To change the heating program:
a.Press either of the PROGRAM
or
buttons to enter the programming mode. The
time / temperature settings for period 1 on
Monday (Day 1) will be flashing as shown.
The active period is highlighted by a flashing
square around the numbers at the bottom of
the screen and the selected day is shown
with the day indicator.
1
2
3
4
5
6
7
1 2 3 4
or buttons, the ‘OK?’ indicator will
b.To adjust the period start time use the
be displayed to confirm the change. Holding the button down will change the time
quickly.
or buttons and the display flashes the next
Note: If you are pressing the
period, it means the next period will be pushed forward.
6
PROGRAMMING THE CM707
c. Once the required time is reached press the green
button to confirm.
Note: If the original time setting did not require adjustment press the green
button to move to step ‘d’.
d.The temperature setting for period 1 on Monday (Day 1) will now be flashing. To
or buttons and confirm the setting again by pressing
adjust this press the
the green
button.
e.The next time and temperature period will now be active. Adjust this by repeating
steps b - d above until all 4 periods are set for Monday or press the AUTO button
to run the program as set, at any time.
You now have a choice of how to set the program for the next day:
f. i) Press the COPY DAY button to copy Monday’s program into Tuesday. The
display will go blank apart from the ‘non flashing’ day indicator, which indicates
the day copied and the ‘flashing’ target day to copy the program to. To accept this
button. To select a different target day press the DATE/
day press the green
DAY button until the ‘flashing’ day indicator is under the required day, then accept
button. Note: Once the target day is confirmed it
it by pressing the green
becomes the day that is copied if the COPY DAY button is pressed again.
OR
ii) Press the DATE/DAY button to move the day indicator to Tuesday (Day 2). The
program for that day can then be adjusted by following steps b to e. Programs
for the remaining days can be set in the same way, using the DATE/DAY button to
move to the next day.
To exit the programming mode select the desired operating mode by pressing the
AUTO, MAN or OFF buttons. Note: To run the adjusted program select the AUTO
mode.
Disabling / Enabling Time Periods
The thermostat has 4 periods each day that can be programmed, but you may not
need all of these switch points for your heating requirements. Therefore, any period
from 2 to 4 can be removed from (or returned to) the heating program profile.
To disable or enable time periods:
a. To disable unwanted periods go to the desired period ( 2 to 4 ) using the
PROGRAM
or
buttons to navigate, ensure the correct period is highlighted
with the flashing square symbol. Press and hold the button for at least 2 seconds
and the display will indicate the period has been removed from the program.
b.To enable periods again follow the same procedure as above, navigating to the
already disabled period. To enable this period again press and hold the button
for at least 2 seconds.
7
OPERATING THE CM707
Operating Modes
The thermostat can operate in three different modes: Automatic, Manual or Off. To
set the operating mode press either of the AUTO, MAN or OFF buttons. The screen
indicates which mode is currently active by displaying AUTO, MAN or OFF.
• AUTO (automatic) mode sets the thermostat to follow the built-in temperature
program (default or personalised). Operating the thermostat in this mode is the
best way to maintain a high level of temperature comfort whilst maximising your
energy savings.
• MAN (manual) mode sets the thermostat to act as a simple thermostat with
a fixed setpoint throughout the day. The setpoint can be adjusted from 5°C to
or buttons. The thermostat will continue to maintain this
35°C by using the
temperature until another operating mode or temperature is selected.
• OFF mode sets the thermostat to control to a minimum temperature setting of 5°C
(default) that acts as a frost protection measure for your home.
Temperature Enquiry/Adjustment
• Temperature Enquiry
In AUTO, MAN and OFF operating modes the thermostat will display the
current room temperature. To review the programmed ‘target’ temperature
(the temperature which the thermostat is trying to maintain) press the button.
This ‘target’ temperature value will be displayed flashing for 5 seconds before
returning to the current room temperature value.
• Temperature Override
During normal operation (AUTO mode) the programmed temperature can be
or buttons or the button. The ‘target’
adjusted manually by pressing the
temperature will be displayed and flash for 5 seconds - during this time the
or
buttons can be used to modify the set value. Note: This temperature override is
cancelled at the next programmed temperature change.
Time Adjustment
To adjust only the time during normal operation use the
button again to confirm any changes.
the green
8
or
buttons and press
OPERATING THE CM707
Holiday Function
The holiday function allows you to set a constant temperature (default = 10°C) for a
specified number of days (from 1 - 99 days). This lets you save energy and related
costs when you are away from home, but resumes normal operation on the day of
your return.
To set the Holiday function:
a. Ensure the thermostat is running in AUTO or MAN operating modes.
button to display the holiday days counter and temperature
b. Press the holiday
setting, along with the holiday indicator .
c. Press the
the green
or time buttons to set the holiday time (1 - 99 days) and press
button to confirm.
d. Press the
the green
or buttons to set the holiday temperature (5°C - 35°C) and press
button to confirm.
The thermostat will now control to the new temperature for the set number of days
that your home is vacant. At midnight the holiday counter will be reduced by one until
the selected number of days have passed. The thermostat will then return to normal
operation as set by the MAN or AUTO mode. To cancel the HOLIDAY function or to
button a second time.
exit the function at any time press the
Special Features
• Display Backlight
The CM707 has a backlit display that will illuminate when a button is pressed for
easier viewing of the display in low light conditions.
• SERVICE indicator (optional)
Note: This option only works if activated by your installer.
The 'SERVICE' indicator is displayed at set
intervals as a reminder that your heating
system requires a routine check. Please
call your installer to arrange a maintenance
visit.
The ‘SERVICE’ indicator will remain on the
display of the CM707 until it is either reset
or disabled by your installer. The CM707
and heating system will continue to operate
as normal.
9
OPERATING THE CM707
• Automatic Summer/Winter Time Change
The CM707 has a built-in Automatic Summer/Winter Time Change feature that
will automatically adjust the clock forward or backward by one hour for ‘Daylight
Saving Time’. This is carried out on the last Sunday of March and October each
year.
)
• Optimum Start (tick if enabled
Optimum Start measures how quickly your system normally takes to heat up, and
then calculates how far in advance it needs to switch the boiler on to reach the
comfort temperature at the programmed time.
This setting ensures the desired temperatures are reached nearer the actual
programmed times, removing the need to guess how long the heating will take to
warm up.
• Delayed Start (tick if enabled
)
If you program your heating to come on early to allow it to heat up, Delayed
Start will save energy by delaying the start of the boiler a little depending on
the difference between the programmed temperature and the actual room
temperature. When the two temperatures are close to one another the delay will
be longer than when the they are further apart, and in both cases will achieve the
same set temperature within a similar time frame.
• Optimum Stop (tick if enabled
)
Optimum Stop will save energy by switching the boiler off a little bit earlier than
the programmed time. If the house is up to temperature, you should not notice the
effect on the temperature, but you should see a difference in your energy bill.
When the Optimum Start or Optimum Stop function
is enabled the “OPT” symbol will appear on the
display.
10
1
OPT
2
3
4
5
6
7
AUTO
TROUBLESHOOTING THE CM707
Troubleshooting Guide
Symptom
Remedy
Blank Display (Power Loss).
Check batteries are installed by removing the
battery cover.
Check batteries have been installed in the
correct orientation.
Replace the batteries.
Display shows flashing
symbol.
Display shows
symbol.
The batteries in the thermostat are low on
power - Replace the batteries.
A fault has occurred in your heating system.
Remove and re-insert the batteries.
If the
symbol does not clear after a few
minutes contact your installer.
Display shows the word
‘SERVICE’
Your installer has set a scheduled
maintenance alert period on your CM707 as
a recommendation that your heating system
should receive a routine inspection.
Call your installer to arrange a maintenance
visit.
Note: The CM707 and heating system will
continue to operate as normal.
Manufactured for and on behalf of the Environmental and Combustion Controls Division of
Honeywell Technologies Sàrl, ACS-ECC EMEA, Z.A. La Pièce 16, 1180 Rolle, Switzerland by its
Authorised Representative Honeywell International Inc.
11
Honeywell Control Systems Ltd.
Skimped Hill Lane
Bracknell
Berkshire
RG12 1EB
Technical Help Desk: 08457 678999
42010938-017 AA
www.honeywelluk.com
© 2013 Honeywell International Inc.