1
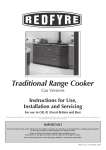
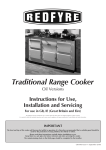
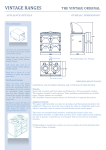
LIGHTING THE BURNER
TURNING OFF THE BURNER
WARNING
• Pull up the Safety Button until it clicks, and turn the Oil Control Knob fully
clockwise to ‘Off’. If you’re leaving it for some time, it’s a good idea to also
turn off the oil supply at the tank.
NEVER try to re-light a hot burner! The burner MUST be cool before you
turn on the oil!
1
Burner Door
CLEANING THE COOKER
2
Burner Cover
fixing nut
Burner
Cover
WARNING
Beware of hot surfaces at all times! Only clean the cooker when it has
cooled down sufficiently.
Burner Cover
Open the cast-iron Burner Door, then unscrew the large hexagonal nut
securing the Burner Cover using the tool provided.
Your range cooker is finished in a high gloss vitreous enamel. To keep it in the
best possible condition, follow these simple steps.
• Wipe over daily with a damp soapy cloth, then polish the enamel with a
clean dry duster.
Lift up the Burner Cover, and remove it.
• While you’re cooking, keep a damp cloth handy to wipe up spills.
4
3
Lighting Port
Cover
Oil Control
Valve Cover
Oven Heat
Thermostat
Oil Control
Lighting Port
Thermostat
Over-ride
Safety
Button
Power
indicator
• Should spills become baked on, use a non-abrasive cream cleaner.
Check that it’s approved by the Vitreous Enamel Development Council.
• If liquids that are either acidic, like fruit juice or milk, or have a high
sugar content like jams and preserves, are spilt onto the enamel – wipe
off immediately or the surface may be permanently discoloured.
• Abrasive pads, hard scrapers and oven cleaners containing citric acid can
ONLY be used on the stainless steel surfaces, NEVER use them on the
enamel as they will damage it.
Turn on the oil at the front. Lift up the Control cover, and make sure that the
electrical supply is on by checking the indicator light. Push down the Safety
Button to turn on the oil supply, and make sure the Thermostat Over-ride is
in the ‘On’ position. Now turn the Oil Control Knob to ‘High +’, and allow
15 minutes for sufficient oil to enter the burner.
To keep the hotplates and the inside of the ovens clean, use a light wire brush
– but take care not to touch the enamel. Carbonised fat splashes in the oven
can also be removed with the wire brush. The shelves can be soaked and
cleaned with an oven cleaner.
Lift the hinged cover of the Lighting Port on the front of the burner and insert
either a long gas lighter or a taper to light the wick, which is
just inside.
The oven doors can be removed for easier cleaning, this should be done with
care as they are heavy. Lift them off their hinges and place them face down on
a surface which has been covered with a cloth to protect the enamel. Do not
submerge the doors in water.
• Shut the Lighting Port Cover, then the Burner Cover – making sure it’s
properly secured with the large nut. The hotplate covers must also be
closed, to conserve heat.
POWER FAILURE
• Leave the Oil Control Knob at ‘High +’, and turn the Oven Heat
Thermostat to its mid position. Shut the cast-iron Burner Door.
• The oven temperature will now rise, taking about two and a half hours to
reach 200°C (400°F). The oven will hold its temperature.
• When cooking isn’t required, turn the Thermostat down to the
‘Warm –’ position.
•
•
•
If the cooker will not operate, check that the Indicator on the Control Panel
is lit and there is sufficient oil in the tank.
If the Indicator is not lit, move the Thermostat Over-ride Lever to the Off
position and control the oven heat with the Oil Control Dial.
If the Indicator is lit and there is sufficent oil in the tank, ensure that the
Safety Button is depressed.
How to get the best from your
Oil-Fired Classic Range Cooker
Please read this carefully before lighting for the first time.
Your new REDFYRE oil-fired range cooker has been manufactured by
the market leader in natural draught vaporising burner technology. If
installed, used and serviced correctly it will give you many years of
economical, trouble-free operation.
IMPORTANT
To make sure you get the best possible performance from your range cooker,
it must be installed and commissioned by a REDFYRE/OFTEC
approved engineer.
Installation must be carried out to accepted standards, and comply with all
regional and national regulations. REDFYRE will accept no responsibility or
liability for any faults arising from poor or incorrect installation.
Any alteration not approved by REDFYRE could invalidate the approval of the
appliance and the operation of its warranty, as well as adversely affecting
your statutory rights.
It is recommended that a qualified engineer should carry out servicing once,
or preferably twice, a year. The burner should be turned off at least 4 hours
before the Service Engineer arrives, to allow the appliance to cool.
PR0715 Issue 1 (November 2003)
OVEN AND HOB SIZES
345mm
USING THE TOP OVEN
COOKING TIPS
The temperature of the oven will depend on the setting of the oven heat control.
For rapid heating, turn the Thermostat up to 5 until the oven reaches the
temperature you require then turn it back to hold the required temperature.
OVENS
The left hand side of the Top Oven is nearer the burner. When baking in the Top
Oven, turn the food 180° approximately half way through cooking to ensure even
browning.
345mm
Oven Heat Thermostat
Oven Heat
PANS
For really good results it is essential to use good quality flat based pans. Pans
which bend or don’t sit flat will result in scorching and uneven cooking.
3
4
2
1
HOB LIDS
Ensure that the Hob Lids are closed when cooking has finished. If they are left up
the cooker temperature will drop quickly.
310mm
1
5
3
6
250mm
38
5m
m
m
0m
51
NOTE: The Top Oven of this cooker is one of the largest of any range cooker
currently on the market.
6
2
5
4
Below is a guide to the control positions, these temperatures are approximate.
Remember that the oven is hotter at the top and cooler at the bottom, with use
you will become accustomed to the temperature variations.
POSITION
DESCRIPTION
°C
°F
GAS MARK
1
2
3
4
5
6
Very cool
Cool
Moderate
Moderately Hot
Hot
Very Hot
110°C-120°C
140°C-150°C
160°C-180°C
190°C-200°C
210°C-230°C
240°C
225°F-250°F
275°F-300°F
325°F-350°F
375°F-400°F
425°F-450°F
475°F
0.25-0.5
1-2
3-4
5-6
7-8
9
USING THE HOT PLATES
USING THE BOTTOM OVEN
KETTLE
Make sure that the kettle is not left simmering for long periods of time. Not only
does this waste fuel but it also concentrates the minerals in the water which is not
good for you.
GRILLING
The upper part of the Top Oven is the hottest when the oven is on full. For grilling
use a shelf in the highest position.
TOAST
To make toast put the bread directly onto the hot plates or use the toasting ‘bat’
provided.
The Boiling Plate will toast the bread faster, this results in toast that is crisp on the
outside and softer in the middle. The Simmering Plate toasts the bread more
slowly so that the bread is crisp all the way through.
BACOGLIDE
When cooking directly on the hot plates, e.g. eggs, drop scones, pancakes etc.
use REDFYRE Bacoglide to prevent food sticking to the surface. Sample pieces are
supplied with the cooker.
Bacoglide is available as sheets or a roll and can be purchased from your dealer.
The Bottom Oven is approximately half the temperature of the top oven plus 10°,
making it ideal for simmering, slow cooking and warming.
Boiling Plate
The rear half of
this plate is hotter
than the front.
Simmering Plate
This is cooler
than the
Boiling Plate.
Take care not to leave the cooker running with the oven doors open for
long periods as the cooker will lose heat and take time to recover to
cooking temperature.
USING A TIMER
The temperature of the plates depends on the setting of the oven heat control.
Below is a rough guide, please note that these temperatures are approximate.
POSITION
1
2
3
4
5
6
DESCRIPTION
Very cool
Cool
Moderate
Moderately Hot
Hot
Very Hot
To get the best economy from your range cooker it can be fitted with a timer.
This timer will allow you to control your cooker throughout the week ensuring
that it is always ready when you need it.
The timer will keep your cooker running on low and turn it on before breakfast,
lunch and tea time. The cooker will rise to the temperature set on the oven heat
thermostat.
Full details on how to use the timer is supplied with the timer kit, which is
available from your REDFYRE stockist.