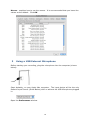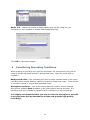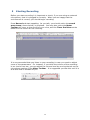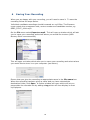
1
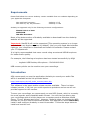
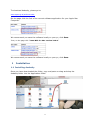
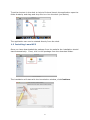
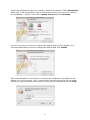
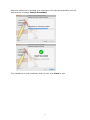
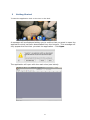
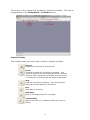
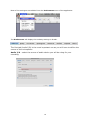
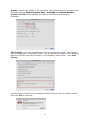
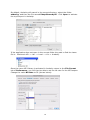
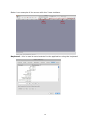
Audacity
(Release version 1.2.5)
For use with MFL Speaking Tests
User Guide
(Apple MacOS X)
version 1.4
Table of Contents
Requirements........................................................................................................................................ 3
Introduction .......................................................................................................................................... 3
1
Installation ............................................................................................................................... 4
1.1
Installing Audacity .................................................................................................................4
1.2
Installing Lame MP3 ..............................................................................................................5
2
Getting Started......................................................................................................................... 8
3
Using a USB external Microphone ......................................................................................... 15
4
Considering Recording Conditions......................................................................................... 16
5
Starting Recording ................................................................................................................. 17
6
Saving Your Recording ........................................................................................................... 18
7
Playback ................................................................................................................................. 19
8
Helpdesk Contact ................................................................................................................... 21
2
Requirements
Please find bellow the correct Audacity version available from our website depending on
your Apple Mac Computer:
Mac with Intel Processor:
Mac with G3, G4, G5 processor:
Audacity 1.2.5
Audacity 1.2.6a
Audacity is supported only for the following minimum configurations:
MacOS X 10.1 or later
64Mb RAM
300 Mhz Processor
None of the beta versions of Audacity available to download from the Audacity
website will be supported.
Important: MacOS 9 will not be supported (This operating system is no longer
included with any Apple computer by default). Also you may need Administrator
rights on your computer to download and install this software. Please contact
your IT Department.
It is highly recommended that users record using an external USB Microphone
for better audio quality.
For example, the following microphone has been tested successfully by AQA:
-
Logitech USB Desktop Microphone - PN 980186-0914
USB memory sticks can be used to save your recordings.
Introduction
AQA recommend you use the application Audacity to record your audio files
which is available at the link provided below.
http://web.aqa.org.uk/mfl_audio_recorder/index.php
This software is the latest stable release version available. There is a beta
release (version 1.3.6) but you could experience problems and so we will not
provide support for this version.
To save your recordings, we recommend you use MP3 format, which is currently
the most popular and compatible audio format. You will then be able to play
your recordings with all music players on computers such as Windows Media
Player, iTunes, Winamp and more. However, Audacity does not include the MP3
encoder so you will need to download another free application called Lame MP3,
install it and configure Audacity to use this encoder. Follow the steps below to
install and use the tool.
3
To download Audacity, please go to:
www.aqa.org.uk/audiorecorder
On the page click the link of the correct software application for your Apple Mac
Computer.
We recommend you save the software locally on your pc, click Save.
Then, on the page click “Lame MP3 for Mac version 3.98.2”
We recommend you save the software locally on your pc, click Save.
1
Installation
1.1 Installing Audacity
Once you have downloaded the folder, copy and paste or drag and drop the
Audacity folder into the Application folder.
4
To add a shortcut in the dock to help to find and launch the application open the
folder Audacity and drag and drop the icon into the dock (see below).
The application can now be started directly from the dock.
1.2 Installing Lame MP3
Once you have downloaded the package from the website the installation should
start automatically. If not, click on the package from the download folder.
The installation will start with the introduction window, click Continue.
5
Select the destination where you want to install the software. For information,
disks with a red exclamation mark on the bottom right corner are not valid for
the installation. Select a disk with a green arrow and click Continue.
You will be given the option to change the default path of the software. It is
recommended that you do not change the default and click Install.
User authentication is necessary to continue the installation, by default it will
display your user account, but in cases where several users work on the same
Computer, type the admin user account, then type the password and click OK.
6
Once the password is checked, the installation will start automatically and will
end with the message Install Succeeded.
The installation is now complete, and you can click Close to quit.
7
2
Getting Started
To start the application click on the icon in the dock.
A message will be displayed asking you to confirm that you want to open the
application which has been downloaded from the internet. This message will
only appear the first time you start the application. Click Open.
The application will open with the main view (see below).
8
The screen is very simple and, by default, includes 2 toolbars. This can be
changed later in the Preferences – Interface menu.
Control Toolbar
This toolbar works very much like a video or cassette recorder.
Record
Initiates the recording of an audio file.
Pause
Temporarily stops the recording or playback. This
comes in useful if you record one part of your podcast
and then want to prepare yourself for the next section.
To restart the recording press the pause button again.
Stop
Ends the recording or playback. This must be done
before any further editing is carried out.
Play
Plays back a recording.
Back Skip
Skips to the beginning of the recording.
Forward Skip
Skips to the end or to a position where the cursor is
placed.
9
Most of the settings are available from the Preferences menu of the application.
The Preferences will display the audacity settings in 8 tabs.
The first tab (Audio I/O) is the most important one as you will have to define the
source of the microphone.
Audio I/O - select the source of audio device you will be using for your
recording.
10
Quality - define the quality of the recording. We recommend you change to the
following settings Default Sample Rate - 44100Hz and Default Sample
Format - 16-bit (these settings are used by the BBC to produce their
Podcasts).
File Formats – this has the parameters of the export file format. You need to
set the application to use MP3 format. This is important because it tells Audacity
where to find the Lame MP3 encoder (2.2 Installation Lame MP3). Click Find
Library.
A confirmation window will be displayed explaining why Lame is used to export
MP3 click Yes to continue.
11
By default, Audacity will search in the correct directory, select the folder
audacity, and then the file named libmp3lame.dylib. Click Open to activate
the mp3 export in Audacity.
If the application does not open in the correct folder the path to find the Lame
file is: Macintosh HD –> Usr –> Local –> Lib -> Audacity
Once the Lame MP3 library is activated in Audacity return to the File Format
tab of Preferences, you will then be able to set the bit rate for the MP3 export.
Change the value Bit Rate to 56 (shown below).
12
Spectrograms - will be not used for your recording, so leave at the default
value.
Directories – gives the location/path where the record is saved until it is
exported (temporary folder). It is recommended that you do not change this
default, but make a note of the folder in case of problems with the recording.
Interface – here you can add 2 useful toolbars which are in addition to those
added by default. Tick the boxes “Enable Mixer Toolbar” and “Enable Meter
Toolbar”. In addition, change the value of dB mode display to 96 db (Shown
below).
13
Below is an example of the screen with the 2 new toolbars.
Keyboard – this is used to set shortcuts for the application using the keyboard.
14
Mouse – explains how to use the mouse. It is recommended that you leave the
values as the default. Click OK.
3
Using a USB External Microphone
Before starting your recording, plug the microphone into the computer (shown
below).
Start Audacity, on your Apple Mac computer. The input device will be the only
Default Input Source (Show Below) with or without the USB Microphone plugged
in.
Open the Preferences window.
15
Audio I/O - select the source of audio device you will be using for your
recording (in our example C-Media USB Headphone Set).
.
Click OK to save the changes.
4
Considering Recording Conditions
When making a recording you need to remember the microphone will pick up
most of the sound made around it during that time. Here are some tips to
consider:
Background noise - the recording will pick up other sounds made in the room
including other people talking, machine noise and telephone rings. To avoid this
it is best to record in a quiet and secluded room.
Microphone position – You must ensure that the location of the external
Microphone enables both speakers to be heard clearly during the test. It is
essential that this is tested in situation well in advance of any recordings.
It is highly recommended that you use an external microphone, as builtin microphones pick up extraneous noises and prevent high quality
recordings.
16
5
Starting Recording
Before you start recording it is important to check, if you are using an external
microphone, that it is plugged in correctly. When you are happy that the
environment is correct, you should begin recording.
Press Record and start speaking. As you talk, you should notice the sound
wave trace (shown below) is produced. You may also notice the Meter
Toolbar will move to the sound of your voice, and the Timer Positions at the
bottom of the screen will be counting.
It is recommended that you listen to your recording in case you need to adjust
some of the parameters. For instance, if you think the volume of the recording
is too loud or too low, you can adjust the volume level by moving the tab on the
microphone section of the Mixer Toolbar. It is suggested you test this until it is
at a level that is suitable to you.
17
6
Saving Your Recording
When you are happy with your recording, you will need to save it. To save the
recording follow the steps below.
Individual candidate recordings should be saved as .mp3 files. The filename
must contain the component code, centre number and candidate number, eg
GER2_55217_0041.mp3.
On the File menu select Export as mp3. This will open a window which will ask
you to name your recording and select where you would like to store (USB
Memory Stick recommended).
This will open a window which asks you to name your recording and select where
you would like to store it on your computer (see below).
Ensure that you give the recording an appropriate name in the File name box.
When the recording has been given a name and you have selected the
destination folder, click Save. A further window will open which will let you
personalise the recorded file by adding a tag which will then display in most
mp3 players.
18
This is optional information but it could help to recognise your recordings while
playing using an mp3 player such as iTunes or Winamp. For example, you could
fill the Artist field with the candidate name, and the title field with the
examination name. Once this has been done click OK.
When closing the application AQA Audio Recorder will ask if you want to “save
changes before closing”. All your recordings will have been exported into MP3
files, there is no need to save. Click No.
7
Playback
Mp3 files can be played with a wide range of different players. All Apple Mac
Computer comes with iTunes and Quicktime by default.
Be aware that iTunes may copy the mp3 files into its own library. If the
computer is used by several people, it is highly recommended that you delete
the file from iTunes once you finish the playback.
Locate the mp3 recordings on the computer or USB Memory Stick depending on
where you saved the files (see section 6 above).
For our example, the mp3 files will be located in the USB Memory Stick.
Browse the computer to locate the files, click Macintosh HD (The hard drive icon
if you renamed the disk).
Once the window has opened, select the correct device (Right Column) on which
the files are located:
19
Double click the file to open it with iTunes. The file will start automatically.
Select the library Music (Right column) to see the list of files added into itunes.
To pause the recording, click
To start playing, click
To listen to a specific part of the recording, move the tab to the correct position.
Once you have finished playing the recording, you can close iTunes or delete the
file from the iTunes library.
By default, iTunes does not play the file from the original location, but imports
this file into the library.
20
To delete the file, select the file in the library (Highlighted in blue) then select
delete from the menu Edit:
A confirmation to delete the file will be displayed, click Remove
Another confirmation to delete the file copy into the library will be displayed,
click Move to Trash
Make sure the files are correctly saved on the original location, and then you can
empty the trash to delete the files from the computer.
To close iTunes, click the red button on the top left corner:
8
Helpdesk Contact
Exams Office Support is open Monday – Friday (8am to 5pm)
Telephone number: 0844 2096614
e-mail: [email protected]
21