1
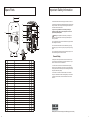
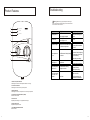
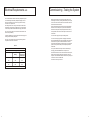
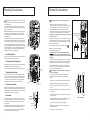
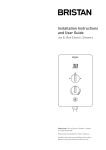
Installation Instructions
and User Guide
Bristan Electric Shower
Address:Bristan Limited
Birch Coppice Business Park
Dordon
Tamworth
Staffordshire
B78 1SG
Web:www.bristan.com
Tel: 0844 7016273
Fax: 0844 7016275
Email: [email protected]
Manufactured by:
AJ Gummers
Unit H
Redfern Park Way
Tyseley
Birmingham
B11 2DN
A Masco Company
Please keep this booklet for future reference.
Installer, when you have read these
instructions please ensure you leave
them with the user.
404-0158C
Contents
Important safety information ..................................................
3
Product features .......................................................................
4
Guarantee
Guarantee
Electrical requirements.............................................................
5-6
Thank you for purchasing a Bristan product. This product has
been designed, manufactured and tested, in the UK; to the
highest standards.
Water requirements .................................................................
7
Guarantee: 2 years.
Plumbing connections ..............................................................
8
This guarantee applies to products purchased within the
United Kingdom or Republic of Ireland, but does not apply to
products used commercially.
Electrical connections ...............................................................
9
This is provided that:
Fixing your shower to the wall ................................................
10
Fitting the riser rail ...................................................................
10
Commissioning - testing the system .......................................
11
Operating the shower ..............................................................
12
1. The guarantee registration card is completion and returned
within ten days complete with a copy of proof and purchase.
Proof of purchase is required for any serviced requirements.
2. The product is installed and operated in accordance with
our instructions and has not been misused or damaged.
This in no way affects your statutory rights as a consumer.
Adjusting the showerhead .......................................................
12
Cleaning & maintenance ..........................................................
12
Troubleshooting ........................................................................
13
Spare parts ................................................................................
14
Guarantee .................................................................................
15
Service policy ............................................................................
15
The information on the Guarantee card helps Bristan to
process any claims and contact you about your product and
its maintenance if required. The registration of your personal
details is purely for Bristan use and the remaining information
helps us to make products for the future.
Should a complaint arise, products are guaranteed against
faulty workmanship and materials for a period of 12 months
from the date of purchase, when in domestic use (second
year guarantee is parts only). For your guarantee to be valid,
your shower must be installed by a competent person, in
accordance with the installation manual.
Bristan will repair or replace (at our option), free of charge,
any faulty components during the guarantee period, provided
it has been maintained and operated in accordance with our
instructions, and has not been misused or damaged.
Modification or repair of this product by person (s) not
authorised by Bristan will invalidate this quarantee.
This guarantee does not effect your statutory rights.
Service Policy
Replacement Parts Policy
IMPORTANT
In the event of product or component malfunction, DO NOT
tamper with or remove the product from site. Telephone the
Customer Services Department on 0844 7016273 and be
prepared with the date of purchase, model number and a
clear description of the complaint.
Our service staff are fully qualified to advise on correct
installation procedures and will be able to diagnose whether
the fault will require a replacement part or a visit from a
Bristan engineer.
If required, a service call will be booked and either yourself or
an appointed representative (who should be a person of 18
years or over) must be present during the visit.
All site visits to product within the guarantee period will
be carried out free of any parts or labour charges provided
the conditions of the guarantee have been adhered to (the
second year guarantee is parts only).
All site visits to product out of guarantee will be subject to
charges for parts and labour which is payable by you or your
appointed representative at the time of the visit. Charges will
also be levied on cancelled appointments, unless advised to
Bristan at least 24 hours in advance of the agreed date and
time.
We reserve the right not to undertake work where payment
cannot be made to our engineer at the time of the visit.
Bristan hold stocks of components for all their range of
products and these will be maintained for the duration of
their life.
Should a product be discontinued, spare parts stocks will be
maintained, but in the event of a part becoming unavailable
Bristan reserve the right to supply a substitute of equal
quality.
The following payment methods can be used to obtain spare
parts:
By post, pre-payment of proforma invoice by cheque or postal
order.
By telephone quoting credit card (MasterCard, Visa or Visa
Delta) details.
Customer Service Hotline:
Tel: 0844 7016273 • Fax: 0844 7016275
2
15
Important Safety Information
Spare Parts
16
17
• Please read these instructions thoroughly and retain for future use.
11
• All products manufactured and supplied by Bristan are safe provided
1
2
3
ReduceTemperature
Low Pressure
Standby Indicator
10
L
N
E
4
14
WARNING
15
THIS APPLIANCE
MUST BE EARTHED
9
5
8
7
they are installed, used correctly and receive regular maintenance in
accordance with these instructions.
• If you are in any doubt what so ever about your ability to
install this product safely you must employ the services of an
experienced qualified plumber.
•
Warning: Do not operate the shower unit if you suspect it is
frozen. Do not site the shower unit where it might be subjected to
freezing conditions.
• Do not operate the shower unit if the showerhead or spray hose has
been damaged or is blocked.
Stop / Start
• Do not block the flow of water from the showerhead, by placing it
WATER INLET
WATER INLET
6
• Do not operate the shower if the water stops flowing during use or if
12
the water is leaking from the shower unit itself.
13
16
General Safety
No.
Part No.
Description
01
SP-092-0546
8.5kW Heating Canister
02
SP-092-0547
9.5kW Heating Canister
03
SP-092-0548
10.34kW Heating Canister
04
SP-092-0425
PRD Cap & Shear Pad
X
X
X
85
95
104
X
X
• Always switch off the power at the consumer unit and remove the
correct circuit fuse before making any electrical connections or if you
have to remove the cover of an installed unit.
• The unit must be mounted on the finished wall surface (usually
X
05
SP-092-1042
Stabiliser Valve (High Flow)
X
X
X
06
SP-092-0426
Solenoid
X
X
X
07
SP-092-0291
Pressure Switch Assembly
X
X
X
08
SP-092-1050
Low Pressure Microswitch with Lever
X
X
X
09
SP-092-1025
Camshaft Retention Plate
X
X
X
10
SP-092-0420
Phased Shutdown PCB
X
X
X
11
SP-092-1133
2 Stage Thermal Cut-out
X
X
X
12
SP-092-1077
Microswitch - 25 amp
X
X
X
13
SP-092-0355
Camshaft
X
X
X
14
SP-092-1060
Pressure Relief Device Assembly
X
X
X
15
SP-Cover*/**
Cover & Knob Assembly
X
X
X
16
SP-092-0018
Cover Retaining Screw
X
X
X
17
SP-092-0429
Screw Bush
X
X
X
SP-BR-5020
B85 Base Assembly Complete
X
SP-BR-5021
B95 Base Assembly Complete
tiled). Under no circumstances must you tile up to the unit after fixing
it directly to the bare wall as this may cause overheating and activate
the pressure relief device (PRD).
• If the shower unit is fitted in a hard water area, a scale inhibitor
may have to be fitted and the filter cleaned regularly. For more advice
on obtaining a scale inhibitor, contact Customer Services on 0844
7016273.
X
SP-BR-5022
B104 Base Assembly Complete
SP-285-0820
1.50 x 8mm Shower Hose
X
X
X
SP-168-0205
Handset
X
X
X
SP-320-0026
Hose Washer
X
X
X
*Please state model of shower **Please state colour
14
(smothering it) on your hand or any other part of your body or foreign
object.
X
BEAB (British Electrotechnical Approvals Board) approval of safety.
3
Troubleshooting
Product Features
Warning: Before carrying out general repairs or testing the
shower, ensure that the electricity supply is turned off at the mains
and the correct circuit is removed.
1
ReduceTemperature
2
Low Pressure
Symptom
Likely Cause
Action/Remedy
3
Standby Indicator
Standby lights not
on.
Fuse Blown.
Examine electrical supply to
shower.
No water flow.
4
Low pressure light
on.
Power supply interupted.
Isolating valve.
Power supply not on.
Water pressure has fallen below
the minimum requirement.
Turn on.
Check running pressure.
Wait until pressure increases
to 1.0 bar.
Clean the Handset.
5
Water temperature
too hot.
6
Insufficient water flowing through
the shower.
Increase the flow by adjusting
the temperature control knob
to a cooler setting.
Reduce the power setting.
7
Stop / Start
Shower runs hot and
cold during use.
Water pressure is at minimum
requirement.
Reduce temperature
light comes on.
Insufficient water flowiing
through the shower.
Water from pressure
relief outlet - PRD
activated.
Check running pressure.
Wait until pressure increases.
Reduce temperature setting
(increase flow rate).
Reduce power setting.
Obsruction in hose or handset.
Call Customer Services to
obtain a new RPD,
Unit frozen.
Install in accordance with
manufacturer's instructions.
1. Reduce Temperature Indicator
Indicator light to show when the temperature selection is too high.
2. Low Pressure Indicator
Indicator light to show low incoming water pressure.
3. Standby Indicator
Indicator light to show the unit has power to it and is ready for operation.
4. Location for Pressure Relief Device (PRD)
Ventilation holes for RPD.
5. Power Control
Adjustable power settings: Low (Cold), Medium and High.
6. Temperature Control
Adjustable Temperature Control.
7. Push Button STOP/START Switch
Electronic Switch.
4
13
Electrical Requirements
Operating the Shower
Please ensure the commissioning procedure has been carried out. If
you did not fit this shower yourself and you are about to use it for
the first time, check with the installer to ensure that they have run the
commissioning procedure as described on page 11.
This appliance MUST be earthed!
Isolating
Valve
Double Pole
Switch
ReduceTemperature
Low Pressure
To start the shower
Rating at 240V Rating at 230V Cable Size
Standby Indicator
Press the STOP/START button (1).
6mm²
8.7kW
10mm²
10.34kW
9.5kW
Stop / Start
If you don’t have a spare fuse way or the rating at the main fuse box is
below 80A, you should seek advice from an electrician and may need
a new consumer unit - specifically for the shower.
Your Bristan showerhead has a rub-clean pad for easy cleaning. Simply
rub your fingers across the rubber spray jets and turn the shower on to
remove any scale or debris. You might want to repeat this procedure if
the build up of scale is excessive.
Cleaning and Maintenance
Before attempting to clean your shower unit you must switch off
the power at the isolating switch. Do not remove the cover.
Do not use abrasive cleaners or solvents to clean this unit. The shower
unit and accessories should be cleaned with a clean, soft cloth using
warm water.
The hardness of the water in your area will determine how often you
should clean your showerhead. Build up of scale can come quickly and
in particularly hard water areas combined with constant use you may
need to clean your showerhead once a week. To ensure continued
performance of your electric shower the shower head needs to be
regularly descaled from lime scale buildup within the shower spray
plate.
Consumer
Unit
The shower must only be connected to a 230-240V ac supply. The
electrical rating of your shower is on the pack or on the rating plate
label.
IMPORTANT: The shower unit must be switched off at the isolating
switch (pull cord) when not in use.
Cleaning the shower head
For cable
capacity
see table
Shower Unit
45A RCD 30mA
Please note: You must switch off the power at the consumer unit and
remove the correct circuit fuse before making any electrical connection.
1
IMPORTANT: Children should be supervised to ensure that they do
not play with the appliance.
Your Bristan showerhead has 3 spray modes - spray, jet spray and
combination. Simply rotate the spray head one way or the other to the
desired spray pattern.
Shower Unit
10mm²
The shower must be connected to its own independent electrical
circuit. It must not be connected to a ring main, spur, power socket, or
lighting circuit. You will need to check the mains fuse box has a spare
fuse way capable of taking the fuse or mcb (miniature circuit breaker)
necessary for the shower. The main fuse box must have a main switch
rating of 80A or above.
Adjusting the Showerhead
12
7.8kW
9.5kW
The Electrical Installation and Circuit Protection of this shower must
comply with I.E.E. Wiring Regulations and should be checked by a
qualified electrician prior to use.
Press the STOP/START button (1).
Warning: This appliance is not intended for use by persons
(including) children with reduced physical, sensory or mental
capabilites, or lack of experience and knowledge, unless they have
been given supervision or instruction concerning use of the appliance
by a person responsible for their safety.
8.5kW
Bristan B104
To stop the shower
It is always advisable to test the water temperature with your hand
before stepping under the shower. Please note that there is always a
delay of a few seconds between you selecting a temperature setting
and the selected water temperature starting to flow.
Bristan B85
Bristan B95
Mains Water
Supply
Mains Supply
Supplementary bonding: All accessible conductive (metal) parts
within the bathroom or shower room must be bonded to earth using
a minimum cable size 4.0mm² (2.5mm² if cable is mechanically
protected). Typically, metal baths, radiators, water pipes, taps and
metal waste fittings must all be electrically bonded together.
Important: Voltage drop in the supply to the premises, due to heavy
local demand, will affect the performance of your shower.
To ensure optimum performance and trouble-free service from
your shower, care should be taken during installation. This shower
incorporates a pressure relief device, in the unlikely event of the device
discharging, it is advisable to position the shower unit over the bath or
shower tray.
To gain the optimum power possible from this shower unit try to find
the shortest possible route from the consumer unit to the shower to
run your cable.
A separate and permanently connected cable must be taken from the
customer unit directly to the shower via a double pole switch with a
minimum contact separation gap of 3mm in all poles. It is recommended
that a residual current device 45A(RCD) formerly known as an earth
leakage circuit breaker (ELCB) with a tripping current of 30mA, is
incorporated in the circuit.
5
Electrical Requirements cont.
Commissioning - Testing the System
It is recommended that a residual current device (RCD) formerly known
as an earth leakage circuit breaker (ELCB) with a tripping current of
30mA is incorporated in the circuit. This may be part of the existing
consumer unit or a separate unit.
Before using the shower for the first time, it should receive a final
flush through to remove any remaining debris that may be in the pipe
work or hose and to ensure the heater unit contains water before the
electrical elements are switched on.
The isolating switch can be a ceiling mounted pull cord switch within
the bathroom or wall mounted in an adjacent room. The power switch
must be easily accessible and identifiable as the supply to the shower.
Remove the showerhead from the hose and if not already attached,
attach the hose to the outlet port. The power control knob must be
switched to the cold position ‘blue’ (heating elements will not be on).
The current carrying capacity of the circuit must be at least that of the
shower circuit (see table A).
The temperature control knob must be set fully clockwise to full hot/
minimum flow.
In domestic installations you must ensure that the electrical supply and
existing fuse board are adequately rated.
Turn on the water supply and inspect for water tightness.
Do not turn on the electrical supply unit until the plumbing has been
completed and the shower cover re-fitted.
Table A
Twin and Earth PVC Insulated Cable
Current Carrying Capacity
In an insulated wall
In conduit or
trunking
Clipped direct or
buried in a non
insulated wall
6mm²
6mm²
6mm²
32A
38A
46A
10mm²
10mm²
10mm²
43A
52A
63A
Turn on the electricity supply and the ‘standby light’ will illuminate.
Press the STOP/START button, wait approximately 30 seconds for the
water to flow correctly. Once the water has flowed for a further 10
seconds, rotate the temperature control knob from the fully clockwise
position to the fully anti-clockwise position. Repeat this procedure
several times.
Once you are satisfied that the system has been flushed through
thoroughly, press the STOP/START button to stop the flow.
Re-fit the showerhead to the hose, insert hose rubber to seal the joint;
please ensure that the hose passes through the larger hole in the
soap dish. The showerhead is attached to the riser rail by inserting the
conical hose nut into the movable slider.
Your shower is now ready for first use.
Note: Cable selection is dependant on derating factors
6
11
Fixing Your Shower to the Wall
Water Requirements
Warning! Please check for any hidden pipes and cables before
drilling holes in the wall.
The installation must comply with all Water Authority and Building Bylaws and Regulations.
Remove the three cover retaining screws and lift off the cover. Do not
try to remove the control knobs from the cover. They are an integral
part of the cover and must not be removed.
If the shower is to be installed in a hard water area, we recommend
that an in-line scale reducer is fitted. Please refer to your supplier for
advice.
Depending on your choice of cold-water entry direction, you may need
to remove thin areas of plastic cover to facilitate pipe work entry to the
unit.
L
N
WARNING
THIS APPLIANCE
MUST BE EARTHED
The shower must be connected to a mains water supply with
a minimum running pressure of 1.0bar (100kPa, 14.5psi) at a
minimum flow rate of nine litres per minute. The maximum static
pressure must be 10bar (1MPa, 145psi).
Select the position for the shower and offer the shower back plate to
the wall, marking the 3 fixing points with a suitable pencil. Remove
the back plate from the wall, drill 6mm diameter holes to a depth
of 35mm, insert the wall plugs and secure the back plate to the wall
ensuring it is perfectly straight using the 35mm screws provided.
During periods of high ambient temperatures (e.g. hot summer days),
it may be necessary to select a lower power setting in order to achieve
your ideal shower temperature.
Fitting the Riser Rail
Before proceeding with fitting the rail, identify each of the items
supplied using the illustration on your right.
The Slider should not be removed from the rail during fitting. The top
of the slider has a smooth profile, whereas the underside has a recess
revealing the grooves on the handset holder.
Fit the soap dish onto the bottom end of the rail and secure using the
small screw from the kit.
Position the rail on the wall, bearing in mind the different heights
of people likely to use the shower and the length of the hose when
connected to the shower and passed through the retaining hole in the
soap dish. Mark the wall to indicate the upper fixing screw position.
Screw centres are 605mm (approx. 23 - inches,) apart.
Warning! Please check for any hidden pipes and cables before
drilling holes in the wall.
Drill the wall at the marked fixing position using a 6mm drill to a depth
of 35mm and loosely fix the rail end, checking that the rail is hanging
vertically using the spirit level incorporated into the top end of the rail.
The bubble should be exactly between the two lines on the spirit level
body. Mark the position for the lower fixing screw, move the rail to one
side, drill the wall, and fix the lower end of the rail.
Check that the rail is perfectly vertical and tighten both fixing screws.
Slide the end cap into position on the top end of the rail, and fit the
screw cover into the recess in the soap dish.
When fitting the hose, it should pass through the larger hole of the
soap dish.
Shower rail
660mm high
275mm wide
Shower Unit
330mm high
215mm wide
Warning: The shower must not be installed in an area subject
to freezing conditions. Do not use if you suspect the shower is
frozen, this will damage the shower unit.
E
If you are fitting the unit to a partition wall or a wall of particularly soft
friable substrate, you will need specialist fixings. For specialist fixings
advice visit userview.co.uk/fixings or contact Customer Services on
0844 7016273.
Re-fit cover ensuring the Power Control knob is at the 12 o’clock
position and the Temperature Control knob is turned to the highest
temperature point.
Double Pole
Switch
WATER INLET
WATER INLET
1m minimum height
from shower unit
to floor
Bath spillover level
Shower tray
spillover level
Minimum 20mm
between Showerhead
and spillover
If it is intended to operate the shower at pressures above the
maximum or below the minimum stated, contact our Customer
Services for advice 0844 7016273
Water regulation stipulates that the showerhead be ‘constrained by
a fixed or sliding attachment so that it can only discharge water at
a point not less than 20mm above the spill over level of the bath or
shower tray or other fixed appliance’.
If a showerhead can sit within a bath, basin or shower tray, you must
fit a double check valve in the supply pipe work to prevent back
siphonage. If the showerhead can sit within a WC then the air gap
should be a type AUK3 not less than 20mm or twice the diameter of
the inlet pipe to the fitting, whichever is the greater.
Pressure Relief Device (PRD)
A pressure relief device is designed into this shower. The pressure relief
device provides protection should an excessive build up of pressure
occur within the shower unit.
Do not use the shower with a damaged or kinked shower hose or
blocked handset. This may trigger the PRD which will discharge
through the vent in the front cover area. During the ‘Commissioning’
phase, the temperature control should be turned to the minimum flow
setting and the handset removed from the hose.
In the event of the PRD activating, it is most likely water will be
dispersed from the vent above the temperature control knob. If this
happens, switch off the electricity and water supplies to the shower
at the mains and contact Customer Services in order to obtain a new
pressure relief device (PRD).
IMPORTANT! The shower unit must be fitted to a flat, tiled and fully
waterproof surface. Under no circumstances should the shower unit be
attached to a wall and then tiled up to the edges. The unit must be
fixed on top of the wall surface.
Note: Do not seal the air gap between the wall and the unit with
silicon sealant or similar gap filler. The gap is required to discharge
condensation.
Note: The hose nut and not the handset handle, fits into the slider. The
slider moves more freely on the rail if gripped next to the rail, rather
than at the handset.
10
7
Electrical Connections
Plumbing Connections
Warning!This appliance and all connecting pipework must be
Warning! The outlet of the shower acts as a vent and must not be
blocked, restricted or connected to any tap/ closure device other than
the handset supplied.
earthed.
• Ensure that an earth continuity conductor is securely and
permanently connected to all exposed, metal parts of other services
and appliances within the room where the shower is installed.
Do not solder within 300mm of the shower unit or allow solder or
flux to fall onto the casings. Compression fittings must not be used to
connect to the shower inlet.
Important: An additional independent stop valve complying with the
current water regulations must be fitted in the mains water supply
as a means of isolating the supply to the unit for servicing and/or
maintenance work.
L
N
E
• All cables must conform to the relevant tables within the I.E.E
Regulations. The supply cable can be surface mounted and clipped,
recessed or in conduit as detailed within the I.E.E Regulations.
WARNING
THIS APPLIANCE
MUST BE EARTHED
Switch OFF the electricity supply at the consumer unit and remove
the correct circuit fuse.
Remove plastic
plug
It is essential that all pipe work is flushed through to remove debris
and swarf that could otherwise damage the unit. Once the pipe work
has been flushed through, turn off the water supply at the stop valve.
Connect the mains water supply to the inlet port of the shower using
15mm copper pipe (BS EN1057) or 15mm PEX plastic pipe. Do not use
stainless steel pipework. If using chrome plated pipe ensure that the
first 25mm of plating is carefully removed to prevent damage to the
sealing surface. (see inlet entry options below).
WATER INLET
The power cable entry point is shown on the diagram. The cable can be
surface clipped, hidden or via 20mm conduit. However, conduit entry
can only be from the rear of this unit. Electrical connection to be made
at the terminal block as follows:
WATER INLET
Neutral cable to the terminal marked N
L
N
E
THIS APPLIANCE
MUST BE EARTHED
2.Swing outlet pipe
up and out of the way
WATER INLET
Warning! Do not restore power to the shower unit until the
cover has been fully fitted.
Fit the cover onto the back plate ensuring no cables or pipes are
trapped between both parts preventing the cover from closing
correctly.
WATER INLET
12 o’clock
narrow
• Rotate the power control spindle with narrow part facing 12 o’clock.
1.Remove screws
and clamp
3.Swing inlet elbow to other side,
replace clamp with screws
• Rotate the splined temperature control spindle fully clockwise.
• Set the left hand power control knob with the index mark at 12
o’clock.
Swivel the connector elbow to face a rear entry pipe connection. If the
pipework entry is from the rear, ensure that there is space left around
the push-fit elbow for future servicing. Bring the cold water pipe to the
shower position and connect to the inlet elbow.
8
10mm²
Secure the supply cable using the clamp, which is reversible for use
with 6mm² or 10mm² cables. If the cable size used is greater than
10mm², the clamp should be discarded.
Remove plastic
plug
Unfasten the two screws securing the inlet connector elbow clamp
(1).Lift the outlet connection (2) from its position at the bottom of the
unit and hold it up out of the way. Pull the connector elbow towards
you and over to the right hand side with the inlet entry point facing
down. Refasten the clamp and replace the outlet connection.
Turn on the water supply and inspect for water leaks at the shower
inlet. Once inspected-turn off the water supply.
6mm²
The supply cable earth conductor must be sleeved. The supply cable
must be secured by routing through conduit or in trunking or by being
embedded in the wall in accordance with current I.E.E. regulations.
To bottom right position
To release the pipe work from the push-fit type fitting, press and hold
the collett against the elbow and pull the pipe out of the fitting.
Cable clamps
WARNING
The shower unit should come supplied with the inlet connection set for
a bottom left position. To change it to a top left position:
The inlet pipe connection into the elbow is a self-seal push-fit type.
All burrs and rough edges must be removed from the end of the tube
before attempting. If a chrome plated tube is used, remove the first
25mm of plating.
E
Important: Terminals must be fully tightened onto the cables
ensuring that no cable insulation is trapped under the screws. It
must be metal to metal. Loose connections can result in the cables
overheating.
To top or bottom left positions
Connection
N
Live cable to the terminal marked L
The pipe work can enter the shower unit from 5 different positions. Top
left, bottom left, rear left, rear right or bottom right.
To rear entry position
L
WARNING
THIS APPLIANCE
MUST BE EARTHED
Earth cable to the terminal marked with the Earth symbol E.
Rotate inlet elbow
to new position
Inlet Entry Options
Swivel the connector elbow from facing downward to facing upward.
Fix cable clamp using
2 x 15mm screws
• Set the right hand temperature control knob with the index mark at 4
o’clock (full hot).
• If the clicker (Re: Part no. 5 page 14) has been removed then it must
Pull collett
back towards
elbow
Pull pipe
from elbow
6 o’clock
wide
be re-ftted as follows:
Collett
Rotate the spindle fully clockwise to the stop position. Fit the clicker
with the aim to the left of the stop (11 o’clock position).
Power control spindle
• Locate cover in position ensuring wiring is not trapped.
• (Note: slight angular adjustment of the knobs may be required to
locate cover correctly).
• Secure using the 3 fxing screws supplied.
9