1
Electrical Requirements cont.
Commissioning - Testing the System
It is recommended that a residual current device (RCD) formerly known
as an earth leakage circuit breaker (ELCB) with a tripping current of
30mA is incorporated in the circuit. This may be part of the existing
consumer unit or a separate unit.
Before using the shower for the first time, it should receive a final
flush through to remove any remaining debris that may be in the pipe
work or hose and to ensure the heater unit contains water before the
electrical elements are switched on.
The isolating switch can be a ceiling mounted pull cord switch within
the bathroom or wall mounted in an adjacent room. The power switch
must be easily accessible and identifiable as the supply to the shower.
Remove the showerhead from the hose and if not already attached,
attach the hose to the outlet port. The power control knob must be
switched to the cold position ‘blue’ (heating elements will not be on).
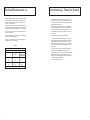
The current carrying capacity of the circuit must be at least that of the
shower circuit (see table A).
The temperature control knob must be set fully clockwise to full hot/
minimum flow.
In domestic installations you must ensure that the electrical supply and
existing fuse board are adequately rated.
Turn on the water supply and inspect for water tightness.
Do not turn on the electrical supply unit until the plumbing has been
completed and the shower cover re-fitted.
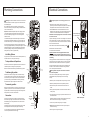
Table A
Twin and Earth PVC Insulated Cable
Current Carrying Capacity
In an insulated wall
In conduit or
trunking
Clipped direct or
buried in a non
insulated wall
6mm²
6mm²
6mm²
32A
38A
46A
10mm²
10mm²
10mm²
43A
52A
63A
Turn on the electricity supply and the ‘standby light’ will illuminate.
Press the STOP/START button, wait approximately 30 seconds for the
water to flow correctly. Once the water has flowed for a further 10
seconds, rotate the temperature control knob from the fully clockwise
position to the fully anti-clockwise position. Repeat this procedure
several times.
Once you are satisfied that the system has been flushed through
thoroughly, press the STOP/START button to stop the flow.
Re-fit the showerhead to the hose, insert hose rubber to seal the joint;
please ensure that the hose passes through the larger hole in the
soap dish. The showerhead is attached to the riser rail by inserting the
conical hose nut into the movable slider.
Your shower is now ready for first use.
Note: Cable selection is dependant on derating factors
6
11