1
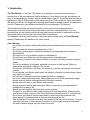
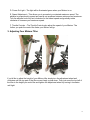
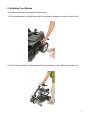
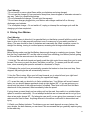
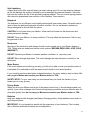
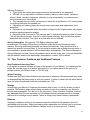
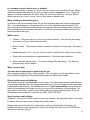
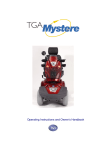
Operating Instructions and Owner’s Handbook Contents Page Introduction 3 Your Minimo Controls & Instrument Panel 4 Adjusting Your Minimo Tiller 5 Removing Your Minimo Battery Pack 6 Folding Your Minimo 6 Unfolding Your Minimo 9 Charging your Minimo 10 Driving Your Minimo 12 Parking Brake Release 13 Maintaining Your Minimo 13 Technical Specifications 15 Warranty 15 Tips, Cautions, Problems and Additional Features 16 Safe Driving Tips for Scooter Users 17 Notes 19 2 1. Introduction The TGA Minimo – Your New TGA Minimo is a revelation in compact scooter design. It features one of the most advanced folding designs to fit into the boot of a car and requires no parts to be dismantled for storage, with an overall weight of just 27.3kg (60lbs) with the optional lightweight 2.65kg (5.85lbs) battery pack transporting your TGA scooter has never been easier. We hope your Minimo will bring many admiring glances and increased freedom and pleasure to your life. Please enjoy your Minimo and thank you for purchasing a TGA scooter. This handbook provides important information on the most common operational and maintenance concerns that you should be familiar with when owning a Minimo. It is very important that you are familiar with the driving technique and are able to operate the controls competently before venturing far from where there is assistance. The handbook will draw your attention to important safety related issues by Care! Warning labeling. Please keep this handbook for future referral. Care! Warning * Do not ride your Minimo without fully reading and understanding this instruction manual first. * Do not exceed the maximum gradient/slope of 10%. * Do not carry passengers or exceed the maximum carrying weight (see Technical Specifications). * Do not get on or off your Minimo unless it is switched off. * Do not switch your Minimo on with the speed control lever depressed. * Do not back your Minimo into uneven inclines or surfaces. Be cautious when traversing slopes. * Do not turn suddenly at full speed, especially on uneven or hilly ground. Failure to observe this may result in tipping of the scooter. * Do not drive your Minimo over deep, soft terrain (e.g. soft dirt, deep grass, loose gravel or sand). * Do not operate your Minimo when under the influence of alcohol or certain drugs, which may impair your safety. * Do not climb or descend curbs that exceed the Minimo’s capability. * Do not turn when negotiating curbs. Always approach curbs at low speed and straight. * Always stop fully before changing direction (forward or reverse). * Always keep your feet on your Minimo when driving. * Always proceed carefully while riding your Minimo, especially as you approach the downgrade of a ramp or hill. * Always proceed carefully while riding on uneven surfaces. * Do not sit on your Minimo while being transported in a moving vehicle. Always restrain your Minimo so that it cannot move in the vehicle and transfer yourself to a vehicle seat. * Do not drive your Minimo through deep water or clean with a high pressure hose. * Never attempt to freewheel down a slope as all braking will be lost. * Safe driving tips for scooter users have been printed in the back of this manual. For your own safety and that of others please ensure that you thoroughly read and understand this and in addition always obey the rules of the road. 3 Intended Purpose Your Minimo is intended for outdoor use and can negotiate gradients up to 10%. It can also be folded or disassembled to fit easily into the boot of a car. Pavement Use The speed of your Minimo is dependent on the weight of the occupant, incline and the type of surface. The UK law limits the speed to 4mph, which your Minimo is unable to exceed but please drive with care and have consideration for pedestrians. 2. Your Minimo Controls & Instrument Panel C B D A E F A. Horn – Press the Horn button to sound the horn. B. Key – Insert the key and rotate it clockwise to power on your Minimo. To turn off your Minimo rotate the key anti clockwise. Should you require additional or replacement key your Minimo uses a 606 key. C. Battery Display Indicator – When your Minimo is switched on the needle on the indicator will move across from the left ‘Red’ sector to the ‘Green’ sector indicating the state of charge in your batteries. As the charge is used up in your batteries the needle will slowly move towards the red sector indicating the state of charge at that precise time. When the needle is pointing fully to the right the batteries are fully charged. As the needle falls towards the red sector your batteries are losing charge and when the needle is in the red sector your batteries need to be recharged. For more information see the Battery Charging section. 4 D. Power On Light – The light will be illuminated green when your Minimo is on. E. Speed Adjustment – This allows you to pre-select your desired maximum speed. The adjuster is proportional to speed and can be set anywhere between minimum and maximum. Turn the adjuster knob fully anti clockwise for the lowest speed and gradually rotate clockwise to increase your maximum speed. F. Throttle Controls – The Throttle Controls also adjust the speed of your Minimo. The further you push the control the faster your Minimo will go. 3. Adjusting Your Minimo Tiller If you’d like to adjust the height of your Minimo tiller simply turn the adjustment wheel anti clockwise until the top part of the tiller moves freely up and down. Then just move the top half of the tiller to the height you would like and tighten the adjustment wheel by turning it clockwise until tight. 5 4. Removing Your Minimo Battery Pack To remove the battery pack of your Minimo first ensure the pack is unlocked by inserting the key into the pack and turning it 90° anti clockwise to the unlock position. Then simply lift the pack up away from the base of the scooter and the seat using the handle provided. 5. Folding Your Minimo To fold your Minimo in order to put it into a car boot or stand it up and store it follow these 4 simple steps: 1. Place one hand on your Minimo seat base and use the other to pull up on the red handle located at the back of the floor pan just in front of the battery pack until you hear a click. 6 2. Fold the back of the seat down. 3. Use one hand to push the seat down towards the floor pan and the other to move the tiller towards the seat which will lift the front wheels off the floor and fold your Minimo. 7 4. Finally push the tiller against the seat and the front of the floor pan towards the rear wheels to ensure your Minimo is locked into the folded position. Once folded you can then lift your Minimo using the handle at the rear and stand it on its front wheels to move around in the folded position. 8 6. Unfolding Your Minimo To unfold your Minimo follow these 3 simple steps: 1. Pull the red handle on the left hand side of your Minimo towards you until you feel it click. 2. Pull the tiller away from the floor pan until the front wheels of your Minimo touch the floor. 9 3. Ensure your Minimo is locked in the unfolded position by pulling the chair away from the floor pan with one hand and pushing the tiller away from the seat with the other until you hear a click and feel you Minimo lock into this position. Once your Minimo is locked in position you will no longer be able to move the tiller towards and away from the seat so use this as a simple test to find out if you Minimo is locked in the unfolded position. Care! Warning *Always take care when folding and unfolding your Minimo that your hands and fingers are clear of moving parts of the scooter. * Always ensure the Minimo is locked in the unfolded position before attempting to get on. Failure to check this could result in injury. 7. Charging Your Minimo The battery charger supplied is special to your Minimo and so it may not be suitable for any other powered mobility product. Only use the charger supplied with your Minimo as other makes of chargers may permanently damage your batteries and will void the warranty. There are two types of battery available for the TGA Minimo so please make sure you follow the correct charging guidelines for the type of battery in your Minimo. If you would like confirmation of the type of battery in your Minimo call TGA on 01787 882244 and we will confirm for you. If your Minimo is fitted with a Lithium battery follow these simple steps: 1. Switch OFF your Minimo and remove the key 2. Plug the charger lead into a suitable wall outlet and switch on 3. You will see the light on the charger will turn Red to indicate it is ready to charge 4. Plug the charger lead into the socket located on your Minimo battery pack 5. You will see the light on the charger will turn Orange to indicate it is charging 10 6. After a period of time the light on the charger will turn Green indicating the battery is fully charged 7. At this time the charger can be disconnected and your Minimo is ready for use. NB At the point the Green light comes on the charger will automatically stop charging although the light will still be on. The battery cannot overcharge 8. Depending on the depth of the discharge, the time taken to recharge your Lithium Minimo battery fully will be between 5-6 hours. Please note that this time may increase as batteries get older. During periods without use (perhaps during the winter) it is wise to charge the batteries every 4 to 6 weeks. 9. For the best results your batteries must be cycled for their first 18-20 charges. This means run them down as much as you safely can in use and then give them a full charge. They will not work at their best until this process has been carried out. You will find that the distance that your Minimo can travel will gradually increase over the first few weeks of use as the batteries reach their optimum efficiency after approximately 20 cycles of discharge and recharge. NB When the charger is plugged into Minimo an automatic inhibit device will shut down the scooter stopping anything being used whilst plugged into the charger. If your Minimo is fitted with a Sealed Lead Acid batteries follow these simple steps: 1. Switch OFF your Minimo and remove the key 2. Plug the charger lead into the socket located on your Minimo battery pack 2. Plug the charger lead into a suitable wall outlet and switch on 4. You will see the light on the charger will turn Orange to indicate it is charging 6. After a period of time the light on the charger will turn Green indicating the battery is fully charged 7. At this time the charger can be disconnected and your Minimo is ready for use. NB At the point the Green light comes on the charger will automatically stop charging although the light will still be on. The batteries cannot overcharge 8. Although to get out of trouble the batteries can be put on charge for a short period of time, it is always best to go through a complete charge cycle each time. Excessive short period charging will be detrimental to battery life 9. For the best results and to prolong battery life, try to run the battery down by at least 50% before recharging and in addition it is always best to go through a complete charge cycle each time. 10. Depending on the depth of the discharge, the minimum time taken to recharge serviceable batteries fully will vary up to 12 hours. Please note that this time may increase as batteries get older. During periods without use (perhaps during the winter) it is wise to charge the batteries every 4 to 6 weeks. 11. For the best results your batteries must be cycled for their first 10-15 charges. This means run them down as much as you safely can in use and then give them a full charge. They will not work at their best until this process has been carried out. It can also prolong battery life. You will find that the distance that your Minimo can travel will gradually increase over the first few weeks of use as the batteries reach their optimum efficiency after approximately 10-15 cycles of discharge and recharge. NB When the charger is plugged into Minimo an automatic inhibit device will shut down the scooter stopping anything being used whilst plugged into the charger. 11 Care! Warning * Do not smoke or use a naked flame while your batteries are being charged. * Do not use the charger if it has received a sharp blow, been dropped or otherwise misused in any way. Take it to a qualified technician. * Do not dismantle the charger. This will void the warranty. * Do not leave charger plugged into your Minimo with charger switched off as this may discharge your batteries. * For a complete charge – Do not switch off, unplug or interrupt the recharge cycle until the charging cycle has completed. 8. Driving Your Minimo Care! Warning The Minimo is easy to drive but it is essential that you familiarize yourself with the controls and learn to drive it in a safe area with sufficient room to maneuver for your safety and that of others. The area should be free of obstacles and reasonably flat. Mark a practice course for straight line driving, turning in confined spaces, reversing and driving around obstacles. Driving Before driving make sure that the Battery has enough charge to complete your journey. Check that the Key is switched OFF and the seat is locked (see unfolding your Minimo) before getting on. Ensure that the armrests are in the down position. 1. Hold the Tiller with both hands and gently push the right control lever away from you to move forward. The more you push the lever, the faster you will go. To reverse push the left control lever, when reversing the speed is reduced to a maximum of 2mph. 2. Releasing the control lever automatically operates the brakes to slow down and stop. Once stopped, the parking brake will automatically come on. 3. Use the Tiller to steer. Move your left hand towards you to steer left and your right hand towards you to steer right. When reversing the opposite will apply. 4. To cross the road you should try to find a suitable slope. Your Minimo will mount lowered kerbs, but you should always approach a kerb at right angles (90°). If you are going up you should stop just short of the edge and select full speed. Then drive until both front and back wheels are on the pavement, then immediately lower the speed. If going down, proceed slowly on low setting until on the road, then switch to a suitable higher speed to cross the road safely. Do not attempt kerbs that are not lowered and do not go up or down at an angle, always 90°. Do take extra care and if you are going from pavement to road, make sure the road is clear. Anything different to the above could result in an accident and injury. 5. Watch your Battery Indicator. The distance you can travel depends on many factors, the more slopes, the less distance you can travel. We recommend that you gradually explore going further each day. 12 6. Should the battery “run out” before you get home there are two things you can do to avoid being stranded. Stopping and switching off the KEY for 5 – 10 minutes will allow the battery to “recover” a little power so that you can proceed further. You can attempt this a number of times. If you are unfortunate and cannot return to home under the battery power there is a “Free Wheel” device that will allow someone to push you home (see Parking Brake Release). 7. Range is influenced by many environmental conditions, hills will substantially decrease the range. Establish what you can obtain around your locality by gradually increasing the distance and checking the battery indicators at the end of each journey. 8. Reducing the speed will also reduce the power. For climbing obstacles or hills you will need to increase the speed setting to give the power and then control the speed with the levers. Parking 1. Before leaving your scooter, switch the ignition off, the battery indicator will then go off. Remove the Key for security. 2. If your Minimo has been used in the Free Wheel mode (see Parking Brake Release), it is VERY IMPORTANT to re-engage the drive to ensure that the scooter brake is on before you get on. 9. Parking Brake Release Your Minimo is fitted with a manual parking brake release. This is located on the back panel to the left of the right hand rear wheel. When the lever is pointing backwards it is set for normal use. When it is pointing forwards the brake is released which allows your Minimo to be pushed. There will be no power to drive your Minimo when the brake is in this position, however when switched on the Power On light will flash to indicate the parking brake is disengaged. Never release this lever when your Minimo is on a slope. Push lever up to regain normal drive. 10. Maintaining Your Minimo We recommend that your Minimo has an annual service and maintenance check by your Minimo Dealer or TGA. This is very important and can help to avoid breakdowns. The following are weekly/monthly checks that will keep your Minimo in good running order. • Do not apply oil or grease to any components. Sealed bearings and nylon bushes eliminate the need for lubrication. • Keep all components clean and dry. • Your Minimo uses maintenance free batteries, they are leak-proof regardless of position. Charging the battery is the only maintenance required (refer to charging instructions). DO NOT leave the batteries flat, charge every 4-6 weeks if your Minimo is being stored and not used. • Check the electrical cable connectors are fully home and secure. • Battery Replacement is dependent upon use. When batteries lose power too quickly, it is likely they are due for replacement. • Repairs relating to electrical or mechanical components should be performed by your Minimo dealer or TGA only. 13 Seat Upholstery A damp cloth and a little soap will keep your seat, looking good. Do not use abrasive cleaners as this will damage the coating. Upholstery can be damaged by chemical cleaners. Ultraviolet light can also reduce the life of the upholstery coating material. This is a normal ageing process and cannot be guaranteed (see exclusion in the Warranty Terms section). Bodywork The bodywork on your Minimo can be lightly washed with clean soapy water. Car polish can be used to keep the paint and bodywork in pristine condition. Do not use abrasive cleaners or strong detergents as this will fade the colour. CAUTION: Do not hose down your Minimo. Water could be forced into the electronics and cause permanent damage. DO NOT: Store your Minimo in damp conditions. This may affect the electronics if left for very long periods of time. Electronics Servicing of the electronics and charger should only be carried out by your Minimo dealer or TGA. These units are sealed and should not be opened. BROKEN SEALS WILL VOID YOUR WARRANTY. DO NOT: Operate your Minimo in extreme weather conditions i.e. very heavy rain. DO NOT: Drive through deep water. This could damage the main electronic controller or the electronics. Motor Brakes If the motor brakes are functioning correctly, you will not be able to push your machine when it is switched off or switched on with the speed control throttle in the neutral position. If your machine can be pushed when as described above, the motor brake(s) may be faulty. Do not use your Minimo and contact your Minimo dealer or TGA. SAFETY NOTE: For your own safety, we recommend that you check the function of your brakes prior to every journey. Driving Brake When you drive your Minimo and let go of the speed control lever, it should reduce speed very quickly. If you notice a change in the normal driving/slowing condition and your Minimo does not slow down quickly then do not use your Minimo and contact your Minimo dealer or TGA. Batteries Keep your batteries well charged (see Battery Charging section). Keep batteries clean and in a dry frost-proof place. IMPORTANT: It is not possible to predict the life expectancy of your batteries. This is mainly due to different workloads a battery can be subjected to. 14 Some Minimo users will use their scooter every day and for long periods of time. Their batteries will receive a near total and regular discharge and the life of their batteries will be short (12 months or less in some cases). Other Minimo users will use their vehicles less frequently, putting their batteries through a less demanding discharge lifestyle. These batteries will probably have a longer life (12 to 24 months or longer). When you need to replace the batteries, always insist on the model fitted as standard equipment to your Minimo. If In doubt, consult with your Minimo dealer or TGA. 11. Technical Specification Length Width Height Folded Dimensions Seat Width Total Weight (Including Batteries) Battery Pack Weight Standard Upgrade Speed Turning Radius Approximate Range Battery Size Standard Upgrade Controller Details Motor Details Maximum Carry Capacity Front Wheel Size Rear Wheel Size Maximum Gradient Ground Clearance 930mm 36" 485mm 19" 945mm 37" 750mm x 485mm 450mm 29" x 19" x 17" 410mm 16" 27.3kgs 60lbs 8.85kgs 19.5lbs 2.65kgs 5.85lbs Up To 4mph 6.4kmh 820mm 32" 20km 12 miles 2 x 12V 12AH SLA 2 x 11.5AH Li-Polymer 45 Amp S-Drive 4 Pole 270W 115kgs 18 stone 180mm 7" 200mm 8" 10% 60mm 2" 12. Warranty This is to certify that your Minimo is warranted by TGA for a period of twelve months from the date of purchase subject to the following conditions: 1. This warranty is available only to the original purchaser/user of the Minimo. The Minimo is identified by the unique serial number located on the frame. Warranty is not transferable. 2. TGA will repair or replace free of charge any part found upon inspection by an authorised representative of TGA to be defective in material and/or workmanship. 3. If a defect or fault is discovered, the dealer from where the product was purchased should be notified immediately. 15 Warranty Exclusions Tyres (these are normal wear components and replacement is not warranted) TGA will not be responsible for defects caused by abuse in return transit, vandalism, misuse, abuse, accident, negligence, alteration or misuse caused by non-observance of instructions set out in this manual This warranty does not cover commercial or rental use of the Minimo or if it is being used for anything other than its intended use Upholstery and seating (these are normal wear components and replacement is not warranted) Returns are only accepted when the product is shipped in the original carton with original protective packing materials installed Returned goods to be sent to TGA carriage paid. If a successful warranty claim is found TGA will pay return carriage. There is no other express warranty. Any and all other implied warranties are excluded. Your rights as a consumer are not affected. Service Information: Only genuine TGA Spares should be used. An authorised TGA dealer will service your Minimo under the terms of the above stated warranty. Servicing dealership personnel are trained professionals. They should be able to answer any question you may have. If you encounter a problem that a dealer does not solve to your satisfaction, please discuss it with the dealership's management. The Service Manager or General Manager can help. Almost all problems can be solved in this way. If you are dissatisfied with the decision made by the dealership's management, contact TGA for advice. 13. Tips, Cautions, Problems and Additional Features Stop Problems before they Start If you detect an unusual vibration or noise in the operation of your Minimo, try to determine the cause. Be sure the power is off before investigating. If you cannot discover the cause of a problem contact your Minimo dealer or TGA for help. Airline Checking Sealed Lead Acid and Lithium Batteries are permitted on airplanes. Airline personnel may insist on disassembling the battery pack to verify its contents. It is best to check with the airline before hand. An airline compliance certificate is available from TGA. Storage Avoid storing your Minimo in locations with extreme heat or cold. A cool dry location is ideal if possible. The following steps will help keep rust and corrosion from impairing your Minimo’s function and appearance. Turn the key to the off position. Clean all exterior surfaces, touch-up any damaged paint. Be sure the battery is fully charged before prolonged periods of storage and be sure to recharge every 6 weeks. Failure to comply may result in battery replacement. Batteries Keeping your Minimo working to its maximum potential means that the batterie(s) must be maintained with full power. Nightly recharging, after reasonable use, will help you to give them a longer life and will ensure your Minimo is always ready to go when you are. However, 16 occasionally running the batteries down as far as safely possible is also a good idea as it allows the batteries to then take a full charge. 14. Safe Driving Tips for Scooter Users Scooters fall into two categories, Class 2 or Class 3. A Class 2 scooter is essentially a 4mph pavement vehicle and can only legally be used on the road when either crossing over or because there are no footpaths. A Class 3 vehicle is capable of 4 & 8 mph and provided it is fitted with front and rear lights, flashing indicators, horn and rear view mirror it is legal for use on the road. It can also be used on the footpaths but must not exceed 4 mph. Class 2 & 3 vehicles must not be driven on Dual Carriageways, Motorways, Bus Lanes or Cycle Tracks. Insurance There is no legal requirement for insurance but it is a very good idea to have cover for fire and theft, accidental and malicious damage, and also third party damages. Just phone TGA on 01787 882244 and they will talk you through it. Breakdown & Recovery Service Again a very good idea and can take a load of worry off your mind. Just talk to TGA. Mobile Phone An essential item if you are on a journey alone. You never know, breakdown, accident, health communication is a must. Carrying Loads Do not overload. It may make your Minimo unstable and reduce its range. Place heavy loads inboard – in the middle – not behind the back wheel which can lighten the steering or can cause the front end to lift off the road on a bump, and not at the front which might make steering heavy. Watch Your Brakes Never try to drive, or even sit on your Minimo while it is in “free wheel”. The parking brake will be out of action and your Minimo could run away with you. Maintenance Carry out the checks listed in this manual regularly and also have your Minimo serviced by your Minimo dealer or TGA at least once a year. Sensible Guidelines for Safety When using the footpath Just because you are on the footpath or pedestrian precinct does not make you a pedestrian. If you are on a motorized vehicle you are no longer a pedestrian. Remember pedestrians always have right of way! Many people on foot will be kind and helpful to the drivers of a wheelchair or scooter, but not everyone! 17 In a crowded precinct, market area, or footpath It is your responsibility to ensure you do not run into anyone or do any harm with your Minimo. While many people will make way for you, you cannot expect everyone to do so. Some will appear to not even realize you are there. They will climb round and even over your Minimo rather than allow you room to move. Also be very aware of people’s feet. When climbing or descending kerbs Your Minimo will mount lowered kerbs, but you should always approach a kerb at right angles (90°). If you are going up you should stop just short of the edge and select full speed. Then drive until both front and back wheels are on the pavement, then immediately lower the speed. Kerb climbing in any other manner will lead to your Minimo becoming unstable and the risk of possible accident and injury. Watch out for: Children – They may well run in front of you without warning. You may only be moving very slowly, but you could still injure a child. Elderly People – They may be unable to quickly move aside to let you pass. Give way to them Disabled people on foot – they too may be unable to quickly move aside to let you pass People with visual problems or impaired hearing – Give them space and time Other motorised vehicle users – You may be doing all the right things. This does not guarantee they will do likewise When you need help: You may need to ask people to open doors for you Most people are willing to help, if asked politely. Don’t struggle to do the impossible or even the very difficult things when there are people around who would help if asked. Driving inside shops and buildings This is where you have the advantage over car users! Not many supermarkets would welcome a car driving round their store. But bigger shops and even some quite small ones are accessible to wheelchairs and scooters. Once inside the store it is your responsibility to drive slowly and safely and not damage the fittings or the stock, or injure other shoppers or store workers. You may need to ask for help. Again in most cases people are willing if asked politely. Don’t risk pulling down a whole display to reach the top shelf. ASK FOR HELP. Speed in shops and buildings Reduce it! – Drive at the slowest speed to avoid any accident. Be especially careful if you need to reverse, that your way is clear of shop fittings and people Please ensure you have read and understood everything in this manual, it has been put together using many years experience to ensure you will get the best from your TGA Minimo and that you will enjoy using it. 18 Notes 19 TGA Electric Leisure Ltd ● Woodhall Business Park ● Sudbury ● Suffolk ● CO10 1WH T 01787 882244 ● F 01787 882248 [email protected] www.tgamobility.co.uk TGA Electric Leisure Ltd reserves the right to change specification and/or prices without prior notification or warning INS01v1 20