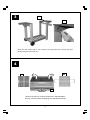
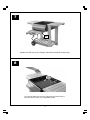
1
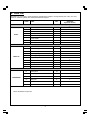
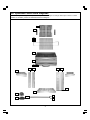
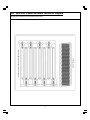
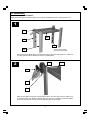
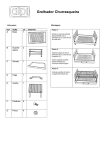
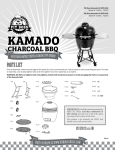
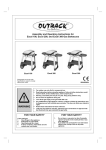
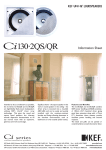
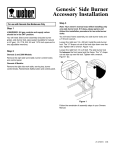
Charcoal Barbecues
Assembly and Operating Instructions for
Outback® Spectrum Flamer Charcoal Barbecues
Photographs are not to scale.
Specifications subject to change
without prior notice.
•
•
•
•
WARNING
•
•
•
•
For outdoor use only - do not use indoors! Not for commercial use.
Read instructions before using the appliance. Failure to follow instructions
could result in death, serious bodily injury, and/or property loss.
WARNING! Accessible parts may be very hot. Keep children and pets away!
CAUTION: Do not use spirit or petrol for lighting or re-lighting! Use only
firelighters complying to EN1860-3!
WARNING! This barbecue becomes very hot. Do not move it during operation!
Install this barbecue on a safe and even surface.
Any modification of the appliance, misuse, or failure to follow the instructions
may be dangerous and will invalidate your warranty. This does not affect your
statutory rights.
Retain these instructions for future reference.
A. Parts List
Quantities vary according to model purchased. Specifications subject to change without prior notice. For more
details on hardware, please see ‘Hardware Reference Diagram’.
CODE
BODY
TROLLEY
HARDWARE
PART
QTY
A1
Grill Lifting Handle
2
A2
Cast Iron Grill
2
A3
Charcoal Basket Handle
2
A4
Charcoal Basket
1
A5
Barbecue Body
1
A6
Front Panel
1
A7
Ash Tray Handle
1
A8
Ash Tray
1
B1
Side Shelf
2
B2
Front Left Leg
1
B3
Rear Left Leg
1
B4
Front Right Leg
1
B5
Rear Right Leg
1
B6
Leg Endcap
2
B7
Wheel
2
B8
Hubcap
2
B9
Axle
1
B10
Trolley Base
1
C1
Trolley Bolt
24
C2
Body Support Bolt
8
C3
Spacer
8
C4
Wing Nut
8
C5
Washer
2
C6
Locknut
2
Pre-Assembled Component
2
Outback®
Spectrum Flamer
B1. Spectrum Flamer Parts Diagrams
Quantities vary according to model purchased. Specifications subject to change without prior notice. For more
details on hardware, please see ‘Hardware Reference Diagram.’
A2
A1
A3
A4
A5
A6
A7 A8
B3
B2
B5
B4
B1
B6
B10
B7
C6
B9
B8
C5
3
B2. Spectrum Flamer Hardware Reference Diagram
Specifications subject to change without prior notice.
Part C1 (24pcs)
Part C2 (8pcs) Part C3 (8pcs) Part C4 (8pcs)
4
D. Assembly
TOOLS NEEDED FOR ASSEMBLY:
Medium size flat blade or Phillips/crosspoint screwdriver, adjustable spanner or metric spanner set
1
C1
B10
B2
B4
B3
(Photo depicts trolley
from the reverse side)
Attach the legs (B2,B3,B4,B5) to the trolley base (B10) using the trolley bolts (C1). Take care
to fix the legs with Velcro attached as shown in the illustration.
2
C5
B9
B8
C6
B7
Slide the axle (B9) through the corresponding holes in the short legs. Place a washer (C5)
on each end of the axle. Slide the wheels (B7) over each end of the axle. Secure the wheels
into place with the locknuts (C6). Snap the hubcaps (B8) into the wheels.
5
3
B1
C1
Attach the side shelves (B1) to the front/rear left legs (B2,B3) and front/rear right legs
(B4,B5) using the trolley bolts (C1).
4
A4
A2
A7
Remove all cast iron cooking components, charcoal basket,
ash tray, and any internal packaging from the barbecue body.
6
5
A5
A5
Lay the assembled trolley on its side. Lay the body (A5) on its back and slide into
position between the trolley legs.
6
C2
C3
C4
With the barbecue laid on the ground, insert a body support bolt (C2) through the short leg,
through a spacer (C3), through the sidewall of the body, and secure the bolt with a wing nut
(C4). Repeat the process for all the legs until the body is completely fixed to the trolley.
NOTE: When positioning the body of the barbecue, ensure the control panel is on the same
side as the legs with Velcro fastenings.
7
7
A7
Replace the ash tray (A7) by sliding it underneath the barbecue body (A5).
8
A4
Lay charcoal basket (A4) into body making sure the basket rests on
the lowest level of hooks on the adjustable handles.
8
9
A2
Lay cast iron grills (A2) into barbecue body (A5).
ASSEMBLY IS NOW COMPLETE.
PROCEED TO THE NEXT PAGE FOR INSTRUCTIONS ON
OPERATION AND MAINTENANCE.
9
single layer. Do not overload the charcoal
basket. The maximum amount of briquettes to
be used at any one time is 2.0kg.
E. Important Information
Please read and understand these instructions
before assembly and use.
•
•
•
•
•
•
•
•
•
•
•
•
•
•
•
G2. Lining the Ash Tray
Line the ash tray with aluminium foil. This will
protect the tray, help better reflect heat, and
make cleaning easier when barbecuing is
finished.
Retain these instructions for future reference.
For outdoor use only – do not use indoors!
Do not move the barbecue while lit.
Ensure the ash pan is in place before use.
Never remove the ash pan whilst the
barbecue is in use. Wait until the barbecue is
completely cooled before removing it.
Modification of the barbecue may be
dangerous, is not permitted, and will nullify
any warranty.
Use this barbecue only on a stable, flat
plane.
Do not use within 1m of any flammable
structure or under any combustible surface.
Caution: Do not use spirit or petrol for
lighting or re-lighting! Use only firelighters
complying to EN1860-3.
Do not store flammable materials near this
barbecue.
Do not use aerosols near this barbecue.
WARNING! This barbecue becomes very
hot. Do not move it during operation.
WARNING! Keep children and pets away.
Failure to follow the instructions in this
manual could result in serious injury or
property damage.
If you have any queries regarding these
instructions, contact your local dealer.
G3. Starting the Charcoal
• Make sure the charcoal basket is in the
highest position before lighting the charcoal.
• Caution: Do not use spirit or petrol for lighting
or re-lighting! Use only firelighters complying
to EN1860-3.
• When placing charcoal, never allow charcoal
to be closer than 5cm to the surrounding sides
of the barbecue body. The maximum amount
of charcoal to be used at any one time is
2.0kg.
• Block Type Starters – Form charcoal in a
pyramid around it. Light the starter block.
When charcoal is well lit, spread around the
charcoal grid and add more as necessary.
• Liquid Starters – Place charcoal in a shallow
tin. Pour liquid charcoal starter onto charcoal
and wait 5-10 minutes so that starter is
allowed to penetrate into the charcoal. Then
place charcoal on grid in a pyramid formation.
Light charcoal. Allow time for charcoal to
become well lit. Spread charcoal in a uniform
layer, so that each lump is just touching. When
the charcoal is ashed over (grey coating of ash
over each lump) you are ready to begin
cooking.
• Do not begin cooking until charcoal has an
ashed-over coat.
• Do not attempt to cook whilst charcoal is
flaming.
F. Installation
F1. Selecting a Location
This barbecue is for outdoor use only and should
be placed in a well-ventilated area on a safe and
even surface. Take care to ensure that it is not
placed UNDER any combustible surface. The
sides of the barbecue should NEVER be closer
than 1 metre from any combustible surface. Keep
this barbecue away from any flammable materials!
G4. Running in the Barbecue
To prevent foods from sticking to the porcelain,
please use a long handled brush to apply a light
coat of cooking or vegetable oil before each
barbecuing session.
G. Operation
Fill the barbecue with charcoal, light the charcoal
and allow the charcoal to become red-hot. It is
recommended to operate the barbecue with redhot charcoal for at least 30 minutes before first
use. The barbecue and grills are now ready to be
used for cooking.
G1. Warning
• Before proceeding, make certain that you
understand the IMPORTANT INFORMATION
section of this manual.
• This barbecue is designed for charcoal use
only. We recommend using charcoal
briquettes. Use only enough briquettes to
cover the bottom of the charcoal basket in a
G5. Using the Adjustable Charcoal Basket
Warning: Handles can become hot during use.
Please wear oven gloves and take care when
handling the adjustable charcoal basket.
Heat can be controlled by raising or lowering the
charcoal basket using the adjustable handles. For
10
normal cooking, set the charcoal basket to the
lowest level. As charcoal becomes consumed, the
basket can be raised to the highest level in order
to compensate for heat loss. Also, the basket can
be adjusted higher on one side and lower on the
other to facilitate warming of foods on the lower
side, and cooking on the higher side. The basket
should NEVER rest directly on top of the ash tray.
Always use either the lowest or highest levels of
hooks on the adjustable handles. The charcoal
basket must always be positioned in the middle of
the barbecue body, between the two stop pins.
Even when your barbecue is covered for its’
protection it must be inspected on a regular basis
as damp or condensation can form which may
result in damage to the barbecue. It may be
necessary to dry the barbecue and the inside of
the cover.
H1. Porcelain Coated Cast Iron Cooking
Surfaces
Clean with hot, soapy water. To remove any food
residue, use a mild cream cleaner on a nonabrasive pad. Rinse well and dry thoroughly. We
do not recommend cleaning grills and griddles in a
dishwasher.
G6. Flare-Up Control
Flare-ups occur when meat is barbecued and its
fat and juices fall upon the hot charcoal. Smoke
helps give food its barbecued flavour, but avoid
excessive flare-up to prevent food being burned.
To control flare-ups, it is advisable to trim away
excess fat from meat and poultry before grilling.
Flare-ups can be extinguished by applying baking
soda or a salt directly onto the charcoal. Always
protect your hands when handling anything near
the cooking surface of the barbecue.
H2. Adjustable Charcoal Basket
When fully cooled, use the handles to shake the
basket vigorously until all loose ash falls through
into the ash tray. Dispose of any unburned
charcoal and remove remaining residue with a
brass wire brush.
H3. Ash Tray
After every use, check the tray for ash or fat buildup on the aluminium foil. Discard the ash and foil,
and wash any remaining ash or fat from the tray.
Failure to clean thoroughly may cause fat fires.
These fires can severely damage your barbecue
and are not covered by the warranty.
If a fat fire should occur in the ash tray, wait for
the fire to go out. Do not pull out the ash-collecting
tray or douse charcoal or tray with water.
G7. Replenishing the Charcoal
To replenish the charcoal during use, remove the
food from the grill. With protected hands, use the
grill-lifting handles provided to lift the grill. Once
the grill is lifted, add the charcoal, carefully
replace the grill, and continue cooking when the
charcoal is ready. When using the handles to
move the grill, take care to position them correctly
so that the grill is stable.
H4. Barbecue Body
Regularly remove excess grease or fat from the
barbecue body with a soft plastic or wooden
scraper. It is not necessary to remove all the
grease from the body. If you need to clean fully,
use hot soapy water and a cloth, or nylon-bristled
brush only. Remove cast iron cooking grills before
full cleaning.
H5. Trolley
Your trolley is manufactured using a hardwood
suited to outdoor use, provided it is treated with
Teak oil or similar after assembly and on a regular
basis thereafter. Hardwood will naturally weather
and change its appearance. It is quite natural for
small cracks to appear on the surface of the
wood.
H. Care and Maintenance
Clean your barbecue after use, especially before
extended periods of storage. Ensure the barbecue
and its components are sufficiently cool before
cleaning.
•
•
Never douse the barbecue with water when its
surfaces are hot.
Never handle hot parts with unprotected
hands.
H6. Fixings
All screws and bolts, etc. should be checked and
tightened on a regular basis.
In order to extend the life and maintain the
condition of your barbecue, we strongly
recommend that the unit be covered when left
outside for any length of time, especially during
the winter months. A full range of heavy-duty
Outback® covers is available for all models. Do
not leave the barbecue exposed to outside
weather conditions or stored in damp, moist
areas.
Specifications are subject to change without prior notice.
11
OUTBACK UK LTD
LIMITED 10 YEAR WARRANTY
OUTBACK barbecues are warranted to the original purchaser against defects in materials and
workmanship. Porcelain coated barbecue bodies, porcelain coated roasting hoods and
stainless steel roasting hoods are warranted for a period of ten (10) years from the date of
purchase. Stainless steel burners are warranted for a period of two (2) years from the date of
purchase. OUTBACK UK will, within this period, supply replacements for defective parts free
of charge provided that:
♦
♦
♦
♦
The product has not been used for trade, professional or hire purposes.
The product has not been subjected to misuse or neglect, including fat fires and flare ups
or use of a faulty or incorrect regulator.
The product has not sustained damage through foreign objects, substances or accidents.
The care and maintenance instructions given in your Outback manual have been followed.
This warranty is offered as an extra benefit and is in addition to the customers’ statutory rights.
Outback UK does not warranty in any way the gas cylinder.
If you have any queries regarding the assembly or use of your barbecue please contact
Outback UK
In the unlikely event that you experience
problems with this barbeque, please contact:
Customer Service
Outback UK
Unit 2 Farleigh Hill
Tovil
Maidstone
Kent ME15 6RG
Tel: 01622 671771
Fax: 01622 673101
e-mail: [email protected]
website: www.outbackuk.com
Published September 2007
12