1
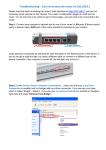
Connectivity Checker Troubleshooting Guide
Contents
1.
Possible error messages: .................................................................................................................................................. 2
2.
Troubleshooting .................................................................................................................................................................. 4
3.
Next Steps / Verifying issues are resolved ..................................................................................................................... 6
1
Please find below some scenarios of error messages that can be received when using the Connectivity Checker and
a few steps you can perform to resolve those issues.
1. Possible error messages
Error message 1: “Connection test failed with exception: The remote name could not be resolved:
“www.testdomain.com”
Possible Cause: This message can be received when you press, “Test Connection to Server” and
there is a broken network connection. The cause may be local or remote.
Fix: please refer to section 2. Troubleshooting
Error message 2: “Could not connect to Web Service URL. Test Portal Connection for more
details…”
Possible Cause: This message can be received when you press, “Run Full Test” and there is a
broken network connection.
Fix: please refer to section 2. Troubleshooting
2
Error message 3: “Connection test failed with exception: Unable to connect to the remote server”
Possible Cause: The message you get is a failure to resolve DNS (convert a name to an IP
address), which is expected when unplugged.
If you are being blocked at any point beyond DNS resolution, you will get this error.
Fix: please refer to section 2. Troubleshooting
3
2. Troubleshooting
Please try the following Steps 1 – 4 to resolve the above mentioned issues:
1.
Loose or disconnected Ethernet cables can cause network or Internet connection issues. Check all
network connections (such as where they plug into your computer and where they plug into the wall
jack or network switch) to make sure they are properly connected.
2. Open your internet browser and attempt to connect to your internet home page. If unsuccessful,
proceed to step 3.
3. Enter “cmd” in the box underneath “All Programs” to open up a window with a command prompt.
If you are using Windows 7, your Start menu will change to something similar like this:
4. Enter “ipconfig” at the blinking cursor and hit the Enter-Key.
4
If you see no IP address listed, like in the picture immediately below, you may have a problem with
your local network connection not allowing you to connect to the internet and the remote database.
This picture below is similar to what you should see when you enter “ipconfig”, where the local
network has issued an IP address to your computer.
5
3. Next Steps / Verifying issues are resolved
After performing the above steps 1-4, please run the Connectivity Checker again to confirm the
issue is corrected (reference the Using the Connectivity Checker document).
If you are still unable to successfully run the Connectivity Checker, please contact your Project
Coordinator for the next steps.
6