1
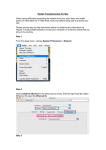
TROUBLESHOOTING GUIDE COMMON PROBLEMS & THEIR SOLUTIONS 1. I have recently registered for my room to be connected but I am unable to access the internet. Please check the list of new user's Common Connection Problems on page 4. 2. My internet connection does not work. Please see the Connection Troubleshooter on page 2. 3. My internet is slow. There are a number of reasons why your connection may be slow. If Windows generally runs slowly on your PC then your internet will also run slowly. Slow connections can also be caused by having lots of Spyware or Viruses on your system. You should scan your computer for spyware and viruses. Also download Mozilla Firefox which is a web browser that loads pages faster and provide better security than IE. 4. I can’t access Bannerweb or other specific web pages although the majority of pages load fine. If you can access web pages but not Bannerweb it could be that your personal firewall is configured incorrectly. You should uninstall your firewall or use the Windows Firewall as directed on page 12. 5. Certain parts of web pages such as pictures or buttons are missing but are present when I access the same page on a different machine Are you running a Firewall or Internet Security Program? Try uninstalling the firewall and enable the Windows firewall instead. 6. My computer keeps turning itself off. I see a warning popup on the screen and a countdown timer. When the countdown reaches zero the computer turns off. This is a symptom of a type of Virus which attempts to connect to your computer through the network. To protect yourself you must run Windows Update & enable Firewall as directed on page 12 to receive the security updates that you need. 7. How can I make voice or video calls? Download the new Skype version in order to make voice and video calls from http://www.skype.com 8. I am getting lots of popups when browsing the web and often i am diverted to other websites instead of the website i want to go to. Your system is infected with Spyware. You will need to remove the spyware and make sure you have all the necessary Windows Updates which will help prevent you from getting more spyware. 9. I cant connect. You are not permitted to use Kazaa & other file sharing applications on ResNet. This is written in the Service Level Agreement which you agreed to when you registered. get Kazzaa to 1 CONNECTION TROUBLESHOOTER This Troubleshooter will help you diagnose and solve any connection problems you may have. Start at problem number 1 and work your way through the Troubleshooter, following the instructions on right column. You must follow the instructions before proceeding to the next step; otherwise the next step may not make sense. If you identify and solve your problem, restart your computer and check your internet connection then return to problem number 1 if necessary. If you are unable to solve your problem with this Troubleshooter please email ResNet Support at [email protected] for further assistance. You may also make an appointment for a member of the technical support team to visit you by going to the accommodation reception on your campus. 1. I cannot access the internet. You need to see if you have a connection to the network or not (for instructions see page 11). If you have a connection to the network there must be something else preventing you from accessing the Internet. If you have a connection to ResNet -your IP address should starts with 172. If your IP address starts with a number other than 172 Proceed to step 2. 2. 3. IPCONFIG shows that my IP address does not start with 172 therefore I have no connection. My network card is ok but i still have no connection. Is your Network Card working correctly? Follow the instructions on page 7 to see your card in the device manager and working correctly. If the card is working correctly proceed to step 3. If the card is shown with a yellow exclamation mark go to step 7. Check the Network Cable connecting your PC to the network socket on the wall. Make sure that you are using the right cable and that both ends are plugged in correctly, see network cables on page 6. To check it is plugged in ok, go to the control panel (click start > control panel) and select Network Connections. There should be a connection called Local Area Connection. Make sure that there is no red cross on its icon. If there is a red cross then your computer is not connected to the wall socket or there is a problem with socket. If you have the wrong type of cable you can buy one from the Student Union Shop on campus. If you have the right cable but see a red cross next to Local Area Connection and you suspect there is a problem with the wall socket please email ResNet Support at [email protected]. If your cable is connected ok proceed to step 4. 2 4. 5. My network card & cable are ok but i still have no connection. My network card & cable are ok and my network settings are ok but i still have no connection. Are your Network Settings correct? Check your TCP/IP Settings as directed in page 10. If TCP/IP Settings are correct but you still have no connection proceed to step 5. Are you running a Personal Firewall? If firewall configured wrongly, a personal firewall can restrict your access to the internet and slow it down considerably. You should uninstall any firewall application you have. If after disabling a firewall & still no connection or you are not using firewall at all, go to step 7. 6. 7. I tried everything above and i still can't get in ip address that begins with 172. Please make a technical support appointment by going to the accommodation reception on relevant campus: My network card is not working. You may need to reinstall the driver for the card. Instructions of Installing Network Card Driver are given on page 8. If that doesn't work your card may be faulty or you may be using the wrong driver. Avery Hill - Aragon Reception Greenwich - Queen Mary Building Medway - Blake Building If you successfully installed your card you will have to restart your computer. After restart check if you have internet access and if not then return to step 1. If you could not install the card correctly then please make a technical support appointment at the accommodation reception. 8. My network card & cable are ok. My network settings are correct and I am not running a firewall but i still do not have a connection. Do you have a Network Bridge? If you have then this will stop your computer connecting to ResNet. Most windows users don’t even know they have one set up. You can check by looking in Network Connections (click start > control panel > network connections). If you see an icon called Network Bridge, delete it then check your TCP/IP Settings are correct as directed on page 10. If you had a network bridge and deleted it, your physical address most likely changed too. In order to get your connection working you will have to: Find your new Physical Address (for instructions go to page 5) and then Register your new Physical Address on Bannerweb. If you do not have a network bridge and your connection is not working proceed to step 7. 3 COMMON CONNECTION PROBLEMS: At least 50% of all users who have problems connecting after registration do so for one (or more) of the following reasons: 1 - You do not have a network card Quite often, Modems are mistaken for Network Cards. A modem allows you to plug your computer into a Phone Socket and although you may have received Internet at a different address via a modem it will not allow you to access ResNet on campus. The network cable needs to be plug into the network card socket. The socket on the back of a Network Card looks very similar to the socket on a modem except that the network card's socket is bigger as shown in the picture below: RJ11 Modem RJ45 Network Check your network card socket and then purchase a network cable from the Student Union Shop on campus and see if it fits. 2 - You registered the wrong MAC/Physical address Modems also have a Physical address as well as network cards. If you followed the instructions to find your Physical address given on page 5 and had a modem inside your computer but no network card, you would be given the Physical address of the modem. Be sure, if you have both a network card and modem, that you register the Physical address of the Network Card. 3 - You are using the wrong cable There are different types of network cable available, see page 6. If the cable came with a network card or you bought your cable from anywhere other than a Student Union Shop, it may be the wrong type. Often modem cables are mistakenly used to connect a network card to the network socket. Although a modem cable will fit (loosely) into a network socket but it will not work. The pictures below show the jack plug of a modem cable and a cat 5 network cable. Compare these to your cable to ensure you have the right one. Modem Cable with RJ11 Jack CAT 5 Cable with RJ45 Jack 4 - Your TCP/IP settings are incorrect This is the main cause for connections not working. To check your TCP/IP settings first right click on My Network Places icon on your desktop and select properties. Then check that TCP/IP is properly configured. For instructions on how to check TCP/IP Settings in Windows XP please see page 10. 4 HOW TO GET PHYSICAL ADDRESS This section gives instructions on how to find your Physical / MAC Address or which you will need to register. Click the Start button Select Network from the start menu. Click Network and Sharing Center at the top Click Manage network connections from the Tasks on the left. 5 Right click on your Local Area Connection and select Status. If you don't have a Local Area Connection, or Status is greyed out, check your cable and Network card. Click on the Details button in the next window you see. Finally, you will see a window with the Physical Address of your network card, as shown below: 6 NETWORK CABLE To connect your computer to ResNet you need a CAT 5 Network cable which is available from all Student Union shops. The cable should look like the one below. There are a number of cables which have plugs similar to this such as a modem cable (see below), so to be sure you get the right one buy it from a SU shop on campus. If you buy a cable from elsewhere make sure you do not buy a cat 5 crossover cable as this will not work either. Connecting the cable To connect the cable, carefully insert one end to the socket on your network card. It will only fit one way due to the small clip on the top of the plug. When the plug is all the way in you should hear a click. Connect the other end of the cable in the same way to the socket on the wall of your room. Modem cables & Network cables Often modem cables are mistaken for network cables. The pictures below show both modem and network cables taken from different angles. If you are unsure what type of cable you have, compare it to the pictures below. Your cable should look like the cat 5 network cables on the right. Modem Cable with RJ11 Jack CAT 5 Cable with RJ45 Jack 7 Check Your PC Network Card Many desktop computers and all new laptops come with network cards already installed so it is worth checking before you go out and buy one. Look at the connections on the back of your computer to see if it has a socket like the example below. Note that laptops often have this socket on their side instead of the back. If you have a socket like the one above then you have a network card installed. The next step in to check if the network card driver is installed: Right click Computer and select properties. This will open your system properties. In the System Properties window click the Device Manager on the left. This will open the Device Manager window. Double click on Network adapters. 8 Your network card should now appear underneath "Network Adapters". If this is the case then your network card is installed correctly. If you see your card but it has a yellow exclamation mark next to it or if you can’t see "Network Adapters" at all you may need to reinstall your drivers as directed on page 8. If you do not want to attempt this yourself you may make an appointment for a member of the technical support team to visit you by going to Accommodation Reception. INSTALLING A NETWORK CARD Important - Read this first! Installing a Network Interface Card requires you to open up your computer. By doing this you may invalidate your PC's warranty and if done incorrectly you could damage your PC. If after reading this page you feel that you are unable to install your card please contact ResNet Technical Support at [email protected]. Most Network cards come with an installation manual. You should follow the instructions contained in the manual and use this document as a guide as it is generic and will apply to most cards. To complete the install you will need the Network Card's Driver Software. These usually come with the card on a disk or CD. If you do not have the driver they can be downloaded from the card manufacturer’s web site. You may also need Windows CD. Hardware Installation Make sure your PC is turned off and disconnect the mains cable. Unscrew the case & remove the cover so that you have access to the motherboard. Before you proceed you must earth yourself to remove any static charge you have which could damage components. Do this by touching a metal heater / radiator. Carefully insert the card into an empty PCI slot on the motherboard. You may need to remove a metal dust cover from the back of your PC to do this. Make sure the card is in properly by comparing it to other cards on the motherboard and screw the card in place. Connect the power cable and turn the computer on. If the card is not inserted correctly your PC may beep unusually. If this is the case turn off the power and check the card is in properly. If the computer starts normally let it boot to Windows so you can install the drivers (see next section). Once the drivers are installed screw the case cover back on. You now need to check your Network Settings are correct as directed on page 10. 9 NETWORK SETTINGS When you install a Network card on your computer the correct settings are usually loaded for you. Many users encounter problems when accessing the internet because their TCP/IP settings are not correct. Check the TCP/IP Settings section below for the correct TCP/IP configuration. Click the Start button. Then select Network and Sharing Center. Click on Manage Network Connections from the tasks on the left. Right click on Local Area Connection. Then select Properties. In the Properties window click on Internet Protocol (TCP/IPv4). Then click Properties. Make sure that the following options are selected as shown in the example: Obtain an IP address automatically Obtain DNS server address automatically Then click OK to return to the properties window. Then click OK in the properties window to finish. 10 After clicking OK you have to restart the computer. When you restart, your Network settings should now be correct. To check your ResNet Connections see page 11. CHECK YOUR RESNET CONNECTION Follow these instructions to check that you are connected properly. Note that registration can take up to 5 working days, so if you registered recently you may not be connected yet. Click the Start button Select Run. This opens the Run window. Type COMMAND and click OK A command window like the one on the left will now appear Type ipconfig /all and press Enter The information shown above should now be shown in the command window If you are connected properly the first number next to "IP Address" should be 172. Also, next to "DNS Suffix Search List" and "Connection-specific DNS Suffix" it should say resnet.gre.ac.uk. 11 Windows XP Firewall A firewall is a program or a piece of hardware or software which prevents unauthorised access to your computer. The whole campus is protected by a firewall which means that you can not be 'hacked' from a computer outside the campus. ResNet users who wish to run their own firewall should be warned that by doing so they may interfere with the way the way their computer communicates with the network. This may cause slow connection speeds or block the connection completely. In the worst case a wrongly configured firewall can even cause problems for other users on the network. For this reason we insist that ResNet users only run the built in Windows Vista Firewall which is included in service pack 2. If you do not have service pack 2 then you will need to run windows update to get it. ENABLE Windows XP Firewall Click Start button and select Control Panel. Click Security to see a list of security options. Clicking Security Center will give you a screen displaying the security status of your computer. If anything is not OK or On, click it and read the instructions to find out what can be done. 12