1
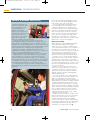
P017_TENG_OCT11.qxp:Layout 1
21/9/11
17:27
Page 17
ELECTRICAL TROUBLESHOOTING
Back to basics
Diagnostics equipment has a critical part to play in fault-finding with today’s trucks, vans, buses and
coaches. However, we’re not looking at a magic wand, says Brian Tinham
H
ow many technicians, if they were
honest, would concede that they
joined the transport trade because they
were interested in trucks, engines and
gearboxes – not in response to a latent
love affair with the electrical or electronic sides of
vehicles? We all know the answer: the vast majority.
So it is little surprise that, when it comes to
troubleshooting the array of electrical and electronic
systems on modern commercial vehicles, there is
generally now an over-dependence on diagnostic
equipment. Too few engineers seem comfortable
getting stuck in with a DMM (digital multimeter).
Even fewer are happy to wield an oscilloscope. And
even if they can, it’s only those rare superheroes
who are able to move logically around vehicle
harnesses, determining the root causes of electrical
problems and making informed decisions about
repair work – particularly where additional
subsystems have been installed on, for example,
specialist vehicles.
The problem with all of this is not that trucks,
vans or buses are left in a dangerous or
unroadworthy state: that is seldom the case. No, it is
primarily that repairs may be costing considerably
more than they should – at a time when we’re all
supposed to be tightening our belts. Also, there is a
risk that associated emerging problems – such as
short circuits caused, for instance, by multi-core
cables bending over a bodywork edge or rubbing
against moving parts – will go undiagnosed, leading
to vehicles in and out of the workshops, or breaking
down in service and costing operators even more
money, in terms of further repairs and downtime.
wires hanging off it – even mirrors and wheel hubs.”
For him, learning electrics is a simple matter of
going back to basics, and explaining that these can,
and should, be applied to any sensor or system, no
matter how apparently complex. “I always start by
running through the fundamentals of electricity,
because technicians need to understand that amps
equate to current flow, voltage to pressure and
ohms to resistance.” Armed with that knowledge,
technicians will, at the very least, know that
ammeters must be connected in series with a circuit,
while voltmeters are set up in parallel.
Why does this matter so much? Lock explains
that when, for example, the diagnostic system tells a
technician that it can’t see a camshaft sensor – or a
crankshaft sensor, wheel speed sensor, whatever – if
he can’t use a DMM, that individual is left guessing
which part to swap out.
“Those that know what they’re doing will find out
what needs replacing, because they’ll follow up what
the diagnostic kit says by wandering around the
relevant sensor and circuit, quickly performing
appropriate simple meter tests.”
In the case of a passive wheel sensor, for
example – essentially a small coil – technicians
should expect to find the resistance of that coil by
performing a quick test across the sensor. If the
resistance is correct, the problem is with the wiring
or the computer, and the next step should be to go
Simple electrics
Yet Colin Lock, head of vehicle electrical training at
S&B Automotive Academy in Bristol, says it need
not be like this. “It’s not just apprentices; when
qualified technicians come to us, there is always a
fair percentage that see the electrical side as too
complicated. Their knowledge of wiring and basic
tools, such as meters, is poor. And it’s the same with
the electrical side of vehicle sensors and actuators.”
They’re worried about setting fire to something or
blowing up a £500 ECU, so they tend to leave the
electrics to ‘somebody else’, he says. “That’s a big
mistake, given that virtually everything today has
October 2011 Transport Engineer
17
P017_TENG_OCT11.qxp:Layout 1
21/9/11
17:27
Page 18
ELECTRICAL TROUBLESHOOTING
Correct processes are the key
The problem with diagnostics
is that some technicians think
they can just plug it in and
start throwing parts at a
problem. “They think of
diagnostics as a magic wand
that will just fix a problem, but
it won’t. It’s another tool to
help them.” So says Stephen
Ball, technical trainer with
diagnostics equipment manufacturer Texa.
“I always say that you need to speak to the person who
acknowledged the fault first, whether that’s the driver, the vehicle
owner, whoever. Ask questions such as: was it raining, were you
braking, were you going downhill? Get the context for the fault. Then
check the basics: look for split pipes, loose battery terminals, all the
obvious stuff. Only then should you plug in the diagnostics.”
Ball gives the example of an ABS warning light on a truck
instrument panel. Having carried out the basic checks, he says, the
correct process starts with plugging in the diagnostic,
communicating with the ECU and looking for errors or fault codes.
“That will point to a circuit with a problem. It may be an ABS
sensor circuit fault, so you need to look at wheel speeds and
voltages by spinning the wheel. From there, you can determine is
there a problem, but then you need to revert back to normal testing
– checking the sensor resistance and looking for mechanical faults,
such as wheel bearing problems or corroded sensor rings.”
For Ball, diagnostics are part of the mix of troubleshooting. It’s
about blending good, old-fashioned technician practice with modern
equipment.
18
back to the ECU, unplug it and perform the same
test on the loom wires, with the DMM in resistance
mode. If that’s open circuit, it’s the wiring.
His point: although the fault might be with the
sensor, the diagnostic kit is only saying it can’t
communicate with the device. “Technicians who
don’t know any better tend to blindly fit what the kit
indicates as a potential problem. Often they will be
right – wheel speed sensors’ wiring, for instance,
tends to go across the suspension. By fitting a new
sensor, which comes with its own length of wire,
they may overcome the problem – even without
realising that it could, in fact, have been due to faulty
wiring or just a connector left unplugged.”
Scoping the problem
But it’s not just about using a DMM properly. Most
modern diagnostic equipment also includes
oscilloscope screens, capable of revealing vehicle
sensor and actuator waveforms. As Lock explains, if
the diagnostics are pointing to our wheel speed
sensor, but it’s not open circuit, then you can identify
exactly what’s going on by spinning the wheel in
question and then spinning another known good
wheel at the same speed, and comparing signals.
“If it turns out to be a weak signal, the problem
might not be the sensor itself. It could be a large air
gap between the sensor and rotor, or just debris
interfering with the magnetic field. Clearly, technicians
do need to understand the basics of sensors as well,
but at least the equipment will help them get to the
real cause,” he advises.
However, scopes really come into their own –
whether as part of the diagnostic kit or, even more,
as standalone instruments – when the problems
detected concern motorised actuators, which are
generally computer-controlled, using PWM (pulse
width modulation) signals.
“You can’t see what’s gong on with a voltmeter,
because the signals move too fast,” explains Lock.
“But a scope will draw you a picture of exactly
what’s happening. With the test leads clipped to the
wiring, it will show you what the computer is trying to
do, with its power switching signals. And you can
compare that with the actuator response around its
duty cycle. If it’s the throttle, for example, revving the
engine should show the pulse width signal changing,
as the computer attempts to move the actuator.
But, if the device stays put, then the fault is at the
actuator end. It might be seized or there could be
a fault with the actuator electrics.”
And it’s much the same with, for example, crank
shaft speed and position sensors. Here the value of
using a scope is that it enables a technician to
compare signal shape with that of the OEM’s
reference on the website – always ensuring that the
measurement conditions are the same. Clearly, with
properly administered electrical testing, there are
opportunities to save time and money. TE
October 2011 Transport Engineer