1
ASSEMBLY
VECTOR 1
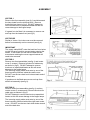
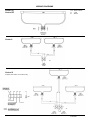
Remove the front assembly (see fig.1) and disconnect
the lamp leads from the terminal block. Remove
knockout(s) as shown in fig.2. DO NOT attempt to
remove knockouts on assembled heater as this will
cause damage to the fragile lamps.
If a guard is to be fitted it is necessary to remove one
end cap from the heater front (see fig.3).
VECTOR RP
Similar to Vector 1 but rain cover must be removed
before front assembly can be removed (see fig 4).
IMPORTANT
The supply cable MUST enter the back box from below
on this rain-proof model to prevent water entering the
heater. If the heater is to be wall mounted the two
screws/nuts retaining the cover support bracket will
need to be removed.
VECTOR II
Remove two front assemblies (see fig.1) and centre
cover (3 screws). Remove knockout for cable entry
as shown in (fig.2). DO NOT attempt to remove
knockout on assembled heater as this will cause
damage to the fragile lamps.
The incoming supply cable must enter by one of the
three knockout positions inside the centre cover.
DO NOT use the two chain hook holes at each end of
the back box.
If guards are to be fitted remove one end cap from
each front assembly (see fig.3).
VECTOR III
Remove three front assemblies (see fig.1) and two
centre covers (3 screws each). Remove knockout for
cable entry as shown in (fig.2).
DO NOT attempt to remove knockout on assembled
heater as this will cause damage to the fragile lamps.
The incoming supply cable must enter by one of the
three knockout positions behind the right hand centre
cover. DO NOT use the two chain hook holes at each
end of the back box.