1
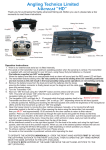
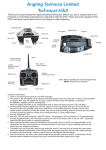
Angling Technics Limited
Microcat MkIII
Thank you for purchasing this highly advanced fishing aid. Before you use it, please take a few
moments to read these instructions in conjunction with the DVD. There are some aspects of the
DVD have been superceded due to the change in radio frequency.
Red LED
Carrying Handle
Blue LED
Battery Box
Charging Socket
Line Guides
On / Off Button
Pump Outlet
White LED
Pump Outlet
Yellow Power LED
Aerial
Trainer
Switches
(Non Functional)
Joystick
(Lights & Hopper
Release)
Blue Led
Hi / Low
Switch
(Non Functional)
Joystick
(Directional Steering)
Digital
Trims
Green LED
Hoppers
Battery Box
Note: When operating the boat the digital trims
MUST always be set centrally.
Digital Trims
Neck Strap
Mounting
Power LEDs
Power On / Off
Operation Instructions:
1. There is no external boat aerial as it is fitted internally.
2. The aerial an the transmitter has it optimum operating position when the aerial tip in vertical. The transmitter
is supplied with, and will operate for 24 hours, using Heavy Duty AA batteries i.e. Duracell.
The batteries supplied are NOT rechargeable.
When the battery level falls to an unacceptable level an alarm will sound and the LED’s will flash.
3. The transmitter features digital trims. Be very careful to ensure the digital trims are not moved as this will
result in the boat possibly losing some operations or not working correctly. All trims are set in the middle of
their movement. If they are moved they can be reset by holding down/up the trim until the middle is found.
At each end and the middle of the movement there is an audible bleep.
4. Turn the Transmitter “ON”.
5. Now turn “ON” the boat using the “ON/OFF” button. The boat will perform a self test and each of the
motors will run, for a second, in turn and the yellow LED will come “on”. This LED will remain “on”
while the boat is switched “on” even when the navigation lights are turned “off”.
6. The navigation LED’s will flash for 5-10 seconds while the boat registers itself to the Transmitter and
then the LED’s will remain “ON” or will go “OFF” depending where the left hand joystick is vertically
positioned.
7. Open the hopper doors by moving the door catches forwards manually, or by moving the left-hand
transmitter joystick to the left or right. When opening the doors using the transmitter (not manually)
then you MUST wait approximately15-20 seconds for the door catches to return to their natural
position. Place your line and hooked bait up through the open doors and guide the line(s) so that they
trail from the “Line Guides” at the stern of the boat, in the centre, and make sure exposed hooks are
kept clear of the top edge of the doors. Close the doors, which will lock in place, load your bait into
either or both hoppers ensuring the bait is away from the top of the doors.
8. Place the boat into the water and using the right-hand joystick steer the boat to its destination. At the
desired position release the bait and your rig by moving the left-hand joystick left or right depending
on which operation you require.
TO OPERATE THE HOPPERS INDIVIDUALLY - OPEN THE RIGHT HAND HOPPER FIRST BY
MOVING THE LEFT-HAND JOYSTICK TO THE RIGHT (3’OCLOCK). THEN TO OPEN THE LEFT
HAND HOPPER MOVE THE SAME JOYSTICK TO THE LEFT (9 O’CLOCK).
TO OPERATE BOTH HOPPERS AT THE SAME TIME MOVE THE LEFT-HAND JOYSTICK TO
THE LEFT (9’OCLOCK).
9. When the hopper(s) are released the boat LED’s will go “off” (provided you are using the boat with
the navigation lights “ON”) until the joystick is back in the central position and the hopper(s) have
opened. The hopper(s) can operate independently of the other controls so you can have the option
to release the bait while the boat is moving. When the bait and or line(s) have been released guide
the boat back to you.
10. To get a minimum turning circle simply ensure the boat is not moving and move the right-hand
joystick to the left or right (3 O’clock or 9 O’clock) leaving the joystick in the neutral position as
far as the forward and reverse is concerned.
11. Moving the left-hand joystick (light control) fully back towards yourself will turn the navigation
lights (LED’s) to the “OFF” position. As you move the same joystick slowly forwards the navigation
lights will come “ON” and gradually increase in brightness until they are fully “ON” when the lever
is fully forwards. When the LED’s are “OFF” they will only come back “ON” at half power (dim)
if the boat loses radio signal, and they will stay that way, and the boat will not move, until the
radio signal is restored.
12. Remove the Microcat from the water and gently close the hopper door(s). Switch “OFF” the boat
by pressing the button again.
13. Switch “OFF” the transmitter.
Lights.
Lights continuously “ON” - normal operation.
Dim lights
- radio signal failure to the boat.
Two /three second blink - hopper door(s) operated.
No lights
- transmitter set to “NO LIGHTS” mode.
Additional Operating Notes.
a. There is no mechanical rudder used in the boat. Its steering is achieved by altering the power of
the pumps.
b. The positions of the transmitter control joysticks are directly proportional to the pump power.
c. The boat possesses a very high degree of manoeuvrability, the maximum turning force being when
the throttle joystick is in the central position and the rudder joystick is at extreme right or left.
d. With the lights (LED’s) set to the “OFF” position there is no visual indication that the hopper doors
have opened.
e. If it appears that the boat is becoming exhausted and may not make it back to you, then let the
boat drift for a while and the batteries will recover enough energy to make the return. You may
need to do this a couple of times. It is recommended that a bankside or solar charger be used
to top up the batteries after every trip, while at the bankside.
f. If the pumps filters become blocked the steering of the boat may become impossible. Putting
the boat into reverse will not clear the filters. If the boat appears to have a blocked filter, let it drift
for a while as the offending blockage may fall away from the filter.
g. Should the boat take in water, holding the boat with its bow facing down should drain the water
from the forward drain holes. This practice is recommended at all times.
h. The boat can be used in wind and rain. If the situation gets very difficult while the boat is still on
the water, it should be driven into or away from the wind whichever is most convenient.
I. Do NOT use the boat in high winds and choppy conditions.
j. If the transmitter is turned “OFF” while the boat is still “ON” the boat lights and pumps may operate
erratically, this is not good practise.
k. The pumps may be operated out of water without fear of damage, unless fouled by a blockage,
which interferes with the impellers. Never try and remove anything that is fouling the impellers
with the batteries still connected.
l. There are differences between the DVD and your boat. These changes have been made to improve
the original system. These instructions supercede the DVD instructions.
m. It is important when the boat is not being charged that the supplied cover is placed over the charging
socket. This will prevent anything entering the connector and will help prevent corrosion.
n. If you are using trout pellets or similar sized bait, ensure it does not get caught between the highest
part of the door(s) and the hull as this may prevent the door(s) from opening fully.
o. Always pick up the boat gently as a fully loaded boat snatched up may cause excessive strain on
the handle and hull structure.
p. Whilst reversing the boat it may not reverse in a straight line, this is due to the shape of the rear of the
boat. To get the best results inch the boat backwards while moving the right hand joystick to the left or
right. This will provide steering in reverse.
Batteries & Charging: There is a mains powered charger supplied with the boat. The Boat
charger is capable of charging the boats batteries from fully discharged to fully charged in 18 - 20
hours. Under NO circumstances should the batteries for the boat be fully discharged before charging
as this can severely damage them. Boat battery charging can take place at any time without any
detrimental effect on their performance. If the batteries are not used for some time they will need
to be regularly charged ( at least every 8 weeks) to keep them in peak condition. Please always
disconnect and remove the batteries when the boat is in storage or being transported.
Do NOT under any circumstances use batteries other than 6 volt units as this will lead to
irreparable damage to your boat and will void the guarantee.
The Boat is charged while it is switched “off”.
If the boat is not going to be used for some months then every 6-8 weeks give the boat an overnight
charge to ensure the batteries remain fully charged.
All rechargeable batteries will remain highly efficient if stored and maintained in a fully charged
state. If the batteries are stored for long periods with very little or no charge in them, then you
will probably be in a situation where the batteries will not accept a charge at all.
The Transmitter is supplied with 4 off heavy duty none rechargeable AA batteries, which will operate the
transmitter for approximately 24 hours.
CARE OF YOUR EQUIPMENT.
1. Do NOT drop / severally knock the Microcat as this may damage internal parts.
2. It is recommended that the boat be wiped down with a damp cloth and allowed to dry out any
condensation in a warm and dry environment for a day or two with the battery boxes left out of
the boat.
3. Although the electronics are sealed, it is important that the boat and transmitter be stored in a warm,
dry place, in order to prevent condensation build up.
4. The transmitter should be protected from water / condensation at all times.
Fault Diagnosis
Problem
Cause
Action
Slow running motors
Boat battery(s) voltage low
Charge the boat battery(s)
Low radio range
Boat battery(s) need recharging
Transmitter batteries - low charge
Charge the boat batteries
Replace transmitter batteries
Motors run correctly but there
is no movement
Filter(s) blocked
Clean filter(s) either by hand
or by forcing water through
the outputs
Boat does not respond to
transmitter control and
appears “dead”
(a) Boat battery(s) is flat
(b) Transmitter batteries are flat
(a) Charge the boat battery(s)
(b) Replace transmitter
batteries
Door(s) open without
command / boat is out of
control
Radio interference from other
sources
Check other boats users for
common channel
Boat goes round in circles
/ difficult to steer
(a) Battery(s) low on boat
(b) Blocked filter(s)
(a) Charge battery(s)
(b) Clean filter(s)
Door(s) will not open
Boat battery(s) low
Charge boat battery(s)
Doors will not close
There is a delay of approx 15
Wait for the door catches to
secs between operating the door(s) return naturally
by radio and the catches returning
to their natural position. It is always
recommended that the doors be
opened by hand when loading rigs
and bait
Many things will cause radio interference with the boat including other boats users, CB radio, mobile
phones, emergency service radios, weather (especially rain) low battery levels, radio “dead spots”
(defined areas where the boat overwhelming point transmissions from unknown sources). If you
suspect it is a fault with the boat then, before contacting us, please try again on another water well
away the area. If you have any further questions regarding the boat, a technical helpline is available
on +44 (0) 1666 575144 or fax us on +44 (0) 1666 576300.
Your boat is guaranteed for 12 months from the date of purchase. The guarantee covers any defects
arising from faulty material or workmanship; it does not cover damage arising from improper use, or
normal wear of the boat or associated equipment. The guarantee is invalidated if unauthorised
persons undertake repairs or modifications.
To register your guarantee, please complete ALL of the following slip in BLOCK CAPITALS and return
it to;
Angling Technics Limited, Unit 5, Kemble Business Park, Crudwell, Wiltshire. SN16 9SH
Tel: +44 (0) 1666 575144
Fax: +44 (0) 1666 576300
Website: www.anglingtechnics.com
If the guarantee is not completed and returned then the warranty on the Microcat will be taken from
the date of manufacture.
Cut along the dotted line
..................................................................................................................................................................................
Microcat MkIII Guarantee
Boat Serial No:
Name:
Address:
Telephone:
Signed:
Date of Purchase:
Place of Purchase: