1
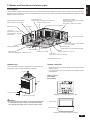
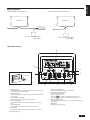
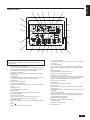
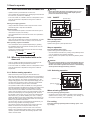
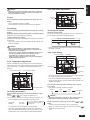
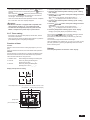
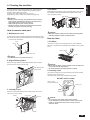
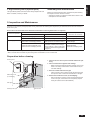
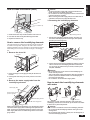
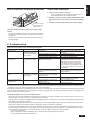
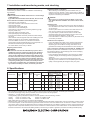
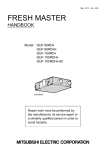
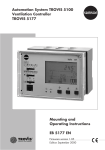
ENGLISH 1305875HJ1001 Fresh Master Models: GUF-50RDH4, GUF-50RD4 GUF-100RDH4, GUF-100RD4 Operating Instructions (For the user) Contents GUF-50RDH4 shown above. +XPLGL¿HUIXQFWLRQQRWDYDLODEOHRQ*8)5'DQG GUF-100RD4. English is original. The other languages versions are translation of the original. 1. Safety precautions............................................. 2-3 1.1. Installation ................................................... 2 1.2. During operation.......................................... 3 1.3. Disposing of the unit.................................... 3 2. Names and functions of various parts ............... 4-6 3. How to operate .................................................. 7-9 3.1. When interlocked with an indoor unit .......... 7 3.2. When not interlocked with an indoor unit .... 7 3.2.1. Before starting operation ........................ 7 3.2.2. ON/OFF.................................................. 7 3.2.3. Selecting operation ................................ 7 3.2.4. Temperature adjustment ........................ 8 3.2.5. Fan speed adjustment............................ 8 3.2.6. Time setting ............................................ 8 3.2.7. Timer setting .......................................... 9 4. Cleaning the machine.................................... 10-11 5. Inspection and maintenance (GUF-50-100RDH4 only)............................... 11-13 6. Troubleshooting .................................................. 13 7. Installation and transferring works, and checking ... 14 6SHFL¿FDWLRQV ..................................................... 14 Please read through these instructions in order to familiarize yourself with the proper and safe procedures for operating the Fresh Master. After reading this manual, keep it in an easily accessible and safe place for future reference. The warranty will not apply to damage resulting from failure to follow the warnings and precautions included in the Operating Instructions. For use with the R410A & R407C 1 ENGLISH 1. Safety precautions WARNING Prohibited Do not disassemble Do not wet Do not touch - Do not turn the remote controller on or off when ÀDPPDEOHJDVKDVOHDNHG ,WFRXOGFDWFK¿UHRUFDXVHH[SORVLRQZLWKVSDUNV released from electric contractor. Open windows to ventilate. - Don't operate with wet hands. - Electrical shock can result. Wet hands prohibited 8VHWKHVSHFL¿HGSRZHUVXSSO\DQGYROWDJH 8VHRILQFRUUHFWSRZHUVXSSO\FRXOGFDXVH¿UHRU - Do not modify or disassemble. electric shock. ,WFRXOGFDXVH¿UHHOHFWULFVKRFNRULQMXU\ - Make sure the power supply isolator is turned off on the power distribution panel before starting maintenance. - It could cause electric shock or injury if it is turned on. - Do not apply water to the unit and remote controller. The instructions - When any abnormal conditions (burning smell, or given must be - Electrical shock can result. others) are observed, stop operation, turn off the followed. power supply isolator on the power distribution 'RQRWSRNH\RXU¿QJHUVRUVWLFNVLQWRWKHDLU panel and consult your dealer. intake and outlet while the product is operating. - Continuing operation under such conditions could - Failure to heed this warning may result in injury. FDXVHHOHFWULFVKRFN¿UHRUGDPDJH CAUTION Prohibited - Do not place a burning appliance in a place where it is exposed directly to the wind from Fresh Master. - It could cause an accident as a result of incomplete combustion. - Don't operate with the "BY-PASS" when heating the room in winter. - Condensed water may drip from the unit and wet the surface of ceiling.) - Do not use at a place where exposed to high temperatures (40Û&RUKLJKHUQDNHGÀDPHVRULQ The instructions given must be environment with heavy fumes. followed. ,WFRXOGFDXVH¿UH - Do not use in an environment such as a chemical factory, where hazardous gases such as acidic gases, alkaline gases, organic solvent fumes, paint fumes, or gases containing corrosive components are generated. - It could malfunction. Before operating the unit, make sure you read all the “Safety precautions”. “Safety precautions” lists important points about safety. Please be sure to follow them. Symbols used in the text Warning: Describes precautions that should be observed to avoid the risk of injury or death to the user. Caution: Describes precautions that should be observed to prevent damage to the unit. Symbols used in the illustrations : Indicates that important instructions must be followed. : Indicates a part which must be grounded. : Beware of electric shock. (This symbol is displayed on the main unit label.) <Colour: Yellow> Warning: &DUHIXOO\UHDGWKHODEHOVDI¿[HGWRWKHPDLQXQLW - Securely install parts after maintenance. - It could cause injury if parts fall. - Put on gloves during maintenance. - It could cause injury. - Make sure the power supply isolator is turned off on the power distribution panel when Fresh Master is not used for a long period of time. ,WFRXOGFDXVHHOHFWULFVKRFNSRZHUOHDNDJHRU¿UH as a result of deteriorated insulation. - The appliance is not be used by children or persons with reduced physical, sensory or mental capabilities, or lack of experience and knowledge, unless they have been given supervision or instruction. Children should be supervised to ensure that they do not play with the appliance. 1.1. Installation After you have read this manual, keep it and the Installation Manual in a safe place for easy reference whenever a question arises. If the unit is going to be operated by another person, make sure that this manual is given to him or her. Warning: - 1HYHUFKDUJHDQ\W\SHVRIUHIULJHUDQWRWKHUWKDQWKRVHVSHFL¿HG by Mitsubishi Electric. Failure to follow this warning may result in YLRODWLRQRIODZRUEORZRXWH[SORVLRQRU¿UHZKHQWKHSURGXFWLV used, serviced, or disposed of. The types of refrigerant that can be XVHGDUHVSHFL¿HGLQWKHPDQXDOVXSSOLHGZLWKWKHSURGXFWRURQ the product nameplate. Mitsubishi Electric shall assume no liability for any damage, breakdown, malfunction, or accident resulting from WKHFKDUJLQJRIDUHIULJHUDQWQRWVSHFL¿HGE\0LWVXELVKL(OHFWULF - The unit should not be installed by the user. Ask the dealer or an authorized company to install the unit. If the unit is installed LPSURSHUO\ZDWHUOHDNDJHHOHFWULFVKRFNRU¿UHPD\UHVXOW - Use only accessories authorized by Mitsubishi Electric and ask your dealer or an authorized company to install them. If accessories are installed improperly, water leakage, electric VKRFNRU¿UHPD\UHVXOW - The Installation Manual details the suggested installation method. Any structural alteration necessary for installation must comply with local building code requirements. - Never repair the unit or transfer it to another site by yourself. If repair is performed improperly, water leakage, electric VKRFNRU¿UHPD\UHVXOW,I\RXQHHGWRKDYHWKHXQLWUHSDLUHG or moved, consult your dealer. - The appliance is not to be used by children or persons with reduced physical, sensory or mental capabilities, or lack of experience and knowledge, unless they have been given supervision or instruction. 2 1) Outdoor unit Warning: - The outdoor unit must be installed on a stable, level surface, in a place where there is no accumulation of snow, leaves or rubbish. - Do not stand on, or place any items on the unit. You may fall down or the item may fall, causing injury. Caution: - The outdoor unit should be installed in a location where air and noise emitted by the unit will not disturb the neighbours. 2) Fresh Master Warning: - The Fresh Master should be securely installed. If the unit is loosely mounted, it may fall, causing injury. 3) Remote controller Warning: - The Remote controller should be installed in such a way that children cannot play with it. 4) Drain hose - 1HYHULQVHUW¿QJHUVVWLFNVHWFLQWRWKHLQWDNHVRURXWOHWVRWKerwise injury may result, since the fan inside the unit rotates at high speed. Exercise particular care when children are present. - If you detect odd smells, stop using the unit, turn off the power switch and consult your dealer. Otherwise, a breakGRZQHOHFWULFVKRFNRU¿UHPD\UHVXOW - When you notice exceptionally abnormal noise or vibration, stop operation, turn off the power switch, and contact your dealer. - Do not leave handicapped people or infants sitting or standLQJLQWKHSDWKRIWKHDLUÀRZIURPWKH)UHVK0DVWHU7KLV could cause health problems. Caution: - Do not use any sharp object to push the buttons, as this may damage the Remote controller. - Do not twist or tug on the Remote controller cord as this may damage the Remote controller and cause malfunction. - Never remove the upper case of the Remote controller. It is dangerous to remove the upper case of the Remote controller and touch the printed circuit boards inside. Doing so can UHVXOWLQ¿UHDQGIDLOXUH - Never wipe the Remote controller with benzene, thinner, chemical rags, etc. Doing so can result in discoloration and failure. To remove heavy stains, soak a cloth in neutral detergent mixed with water, wring it out thoroughly, wipe the stains off, and wipe again with a dry cloth. - Never block or cover the Fresh Master or outdoor unit intakes or outlets. Tall items of furniture underneath the Fresh Master, or bulky items such as large boxes placed close to the RXWGRRUXQLWZLOOUHGXFHWKHXQLW VHI¿FLHQF\ 'RQRWGLUHFWWKHDLUÀRZDWSODQWVRUFDJHGSHWV Caution: - Make sure that the drain hose is installed so that drainage can go ahead smoothly. Incorrect installation may result in water leakage, causing damage to furniture. 5) Power Supply, fuse or circuit isolator Warning: - Make sure that the unit is powered by a dedicated power supply. Other appliances connected to the same power supply could cause an overload. - Make sure that there is a mains power switch. - Be sure to adhere to the unit's voltage and fuse or circuit isolator ratings. Never use a cable or a fuse with a higher rating WKDQWKHRQHVSHFL¿HG 6) Grounding Caution: - The unit must be properly grounded. Never connect the grounding wire to a gas pipe, water pipe, lightning conductor or telephone grounding wire. If the unit is not grounded properly, electric shock may result. - Check frequently that the ground wire from the outdoor unit is properly connected to both the unit's ground terminal and the grounding electrode. 1.2. During operation Warning: - Do not splash water over the unit and do not touch the unit with wet hands. An electric shock may result. - Do not spray combustible gas close to the unit. Fire may result. 'RQRWSODFHDJDVKHDWHURUDQ\RWKHURSHQÀDPHDSSOLDQFH where it will be exposed to the air discharged from the unit. Incomplete combustion may result. - Do not remove the front panel or the fan guard from the outdoor unit when it is running. You could be injured if you touch rotating, hot or high-voltage parts. In case of failure Warning: - Never remodel the Fresh Master. Consult your dealer for any repair service. Improper repair work can result in water leakDJHHOHFWULFVKRFN¿UHHWF - If the Remote controller displays an error indication, the Fresh Master does not run, or there is an abnormality, stop operation and contact your dealer. Leaving the unit as it is XQGHUVXFKFRQGLWLRQVFDQUHVXOWLQ¿UHRUIDLOXUH - If the power isolator is frequently activated, get in touch with \RXUGHDOHU/HDYLQJLWDVLWLVFDQUHVXOWLQ¿UHRUIDLOXUH - If the refrigeration gas blows out or leaks, stop the operation of the Fresh Master, thoroughly ventilate the room, and contact your dealer. Leaving the unit as it is can result in DFFLGHQWVGXHWRR[\JHQGH¿FLHQF\ When the Fresh Master is not to be used for a long time - If the Fresh Master is not to be used for a long time due to a seasonal change, etc., run it for 4 - 5 hours with the air blowing until the inside is completely dry. Failing to do so can result in the growth of unhygienic, unhealthy mold in scattered areas throughout the room. - When it is not to be used for an extended time, keep the power supply turned OFF. - If the power supply is kept on, several watts or several tens of watts will be wasted. Also, the accumulation of dust, etc., FDQUHVXOWLQ¿UH - Keep the power switched ON for more than 12 hours before starting operation. Do not turn the power supply OFF during seasons of heavy use. Doing so can result in failure. 1.3. Disposing of the unit Warning: - When you need to dispose of the unit, consult your dealer. If SLSHVDUHUHPRYHGLQFRUUHFWO\UHIULJHUDQWÀXRURFDUERQJDV may blow out and come into contact with your skin, causing injury. Releasing refrigerant into the atmosphere also damages the environment. 3 ENGLISH - Children should be supervised to ensure that they do not play with the appliance. Fresh Master The Fresh Master supplies clean air that is close to the indoor temperature and humidity by using the Lossnay ventilation function and the direct H[SDQVLRQFRLODLUFRQGLWLRQLQJIXQFWLRQ7KH)UHVK0DVWHUXVHVWKHKLJKHI¿FLHQF\¿OWHUIRUGXVWUHPRYDODQGSHUPHDEOH¿OPKXPLGL¿HUWRFUHDWH a pleasant indoor environment. 'LUHFWH[SDQVLRQFRLO +HDWVRUFRROVWKHDLUVXSSO\DIWHUKHDWH[FKDQJH +LJKHI¿FLHQF\¿OWHUV2SWLRQDOSDUWV Removes dust from the outside air. 3HUPHDEOH¿OPKXPLGL¿HU Performs clean humidifying of the air supply DIWHUKHDWH[FKDQJH Not available on GUF-50 and 100RD4 (OHFWURQLFH[SDQVLRQYDOYH Maintenance cover (for humidifying) Maintenance cover &RQWUROER[ Lossnay core Temperature and humidity are H[FKDQJHGEHWZHHQVXSSO\DLU DQGH[KDXVWDLU 'XFWFRQQHFWLRQÀDQJH Damper plate Switches between the Lossnay ventilation and normal ventilation. &HLOLQJVXVSHQVLRQ¿[WXUH Discharge valve Water supply tube 6XSSOLHVZDWHUWRWKHSHUPHDEOH¿OPKXPLGL¿HU Service valve Drain discharge hole ([KDXVWIDQ Strainer (O-ring installed) )DQXVHGWRH[SHOGLUW\DLUWRRXWVLGHRIWKHURRP $LU¿OWHU Prevents clogs in the Lossnay core Air supply fan Fan to supply outside air to the inside *GUF-50RDH4 shown above. Outdoor unit Remote controller Outdoor units differ according to systems and can sometimes be in FRQ¿JXUDWLRQRWKHUWKDQWKRVHGHVFULEHGLQWKLVPDQXDO - Check out your remote controller. Different controllers are used for different systems. * If you open the door, the name of the Remote controller is shown at the lower left. Air outlet Remote controller [PAR-21MAA] [PAR-F27MEA] Air inlet 78 78 456 Front panel (service panel) 901 456 23 901 23 Grounding conductor (Diagram of a controller with the door open.) Caution: - Carry out grounding work. Never connect the grounding wire to a gas pipe, water pipe, arrester, or telephone grounding wire. Improper grounding work can result in electric shock. Display section Operation section (Diagram of a controller with the door closed) 4 ENGLISH 2. Names and functions of various parts ENGLISH Wiring diagrams When interlocked with an indoor unit. When not interlocked with an indoor unit. Fresh Master Fresh Master Indoor Unit Transmission line Transmission line Remote controller (PAR-21MAA) (PAR-F27MEA) Remote controller (PAR-21MAA) (PAR-F27MEA) Operation section 4 8 1 7 0 Open the door. 6 1 [ON/OFF] Button After natives between run and stop every time it is pressed. The lamp on the button stays lit during operation. 2 [Ventilation] Button * Used when switching the ventilation of the Fresh Master between Stop, Low and High. 3 [Fan speed adjustment] Button Used to switch the fan speed between high and low. 4 [Time selection] Button Used to switch between the current time, starting time, and ending time. 5 [Time-setting] Button Used to set the current time, starting time, and ending time. 5 3 2 9 7 [Selecting operation] Button Used to switch between cooling, fan, and heating. 8 [Temperature adjustment] Button Used to set the temperature. Setting is made in units of 1°C. is pressed, the temperature goes up by 1°C. Every time is pressed, the temperature goes down by 1°C. Every time 9 [Checking/test run] Button Used only during checking test run. Never use this button during normal operation. 0 [Filter] Button 3UHVVHGWRUHVHWWKH¿OWHUVLJQ 6 [Timer] Button Used to switch between continuous operation and timer operation. * When interlocked only. 5 ENGLISH Display section C B A W V U D S E F R Q G P H I J K )RUSXUSRVHVRIH[SODQDWLRQDOOWKHGLVSOD\VRQWKLVSDJHDUH VKRZQLQWKHLUOLWFRQGLWLRQ7KLVFRQ¿JXUDWLRQGRHVQRWRFFXULQ the actual unit. A [Current/starting/ending time] Display When the time switch button is pressed, the current time, starting time and ending time are displayed for 10 seconds. During timer operation, WKHQH[WVWDUWLQJWLPHRUHQGLQJWLPHLVDOZD\VGLVSOD\HG B [Centralized control] Display 'LVSOD\HGZKHQFRQWUROLVH[HFXWHGE\DVHSDUDWHO\VROGFHQWUDOL]HG control unit, etc. C [Timer] Display This displays the modes of continuous operation/timer operation. Time is simultaneously displayed at the time of timer operation. D Operation mode Displays the status of operation. E [Preparing for Heating] Display Displayed from the start of heating operation until the moment warm air blows out. F [Defrosting] Display Displayed during defrosting operation. G [Checking] Display This displays indication when an abnormality occurs in the unit. H [Set temperature] Display Displays the set temperature. I [Address numbers of indoor unit/unit in linked motion] Display Displayed when some abnormality occurs in the unit. J [Error number] Display Displays the (4-digit) checking code when an abnormality occurs in the unit. ” K Display “ Displayed while the air conditioner is powered. T L M N O L [Louver operation] Display This displays the operation of a swing louver. This does not display in case of stop. M [Not available] Display When a button is pressed for any function that the indoor unit cannot SHUIRUPWKLVGLVSOD\ÀDVKHVFRQFXUUHQWO\ZLWKWKHGLVSOD\RIWKDWIXQFtion. N [Ventilation] Display * Displayed during the Fresh Master's operation. O [Position of built-in room temperature sensor] P [Set effective for one hour] Display Displays when the low air blow, downward blow, or horizontal blow (differs according to model) are set in the air-cooling and electronics dry operation. This display disappears after the elapse of one hour. Q [Now checking/test run] Display R [Filter] Display 'LVSOD\HGZKHQLWLVWLPHWRFOHDQWKH¿OWHU S [Sensor] Display Shows a position of the sensor that measures the room temperature. T [Operation] Lamp /LJKWVXSGXULQJRSHUDWLRQJRHVRIIGXULQJVWRSDQGÀDVKHVLQFDVHRI abnormality. U [Room temperature] Display Displays the temperature of the air sucked in during operation. The range of display is 8°C to 39°C. For temperatures outside this range, WKHGLVSOD\ÀDVKHVDW&DQG& V >8SGRZQDLUÀRZGLUHFWLRQ@'LVSOD\ Displays the air blowout direction with a mark. W [Fan speed] Display Displays the selected fan speed. * When interlocked only. 6 3.1. When interlocked with an indoor unit - Operation will be synchronized with an indoor unit. 7KHKXPLGL¿HUZLOOEHRSHUDWHGE\WKHKHDWLQJVLJQDOUHFHLYHGIURP the indoor unit. (For GUF-50, 100RDH4) - In the case of GUF-50, 100RDH4, there is no temperature control since the temperature is adjusted according to the outside air temperature. Warning: &KHFNDQGFRQ¿UPWKHSRZHUFLUFXLWEHIRUHXVH)RUFRQtents, refer to the previously described chapter [Crucial points to be observed for safety]. 3.2.2 ON/OFF Operation lamp Starting and stopping operation - Using the Remote controller to start or stop the indoor unit will automatically start or stop the Fresh Master. Operation modes [ON/OFF] button - The Fresh Master will operate in the same mode as the synchronized indoor unit (heat, cool and fan). - The Fresh Master will be cool when the indoor unit is operated in dry mode. When using with multiple indoor units - When using with multiple indoor units that are set differently, the Fresh Master will operate in the mode with priority of: heat, cool and fan. Start an operation When operating only the Fresh Master Operation lamp lights up and operation starts. - The Fresh Master can be operated independently by pressing the Ventilation button on the Remote controller (in this case, the operation mode will be fan). Stop an operation - Pressing the Ventilation button each time will switch the display between Stop, Low and High. Stop Low High 3.2. When not interlocked with an indoor unit - GUF-50, 100RD4 will adjust the temperature according to the indoor temperature set using the Remote controller. - In the case of GUF-50, 100RDH4, there is no temperature control since the temperature is adjusted according to the outside air temperature. Press [ON/OFF] button Press the [ON/OFF] button again Operation lamp goes off and operation stops. - Once the buttons have been set, pressing of the [ON/OFF] button only can repeat the same operation thereafter. - During operation, the operation lamp above the [ON/OFF] button lights up. Caution: - Even if the operation button is pressed immediately after the operation has stopped, operation will not restart for about 3 minutes. This function protects the machine. It automatically starts operation after approximately 3 minutes. 3.2.3. Selecting operation 3.2.1. Before starting operation - Make sure that the power supply is turned ON before use. (Keep the power supply turned ON at all times when the Fresh Master is in use. Use of the unit without power can result in compressor failure.) - Start running after the “HO” display has disappeared. The “HO” GLVSOD\EULHÀ\DSSHDUVRQWKHURRPWHPSHUDWXUHGLVSOD\PD[ minutes) when the power is turned on and after a power failure. This does not indicate any failure of the Fresh Master. - The operation modes of the Fresh Master air-cooling operation and heating operation are different from those of the outdoor units. When the operation is started with cooling/heating and other indoor units or the Fresh Master connected to the counterpart outdoor units are already running in the same operation mode, the Remote controller displays air-cooling/heating mode. However, the operation comes to stop, and you cannot get a desired mode. :KHQWKLVRFFXUV\RXZLOOEHQRWL¿HGE\WKH³FRRO´RU³KHDWLQJ´ GLVSOD\WKDWÀDVKHVLQWKHOLTXLGFU\VWDOGLVSOD\RIWKH5HPRWHFRQtroller. Set to the operation mode of other indoor unit or the Fresh Master by the operation switch button. The above does not apply to the models that simultaneously run both the cooling operation and heating operation. - The outdoor units stop when all the indoor units and the Fresh Master connected to the counterpart outdoor units stop. Operation mode [selecting operation] button When selecting operation Press the [selecting operation] button - Consecutive press of the selecting operation button switches the operation over to “cooling,” “fan,” “(automatic),” and “heating.” For the contents of operation, check the display. For cooling Press the [selecting operation] button and bring up the “cooling” display - During heating operation, even if the indoor unit or the Fresh Master is set to operation while the outdoor unit is in defrosting operation, operation starts after the defrosting operation of the outdoor unit has ended. 7 ENGLISH 3. How to operate ENGLISH 3.2.5. Fan speed adjustment Caution: - Never expose your body directly to cool air for a long time. Excessive exposure to cool air is bad for your health, and should therefore be avoided. For fan Press the [selecting operation] button and bring up the “fan” display. Fan speed display - The fan operation functions to ventilate. [fan speed] button - The temperature of the room cannot be set by fan operation. For heating Press the [selecting operation] button to bring up the “heating” display. Regarding displays during heating operation “Under defrosting” Displayed only during the defrosting operation. To change fan speed Set the desired fan speed Every time you press the [fan speed] button once, it switches from the low-speed or high-speed settings alternatively. “Under preparation for heating” Displayed from the start of heating operation until the moment warm air blows out. Display of the Remote controller Low High :KHQLQWKH³KHDWLQJ´PRGHWKHKXPLGL¿HUZLOODOVRRSHUDWH)RU GUF-50, 100RDH4) Caution: - When the Fresh Master is used together with burners. - Never place a burner at a place where it is exposed to the DLUÀRZIURPWKH)UHVK0DVWHU Doing so can result in imperfect combustion of the burner. - The microcomputer functions in the following cases: The intake fan is not moving at the set speed. Intake fan stops to prevent any cool air from escaping during the defrosting operation. * Every time the fan speed adjustment button is once pressed, the fan speed is changed. 3.2.6. Time setting Current time display Time display 3.2.4. Temperature adjustment GUF-50, 100RDH4 are OA processing unit and cannot adjust the indoor temperature, even if the procedures given below are followed. In the case of GUF-50, 100RD4, the indoor temperature can be adjusted. Set temperature display [time selection] button [timer] button Room temperature display [time setting] button - Set the current time after turning ON the power of the Fresh Master or after restoration from a power failure. - It can be set regardless of the operation of the Fresh Master. - During the time operation, the time-setting button becomes void, disabling time setting. Press the [time selection] button and bring up the “current time” display [temperature] button “current” time To change temperature Press the temperature button and set the temperature of your choice or once changes the setting by 1°C. Pressing If the pressing is continued, the setting continues to change by 1°C. - Indoor temperature can be set within the following range. Cooling/dry Heating 19 to 30°C 17 to 28°C - Every time it is pressed, the display changes. In the case of GUF-50, 100RDH4, set the temperature the same as the indoor unit. “start” time “end” time (no display) Caution: - When the current time is not yet set, the “current” time disSOD\ÀDVKHVGLVDEOLQJWKHVHWWLQJRIWLPHURSHUDWLRQ Set the current time by pressing the time setting button or - The time cannot be set while the “[timer]” is displayed. - It is impossible to set the temperature in fan operation. * The range of temperature display is 8°C to 39°C. Outside this UDQJHWKHGLVSOD\ÀDVKHVHLWKHU&WR&WRLQIRUP\RXLIWKH temperature is lower or higher than the displayed temperature. - While the “CLOCK” time is displayed, press the time setting buttons and set the time. / 8 - About 10 seconds after the button operation has been completed, the “current time” and “time” displays disappear. Caution: 7KH5HPRWHFRQWUROOHULVHTXLSSHGZLWKDVLPSOL¿HGFORFN with a precision of about + or - one minute per month. - The time must be readjusted (reset) every time the Fresh Master is subjected to a power stop or a power failure. 3.2.7. Timer setting - If the timer is set, the unit starts (stops) at the set time, and the time mode is terminated. :KHQ\RXZLVKWRFRQ¿UPWKHVWDUWLQJDQGHQGLQJWLPHSUHVVWKH [time selection] button while [timer] is displayed. Function of timer On-timer Set the on-timer for the time the working day begins in your company. When the set start time arrives, the Fresh Master starts operation. 1 Press the [timer] button and erase the “timer” display 2 Press the [time selection] button and bring up the “starting time” display 3 Press the ( ) button of the [time setting] and set the starting time When using it as an off-timer, set the starting time to “__ : __ ”. 7KH³BBBB´LVGLVSOD\HGQH[WWRWKHWLPHLH 4 Press the [time selection] button and bring up the “ending time” display 5 Press the ( ) button of the [time setting] and set the ending time When using it as an on-timer, set the ending time to “__ : __ ”. 7KH³BBBB´LVGLVSOD\HGQH[WWRWKHWLPHLH 6 Press the [timer] button and bring up the “timer” display Bringing up the [timer] display completes the setting. Every time the ( ) button of the [timer setting] is pressed once, it advances (or goes back) by 10 minutes. If the button is pressed continuously, it advances (or goes back) continuously. First set the hour digit and then set the minute digit. When the ON/OFF timer mode is set, you can run (on-timer) or stop (off-timer) operation by pressing the [ON/OFF] button even when there is remaining time. Release Press the [timer] button and erase the “timer” display. Off-timer Use the off-timer as a reminder to turn off the Fresh Master. When the set end-work time arrives, the Fresh Master stops operation. There are three methods for using the timer. 1. ON/OFF Timer When setting both starting and ending time 2. On-timer When only setting the starting time 3. Off-timer When only setting the ending time (Ending time is set to “__ : __ ”) (Starting time is set to “__ : __ ”) Display example of timer setting ON OFF ON OFF 7KHH[DPSOHVKRZVDWLPHUVHWIRURSHUDWLRQVWDUWDWDQGHQGDW [Timer] display [Starting/ending time] display [Timer] button [Time selection] button [Time setting] button 9 ENGLISH button is - The setting advances one minute every time the pressed, and goes back one minute every time the button is pressed. When respective buttons are pressed continuously, / the time display goes fast forward. It advances in the order of 1 minute digit - 10 minute digit - one hour digit. 7RSUHYHQWGHFOLQHLQWKH/RVVQD\SHUIRUPDQFHFOHDQWKHDLU¿OWHU DQG/RVVQD\FRUHDVZHOODVUHSODFHWKHKLJKHI¿FLHQF\¿OWHUV $LU¿OWHUFOHDQDWOHDVWRQFHD\HDU (Lossnay core: clean at least once every 2 years) +LJKHI¿FLHQF\¿OWHUVUHSODFHHYHU\KRXUVDSSUR[ $LU¿OWHUV $IWHUSXOOLQJRXWWKH/RVVQD\FRUHVXQGR¿OWHUJXLGHVWKHQUHPRYH WKHDLU¿OWHUVORFDWHGDWWKHERWWRPOHIWDQGULJKWRIWKH/RVVQD\ FRUHVDVEHORZ¿OWHUV Filter stopper Caution: - Before you start cleaning, stop operation and turn OFF the power supply. Remember that the fan is rotating inside at high speed, posing a serious risk of injury. - Always wear gloves when cleaning the unit. - Maintenance work should only be performed by someone who has received the necessary training. Filter guide How to remove each part Caution: 1. Maintenance cover (1) Remove the screw (one piece) left side of the Maintenance cover. (2) Pull back the hinges, open the Maintenance cover and disengage the cover from the catches. Catch %RZ¿OWHUVWRSSHUVDOLWWOHWRUHPRYHWKHPIURP¿OWHUJXLGH 7DNH¿OWHUVWRSSHUVFDUHIXOQRWWREUHDNWKHP How to clean $LU¿OWHUV Screw Use a vacuum cleaner to remove light dust. To remove stubborn dirt wash in a mild solution of detergent and lukewarm water. (under Û& Vacuum cleaner Maintenance cover $LU¿OWHU Caution - The Maintenance cover must be removed. +LJKHI¿FLHQF\¿OWHUV 5HPRYHWKHKLJKHI¿FLHQF\¿OWHUV2SWLRQDOSDUWVIURPWKHXSSHU right side of the Lossnay cores (2 units). +LJKHI¿FLHQF\¿OWHUV (Optional part) Caution: 1HYHUZDVKWKH¿OWHUVLQYHU\KRWZDWHURI&RUKRWWHUDQG never wash them by rubbing them. 'RQRWGU\WKH¿OWHUVE\H[SRVLQJWKHPWRDÀDPH 2. Lossnay cores 8VHDYDFXXPFOHDQHUWRVXFNXSWKHGXVWDQGGLUWRQWKHH[SRVHG surfaces of the Lossnay cores. 8VHDVRIWEUXVKRQO\WRFOHDQH[SRVHGVXUIDFHDUHDV Do NOT wash in water. Vacuum cleaner (with brush attachment) Lossnay core 3. Lossnay cores Take hold of the handle and draw the Lossnay cores out from the main unit (2 Lossnay cores) Handle Lossnay core Main unit Caution: - Do not use the hard nozzle of the vacuum cleaner. If may damage the exposed surfaces of the Lossnay cores. - Under no circumstances should the Lossnay cores be washed in water. $LU¿OWHU 10 ENGLISH 4. Cleaning the machine Assembly after maintenance 7KHKLJKHI¿FLHQF\¿OWHUVFDQQRWEHUHXVHG$OZD\VUHSODFHZLWKQHZ ¿OWHUV)RUGHWDLOVFRQVXOW\RXUGHDOHU Bearing in mind the following points, assemble the parts following WKHVHTXHQFHIRUWKHLUUHPRYDOLQUHYHUVH $UUDQJHWKH/RVVQD\FRUHZLWKWKHDLU¿OWHUVLGHDVVKRZQLQWKH name plate on the Fresh Master. 5. Inspection and Maintenance ,IWKHXQLWLVWREHXVHGIRUSURORQJHGSHULRGVRIWLPHSOHDVHKDYHWKHIROORZLQJLWHPVLQVSHFWHGE\DQDXWKRUL]HGVHUYLFHRI¿FHDWLQWHUYDOVRI about once a year. Be sure to turn off the isolator of the distribution board before conducting maintenance or inspection. Part to be inspected Strainer Humidifying elements Description of maintenance and inspection Inspection item Action to take 3RVVLEOHFRQVHTXHQFHLIPDLQtenance is not conducted Inspect for dust clogging. Remove and clean the dust if clogged. Unable to humidify Inspect for cracks in O-rings. Replace the O-rings if cracked. *Note 1 Water leakage Inspect for water leakage from the surface of each of humidifying element. Replace the humidifying element if water spurts from its surface. *Note 2 Water leakage Inspect for dust and particles on the surface of each humidifying element. If the air pathway is covered by dust or particles, carefully clean it using a vacuum cleaner, or wash it with water by referring to the cleaning procedure on page 12. 5HGXFHGDLUÀRZ Reduced humidifying power * Note 1: Replacement O-rings: Commercially available O-rings P22A and P20 * Note 2: A small amount of water may form through dew condensation, but it is not abnormal. Preparation before cleaning Mounting screw 1. Close the service valve to prevent residual water from spattering. 2. Take a countermeasure against water leakage. - Water inside the humidifying elements will leak. Place a vinyl sheet in the ceiling or take another countermeasure to prevent water leakage. 3. Drain the residual water from the pipe. - Place a bucket or other container under the discharge valve and open the valve to collect the residual water in the pipe. Maintenance cover (for humidifying) 4. Remove the maintenance cover (for humidifying). - Remove the seven mounting screws, slide the maintenance cover to the right, and remove it from the potbelly-shaped KROHVVL[ORFDWLRQVIRUWKH*8)5'+ Drain pipe Discharge valve Service valve 11 ENGLISH +LJKHI¿FLHQF\¿OWHUV2SWLRQDOSDUWV - To remove the water supply tube, hold and slide the hose bands and remove the water supply tube. - Do not remove the water supply tube from the solenoid valve unit with a pressure regulator. - When removing the water supply tube, be sure that water is collected on the drain tray inside the main unit. Strainer 3. Removing the humidifying elements Filter Strainer cap O-ring (P20) O-ring (P22A) Humidifying element 1. Rotate the strainer cap counterclockwise and remove it. 8VHZDWHUWRZDVKRIIDQ\GLUWDGKHULQJWRWKH¿OWHU 3. Replace the strainer cap. How to remove the humidifying elements 7KHKHDWH[FKDQJHULVORFDWHGRQWKHOHIWVLGHDQGWKHKDQJLQJEROW is located on the right side. Swing the rear side of each of the humidifying elements to the right, and take out the humidifying element ZKLOHPDNLQJVXUHQRWWRWRXFKWKHKHDWH[FKDQJHURUWKHKDQJLQJ bolt. 3XOOWKH¿UVWKXPLGLI\LQJHOHPHQWIRUZDUGVZLQJWKHUHDU side of the humidifying element to the right, lift it upward, and then pull it out diagonally. Model name GUF-50RDH4 GUF-100RDH4 Quantity 2 4 Humidifying element 1. Remove the inner lid. Inner lid Grip part Rod for removal of the humidifying elements 2. For the third and subsequent humidifying elements, pull the rod for removal of the humidifying elements forward until you can reach an element with your hands, and then pull it out (GUF-100RDH4). Caution: 3ODFH\RXU¿QJHUVRQWKHJULSSDUWDQGSXOOWKHLQQHUOLG forward. 2. Holding both ends with your hands, pull the inner lid forward. 2. Remove the water supply tube from the humidifying element. Water supply tube - Do not separate the rod for removal of the humidifying elements from the product. - Take out the water supply tube together with the humidifying element. (Collect the residual water in the humidifying element using the drain tray.) - Do not bend or stretch the water supply tubes. How to wash the humidifying elements with water [6] [5] Solenoid valve unit with pressure regulator [4] [3] [2] [1] Scrub brush Humidifying element Water supply tube Hose band +ROGLQJWKHKRVHEDQGVLQGLFDWHGE\>@WR>@ZLWK\RXU¿QJHUV remove the water supply tubes. Referring to the procedure entitled “removing the humidifying elements” below, remove the water supply tube at the rear while taking out the front humidifying element. Hose Fill a bucket or other container with water, then shake each KXPLGLI\LQJHOHPHQWIRXUWR¿YHWLPHVXSDQGGRZQLQWKHZDWHU to wash out any dust and particles. Caution: - Do not use a scrub brush to clean the humidifying elements. - Do not hose off the humidifying elements. Doing do so will damage them. 'RQRWXVHKRWZDWHURI&RUKRWWHUQRUXVHGHWHUJHQWVWR clean the humidifying elements. 12 ENGLISH Caution: +RZWRFOHDQWKHVWUDLQHU¿OWHU ENGLISH How to install the humidifying elements Check after inspection 1. Open the service valve as necessary. 6LQFHKXPLGL¿FDWLRQLVQRWQHHGHGGXULQJWKHVXPPHULWLV recommended that the service valve be closed. 'XULQJWKHZLQWHUWKHVHDVRQUHTXLULQJKXPLGL¿FDWLRQPDNH sure that the power to the heater for prevention of freezing is on. Rod for removal of the humidifying elements (original position) &RQGXFWDWHVWDQGFRQ¿UPWKDWWKHUHLVQRZDWHUOHDNDJH Install the humidifying elements in the reverse order of their removal. - For the GUF-100RDH4, return the rod for removal of the humidifying elements to its original position, and then insert the humidifying elements. - Securely connect the water supply tubes and make sure there is no water leakage. 6. Troubleshooting Before you ask for repair service, check the following points: State of Machine It does not run. Cool air or warm air does not come out. ,WUXQVEULHÀ\EXWVRRQ stops Do not humidify (GUF-50, 100RDH4 only) Remote Controller “ ” display is not lit up No display appears even when the [ON/OFF] button is pressed. 7KHOLTXLGFU\VWDOGLVSOD\ shows that it is in operation. The “check” and check FRGHÀDVKHVRQWKHOLTXLG crystal display. Cause Power failure The power supply is turned OFF. The fuse in the power supply is gone. The earth leakage isolator is gone. The restart-preventing circuit is in operation for 3 minutes. Fresh Master operation is started during the heating and defrosting operation. There are some obstacles at the air inlet and outlet of the Fresh Master and outdoor unit. 7KH¿OWHUVDUH¿OOHGZLWKGXVWDQGGLUW The Fresh Master is not set to the “heating” mode. Water is not supplied. Troubleshooting Press the [ON/OFF] button after power restoration. Turn the power supply ON. Replace fuse. Put in the earth leakage isolator. Wait for a while. (To protect the compressor, a 3-minute restart-preventing circuit is built into the Fresh Master. Therefore, there are occasions sometimes when the compressor does not start running immediately. There are cases when it does not run for as long as 3 minutes.) Wait for a while. (Heating operation starts after ending defrosting operation.) Rerun after removal 5HUXQDIWHUFOHDQLQJWKH¿OWHUV5HIHUWR page 10 [Cleaning the machine].) Set to the “heating” mode. Open the service valve. - If operation stops due to a power failure, the [restart-preventing circuit at power failure] functions and disables operation, even after power restoration. In this case, press the [ON/OFF] button again and start operation. If malfunctions persist after you have checked the above, turn the power supply OFF and contact your dealer with information about the product QDPHWKHQDWXUHRIWKHPDOIXQFWLRQHWF,IWKHGLVSOD\RI³>FKHFN@´DQGGLJLWFKHFNFRGHÀDVKHVWHOOWKHGHDOHUFRQWHQWVRIWKHGLVSOD\FKHFN code). Never attempt to repair by yourself. The following symptoms are not the Fresh Master failures: - The air blown out from the Fresh Master can sometimes give off odours. This is due to cigarette smoke contained in the air of the room, the smell of cosmetics, the walls, furniture, etc., absorbed in the Fresh Master. $KLVVLQJQRLVHFDQEHKHDUGLPPHGLDWHO\DIWHUWKH)UHVK0DVWHULVVWDUWHGRUVWRSSHG7KLVLVWKHVRXQGRIWKHUHIULJHUDWLRQÀRZLQJLQVLGHWKH )UHVK0DVWHU7KHSUREOHPLVLQVLJQL¿FDQW - The Fresh Master sometimes snaps or clicks at the beginning or end of cooling/heating operation. This is the sound of friction on the metal VHFWLRQVGXHWRLQÀDWLRQDQGFRQWUDFWLRQFDXVHGE\WHPSHUDWXUHFKDQJH7KHSUREOHPLVLQVLJQL¿FDQW ,WLVUHFRPPHQGHGWKDWWKHDLUEORZQRXWIURPWKH)UHVK0DVWHUEHGLUHFWHGWRWKHDLUFRQGLWLRQHU¿UVWDQGWKHQGLUHFWHGLQWRWKHURRP+RZever, the air may be directed from the Fresh Master to the room without going through the air conditioner. In this air-blowing method, cold air blows out during heating operation in the cases listed below. In that case, please change the air-blowing method. - At the start of an operation - When an operation is restarted immediately after an operation has been stopped (within 3 minutes) - During a defrosting operation of the outdoor unit 13 Regarding place for installation Consult with your dealer for details on installation and transferring the installation. Caution: - Never install the Fresh Master where there is a risk of leakage RIÀDPPDEOHJDV ,IJDVOHDNVDQGDFFXPXODWHVDURXQGWKHXQLW¿UHFDQUHVXOW Never install the Fresh Master at the following place: - where there is much machine oil - near ocean and beach areas where there is much salt - where humidity is high - where there are hot springs nearby - where there is much sulfureted gas ZKHUHWKHUHLVDKLJKIUHTXHQF\SURFHVVLQJPDFKLQHU\DKLJK IUHTXHQF\ZHOGHUHWF ZKHUHDFLGVROXWLRQLVIUHTXHQWO\XVHG ZKHUHVSHFLDOVSUD\VDUHIUHTXHQWO\XVHG - Install the Fresh Master horizontally. Otherwise, water leakage can result. 7DNHVXI¿FLHQWPHDVXUHVDJDLQVWQRLVHZKHQLQVWDOOLQJWKH)UHVK Master at hospitals or communication-related businesses. If the Fresh Master is used in any of the above-mentioned HQYLURQPHQWVIUHTXHQWRSHUDWLRQDOIDLOXUHFDQEHH[SHFWHG,WLV advisable to avoid these types of installation sites. For further details, consult with your dealer. Regarding electrical work Caution: - The electrical work must be undertaken by a person who is TXDOL¿HGDVDQHOHFWULFHQJLQHHUDFFRUGLQJWRWKH>WHFKQLFDO standard respecting electrical installation], [internal wiring rules], and the installation instruction manual with the absolute use of exclusive circuits. The use of other products with the power source can result in burnt-out beakers and fuses. - Never connect the grounding wire to a gas pipe, water pipe, arrester, or telephone grounding wire. For details, consult with your dealer. - In some types of installation sites, the installation of an earth leakage isolator is mandatory. For details, consult with your dealer. Regarding transfer of installation - When removing and reinstalling the Fresh Master when you enlarge your home, remodel, or move, consult with your dealer in advance to ascertain the cost of the professional engineering work UHTXLUHGIRUWUDQVIHUULQJWKHLQVWDOODWLRQ Caution: - When moving or reinstalling the Fresh Master, consult with your dealer. Defective installation can result in electric shock, ¿UHHWF Regarding noise - In installing work, choose a place that can fully bear the weight of the Fresh Master and outdoor unit, and where noise and vibration can be reduced. - Choose a place where cool or warm air and noise from the outdoor unit's air outlet do not inconvenience the neighbors. - If any alien object is placed near the outdoor unit's air outlet, decreased performance and increased noise can result. Avoid placing any obstacles adjacent to the air outlet. - If the Fresh Master or outdoor unit produces any abnormal sound, consult with your dealer. Maintenance and inspection - If the Fresh Master and outdoor unit is used throughout several seasons, the insides can get dirty, reducing the performance. Depending upon the conditions of usage, foul odours can be generated and drainage can deteriorate due to dust and dirt, etc. Time to change the humidifying element (GUF-50, 100RDH4 only) Because impurities and contamination in tap water accumulate on the humidifying element, the humidifying power of the humidifying element decreases gradually. - If the humidifying power decreases in the course of use, please consider changing the humidifying element (chargeable to the customer). - Although the time to change the humidifying element varies depending on the conditions such as the operating time and water TXDOLW\LWVKRXOGJHQHUDOO\EHFKDQJHGDWHYHU\¿YH\HDUV 6SHFL¿FDWLRQV ([WHUQDODLUORDGKHDWSURHu(TXLYDOHQW cessing capability (kw) Noise Weight Model name midifying indoor unit Heating (dB) (kg) Cooling volume capability capability capability 5.57 6.21 GUF-50RDH4 1.15 235-265 500 139 2.70 33.5-34.5 57 P32 (1.94) (2.04) 11.44 12.56 GUF-100RDH4 2.20 480-505 1,000 278 5.40 38-39 98 P63 Single(4.12) (4.26) phase 50 5.57 6.21 220-240 GUF-50RD4 1.15 235-265 500 139 33.5-34.5 54 P32 (1.94) (2.04) 11.44 12.56 GUF-100RD4 2.20 480-505 1,000 278 38-39 92 P63 (4.12) (4.26) - 7KHYDOXHVJLYHQLQWKHWDEOHIRUWKHQRLVHOHYHOUHÀHFWWKHOHYHOVPHDVXUHGDWDSRVLWLRQPHWHUVLPPHGLDWHO\EHORZWKHXQLWLQDQDQHFKRLFFKDPEHU - The noise at the air outlets (at a 45° angle, 1.5 meters in front) is about 5-6 dB (A) higher than the values given in the table. - The above values apply during Lossnay ventilation when the fan speed is set to high speed. * Capacity in ( ) is heat recovery capacity by Lossnay core. &RROLQJ+HDWLQJFDSDFLW\LQGLFDWHVWKHPD[LPXPYDOXHDWRSHUDWLRQXQGHUWKHIROORZLQJFRQGLWLRQ Cooling: Indoor: 27°C DB/19°C WB Outdoor: 35°C DB/24°C WB Heating: Indoor: 20°C DB/13.8°C WB Outdoor: 7°C DB/6°C WB - Noise measurement is carried out in accordance with JIS B8628. * Mitsubishi Electric measures products according to Japan Industrial Standard (JIS B 8628), therefore Q-H curves are measured by chamber method. * In the United Kingdam, on-site measurements by pitot tube method could be as much 20% difference from JIS test room conditions. If the measXULQJSRLQWLVFORVHWRVRXUFHVRIWXUEXOHQFHOLNHEHQGVFRQWUDFWLRQVDQGGDPSHUVHWFLWLVGLI¿FXOWWRPHDVXUHDLUYROXPHFRUUHFWO\$VWUDLJKWGXFW length more than 10D (D=duct diameter) from the source of turbulence is recommended for correct measurement. On-site measurement should therefore be measured in accordance with BSRIA guideline (Commissioning Air System. Application procedures for buildings AG3/89.3(2001)) Power supply (V) Air volume Power )UHTXHQF\ Current consumption (Hz) (A) (W) m3/h L/S 14 ENGLISH 7. Installation and transferring works, and checking