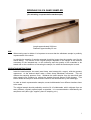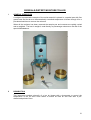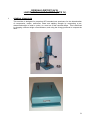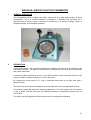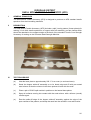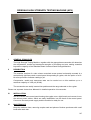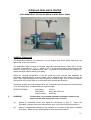
1
FOUNDRY
SAND
TESTING
EQUIPMENT
OPERATING
INSTRUCTIONS
(AFS)
RIDSDALE & CO LTD.
Registered Office
NEWHAM HALL, NEWBY,
MIDDLESBROUGH,
TS8 9EA, ENGLAND
Registration No: 307575 ENGLAND
(Telephone:
+44 (0) 1642 300500)
(Fax: ………..
+44 (0) 1642 315209)
(Email: ……….. [email protected])
(Website:………..
www.basrid.co.uk)
British Licensees of
Dietert Foundry Testing Equipment Inc.
Detroit, USA
INDEX
AFS EQUIPMENT
Item
Ref No
No 42-CE
No 42-CE
No 44-CHT
No 28-CPT
No 14-DB
No 27-EPM
No 48-FHY
No 41-GD
No 31-GCSM
No 42-GHT (B)
No 43-GHT (C)
No 49-HSTM
No 51-TNSA (H)
No 52-TRSA (H)
No 46-IPT
No 25-LCO
No 52-CTPB
No 9-LM
No 10-LSM
No 15-LSR
No 17-CMT
No 22-CGA
No 16-DEI
No 18-FLI
No 15-RB
No 21-SST
No 19-TNRA
No 20-TRRA
No 5-MBCT
No 12-MBL
No 11-MTL
No 29-MPA
No 45-MST
No 50-PBT
No 26-SPM
No 4-RSW
No 7-SSST
No 30-SIT
No 23-STNA
No 24-STRA
No 3-SSS
No 14-SWS
No 6-UCTA
No 32-USSM (ho)
No 33-USSM (md)
No 35-HDS
No 34-SSA
No 40-SPA
No 36-TNCA
No 37-TRCA
No 38-TRSA
Description
Calibration Equipment (Proving Ring) .........................................................
Calibration Equipment (Test Type Permeability Standards) .....................
Core Hardness Tester
.............................................................
Core Permeability Tube
.............................................................
Digital Balance ..........................................................................................
Electric Permmeter
................................................
Foundry Hydrometer
..............................................................................
Gas Determinator
.............................................................
Green Compression Strength Machine
................................................
Green Hardness Tester ‘B’ Scale .............................................................
Green Hardness Tester ‘C’ Scale .............................................................
High Strength Testing Machine (HSTM) ..................................................
- Tensile Core Strength Accessory for HSTM ..........................
- Transverse Core Strength Accessory for HSTM ......................
Impact Penetration Tester…
.............................................................
Laboratory Core Baking Oven
.............................................................
Laboratory Core Test Piece Blower ..........................................................
Laboratory Mill
.............................................................
Laboratory Sand Mixer…
.............................................................
Laboratory Sand Rammer ‘Type N’ (LSR) .................................................
- Compactability Accessory for LSR .........................................
- CO2 Gassing Accessories for LSR ...........................................
- Density Indicator for LSR .........................................................
- Flowability Indicator for LSR ....................................................
- Ramming Block for LSR .........................................................
- Split Specimen Tube for LSR .................................................
- Tensile Ramming Accessory for LSR .....................................
- Transverse Ramming Accessory for LSR ................................
Methylene Blue Clay Tester
.............................................................
Moistbalance
.............................................................
Moisture Teller
.............................................................
Mould Permeability Accessory
.............................................................
Mould Strength Tester
.............................................................
Peel Back Tester
.............................................................
Permeability Meter
.............................................................
Rapid Sand Washer
.............................................................
Sand Specific Surface Tester
.............................................................
Shatter Index Tester
.............................................................
Shell Mould Tensile Accessory
.............................................................
Shell Mould Transverse Accessory ..........................................................
Silica Sand Sampler
.............................................................
Sliding-Weight Scales
.............................................................
Ultrasonic Clay Tester Accessory ............................................................
Universal Sand Strength Machine (USSM - Hand Operated) ....................
Universal Sand Strength Machine (USSM - Motor Driven) .......................
- High Dry Strength Accessory for USSM ................................
- Shear Strength Accessory for USSM ....................................
- Splitting Strength Accessory for USSM .................................
- Tensile Core Strength Accessory for USSM ..........................
- Transverse Core Strength Accessory for USSM ...................
- Transverse Shell Strength Accessory for USSM ...................
Page No
113
114
125
74
36
69
131
115
80
121
123
105
107
109
127
56
59
24
27
38
45
53
41
43
38
51
47
49
5
33
29
72
129
111
63
2
16
77
101
99
1
35
14
82
86
91
88
103
93
95
97
PREFACE
This instruction book has been compiled to assist the Foundry Technician in obtaining the maximum
benefits from his Ridsdale-Dietert equipment.
Before this can be achieved, certain basic procedures and techniques must be adopted and
followed. Some of these important points are listed below for your guidance.
I
II
III
SAMPLING
(a)
Always try to obtain a generous, representative sample of the sand to be tested.
(b)
Keep in an air-tight container to prevent loss of moisture.
SPECIMEN PREPARATION
(a)
When preparing a number of specimens from the same sample, replace the lid of the
container after weighing out each specimen.
(b)
Carefully level out the sand surface in the specimen tube before placing under the
plunger of the Standard Rammer.
(c)
Never use sand which has already been rammed up once to form a specimen.
(d)
Always ensure that the height of a specimen is correct, that is within the tolerance
specified.
(e)
Reject any specimen which shows any sign of damage.
(f)
Green sands should be tested immediately, dried or baked sands as soon as they
have cooled in a desiccator and with cured sands the length of time between curing
and testing should be stated when reporting results.
(g)
Any deviation from standard ramming practice should be reported with results.
SPECIMEN TESTING
(a)
Handle specimens carefully.
(b)
Always test three specimens and report the average result.
(c)
For research work never use the same specimen for two different tests, ie,
Permeability and Compression Tests.
(d)
Always follow the instructions with regard to rate and method of applying load to
specimens eg, the Hand Operated Universal Sand Strength Machine should be
loaded evenly at the rate of 7.5 psi compression in 15 seconds.
RIDSDALE SILICA SAND SAMPLER
(for extracting a representative sand sample)
Length approximately 2000 mm
Diameter approximately 35 mm
Length approximately 2000 mm
Diameter approximately 35 mm
USE
When testing sand or binder it is important to ensure that the withdrawn sample is perfectly
representative of the whole.
In principle the quantity of sample extracted should be larger than the quantity used for the
actual testing. The volume of the original sample depends on the weight of the material
necessary for the intended test, on the uniformity and the quantity of the materials to be
tested and on the conditions of extracting the sample, for which the sand sampler is used.
OPERATING INSTRUCTIONS
Insert the sand sampler into sand (sand heap, sand storage bin, wagon), with the aperture
uppermost. At the desired depth make a short sharp withdrawal movement. This will
release the sampling aperture cover. Withdraw the sand sampler from the sand bulk and
place sample into container by raising the sampler through approx 50-60 degrees. This
action allows the sample to slide down the inside of the tube and exit by the handle/grip.
In order to obtain representative samples, several withdrawals from different locations have
to be made.
The original sample should preferably consist of 8-10 withdrawals, which originate from as
many different, regularly spaced spots as possible. It is recommended to mark/identify the
sample as well (date, type, supplier, place of sampling, etc.).
1
RIDSDALE-DIETERT
RAPID SAND WASHER (Type N)
I
GENERAL PRINCIPLES
This unit separates the clay particles from the sand grains in a sand by means of rapid
agitation. The clay grade is held in suspension, removed by means of a syphon, and is
determined by loss in weight.
II
DESCRIPTION
The sand washer assembly consists of a motor stirrer unit, glass wash beaker, cleaning
brush, metal stand, syphon tube and control box. An extra beaker is provided to enable a
second test to be carried out concurrently within the settling and drying periods of the first
test.
The metal stand is designed to accommodate the wash beaker during the agitation period of
the test and the syphon tube allows the clay/water suspension to be syphoned off, after the
settling periods, without disturbing the sand grains in the beaker.
The control box provides an essential means of timing and controlling the agitation and
settling periods. It incorporates an alarm buzzer as well as a facility for by-passing the timer
and allowing the stirrer to run continuously.
2
RIDSDALE-DIETERT
RAPID SAND WASHER (Type N) (cont’d)
III
INSTALLATION
Connect the control box to an appropriate power supply (see name plate on motor for correct
voltage and frequency). Plug the stirrer unit into the control box. Place a wash beaker in
position in the metal stand and check the length of the syphon tube by moving the clip so
that the curved end of the tube is 25 mm above the bottom of the beaker. Remove the tube
from the beaker.
IV
TEST PROCEDURE
(a)
Take a representative sample of moist sand weighing approximately 50 g.
(b)
Dry the sample, weigh accurately and place in the wash beaker.
(c)
Add 475 ml distilled water at room temperature and 25 ml of 1.5% w/v tetrasodium
pyrophosphate solution (now recommended by the AFS as a deflocculant instead of
sodium hydroxide, which has a tendency to cause gelling problems preventing sand
grains from settling properly).
(d)
Place the stirrer unit in the wash beaker.
(e)
Check that the “Continuous” switch on the control box is off, and switch the “Mains”
switch on.
(f)
Set the agitation period to 5 minutes by rotating the time switch to its maximum
position and then back to the figure 5.
(g)
When the 5 minute period has elapsed and the motor stops, disconnect from the
control box. Remove the stirrer unit from the beaker, wash any sand grains which
may adhere to the vertical baffles or agitator back into the beaker with distilled water.
Fill the beaker with distilled water to the top line in such a manner that the contents
are well stirred. Remove the beaker from the stand.
(h)
Set the settling time on the control box at 10 minutes and switch the “buzzer” switch
on.
(i)
When the alarm indicates that the first 10 minute settling period has elapsed switch it
off, fill the syphon tube with water, place a finger over the end of the straight section
and insert the curved section into the beaker. Remove finger and syphon clay/water
suspension out of the beaker.
(j)
Fill the beaker to the top line with distilled water, stirring the sediment on the bottom
and allow to settle for a second 10 minute period.
(k)
Syphon off the suspension when the alarm indicates that the 10 minute settling time
has elapsed. Refill to the top line, allow to settle for 5 minutes and syphon off the
suspension.
(l)
Repeat the process of 5 minute standing and syphoning until the water is clear at the
end of a 5 minute settling period.
(m)
Syphon off the clear water and decant as much of the remaining water as possible
without losing any sand grains.
3
RIDSDALE-DIETERT
RAPID SAND WASHER (Type N) (cont’d)
IV
TEST PROCEDURE (cont’d)
(n)
V
Place the beaker in an oven at 105 °C – 110 °C and dry the sand grains. Transfer
the sand grains from the beaker to a suitable balance using the brush provided.
Weigh and subtract the weight obtained from the original weight of dry sand. Divide
this weight by the original weight of dry sand, multiply by 100 and express as
percentage AFS clay.
MAINTENANCE
Dry the unit thoroughly after use.
VI.
RECOMMENDED SPARES
Part No
N 1002
N 1003
N 1004
N 1005
N 1006
N 1007
N 1008
N 1009
N 1010
N 1011
NB:
Description
Agitator Disc complete with Screw
Glass Wash Beaker
Syphon Tube & Clip
Rubber O-ring in stand
Rubber washer in stand
Carbon brushes for motor
Time-switch
Control box switch
Alarm buzzer
Cleaning brush
The nominal speed of the electric motor used for the stirrer unit, specified by the
motor manufacturers, is 4500 rpm. However, speeds in excess of this may be
attained by some motors and hence a direct comparison between performances of
different Rapid Sand Washers may not always be possible.
4
RIDSDALE-DIETERT
METHYLENE BLUE CLAY TESTER AND ULTRASONIC ACCESSORY
I
GENERAL PRINCIPLES
The Methylene Blue (MB) Clay Tester measures the amount of live clay present by
determining the base exchange capacity of the clay. The use of tetrasodium pyrophosphate
as a preliminary solution enables a similar response to methylene blue of both western and
southern bentonites, and hence the MB Clay Tester makes possible the rapid and accurate
determination of live clay in foundry sand systems employing western or southern bentonites
or any combination of the two. It can also be used to determine systems using fireclay.
The Ultrasonic Accessory breaks down the clay aggregates and enables all the live clay to
react with the methylene blue. This enables the “total” live clay to be determined with the
MB Clay Tester.
Also, the Ultrasonic Accessory can be used in conjunction with the MB Clay Tester to check
incoming clay/bentonite shipments.
II
DESCRIPTION
The composite parts of the Methylene Blue Clay Tester and Ultrasonic Accessory are shown
in Fig (i), and in the spares/parts list in Section VI.
5
RIDSDALE-DIETERT
METHYLENE BLUE CLAY TESTER AND ULTRASONIC ACCESSORY (cont’d)
II
DESCRIPTION (cont’d)
The heavy metal base is designed to accommodate in as compact an area as possible the
self-filling burette system, stainless steel beakers and motor stirrer unit. The ancillary
equipment, such as repeating pipettor, tetrasodium pyrophosphate, methylene blue solution,
filter papers, glass rod, vaseline and Allen wrench, and the Ultrasonic Accessory, completes
the list of items required to determine the live clay in a foundry sand system.
III
INSTALLATION
(a)
Drop the reduced end of the post into the hole in the base until the bottom of the post
is flush with the bottom of the support collar. Tighten set screw with Allen wrench
provided.
(b)
Attach one clamp holder to the post, allowing approximately 8” (200 mm) from the
base to top of the clamp. Attach clamp so that the thumbscrew points to the front of
the base. (Refer to Fig. (i) for proper placement of all clamps).
(c)
Attach one burette clamp to the post, approximately 2” (50 mm) from the top of the
first clamp. Attach clamp so that the portion of the clamp which holds the burette
points to the front of the base.
(d)
Attach the other clamp holder to the post, approximately 3” (75 mm) from the top of
the second clamp. Attach clamp so that the thumbscrew points to the front of the
base.
(e)
Attach the second burette clamp to the post, approximately 15” (375 mm) from the
top of the third clamp. Attach clamp so that the portion of the clamp which holds the
burette points to the front of the base.
(f)
Attach the extension clamp to the post approximately 5” (125 mm) from the top of the
fourth clamp. Attach the clamp so that the thumbscrew points to the front of the
base, then check to ensure all the clamps lie on the same vertical line with the base.
This will allow the burette to be positioned vertical and reasonably level. Position the
solution bottle holder.
(g)
Attach the cup holder to the bottom clamp holder. Attach the cup holder so that it
projects approximately 6” (150 mm) to the right of the post.
(h)
Attach the agitator shaft to the motor and lock the nut on the coupling.
(i)
Attach the motor mounting shaft to the middle clamp. Note that, for proper alignment
between the agitator and beaker, the stainless steel beaker should be placed in the
cup holder. Slide the motor mounting shaft in the clamp until the agitator disc is
centred inside the stainless steel beaker. Lock the back thumbscrew on the clamp
once the proper position is found. (The clamp holding agitator motor will have to be
raised and lowered to allow placement and removal of beaker).
When the clamps which hold the agitator motor and the cup holder are properly
aligned the distance between the agitator disc and the bottom of the stainless steel
beaker should be approximately 0.2” (5 mm).
6
RIDSDALE-DIETERT
METHYLENE BLUE CLAY TESTER AND ULTRASONIC ACCESSORY (cont’d)
III
INSTALLATION (cont’d)
(j)
Position the unit so that there will be no direct heat against the methylene blue
solution bottle. If a heat vent in the room is too close to the bottle it could evaporate
water from the solution and change its strength.
(k)
Position the burette in the burette clamps so that the tip of the burette is 4” (100 mm)
above the base. The top clamp should grip the burette just below the enlarged
overflow section. The lower clamp should grip the burette just below the 50 ml
marking. This will prevent the clamps from obstructing the graduations in the working
range.
(l)
Slide the rod from the extension clamp holding the solution bottle into the upper
clamp holder and tighten it in place. Check to ensure that the bottle is held securely.
(m)
Wet the free end of the rubber tubing coming from the two-way stopcock and slip it
over the outlet tube at the bottom of the amber solution bottle. This bottle is amber in
colour to prevent light from affecting the methylene blue. The outlet tube should face
to the rear.
(n)
Position the small overflow bottle inside the three pegs at the rear of the base. The
rubber tubing from the overflow tube at the top of the burette can now be placed in
the neck of the overflow bottle.
(o)
Lubricate the stopcock and then check the adjustment nut at the back of the stopcock
in the burette. This nut should be tightened just enough to make the stopcock slightly
resistant to turning. If the stopcock is too loose there is a possibility of methylene
blue leaking around the core. Do not overtighten the adjusting nut as this will make
the stopcock too difficult to turn and may result in the burette twisting inside the
clamps.
(p)
Gather the two hoses as neatly as possible at the rear of the upright post and hold
them using the hose clamps provided.
(q)
Position the stopcock handle so that the stopcock is closed.
(r)
Carefully pour one bottle of the methylene blue into the amber one litre solution
bottle. Use the rubber stopper with the glass vent tube to close the opening at the
top of the bottle to prevent dust from contaminating the methylene blue solution.
(s)
Locate the small tubing clamp and slip it over the rubber tubing leading to the inlet at
the bottom of the burette. This clamp should slide over the tubing but at this time do
not restrict the tubing. This clamp is provided as a secondary shut-off in case the
stopcock should leak.
(t)
Carefully turn the stopcock handle until the burette is filled. Watch the methylene
blue as it rises in the burette. Close the stopcock when the methylene blue first spills
out of the overflow tube at the top of the burette. If an air lock develops in the rubber
tubing from the solution bottle, squeeze the tubing with a pumping motion to remove
the air bubbles.
7
RIDSDALE-DIETERT
METHYLENE BLUE CLAY TESTER AND ULTRASONIC ACCESSORY (cont’d)
III
IV
INSTALLATION (cont’d)
(u)
Place one of the stainless steel 250 ml beakers under the burette, turn the stopcock
handle and run out just enough methylene blue to fill the lower portion of the burette.
Turn the stopcock handle again and run in just enough methylene blue to spill a drop
or two from the overflow tube at the top of the burette, thus refilling the burette to
zero. The stopcock handle should be in a horizontal position when the operator is
neither filling nor draining the burette.
(v)
Prepare 500 ml of preliminary solution.
Weigh out 10 g of tetrasodium
pyrophosphate using an ordinary laboratory balance and dissolve in 500 ml of
distilled water.
(w)
Pour the prepared solution into the flask which makes up the lower part of repeating
pipettor.
(x)
Check to see that the chuck is holding the stirring shaft securely to the motor. With
the motor switch in the OFF position, plug the input cord into a power source as
indicated on the motor name plate. Turn on the motor and observe the action of the
stirring blade. The blade edges should be facing up and moving forward so that they
cut into the liquid.
(y)
The methylene blue standard solution is non-toxic but it is a powerful dye and the
operator should be careful to protect the working area and his clothing as the stain is
difficult to remove.
TEST PROCEDURE
(A)
Determination of Calibration Factor
If the calibration factor, being the number of ml. of MB solution required for each
percent of equivalent bentonite or clay, is not known, this must first be determined by
the so-called equivalent material method as follows :(a)
Weigh out 0.3 g of the clay whose calibration factor is to be determined and
4.7 g of base sand. Transfer these to a stainless steel beaker and add 5 g of
220 mesh silicon carbide as provided with the Ultrasonic Accessory.
(b)
Add 50 ml of 2% tetrasodium pyrophosphate solution via the repeating
pipettor by tilting it until the liquid fills the upper receptacle and spills over into
the measuring tube, filling it to the 50 ml drain edge, then tilting it the other
way to drain the 50 ml into the stainless steel beaker. Slip an “O” ring up over
the beaker so that its top is located ¾” (19 mm) below the bottom of the flared
section.
(c)
Transfer the beaker to the Ultrasonic Accessory. Slip the beaker down
through the central opening in the cover which should position the beaker so
that approximately 0.4” (10 mm) is submerged. The water level should be
approximately 1¾” (43 mm) above the bottom of the tank.
(d)
Switch on the Ultrasonic Accessory and allow to operate for 7 minutes. The
silicon carbide particles will act as abrading surfaces and aid the complete
dispersion of the clay.
8
RIDSDALE-DIETERT
METHYLENE BLUE CLAY TESTER AND ULTRASONIC ACCESSORY (cont’d)
IV
TEST PROCEDURE (cont’d)
(A)
Determination of Calibration Factor (cont’d)
(e)
Remove the beaker and place it under the burette filled with methylene blue.
Turn the stopcock handle so that the methylene blue flows into the stainless
steel beaker, and run in roughly 90% of the estimated volume.
(f)
Place the stainless steel beaker in the loop of the cup holder. Lower the
motor/agitator until the agitator blade is in the sand/methylene blue
suspension and then switch on the motor to stir for 2 minutes. This assures
complete contact between methylene blue and live clay.
(g)
Remove the stainless steel beaker from the agitator, momentarily resting the
lip of the beaker against the agitator to drain off all the liquid remaining on the
blade.
(h)
Using the glass rod, remove a single drop of the liquid and place this on a
filter paper. Watch for the formation of a blue-green halo around the outside
of the central spot. There will be no such halo until there is an excess of
methylene blue.
(i)
Add methylene blue to the beaker in 1 ml steps. Stir the solution for 2
minutes after each ml addition and check using the glass rod and filter paper.
(j)
When the final end point has been reached it is sometimes advisable to place
the beaker under the agitator for a further 2 minutes of agitation to ensure
complete contact of the methylene blue with all of the clay. If the halo does
not appear on the test spot after the additional mixing, add another 1 ml of
methylene blue and test again. Repeat until the halo persists.
(k)
A weight of 0.3 g of clay in a 5 g sample is equivalent to a 6% mix. Divide the
total volume of methylene blue required to reach final end point by 6 to
determine the calibration factor of the clay being tested.
(NB: Where a fireclay is being tested, which has a relatively lower MB
requirement than bentonites, a 0.5 g sample can be added to 4.5 g of sand
and tested: in this case the calibration factor will equal the volume of
methylene blue divided by a factor of 10. Similarly, where a blended additive
is being tested, similar proportions of the constituent clays should be
prepared, up to say 0.5 g, sand added up to a total weight of 5 g, and the
procedure carried out as above : again the calibration factor of this blended
additive will equal the volume of methylene blue required to reach end point
divided by a factor of 10).
9
RIDSDALE-DIETERT
METHYLENE BLUE CLAY TESTER AND ULTRASONIC ACCESSORY (cont’d)
IV
TEST PROCEDURE (cont’d)
(B)
(C)
Total Live Clay Determination
(a)
Take a representative sample of approximately 15 g of the system sand to be
tested. Remove any contaminants and dry the sample to constant weight in a
moisture teller or drying oven.
(b)
Weight out a 5.00 g sample for the methylene blue total clay test and transfer
to one of the 250 ml stainless steel beakers. Add 50 ml of 2% tetrasodium
pyrophosphate solution via the repeating pipettor by tilting it until the liquid fills
the upper receptacle and spills over into the measuring tube, filling it to the 50
ml drain edge, then tilting it the other way to drain the 50 ml into the stainless
steel beaker. Slip an “O” ring up over the beaker so that its top is located ¾”
(19 mm) below the bottom of the flared section.
(c)
Transfer the beaker to the Ultrasonic Accessory. Slip the beaker down
through the central opening in the cover which should position the beaker so
that approximately 0.4” (10 mm) is submerged. The water level should be
approximately 1¾” (43 mm) above the bottom of the tank.
(d)
Switch on the Ultrasonic Accessory and allow to operate for 5 minutes.
(e)
Remove the beaker, and carry out the methylene blue titration procedure in
the same manner as described in the “determination of calibration factor”
procedure above (Sections A(e) to A(j)).
(f)
The total live clay is calculated by dividing the number of ml of methylene blue
to reach end point by the calibration factor (as in A above).
Dispersed Live Clay Determinations
(a)
In a system sand not all of the clay present is in the proper form to contribute
strength to the mix. Some of the clay is present in lumps, or colonies, and
may be entrapped by other additives. For maximum strength the clay should
be thoroughly dispersed and completed distributed over the grains. This is
seldom the case. There is usually a difference between the total amount of
clay present and the dispersed and working clay, ie, the clay that is in the
proper form to contribute to the strength of a mould.
(b)
The process for determining this dispersed live clay is exactly the same as for
total live clay as described in B above, except that the Ultrasonic Accessory is
not used at all. Thus the procedure is exactly the same as per B above
except that instead of carrying out the instructions per B(c) and B(d) the
contents of the stainless steel beaker are merely stirred for 2 minutes prior to
methylene blue titration.
(c)
The dispersed live clay is calculated by dividing the number of ml of
methylene blue to reach end point by this means by the calibration factor (as
in A above).
10
RIDSDALE-DIETERT
METHYLENE BLUE CLAY TESTER AND ULTRASONIC ACCESSORY (cont’d)
IV
TEST PROCEDURE (cont’d)
(D)
Testing Incoming Material
(a)
If the same test procedure as used for the determination of calibration factor
is used, as per Section A above, the methylene blue requirement for incoming
material is readily established. This can act as a useful means of checking
for possible variation in the nature, or in the proportion of constituents in the
incoming material. By using the different retention factors of base exchange
capacities after firing at 540 °C (for example calcium bentonites have a much
lower MB requirement after firing than do sodium bentonites) further
information about the composition of incoming material can be gleaned.
(b)
The test procedure is carried out in a similar way as described in Section A,
selecting the appropriate weight of clay or additive to mix with the sand and
silicon carbide prior to ultrasonic scrubbing.
(c)
A change in the volume of methylene blue required to produce the end point
halo will indicate a change in nature of the clay or the proportions of its
constituent material.
ULTRASONIC METHYLENE BLUE ACCESSORY
(1)
The Ultrasonic MB Accessory can be used to determine total live clay or to test incoming
clay or additive shipments as described in the test procedures A, B and D above.
(2)
To use this instrument merely fill the inner stainless steel tank with distilled water or clean
tap water to a level of approximately 1¾” (43 mm) from the bottom of the tank, place the
cover in position and plug in the electric cord.
(3)
The following precautions must, however, be noted :There must always be liquid in the stainless steel tank when the Ultrasonic Unit is in
operation.
When filling the stainless steel tank, do not exceed indicated levels.
The Ultrasonic Unit should never be immersed in water. To clean, simply rinse with tap
water and wipe dry.
A certain amount of heat is generated during ultrasonic scrubbing. Do not become alarmed
if the bottom surface or the water become quite warm.
V
MAINTENANCE
Clean out and dry the equipment thoroughly after use.
11
RIDSDALE-DIETERT
METHYLENE BLUE CLAY TESTER & ULTRASONIC METHYLENE BLUE ACCESSORY (cont’d)
VI
SPARES/PARTS LIST
Methylene Blue Clay Tester
Part No
1
4A
7
8A
9
11A
02279
14
15
019
0206
0622
02231A
02232
02233P
02234
02235
02236
02237
02238
02239
02240
02241
02291
02292
02293
Description
Base
Cup Holder
Rubber Hose
Post
Agitator Shaft and Blade
Hose Clamp
“O” Ring 80 mm O.D., 70 mm I.D.
Rubber Stopper with hole
Glass Vent Tube
Vaseline, 25g bottle
Allen Wrench
Rubber Support
Motor, 240 V., 50/60 cycle
Repeating Pipettor, 50 ml
Methylene Blue, 500 ml bottle
Tetrasodium Pyrophosphate 500 g
Glass Stirring Rod
Hose Pinch-Off Clamp
Overflow bottle
Filter Paper, Box of 100
Beaker, 250 ml stainless steel
Burette 50 ml self-filling
Solution bottle, 1 litre
Extension Clamp
Clamp Holder
Burette Clamp
No required
1
1
2
1
1
2
1
1
1
1
1
3
1
1
2
1
1
1
1
1
2
1
1
1
2
2
ULTRASONIC MB ACCESSORY
Part No
02277
02277C
02278
02279
Description
Ultrasonic MB Accessory, 240 V, 50/60 cycle
Beaker positioning cover
Silicon Carbide Grit (220 mesh), 200 g bottle
“O” ring, 80 mm O.D., 70 mm I.D.
No required
1
1
1
1
12
INSTRUCTIONS –
STIRRER FOR METHYLENE BLUE CLAY TESTER
INTRODUCTION
A versatile stirrer suitable for stirring a variety of low viscosity liquids such as water and light oils in
vessels of up to about 60 litres capacity.
ELECTRICITY SUPPLY
Before connecting this apparatus to the electricity supply check the information given on the
apparatus rating plate and ensure that :(a)
Your supply is single phase a.c. (alternating current) of the stated frequency with
Neutral nominally at Earth potential.
(b)
Your supply voltage is within the stated range.
WARNING:
THIS APPARATUS MUST BE EARTHED.
The wires in the mains lead are coloured in accordance with the following code :Green and Yellow
Blue
Brown
Earth
Neutral
Live.
Connect the wires to a non-reversible 3-pin plug as follows :Green and Yellow wire to terminal marked E (Earth).
G (Ground) or ╧ or coloured green or green and yellow.
Blue wire to terminal marked N (Neutral) or Common or coloured Blue.
Brown wire to terminal marked L (Live) or Phase or coloured Brown.
IMPORTANT :
Consult a qualified electrician if in any doubt or if your supply system has any
of the following:-
No Earth
A colour code different from the above
Reversible Plugs
Supply and return leads that are both above earth potential.
RATE OF STIRRING
The speed of the motor remains approximately constant at 1200 rpm (with 50 Hz supply) over a
wide range of loads. Should this speed be visibly reduced by overloading, employ a smaller rotor or
reduce the pitch of the rotor blades, otherwise the motor may overheat.
13
INSTRUCTIONS FOR THE CORRECT USE OF
ULTRASONIC CLAY TESTER ACCESSORY
For UK and Continental European Models, connect to a 220-240 VAC fully earthed supply via a 3
pin plug. It can be dangerous to operate an ultrasonic bath without an earth connected.
Fill the bath to within 30 mm from the top. The unit is designed to operate correctly with at least ¾
liquid level. This is important especially with heated models, where the heaters are mounted on the
lower bath sides. If the liquid level falls below ½ full the heaters will be damaged, and the warranty
will be void. A lid will prevent liquid loss by evaporation, and reduce fumes from certain cleaning
fluids.
Do not allow items to come into contact with the base of the bath. Damage will occur to the base
due to the high frequency vibrations and the transducers can be damaged. Suspend the items to
be cleaned, or use a basket , instrument tray or glass beaker. Stainless steel baskets, beaker
support trays and hard glass beakers are available accessories.
After filling the bath with warm water and a 2% addition of detergent or recommended cleaning fluid,
advance the timer to the required cleaning time. The timer can be set for a maximum of 15 minutes.
In practice most items will be cleaned in less than 5 minutes. The unit should be switched off when
not required, this will prolong the transducer life.
Gases are present in a first fill with water from the tap. Cavitation, the appearance of “cold-boiling”,
will only occur when the gases have been driven out of the solution. The period taken to degas the
fluid varies. Generally, less than two minutes will see cavitation taking place. Once the solution is
degassed, the bath is always available for immediate use.
14
INSTRUCTIONS FOR THE CORRECT USE OF
ULTRASONIC CLAY TESTER ACCESSORY (cont’d)
After cleaning, remove the items and rinse in clean water. It is not advisable to expose hands to
cleaning materials, or regularly immerse hands in an active bath.
At frequent intervals empty the bath and clean out the debris and residues which if left on the base
will erode the stainless steel. An ultrasonic bath will operate better if clean and last considerably
longer.
Before emptying, remove the mains plug from the supply.
ADVICE ON PROCEDURES
Wherever possible site the bath close to a sink for ease of emptying. Coil excess mains lead neatly
behind the bath. Always switch off and remove the mains plug from the supply before emptying.
Fill the bath with warm, NOT boiling water.
Except for certain optical and dental models, always use a basket or beaker for immersing items in
the cleaning solution and prevent these items from contacting the bath base. Always rinse after
cleaning with clean water.
REMEMBER
Keep bath at least ¾ full, NEVER operate an empty bath.
solutions.
Do not expose hands to cleaning
Use a basket or beaker, NEVER let items contact the base. Fill with warm water, NEVER put hot
water into a cold bath. Remove mains plug from supply when emptying the bath. NEVER use
flammable, toxic, caustic or acid solutions. Avoid breathing fumes from strong solutions. Keep the
bath filled with water when not in use. This will prevent items dropping onto the base of an empty
bath.
ULTRAWAVE baths are manufactured in Great Britain (to BS EN ISO 61010-2) to conform with
British and IEC electrical safety standards and the requirements of the Electrical Safety Code for
Hospital & Laboratory Equipment. (ESCHLE).
The warranty will be invalidated if the bath is subjected to improper treatment or misuse.
If the unit stops working, check the indicator when switched on. If the indicator fails to glow, check
the mains supply and fuse in the mains plug. There are no user serviceable parts inside the bath.
If, after the above checks, the unit fails to operate it should be returned to your supplier for
exchange or service.
For further information, see also the manufacturer’s instructions.
15
RIDSDALE-DIETERT
SAND SPECIFIC SURFACE TESTER
PROCEDURE
(1)
Remove the unit from the packing case, place it on a work bench and level the tester base
using the knurled screws (22), so that the level (053) bubble is centred.
(2)
The burette (6) and burette knurled screw (15), should be checked to ensure that the burette
has not loosened in shipment. The burette should be in contact with the screen at the
bottom of the burette holder. Tighten the jam nut (17) by hand, so that the burette is held
firmly in the rubber sleeve (13).
(3)
Place the valve handle in the “TEST” position and add kerosene to open left-hand levelling
tube (8). Continue adding kerosene until the level in the right-hand volumetric tube (7)
almost reaches the lower black marking on the right-hand tube. Allow the kerosene to drain
from the sides of the tube for a few minutes before adding the last few drops to bring the
liquid level up to the black marking.
(4)
Secure a representative sample of sand and remove the clay using the AFS Clay Content
procedure. Wash enough sand so that sufficient clay-free sand will be left to use for a 50 g
sample. Dry the sand sample at 105 °C, and weigh out a 50 g sample. Place the sand in
the burette, filling it as uniformly as possible to minimise segregation.
16
RIDSDALE-DIETERT
SAND SPECIFIC SURFACE TESTER (cont’d)
PROCEDURE (cont’d)
(5)
Tap the burette by hand or with a pencil until the sand volume cannot be reduced any
further. When tapping the burette, avoid striking the graduations.
(6)
Record the volume of sand in the burette.
(7)
Place the burette in the rubber sealing sleeve (3) in the tester base. To prevent the burette
holder from seizing in the rubber sealing sleeve, it is best to dust the burette holder with talc
before positioning it in the sleeve.
(8)
Set the valve handle to the “SET” position and very carefully squeeze and release the rubber
bulb (01221) at the right of the unit. When the bulb is released, it will draw the kerosene up
in the volumetric tube (7).
CAUTION:
If the bulb is released too quickly, the liquid level may be drawn over the top
of the volumetric tube into the metal tube at the centre rear. If the kerosene
gets into the metal tube, it will be necessary to drain out the kerosene and
start again. The kerosene can be removed by unscrewing the drain screw in
the drain elbow (25).
(9)
Using the rubber squeeze bulb, the liquid level in the volumetric tube should be raised above
the upper black marking. When the liquid level is high enough, move the valve handle to the
“HOLD” position. This will prevent the liquid level from rising or falling until the operator is
ready for the final adjustment.
(10)
Carefully move the pointer on the valve handle to the right of the “HOLD” position until the
liquid level in the volumetric tube begins to fall slowly. When the liquid level reaches the
upper black marking, move the valve handle to the “HOLD” position again. The instrument
will then be in position for the first test.
(11)
Move the valve handle to the “TEST” position and as soon as the liquid level reaches the
upper red marking, start a stopwatch. With the valve handle in the “TEST” position, the
volumetric tube is connected to the burette through the metal tube. Air is drawn through the
sand sample, and the liquid level will fall in the volumetric tube.
(12)
When the liquid level reaches the lower red marking, stop the stopwatch and record the time
required for the standard volume of air to pass through the specimen.
(13)
Knowing the sand volume in cm and time taken for the air to pass through in seconds, the
2
specific surface area Sw in cm /g can be read directly from the accompanying graph, Figure
1.
(14)
The graph, Figure 1, is based on a sand specimen with a specific gravity of 2.65, kerosene
-6
with a specific gravity of 0.811 and air with a dynamic viscosity of 18110 . If material other
than sand is tested, or if a different levelling liquid is used, it will be necessary to determine a
correction factor for use with the graph.
(15)
Once Sw is known, it is necessary to determine the theoretical specific surface area Sth in
order to calculate the Coefficient of Angularity, which is the ratio of the actual specific
surface to the theoretical specific surface.
3
17
RIDSDALE-DIETERT
SAND SPECIFIC SURFACE TESTER (cont’d)
(16)
To determine the theoretical specific surface, remove the sand sample from the burette and
use the same sand for a screen analysis.
PROCEDURE (cont’d)
(17)
Place the sand on the top sieve of a stack of BS 410: 1986 or DIN 4188 (ISO R565) Series
Sieves. Cover and set the stack in a suitable Sieve Shaker and fasten securely. Operate
the sieve shaker for 15 minutes.
(18)
Following the instructions supplied with the BS 410 : 1986 or DIN 4188 (ISO R565) series
sieves, determine the cumulative weight for each sieve.
(19)
By subtraction, calculate the weight of sand retained on each sieve. Multiply the weight on
each sieve by 2, and record as percent retained on each sieve.
(20)
Multiply the percent retained on each sieve by the appropriate theoretical surface factor as
given in the table on the next page. Add the products and divide by 100 to determine the
theoretical specific surface area Sth.
18
TABLE I
FACTORS FOR STANDARD
GRAIN SIZE FRACTIONS
BS 410 : 1986 SERIES
NEAREST MESH NUMBER
16
22
30
44
60
72
85
100
120
170
240
PAN
MULTIPLICATION
FACTOR
19.19
26.48
37.42
52.90
74.72
98.02
115.52
137.22
164.07
209.64
294.05
595.83
(21)
When both Sth and Sw are known, the Coefficient of Angularity (E) may be determined by
dividing Sw by Sth.
(22)
The factors given in Table I, are based on a density of 2.65. With materials that have a
density other than 2.65, it will be necessary to correct for this in the calculations for
theoretical specific surface area, as well as in the actual specific surface area determination.
(23)
The following example illustrates the procedure for determining Sth, Sw and E.
Example:
Sample weight … … …
Volume of Sand Bed …
Time … … … … …
50 g
3
30.6 cm
22.8 s
From the graph, Figure 1, the actual specific surface may be read directly in square
centimetres per gram of sand.
2
Sw = 110.0 cm /g.
19
TABLE II
SCREEN ANALYSIS
BS 410: 1986 SERIES
NEAREST MESH No
CUMULATIVE
WEIGHT
16
22
30
44
60
72
85
100
120
170
240
PAN
0.0
0.0
0.0
0.0
0.0
0.1
48.0
2.0
0.0
0.0
0.0
0.0
PERCENT
RETAINED
0.0
0.0
0.0
0.0
0.0
0.2
95.8
4.0
0.0
0.0
0.0
0.0
MULTIPLIER
FACTOR
19.19
26.48
37.42
52.90
74.72
98.02
115.52
137.22
164.07
209.64
294.05
595.83
PRODUCT
0.0
0.0
0.0
0.0
0.0
19.6
11066.8
548.9
0.0
0.0
0.0
0.0
TOTAL: 11635.3
2
Sth = 11635.3 ÷ 100 = 116.35 cm /g
Coefficient of Angularity (E) =
Sw = 110 = 0.95
Sth
116.35
20
RIDSDALE-DIETERT
SAND SPECIFIC SURFACE TESTER (cont’d)
CALIBRATION PROCEDURE
The chart supplied with the equipment is only correct for silica sands with a relative density of 2.65.
The small deviations in relative density which occur in natural foundry-sands can be ignored.
The equipment can be used for other sands such as zircon sands and olivine sands, but a
volumetrically equivalent quantity of sand must be used.
The sample weight for a volumetrically equivalent sample of a sand other than silica is determined
from the following expression :-
W x = Ws
Dx
___
Ds
where Wx is the weight of the sample of sand to be tested;
Ws is the weight of silica sand normally used (50 g);
Dx is the relative density of the sand to be tested;
and
Ds is the relative density of silica sand (2.65).
For example, determining the specific surface area of zircon sand (relative density 4.6), the :
Sample weight to be used
=
50 g x 4.6 ÷ 2.65
=
86.8 g.
This corresponds
volumetrically to 50 g of silica sand and hence the same conversion chart as for silica sands may be
used.
21
RIDSDALE-DIETERT
SAND SPECIFIC SURFACE TESTER (cont’d)
SAND SPECIFIC SURFACE TESTER
REPLACEMENT PARTS LIST
Part No
0
1
2
3
4
5
6
7
8
11
12
13
14
15
16
17
18
20
21
22
23
25
27
053
01221
01222
01230
Description
Legend Plate
Base
Retaining Sleeve
Sealing Sleeve
Burette Holder
Retaining Washer
Burette
Volumetric tube, Pyrex
Levelling Tube
Support Tube Assembly (includes 9 & 10)
Plastic Tubes (includes A, B & C)
Rubber Sleeve
Filter
Burette Knurled Screw
Rubber Tube Adapter
Jam Nut
Bulb Support
Bulb Cradle Assembly
Orifice
Levelling Screw
Washer
Drain Elbow
Glass Tube Connector
Level
Rubber Bulb
Valve
Rubber Tubing
No Req
1
1
1
1
1
2
1
1
1
1
1
1
1
1
1
1
1
1
1
4
1
1
1
1
1
1
1
22
FIG. 1 - SAND SPECIFIC SURFACE TESTER
23
RIDSDALE LABORATORY MILL
I
GENERAL PRINCIPLES
This is a stationary pan mill with rotating rollers for milling and mixing experimental batch of
moulding and core sands.
II
DESCRIPTION
A ¾ hp motor drives the roller and scraper assembly at a speed of 30 rpm through a
reduction gearbox. It is controlled by a push button switch.
The rollers may be raised or lowered by means of two jacking screws to suit various
quantities of sand being milled, and the scrapers are adjustable to allow for wear.
Water additions to the sand are made from a central tundish feeding two sprinkler arms
which distribute the water evenly throughout the mix.
A safety grill is hinged to the top of the pan fitted with a cut-out switch should the grill be
raised.
A sliding door in the bottom of the mill allows easy discharge of the contents whilst the mill is
in motion.
24
RIDSDALE LABORATORY MILL (cont’d)
III
INSTALLATION
(a)
Set the mill on a strong level bench or plinth about 45 cms high. Secure in position
using the four lugs on the base casting.
(b)
Remove the level plug stamped ‘L’ located on the side of the gearbox beneath the
mill pan.
(c)
Fill the gearbox with CASTROL ALPHA 617 or equivalent gear oil, through the level
hole, using an oil gun or funnel and flexible pipe.
(d)
Replace the level plug.
NOTE:
IV
The drain plug is located below the level plug and stamped ‘D’.
(e)
Connect to appropriate power supply (see motor nameplate for correct voltage and
frequency).
(f)
Check that the scraper clamping bolts are secure, and ensure that the scrapers are
not fouling at any point by revolving motor shaft by hand.
(g)
Place the wire guard in position over the pan and start motor by means of the push
button switch.
(h)
Observe the setting of the scrapers and see that there is free movement of all
working parts.
(i)
Stop motor by pushing red “STOP” button.
TEST PROCEDURE
(a)
Raise the wire guard and place 1 kg – 3.5 kg (2 lb – 8 lb) of sand in the mill, with
bonding material (if any) sprinkled over it.
(b)
Remove the tundish cover.
(c)
Lower the wire guard and start the mill.
(d)
Allow dry ingredients to mix for 1 minute before adding water.
(e)
Pour a measured amount of water into the tundish and allow the bond to develop for
approximately 3 – 5 minutes.
(f)
Empty mill by withdrawing sliding door in the bottom of the pan whilst the rollers are
still in motion.
(g)
Stop the mill.
(h)
Replace the tundish cover.
(i)
Clean the mill by removing sand which is not ejected by the scrapers with a piece of
steel plate and a stiff brush, lifting the rollers to clean underneath them.
NOTE:
UNDER NO CIRCUMSTANCES SHOULD THE FINGERS OR ANY
IMPLEMENT BE PLACED INSIDE THE MILL WHILST IT IS IN MOTION.
25
RIDSDALE LABORATORY MILL (cont’d)
V
MAINTENANCE
(a)
Check the oil level in the gear box monthly. Top up when necessary with CASTROL
ALPHA 617 or equivalent gear oil.
(b)
Grease thrust bearings and roller crankshaft bearings monthly via grease nipples in
crosshead – do not over-grease.
To allow for more through cleaning of the mill the pan can be removed from the base by
slackening off the set-screws in the rim. The rollers, complete with crankshaft can be
removed by slackening off the set-screws in the securing collars.
*NOTE:
Before removing pan, mark position relative to circular base to ensure pan is
replaced in same position.
It should not be necessary to remove the scrapers, but if for any reason this is
done, they must be carefully reset and precautions taken, as laid down in
installation instructions, before switching on the motor.
VI
RECOMMENDED SPARES
Part No.
1101
1102
1103
1114
1115
1132
1133
1134
1145
1146
Description
Gland Plate – Drive Shaft
‘O’ Ring Seal – Gland Plate
Joint – Gland Plate
Thrust Washer – Crosshead
Thrust Washer – Wormwheel
Support Arm Large Scraper
Large Scraper
Small Scraper
Wormwheel 48T ⅜” Pitch No 3980
Worm ⅜” Pitch x ⅜” Lead 6102 – K8
26
RIDSDALE LABORATORY SAND MIXER
I
GENERAL PRINCIPLES
This mixer is designed for making small scale mixes of oil, resin and silicate bonded sands in
the laboratory.
Specially shaped rotating blades and fixed breakers on the side of the pan churn up the
mixture to give rapid, efficient blending.
II
DESCRIPTION
This mixer consists of a ¼” hp geared electric motor which drives two curved blades inside a
fixed pan. A built-in 0 – 15 minute time switch controls the mixing operation, and the mixer is
emptied by means of a pull-out, bottom discharge door.
The complete blade assembly can be removed readily to facilitate cleaning as it is only held
in position in the drive shaft by its own weight.
SAFETY NOTE:
A CUT-OUT SWITCH IS CONNECTED TO THE SAFETY GRILL VIA THE SWITCH
ARM TO PREVENT OPERATION OF THE MOTOR WHEN THE GRILL IS LIFTED.
THE DISCHARGE SHUTE IS GUARDED AGAINST ACCESS TO INTERIOR OF
MIXER.
27
RIDSDALE LABORATORY SAND MIXER (cont’d)
III
IV
V
INSTALLATION
(a)
Stand the mixer on a convenient bench. Connect to power supply (see rating plate
for correct current and voltage) by fitting the moulded plug and 2 metre lead which
are supplied.
(b)
Make sure the blade assembly is properly located on the drive shaft and seated onto
the mixer base.
(c)
Check the operation by switching on the power supply and rotating the time switch
clockwise.
OPERATING PROCEDURE
(a)
Check that the mixer door is closed properly. Put 1 – 2½ kg of sand, plus any dry
additions, into the mixer and mix dry for 1 minute.
(b)
Make any liquid additions (water, resin, silicate, etc) gradually with the mixer running.
Set the time switch for the required time (3 – 5 minutes is usually required for
synthetic moulding or core sands), and allow to time out.
(c)
Empty by pulling out the door with the motor running.
(d)
Allow the mixer to empty itself as far as possible and stop the motor by turning the
time switch anti-clockwise. Switch off the power supply to the unit.
(e)
Remove any loose sand from the blades and breakers with a stiff brush.
(f)
Lift out the blade assembly and clean thoroughly.
(g)
Remove any sand grains adhering to the discharge door and guides.
MAINTENANCE
Clean thoroughly after use.
VI
RECOMMENDED SPARES
Part No
1200
1201
1202
1207
1229
Description
Blade carrier head
Large blade – blade carrier head
Small blade – blade carrier head
Safety switch
Time switch.
28
RIDSDALE-DIETERT MOISTURE TELLER
I
GENERAL PRINCIPLES
A weighed representative sample of the moist material is placed in a special pan with fine
gauze base and hot air at a thermostatically controlled temperature is blown through it for a
pre-determined time to remove the moisture.
When all the moisture has been removed the sample pan and contents are rapidly cooled
and re-weighed. The loss in weight is read directly as percentage moisture on the dial of the
special Moistbalance.
II
DESCRIPTION
This instrument consists primarily of a hot air blower with a thermostat to control the
temperature of the air and a time switch to switch off both air and heat after a predetermined period of time.
29
RIDSDALE-DIETERT MOISTURE TELLER (cont’d)
II
DESCRIPTION (cont’d)
The thermostat is calibrated 0-9 and is normally set to cover the range 90 °C – 170 °C.
Three sample pans are supplied so that while one sample is cooling another can be drying
and the third can be weighed.
At the base of the instrument a spring loaded pan holder locates the sample pan in position.
This can be adjusted to accommodate 1 inch (25 mm), 2 inch (50 mm) or 4 inch (100 mm)
deep pans according to the bulk of the sample under test. 2 inch (50 mm) deep pans are
recommended for foundry sands and this is the standard size supplied unless otherwise
requested.
The three sample pans have a fine Hollander cloth base supported by perforated tinned
steel sheet. This is suitable for all materials except very fine powders.
Additional items include an aluminium cooling stand for rapidly cooling the sample in the pan
and a pair of special tongs for handling hot pans.
III
IV
INSTALLATION
(a)
This instrument is designed to operate on a standard 3 ft (1 m) high laboratory
bench. If the bench has a wooden surface it is desirable to stand the blower unit on
a sheet of insulating material to prevent any possible damage to the surface if it is
operated without the sample in position.
(b)
Connect to an appropriate power supply (see label for correct voltage and frequency)
using the moulded plug and 2 metre lead which are supplied.
(c)
Rotate time switch knob clockwise and check that the blower motor is rotating freely
and that warm air is blown out of the base of the unit (when the instrument is cold it
will take about one minute to warm up). It is important to ensure that the blower is
forcing air over the heating element when the power is on. There must be an
unrestricted flow of air into the blower unit.
TEST PROCEDURE
(a)
Set the thermostat to the required drying temperature. Suitable settings for various
materials are given below :Sand gravel, etc
Yarn
Gelatin
Coal
Sinter (crushed)
Soap Powder
Metal Powder
Salt
Hay
Milk (dried)
Coconut (shredded)
Iron ore (crushed)
Thermostat Setting
7
3
2
6
6
5
5
5
5
4
1
6
Time
2 minutes
5 minutes
12 minutes
6 minutes
4 minutes
6 minutes
4 minutes
6 minutes
15 minutes
10 minutes
5 minutes
8 minutes
30
RIDSDALE-DIETERT MOISTURE TELLER (cont’d)
IV
TEST PROCEDURE (cont’d)
(b)
Rotate time switch to about 3 minutes and allow Moisture Teller to heat up while
weighing out (first) sample.
(c)
Weigh a sample of the material to be tested using the special Moistbalance. Place
the material in the sample pan as quickly as possible until equilibrium is obtained
(any long delay during weighing may cause loss of moisture which would lead to low
results).
(d)
Remove the sample pan from balance with the special tongs and spread the sample
evenly over the base.
(e)
Insert the pan into the Moisture Teller by depressing the rubber button on the
extension from the pan holder. Release and ensure that the top edge of the pan fits
against the underside of the Moisture Teller.
(f)
Rotate the time switch knob to the desired during time.
(g)
When the timer switches off the motor and heater, transfer the sample pan to the
cooling stand using the special tongs. When cooled to room temperature place the
sample pan on the balance. Read the percentage moisture directly from the dial
without calculation.
If the sample contains more than 20% moisture use a 25 g sample and multiply the
dial reading by two.
V
(h)
After each test empty the sample pan and brush out any material adhering to it. Do
not rap the pan on the bench as this may damage the top rim.
(i)
Do not attempt to dry materials which melt and/or adhere to the base of the pan.
Such materials will cause inaccurate sample weights and will clog the screen thus
preventing rapid drying.
MAINTENANCE
(a)
All AC models are fitted with induction motors with pre-packed ball bearings which do
not require attention except during major overhaul by the manufacturers.
(b)
As air from the atmosphere is drawn in through the top of the drying unit it is
desirable to occasionally blow out any dust with compressed air (oil free). This is
facilitated by removing the top casting which is secured by three self-tapping screws
and the bottom gauze which is held in place by a circlip.
(e)
Ensure the gauze is clean and free from dust by brushing with a small stiff brush as
lack of efficiency and local overheating of the element will occur if this gauze
becomes choked and restricts the flow of air through the instrument.
31
RIDSDALE-DIETERT MOISTURE TELLER (cont’d)
VI
RECOMMENDED SPARES
Part No
105
113
132
150
151
167
Description
Pan cooling stand
Heating element
Drying pan – 2 inch (50 mm) deep
Thermostat 90 °C – 170 °C range
Time switch 0-15 minutes
Tongs – pan handling.
32
RIDSDALE MOISTBALANCE
I
GENERAL PRINCIPLES
This balance uses the combination of dial/vernier operation with centre indicating poises and
magnetic damping which makes it fast and easy to use. It is designed for use with the
Moisture Teller or any other moisture determining equipment using the loss in weight
principle on a 50 g sample. There are no loose weights and the operator can rapidly and
accurately determine the percentage moisture in materials as a direct reading after drying.
II
DESCRIPTION
A double beam assembly carrying sliding weights is suspended on precision ground knife
edges. A bow-shaped cradle hangs from one end of the beam assembly and will
accommodate the special Moisture Teller drying pans.
The dial indicator on the front of the balance is calibrated 0% - 20% moisture when using a
50 g sample.
III
INSTALLATION
Geometry of the beam system enables balance to function on non-level conditions. Base is
designed to rest on three feet – only adjustment needed is zero control at end of beam.
33
RIDSDALE MOISTBALANCE (cont’d)
IV
V
TEST PROCEDURE
(a)
Place an empty Moisture Teller pan in position on the pan cradle of the balance.
(b)
Slacken the knurled screw on the back of the rear sliding weight and slide it along the
beam until near equilibrium is obtained. Secure in position by re-tightening the
knurled screw.
(c)
Move the knurled nut on the threaded portion on the end of the beam and move until
the point on the beam comes to rest on the index mark.
(d)
Move the front sliding weight to the 50 g notch on the beam.
(e)
Load the pan with material to be tested until equilibrium is obtained and the pointer
comes to rest on the index mark.
(f)
Transfer the pan to the Moisture Teller and remove the moisture from the material.
Allow the pan to cool on Moisture Teller cooling base.
(g)
Replace the pan containing the dried material in position on the balance and rotate
the dial until equilibrium is again obtained and the pointer comes to rest on the index
mark.
(h)
Read the percentage moisture direct from the dial. The full range of the dial from 0 to
20% is equivalent to a loss in weight of 10 g. Hence if a 100 g sample is used the
dial reading must be divided by 2, or if a 25 g sample is used the dial reading must
be multiplied by 2.
MAINTENANCE
Normal cleanliness is all that is required to maintain the balance in good operating condition.
VI
RECOMMENDED SPARES
Part No
01
02
Description
Compensating Screw
Cradle Assembly.
34
RIDSDALE SLIDING WEIGHT SCALES
Place the Sliding Weight Scales on a level surface, free from vibration if possible.
Adjust the weight on the lower beam to the nearest 10 gram increment required to produce a
standard sand specimen. If any fine adjustment on weight is required, use the weight on the top
beam which is graduated in 0.1 gram increments to achieve the correct specimen height.
Transfer the funnel scoop into the specimen tube, brush out any surplus sand and replace the
funnel scoop back on the Sliding Weight Scales.
MAINTENANCE
Clean thoroughly after use.
RECOMMENDED SPARES
Brass Funnel Scoop
Weight Pan
35
RIDSDALE DIGITAL BALANCE
OPERATION
AC Adapter Operation:
CAUTION:
Use only a 12V Adapter with a negative tip, as provided, to supply AC power. Use of
another type of adapter may permanently damage the unit and will void the warranty.
(a)
Insert the female plug into the receptacle at the rear of the unit, and then into the desired
electrical outlet. Check your use of any extension cord which may affect power output.
Unplug AC adapter when not in use for extended periods.
Battery Operation:
(a)
The Ridsdale Digital Balance can operate on one 9V Alkaline battery, or AC adapter as
provided.
(b)
To install battery, open battery cover on bottom of balance and connect battery to snap.
Place battery into its compartment and replace the cover. Always handle battery lead wires
with care. DO NOT USE EXCESSIVE FORCE!
(c)
Remove battery when balance is not used for extended periods. Replace battery when LCD
indicates “LO”.
36
RIDSDALE DIGITAL BALANCE (cont’d)
CALIBRATION
** PLEASE NOTE:
Calibration weights are NOT supplied. All balances are factory calibrated and
ready to operate.
required.
Calibration weights may be purchased separately if
IMPORTANT:
The calibration procedure is described below. Only use the calibration
weights provided or OIML Class weights. Calibration is always recommended when first using the
balance or after the unit has been moved or subjected to an extreme change in temperature.
Always perform the calibration procedure AFTER the unit has been allowed to warm up properly (at
least 30 minutes). It is also recommended to re-calibrate the unit periodically during long periods of
use and always to start a procedure by taring the unit to re-zero the balance.
External calibration is performed through use of the keypad controls and proper calibration weights.
Internal factory calibration is preset and performed by accessing internal components. Access to
internal components by other than a factory authorised technician will void warranty coverage of this
unit.
Calibration Procedure:
(a)
After allowing unit to warm for 30 minutes, remove all items from the tray top and tare the
balance.
(b)
After observing a stable ZERO with a stable arrow in the (g) gram mode, press and hold the
CAL/MODE button until calibration weight value appears on the display.
(c)
Gently place the correct calibration weight as provided (or equivalent OIML Class Weights)
onto the tray top.
(d)
The + sign will disappear. Wait approximately ten seconds as the unit performs internal
calibration.
IMPORTANT – Do not disturb the balance during this time. Avoid vibration and air currents.
(e)
When calibration is complete the unit will beep, correct calibration weight value will
disappear for one second then reappear as an active weight value. The balance is now
calibrated.
(f)
Remove calibration weight and press the TARE button to reset the zero point. NOTE: If
calibration weight value remains on the LCD display, an improper calibration weight has
been used. Remove improper weight and repeat calibration procedure with correct weight.
37
RIDSDALE-DIETERT (AFS)
LABORATORY SAND RAMMER (TYPE ‘N’)
I
GENERAL PRINCIPLES
This machine is designed for preparing AFS standard test specimens for the determination
of compression, tensile, transverse, shear and splitting strength by compacting a predetermined weight of sand in a tube, or a core box of the required shape. This is achieved
by dropping a known weight a fixed distance, and using the energy produced to compact the
sand.
38
RIDSDALE-DIETERT
(AFS) LABORATORY SAND RAMMER (TYPE ‘N’) (cont’d)
II
DESCRIPTION
The instrument consists of a steel shaft with a ramming head which is mounted in a cast iron
frame. A 14 lb weight is mounted on the shaft and can be raised and released by movement
of a cam handle.
When the cam handle is turned the weight is released exactly 2 inches and then falls freely
through the same distance to make contact with a crosshead fastened to the ramming shaft.
The cam fitted on the left hand side of the main frame enables both the ramming shaft and
the 14 lb weight to be locked in the elevated position, enabling the specimen tube or core
box to the placed in position beneath the ramming head. A tolerance plate is fixed on the
cast iron frame above the top of the steel shaft. A tube conditioner is also supplied with the
rammer and is readily fixed to the base (see ‘Installation’).
The accessories supplied with this machine consist of :One precision specimen tube 2 inches bore x 4¾ inches long, two pedestal cups and one
metal stripping post for removing the rammed specimen from the tube. Additional
accessories are available for attaching to the rammer for the preparation of tensile and
transverse test specimens.
III
INSTALLATION
The rammer should be mounted on the ramming block and secured with the two bolts
provided. (This is necessary in order to eliminate discrepancies in compaction of specimens
which can occur when the rammer is mounted on some semi-resilient surface such as a
bench or table). Alternatively the rammer may be secured to a solid brick or concrete base.
Screw the tube conditioner into the tapped hole in the rear left-hand side of the base of the
rammer frame, and lock in place with the nut provided.
WARNING:
IV
DO NOT TURN THE CAM HANDLE AND ALLOW THE WEIGHT TO FALL
UNLESS A SAMPLE IS BEING RAMMED, OTHERWISE SERIOUS
DAMAGE TO THE RAMMER FRAME MAY RESULT.
TEST PROCEDURE
(a)
Spray the tube conditioner swab with liquid release agent. This should be done as
necessary to maintain the swab in a slightly moistened condition.
(b)
Slide the specimen tube down over the conditioner and back again, then place one
cup over the end of the tube and set up vertically with the cup at the base.
(c)
Weigh out sufficient sand to form a test piece 2 inches (± /32 inches) when rammed,
using scales sensitive to 0.5 g. Transfer to the specimen tube. Start with about 165g
sand, and if this proves to be more or less than required, find by repeated trials, the
correct weight of sand to form a test piece within the permitted tolerance.
Alternatively use the Ridsdale-Dietert Density Indicator to obtain the correct weight of
sand from the first trial.
1
39
RIDSDALE-DIETERT
(AFS) LABORATORY SAND RAMMER (TYPE ‘N’) (cont’d)
IV
TEST PROCEDURE (cont’d)
(d)
Transfer the sample to the specimen tube, level out the surface of the sand if
necessary. (To obtain uniform distribution of contents and more even ramming of
strong sands, place a second pedestal cup over the top of the tube and invert tube
before placing under the ramming plunger).
(e)
Use the cam positioned on the left hand side of the rammer to raise the plunger of
the rammer. Insert the specimen tube and cup containing the sand under the
plunger and make sure that the spigot on the cup is located in the hole in the base of
the rammer frame.
Rotate the cam to release the plunger head to enable it to enter the tube and come to
rest gently on the sand.
V
(f)
Ram with three drops of the sliding weight by turning the cam handle three
revolutions. (In special cases it may be necessary to give more than three rams; if
this is done it should be mentioned when reporting results). The top of the plunger
shaft will be level with the centre line ‘O’ on the tolerance plate when the height of the
test piece is exactly 2 inches.
(g)
Unless the specimen is required for green permeability or shatter index tests, strip
from the tube by inverting over the stripping post and pushing tube gently
downwards.
(h)
When ramming sands which are very weak in the green state use a split specimen
tube in place of the standard precision tube. After ramming remove the bottom cup,
place on a flat drying plate and loosen the clamps. The specimen is left on the plate
by lightly tapping and removing the two halves of the tube without deforming the
specimen.
MAINTENANCE
Keep the machine clean and free from loose sands. Moving parts should be lubricated with
light oil at regular intervals. Lightly grease the underside of the sliding weight to minimise
wear on the cam.
VI
RECOMMENDED SPARES
Part No
LSR 25B
311
313
314
340
341
391
Description
Rammer plunger head
Pedestal cup
Precision specimen tube
Stripping post
Securing screw – Split specimen tube
Drying plate - Split specimen tube
Swab – Tube conditioner.
40
RIDSDALE-DIETERT DENSITY INDICATOR (AFS)
I
GENERAL PRINCIPLES
This accessory for the AFS Sand Rammer provides a rapid method of determining the
weight in pounds per cubic foot of moulding or core sand mixes.
The correct weight of sand to form an AFS standard 2 inch diameter x 2 inch height
specimen can also be readily obtained by using the Density Indicator.
II
DESCRIPTION
The Density Indicator is designed to be mounted on top of the Sand Rammer. The position
of the pointer is controlled by the length of the rammed sand specimen. Three scales are
engraved on a curved plate, two of which indicate density in pounds per cubic foot, one
reading from 88 to 114 pounds per cubic foot when a 165 gram weight of sand is used and
the other reading from 80 to 102 pounds per cubic foot, when a 150 gram sample weight is
used. The third (central) calibration indicates the exact weight (in grams) of sand needed to
form a 2 inch diameter x 2 inch height specimen after ramming a sand specimen weighing
165 grams.
III
INSTALLATION
The Density Indicator is secured to the AFS Sand Rammer by means of two screws
provided, using the two tapped holes on the back of the lug on which the tolerance scale is
mounted. It is positioned correctly by placing the 2 inch gauge block provided, on a pedestal
cup and lowering the ram end on to it. The main arm and the indicating pointer should then
be approximately parallel. Final adjustment is made by slackening the three domed nuts
behind the scale and moving it until the pointer indicates exactly 2 inches on the scale.
41
RIDSDALE-DIETERT DENSITY INDICATOR (AFS) (cont’d)
IV
TEST PROCEDURE (cont’d)
(a)
Weigh out 165 grams of sand and place in a standard 2 inch diameter specimen
tube, using a pedestal cup. Lift the indicator arm to the right so that it comes to rest
on the stop bracket and does not interfere with the action of the rammer.
(b)
Ram the sand with three drops of the rammer or to a chosen mould hardness. Move
the indicator arm until it rests on the top of the rammer plunger and read the density
of the rammed sand in pounds per cubic foot on the left hand scale.
(c)
If the density is less than 88 pounds per cubic foot use a sample weight of 150 grams
and proceed as outlined above, reading the right hand scale.
(d)
To obtain the weight of sand needed to form an AFS 2 inch diameter specimen,
weigh out 165 grams of sand, ram in the usual manner and read the weight in grams
on the centre scale.
42
RIDSDALE-DIETERT FLOWABILITY INDICATOR (AFS)
I
GENERAL PRINCIPLES
This gauge measures the ability of a sand to flow and fill up mould interstices when
subjected to ramming.
II
DESCRIPTION
The Flowability Indicator is a dial indicator which can be readily attached to the AFS
Standard Sand Rammer in such a way that it will measure the amount of movement of the
plunger shaft between the fourth and fifth rams on a 2 inch diameter x 2 inch height
specimen of moulding sand.
III
INSTALLATION
(a)
Fit the securing peg on which the Indicator is mounted, into the hole on the top of the
Rammer frame.
(b)
Position the Indicator, so that, with its stem fully extended, the ball point is
approximately ¼ inch below the tolerance line ‘O’. Secure with the set screw at the
side of the rammer frame (behind the tolerance plate).
(c)
When the Indicator is not in use, it should be rotated out of position so that it does not
interfere with normal ramming procedure.
43
RIDSDALE-DIETERT FLOWABILITY INDICATOR (AFS) (cont’d)
III
TEST PROCEDURE (cont’d)
(a)
Rotate the Flowability Indicator out of position and prepare an AFS standard 2 inch
diameter test specimen of moulding sand with three drops of the rammer weight.
(b)
Ram with a fourth drop of the weight and set the Indicator into position so that the
ball point of the stem comes in contact with the plunger of the rammer. Set the bezel
of the Indicator to read zero.
(c)
Ram a fifth time and record the reading on the Indicator as percentage Flowability. If
the plunger does not descend any further, this indicates that the sand has “flowed” as
far as possible with the initial four rams, hence the flowability is 100%. The further
the plunger descends on the fifth ram, (indicating incomplete initial flow), the lower
the percentage flowability.
(d)
Before removing the sand specimen tube rotate the Indicator backwards out of
position.
44
RIDSDALE-DIETERT COMPACTABILITY TESTER
I
GENERAL PRINCIPLES
The compactability test is carried out in conjunction with a Sand Rammer. This test
measures the decrease in height of a riddled mass of sand, 4¾ inches (120 mm) high, under
the influence of a standard compacting force.
By this means the degree of temper of a sand can be measured and the water requirements
determined.
II
DESCRIPTION
The Compactability Tester consists of a scale, graduated 0 – 65% in units of 5, which fits
into the hole on top of the Standard Sand Rammer, and a tube filler comprising a ¼” (6.35
mm) mesh screen and funnel mounted on a cast base. A locating hole in the centre of the
boss ensures that the specimen tube is positioned directly beneath the funnel outlet.
A strike-off blade is provided for removing excess sand after the specimen tube has been
filled.
45
RIDSDALE-DIETERT COMPACTABILITY TESTER (cont’d)
III
INSTALLATION
(a)
Place a precision specimen tube and pedestal cup in position on the sand rammer.
(b)
Mount the scale on the top of the rammer frame using the ¼” (6.35 mm) drilled hole.
(c)
Using the weight lifting lever, raise the plunger of the rammer until the bottom face of
the ram end is level with the top edge of the specimen tube.
(d)
Move the scale up or down until the zero is in line with the top of the plunger shaft.
(e)
Lock the accessory in position by means of the 3/16” Allen screw located on the
right-hand side of the top of the rammer.
NOTE:
This accessory can be fitted and used without interfering with the Density Indicator.
IV
V
TEST PROCEDURE
(a)
Position a specimen tube and pedestal cup on the tube filler beneath the funnel
outlet.
(b)
Pass the sand to be tested through the screen until the specimen tube is filled.
(c)
Strickle the sand level with the top of the tube with the strike-off blade.
(d)
Remove the specimen tube and pedestal cup and place in position on the sand
rammer.
(e)
Lower the plunger gently onto the sand and ram with three blows.
(f)
Read percentage compactability as indicated by the position of the top of the plunger
shaft on the scale.
RECOMMENDED SPARES
Part No
2601
2603
Description
¼” (6.35 mm) mesh screen
Self-adhesive graduated scale.
46
RIDSDALE-DIETERT
TENSILE RAMMING ACCESSORY (AFS)
I
GENERAL PRINCIPLES
The Tensile Ramming Accessory is required to prepare AFS standard tensile specimens on
the AFS Laboratory Sand Rammer.
II
DESCRIPTION
This accessory consists of :A split metal core box, a base for retaining the two halves of the box and a ramming head
which clamps on to the 2 inch diameter ram head.
III
INSTALLATION
Clamp the ramming head on to the rammer shaft in the position shown in the illustration,
using the bolts and collar supplied. Tighten the securing bolts evenly and just enough to grip
the ram end firmly, without distorting the collar.
47
RIDSDALE-DIETERT
TENSILE RAMMING ACCESSORY (AFS) (cont’d)
IV
TEST PROCEDURE
(a)
Assemble the core box and find, by trial and error, the weight of sand required to
1
form a test piece 1 inch thick (± /64 inch).
Start by transferring approximately 100g of sand to the core box, roughly level the
surface, raise the ramming head using left-hand side cam, and place core box in
position on the rammer.
(b)
Lower the ramming head gently onto the sand. Ram with three blows. The tensile
1
tolerance is marked by a /32 inch wide groove in the rammer shaft marked ‘T’. when
the thickness of the rammed specimen is exactly 1 inch the centre of the groove will
be in line with the top face of the rammer frame top lug.
(c)
Remove the core box assembly from the rammer, loosen the knurled screw and
separate the core box and test piece from the base. Place the core box on a flat
drying plate, rap lightly, and remove the two halves, taking care not to deform the test
piece.
(d)
Dry or cure specimen and cool before testing.
NOTE:
The use of a Mould Release Agent will assist in the clean stripping of test pieces.
48
RIDSDALE-DIETERT
TRANSVERSE RAMMING ACCESSORY (AFS)
I
GENERAL PRINCIPLES
The Transverse Ramming Accessory is required to prepare AFS standard transverse
specimens on the AFS Laboratory Sand Rammer.
II
DESCRIPTION
This accessory consists of :A split metal core box, a sand hopper, a base plate, four drying plates, a spring steel cut-off
knife, a strickling plate and a ramming head which clamps on to the 2 inch diameter ram
head.
III
INSTALLATION
Clamp the ramming head onto the rammer shaft in the position shown in the illustration
using the bolts and collar supplied. Tighten the securing bolts evenly and just sufficiently to
grip the ram end without distorting the collar.
IV
TEST PROCEDURE
(a)
Assemble the core box and hopper on the base plate with both markers on the same
end and insert a drying plate in the bottom of the core box.
(b)
Fill the box with sand to the top of the hopper and strike off level with the strickle
plate, ensuring that there are no open pockets in the sand.
49
RIDSDALE-DIETERT
TRANSVERSE RAMMING ACCESSORY (AFS) (cont’d)
IV
TEST PROCEDURE (cont’d)
(c)
Raise the ramming head using the left-hand side cam and place the core box in
position on the rammer. Carefully lower the plunger into the hopper and line up.
Ram with four blows.
(d)
Raise the plunger, turn the core box assembly through approximately 45° and allow
the weight of the ram to rest on top of the hopper. Insert the knife from one end of
the assembly and cut off the core specimen.
(e)
Remove the core box assembly from the rammer and lift off hopper. Set the core
box with drying plate on the bench and rap lightly. Carefully remove the two halves
of the core box from the specimen.
(f)
Dry or cure the specimen and cool before testing
NOTE:
The use of a Mould Release Agent will assist in the clean stripping of the specimens.
V
RECOMMENDED SPARES
Part No
367
368
Description
Drying Plate
Cut-off Knife.
50
RIDSDALE-DIETERT SPLIT SPECIMEN TUBE (AFS)
I
GENERAL PRINCIPLES
A means of forming an AFS standard 2 inch diameter x 2 inch height specimen in sands
which are very weak in the green state. This accessory also affords a convenient method of
preparing and gassing AFS standard 2 inch diameter x 2 inch height specimens in Sodium
Silicate/CO2 sands.
II
DESCRIPTION
The accessory is a highly polished tube, split longitudinally, the two halves being held
together by means of hinged clamps and knurled screws.
III
TEST PROCEDURE
(a)
Clamp the two halves of the tube, with identification marks together, ensuring that
they fit properly and are not held apart by sand grains.
(b)
Pass once over the specimen tube conditioner.
(c)
Ram a specimen in the normal way using a bottom pedestal cup.
(d)
Remove the tube and specimen from the pedestal cup and place on a flat drying
plate.
(e)
Loosen the clamps, give a few light taps and remove each half carefully without
deforming the specimen.
If using Sodium Silicate/CO2 sands, remove the pedestal cup after ramming, transfer
the tube and specimen to the CO2 Gassing Accessory and gas the specimen.
After gassing, loosen clamps and remove the two halves of the tube.
51
RIDSDALE-DIETERT SPLIT SPECIMEN TUBE (AFS) (cont’d)
IV
MAINTENANCE
Clean thoroughly and ensure all loose sand grains are removed from mating faces. Clamp
the two halves together and pass once over the specimen tube conditioner.
V
RECOMMENDED SPARES
Part No
341
Description
Drying Plate
52
RIDSDALE CO2 GASSING ACCESSORIES (AFS)
I
GENERAL PRINCIPLES
These accessories are for gassing prepared AFS standard compression (2 inch diameter x 2
inch height), tensile (1 inch thick central section) and transverse (1 inch x 1 inch x 8 inches)
specimens of sand mixtures bonded with sodium silicate binders.
II
DESCRIPTION
The accessories consist of three hollow perforated bases, with gas inlet ferrules, designed to
accommodate the split specimen tube, tensile core box and transverse core box
respectively.
III
INSTALLATION
Connect the gas inlet ferrules to a controlled flow of CO2 gas.
IV
TEST PROCEDURE
(A)
Compression Test Specimens
(a)
Prepare an AFS standard 2 inch diameter x 2 inch height test specimen in a
Split Specimen Tube.
(b)
Place the tube and specimen on the rubber gasket in the gassing accessory
with the specimen at the bottom.
(c)
Gas for 60 seconds at a flow rate of 5 litres/min* and strip the specimen.
53
RIDSDALE CO2 GASSING ACCESSORIES (AFS) (cont’d)
IV
TEST PROCEDURE (cont’d)
(B)
(C)
Tensile Test Specimens
(a)
Prepare an AFS standard 1 inch thick central section tensile test specimen in
the Tensile Ramming Accessory.
(b)
Remove the core box and specimen from the base and place in the Tensile
Gassing Accessory. Hold firmly in position with the clamping screw provided.
(c)
Gas for 60 seconds at a flow rate of 5 litres/min.*
Transverse Test Specimens
(a)
Prepare an AFS standard 1 inch x 1 inch x 8 inches test specimen in the
Transverse Ramming Accessory.
(b)
Remove the sand hopper and cut-off knife and carefully brush any loose sand
grains from the top face of the core box.
54
RIDSDALE CO2 GASSING ACCESSORIES (AFS) (cont’d)
IV
TEST PROCEDURE (cont’d)
(C)
Transverse Test Specimens (cont’d)
(c)
Place the Gassing Accessory onto the core box. Holding the Gassing
Accessory, core box and drying plate firmly together, invert the assembly.
Remove the drying plate.
(d)
Gas for 60 second at a flow rate of 5 litres/min.*
* This gassing time and flow rate serves only as a general guide as different binders
and sand mixtures will require various times and volumes of gas to develop
optimum strengths.
V
MAINTENANCE
Remove sand grains from gas passages by blowing out with clean, dry, compressed air.
VI
RECOMMENDED SPARES
Part No
354
352
346
Description
Rubber sealing washer for compression accessory.
Securing screw for tensile accessory.
Rubber sealing washer for tensile accessory.
55
RIDSDALE LABORATORY CORE-BAKING OVEN
(MODEL PF 60)
I
GENERAL PRINCIPLES
(a)
Unpacking & Handling
Remove the shelves and runners from the packaging before attempting to move the
equipment.
Lift the unit by its base. The door should not be used to support the equipment when
moving it. Use two people to carry the oven where possible. Remove any packing
material from the inner chamber before use.
Place the oven on a level surface. If over-temperature protection is not fitted, ensure
that the unit can be directly observed.
Ensure that there is free space behind the oven. There are vents in the back which
must not be obstructed.
Ensure that the oven is placed in such a way that it can be quickly switched off or
disconnected from the electrical supply – see below.
The ends of the runners should be inserted into the vertical columns of holes
simultaneously at the front and the back. The bar should then be rotated through 90°
in a downwards direction to secure it in place. The shelves slide onto the runners
such that the spurs on the lower side of the shelf are under the bar; this prevents the
shelf from tilting forwards when partially withdrawn.
56
RIDSDALE LABORATORY CORE-BAKING OVEN (MODEL PF 60)(cont’d)
I
GENERAL PRINCIPLES (cont’d)
(b)
Electrical Connections
Connection by a qualified electrician is recommended.
The Ridsdale Laboratory Core Baking Oven is supplied for use on single phase
220/230V AC supply.
Check that the supply voltage is compatible with the voltage on the label, and that the
current capacity is sufficient for the amperage on the label, before connection to the
supply.
The oven is supplied complete with a 13 amp moulded plug and lead. A supply-rated
fuse is internally fitted.
II
OPERATING INSTRUCTIONS
(a)
Operating Cycle
The Ridsdale Core-Baking Oven is fitted with a combined supply light and instrument
switch. The light will be on whenever the oven is connected to the supply. The
switch cuts off power to the controller.
The fan assisted circulation will operate when the instrument switch is switched on.
Connect the oven to the electrical supply. The supply light should glow.
Operate the instrument switch to activate the temperature controller; the O position
is off, the I position on. The controller will become illuminated and go through a short
test cycle.
Adjust the temperature controller.
Overtemperature option – Hydraulic thermostat. Set the rotary dial to the desired
protection temperature.
Overtemperature option – Digital. If the overtemperature controller has not yet been
set as required, set and activate it.
Unless a time switch is fitted and is off, the oven will begin to heat up according to
the controller set point or program.
To switch the oven off, set the instrument switch to off. If the oven is to be left off,
isolate it from the electrical supply.
57
RIDSDALE LABORATORY CORE-BAKING OVEN (MODEL PF 60) (cont’d)
II
OPERATING INSTRUCTIONS (cont’d)
(b)
Overtemperature Control
The overtemperature controller should typically be set at 15 °C above the main
controller. If an overtemperature condition occurs, always investigate the possibility
that the main control system has failed.
An overtemperature condition always cuts off power to the heating elements. To
reset the condition, first either allow the oven to cool, or increase the
overtemperature setting.
Hydraulic thermostat. If the overtemperature trip operates then a loud click occurs
and a warning light adjacent to the thermostat lights up; the red reset button on the
thermostat pops out. Reset the thermostat by pressing the red button.
Digital. A light in the overtemperature controller flashes. Reset the overtemperature
controller.
(c)
Vents
On the back of the unit are two vents, inlet and exhaust. The inlet vent is covered by
a baffle which should be left in place.
The exhaust vent is closed by a butterfly valve which can be controlled from the front
panel. Rotate the knob clockwise to open the vent, anti-clockwise to close.
In non-fan models there is only a small flow of air through the chamber. With fan
versions, fumes are pushed out through the exhaust vent by fan action, and drawn in
through the inlet vent.
III
TEMPERATURE CONTROLLERS
For operating instructions relating to Temperature Controllers, see the Manufacturer’s
Instructions supplied with the instrument.
58
RIDSDALE LABORATORY CORE TEST PIECE BLOWER
I
GENERAL INSTRUCTIONS
The Ridsdale Laboratory Core Test Piece Blower is designed for the production of bonded
sand test pieces. Relatively simple dies are used enabling slab test pieces of any
configuration to be produced, such as those needed for hot distortion, tensile or transverse
testing.
The machine can be used for making test pieces from oil-cereal, cold curing, hot box or shell
sand mixtures.
II
DESCRIPTION OF MACHINE
The machine is shown in Fig. 1. It consists of a main frame holding the die clamps and
heater plates, and a blowing head to which is attached a sand magazine which can be
raised and lowered by a rack and pinion operated by a weighted handle. The sand mixture
contained in the magazine is blown into the die by operating a lever. The die temperature is
controlled by a thermostat. The individual parts are numbered in Fig. 1 and their functions
are as follows :No 1 - Temperature Control Panel
Enables the required die temperature to be set. The temperature of the dies is indicated on
the digital display in °C.
59
RIDSDALE LABORATORY CORE TEST PIECE BLOWER (cont’d)
II
DESCRIPTION OF MACHINE (cont’d)
No 2 – Air Pressure Regulator
This regulator enables the required blowing air pressure to be selected by turning the knob,
and maintains this pressure against small fluctuations in the mains supply pressure. The
gauge indicates the pressure of air supplied to the sand magazine.
No 3 – Air Inlet
The air inlet is attached to the side of the pressure regulator. The coupling is ¼ in. BSP.
No 4 – Blower Lever
The blower lever controls the air supply to the sand magazine and is operated by pulling the
knob downwards smartly. A safety device prevents the blow valve being operated until the
sand magazine is in contact with the die.
No 5 – Magazine Positioning and Clamping Handle
This weighted handle is used to raise and lower the sand magazine. The weight is sufficient
to hold the magazine in contact with the die during the blowing operation.
No 6 – Sand Magazine
This consists of a cylinder having a quick release joint at the upper end, and a nozzle at the
lower end. It can be removed from the blowing head fixed to the raising and lowering rack
by turning in an anti-clockwise direction.
The nozzle is detachable, and has an inner recess for holding a removable rubber slotted
valve which is used when blowing shell moulding sands.
No 7 – Die Positioning Screw
This screw is used in conjunction with the die clamping lever and backstop to adjust the
position of the die centrally beneath the sand magazine nozzle.
No 8 – Die Clamping Lever
This lever releases or clamps the side plates of the die by a backward or forward movement.
No 9 – Die Heater Plates
These plates form the side walls of the die cavity, and contain electrical heater elements.
The temperature of the plate is controlled by the temperature controller.
III
DESCRIPTION OF DIES
Dies for Producing Hot-Cured Test Pieces
The die consists of a frame having an insulated handle, and is inserted directly between the
heater plates. After blowing the test piece, the die is removed, and the test piece stripped
from it by pressing it on to a suitable stripping post.
60
RIDSDALE LABORATORY CORE TEST PIECE BLOWER (cont’d)
IV
SETTING UP READY FOR USE
The blowing machine must be firmly fastened to a strong level bench top so that it cannot be
pulled over during the operation of opening and closing the die. As an alternative to
fastening to the bench top, the machine can be bolted to a strong base board at least 750
mm square.
Connect the air inlet to a supply of compressed air at minimum pressure of 80 psi (6 bars)
and maximum 250 psi (18 bars). The supply pipe should be as short as possible and have
adequate bore to minimise the pressure drop during the blowing operation.
Connect the power plug to a suitable electric power supply.
V
INSTRUCTIONS FOR USE
Setting Up Die Ready for Use
(a)
Check that the magazine is correctly positioned on the blow head.
(b)
Place the die between the die heater plates and by means of the die positioning
screw and clamping screw, locate the die centrally beneath the sand magazine and
nozzle. The positioning screw should be adjusted so that the die is firmly clamped by
the side plates when the clamping lever is in a position of 45 °C to the bench top.
(c)
Adjust the backstop so that the magazine nozzle completely covers the die entrance.
NOTE: (d)
(e)
If the die is to be used HOT, release the clamp and reclamp very lightly. This action
allows for die expansion to take place during heat up.
Set the temperature controller to the required temperature. The machine is ready for
use when the pre-set temperature shows on the digital display as described in the
Controller’s Instructions.
Filling the Sand Magazine
(a)
Raise the magazine by turning the positioning handle so that the weight hangs
vertically.
(b)
Unclip the magazine from the blowing head.
(c)
Fill the magazine two-thirds full with shell moulding sand. Do not overfill.
(d)
Fasten the magazine to the blow head.
NOTE: (d)
(e)
In all cases ensure that the faces of the magazine and blow head joint are clean
before fastening.
To prevent overheating, the magazine should only be attached to the blow head
during the time that test pieces are being produced.
61
RIDSDALE LABORATORY CORE TEST PIECE BLOWER (cont’d)
V
INSTRUCTIONS FOR USE (cont’d)
Blowing Operation
(a)
Set the air regulator to the correct pressure.
follows:-
Recommended pressures are as
Shell Sands 80 – 90 psi (6 bars).
This is a guide only and can be adjusted to suit users sand system/mix.
NOTE:
Do not exceed 100 psi (7 bars) blowing pressure.
(b)
Check that the magazine contains sand mixture and is attached to the blow head
correctly as in previous instructions.
(c)
Clamp the die in the correct position.
(d)
Lower the magazine on to the die.
(e)
Depress the blow lever firmly. Hold down for about 2 seconds.
(f)
Release the blow lever.
(g)
Raise the magazine from the die.
NOTE:
VI
This operation is important and prevents overheating of the die nozzle and magazine.
(h)
When using hot curing mixtures, allow the filled die to remain clamped between the
heater plates for the necessary curing period. Then release the clamp and withdraw
the die.
(i)
When blowing shell sand, the nozzle should then be tapped to release any adhering
sand.
(j)
Strip the test piece from the hot die by means of a stripping post.
(k)
Wipe the die clean and replace between the heater plates.
(l)
Blow the next test piece and repeat operations from (c) onwards.
MAINTENANCE OF THE EQUIPMENT
Maintenance will be confined to cleaning off sand from the equipment. Lubrication is not
required; any oil will attract sand and dust.
Attention should be paid to cleaning out the magazine after use, and maintaining the cylinder
in a clean condition.
62
RIDSDALE-DIETERT PERMEABILITY METER (AFS)
I
GENERAL PRINCIPLES
Permeability is defined by the AFS as that physical property of moulded sand which allows
gas to pass through it. It is determined by measuring the rate of flow of air through the AFS
standard rammed specimen under a standard pressure.
The general formula for the calculation of permeability may be expressed as follows :P=
v x h
pxaxt
Where P =
v =
h =
p =
a =
t
=
Permeability number
Volume of air in ml passing through the
specimen
Height of test specimen in cm.
Pressure of air in cm of water.
Area of cross-section of specimen in
2
cm .
Time in seconds.
Since the standard method requires that 2000 ml of air should be forced through a specimen
2
2 inches (5.08 cm) and 2 inches diameter (20.268 cm area), by substituting these values for
v, h, and a, and measuring the time in seconds, the formula becomes :P =
____________30072____________________
air pressure in cm of water x time in seconds
To determine permeability it is, therefore, only necessary to measure accurately the time
taken for 2000 ml of air at a known pressure to pass through a standard test specimen.
For example, if p = 9.6 cm and t = 36 s
P = _______________30072____________________
9.6 x 36
= 87
By means of this instrument a measured volume of air can be passed through a rammed
sand specimen and the permeability of the sand determined by recording the time taken for
the air at a measured pressure to pass through the specimen.
Alternatively, for routine control purposes, calibrated orifices may be used to meter the rate
of flow of air to the sand specimen and by measuring the pressure between the orifice and
the specimen, the permeability may be obtained by referring to the attached table or using
the transparent direct reading scale.
63
RIDSDALE-DIETERT PERMEABILITY METER (AFS) (cont’d)
II
DESCRIPTION
The body of the Permeability Meter is an aluminium casting consisting of a water tank and
base. Inside the water tank floats a balanced air drum carefully weighted and designed to
maintain a constant air pressure of 10 cm during its fall.
The outlet from the air drum is connected to a centre post in the base via a three-way air
valve. The centre post incorporates a pipe for measuring pressure, which is connected to
the water manometer and an expandable ‘O’ ring for sealing the specimen tube. It also
accommodates the orifices.
Two calibrated orifices marked 30 and 270 respectively, and an open orifice marked ‘O’ are
supplied.
A transparent scale is mounted in front of the manometer to measure the air pressure or
permeability when using the orifice method.
64
RIDSDALE-DIETERT PERMEABILITY METER (AFS) (cont’d)
III
INSTALLATION
(a)
Place the Permeability Meter on a level bench and fill tank with water to WATER
LEVEL mark.
(b)
Rotate knurled ring clockwise and remove the aluminium cover from the centre post.
Open priming cup and pour distilled water into it until the water appears in the glass
tube below line ‘O’. Any initial resistance to the entry of the water can be overcome
by pressing the ball of the thumb on the open end of the priming cup.* Close the tap.
(c)
With the manometer scale on the dial in the vertical position, turn the adjusting screw
until the zero on the dial is level with the water in the manometer tube.
(d)
Turn air valve to ‘VENT’ and raise air drum until it is above the water level. Turn
valve to ‘CLOSED’ and allow the drum to descend slowly into the water. Turn the air
valve gradually towards ‘VENT’ and allow the air drum to descend until the ‘X’ mark
on the drum is level with the top edge of the tank. Turn valve to ‘CLOSED’.
(e)
Place the aluminium cover on the centre post and form an air-tight seal by rotating
the knurled ring in an anti-clockwise direction.
(f)
Turn the air valve to a position midway between ‘CLOSED’ and ‘VENT’. The water
level in the manometer should now read 10.0 cm pressure and remain steady. If the
drum should descend this would indicate air leaks in the system.
* The addition of a small amount of detergent will facilitate the filling of the manometer tube.
IV
TEST PROCEDURE
DIN Standard Time and Pressure Method
(a)
Check that the open orifice is in position in the centre post.
(b)
Prepare a standard specimen of sand. Before stripping from tube, place in position
on the centre post and seal by rotating the knurled ring anti-clockwise.
(c)
Raise the air drum as in Section III, paragraph (d).
(d)
Allow the air drum to descend by turning the air valve to a position midway between
‘CLOSED’ and ‘VENT’. Time the descent of the air drum between the zero and the
2000 ml mark with a stop watch and record the pressure indicated on the manometer
during the descent of the drum.
(e)
Calculate the permeability by applying the formula given in Section I.
65
RIDSDALE-DIETERT PERMEABILITY METER (AFS) (cont’d)
Routine Method using calibrated orifice
(a)
Select the orifice that will give as large a pressure reading as possible. Use the small
orifice for permeability values below 36, and the large orifice for permeability values
above 36.
(b)
Screw the appropriate orifice into the air outlet pipe in the centre post. Tighten firmly
onto the rubber washer using the fingers only.
(c)
Raise the air drum as in Section III, paragraph (d), and place the specimen and tube
in position on the centre post. Seal by rotating the knurled ring anti-clockwise.
Allow the air drum to descend by turning the air valve to a position midway between
‘CLOSED’ and ‘VENT’ and either :-
V
(i)
Record the pressure on the manometer and refer to the table for the
Permeability number, or,
(ii)
Rotate the transparent scale until the line on the circumference cuts the
meniscus of the water in the manometer and read the permeability direct. If
the small orifice is used read the outer scale on the dial, and if the large
orifice is used read the inner scale.
MAINTENANCE AND METHOD OF CHECKING CALIBRATION
The instrument should be kept clean at all times and sand, dirt or water should not be
allowed to enter the air outlet pipe in the centre post. This can be achieved by keeping the
aluminium dust cover in position on the centre post whenever the instrument is not in use.
If it is suspected that sand or water etc., has entered the air passages of the instrument,
empty the manometer tank by removing the small screw just below the manometer tube,
empty the large water tank and remove the small screw at the bottom of the centre post.
Blow clean dry air through the system and if necessary remove the clear PVC pipes and dry
them. Replace pipes and screws and refill water tanks.
To check the calibration of the instrument allow 2000 ml of air to pass through each orifice in
turn. The large orifice (1.5 mm) should allow 2000 ml of air to pass through it in 30 s (±0.3
s), and the small orifice (0.5 mm) should allow 2000 ml of air to pass through it in 4 min 30 s
(±1.35 s). This should be checked with a stop watch.
If the orifice appears to be out of calibration check air system for leaks as in Section III
paragraphs (e) and (f), and confirm that 10 cm pressure is registered on the manometer.
If there are no leaks and the pressure is correct, clean orifice with clean dry compressed air
or a soft wood splint.
NEVER CLEAN ORIFICES WITH METAL POINT OR WIRE.
Should the instrument still appear to be out of calibration it is recommended that it be
returned to the manufacturers for overhaul.
66
RIDSDALE-DIETERT PERMEABILITY METER (AFS) (cont’d)
VI
RECOMMENDED SPARES
Part No.
508
509
511
514
515
516
517
518
518a
522
523
524
525
526
528
544
545
546
Description
Air valve – three-way
Priming cock – manometer housing
Air tube – air valve to centre post
Plain ferrule – manometer tube.
Screwed ferrule – manometer tube.
Manometer tube, c/w 2 washers.
Sealing washer – manometer tube
Permeability dial
Permeability dial complete with bracket
Adjusting screw – permeability dial
Large orifice – 30 seconds
Small orifice – 270 seconds
Open orifice
Sealing washer - orifice
Pressure pipe complete with olive and nut
Dust cover – centre post
‘O’ ring – sealing – centre post
‘O’ ring – cushion – centre post.
67
RIDSDALE-DIETERT PERMEABILITY METER (AFS) (cont’d)
PERMEABILITY TEST PRESSURES AND CORRESPONDING VALUES
AS OBTAINED WITH STANDARD ORIFICES
PERMEABILITY
Pressure
grams per
sq. cm.
0.1
0.2
0.3
0.4
0.5
0.6
0.7
0.8
0.9
1.0
1.1
1.2
1.3
1.4
1.5
1.6
1.7
1.8
1.9
2.0
2.1
2.2
2.3
2.4
2.5
2.6
2.7
2.8
2.9
3.0
3.1
3.2
3.3
3.4
3.5
3.6
3.7
3.8
3.9
4.0
4.1
4.2
4.3
4.4
4.5
4.6
4.7
4.8
4.9
5.0
Small
Orifice
0.5 mm
Large
Orifice
1.5 mm
….
….
….
….
….
….
….
….
….
….
….
….
….
….
….
….
….
….
….
49
47
44
42
40
38
36
34
33
31
30
29
28
27
25.8
24.2
23.4
22.7
21.8
21.0
20.0
19.5
19.0
18.4
17.8
17.3
16.7
16.2
15.7
15.2
14.7
….
….
….
2450
2000
1620
1350
1200
1060
950
850
780
710
650
610
550
525
492
467
440
417
398
376
358
341
326
313
300
287
275
264
253
243
235
226
219
212
205
198
193
185
178
173
167
163
156
151
146
142
138
PERMEABILITY
Pressure
grams per
sq. cm
5.1
5.2
5.3
5.4
5.5
5.6
5.7
5.8
5.9
6.0
6.1
6.2
6.3
6.4
6.5
6.6
6.7
6.8
6.9
7.0
7.1
7.2
7.3
7.4
7.5
7.6
7.7
7.8
7.9
8.0
8.1
8.2
8.3
8.4
8.5
8.6
8.7
8.8
8.9
9.0
9.1
9.2
9.3
9.4
9.5
9.6
9.7
9.8
10.0
….
Small
Orifice
0.5 mm
Large
Orifice
1.5 mm
14.3
13.8
13.4
13.0
12.6
12.2
11.8
11.4
11.0
10.7
10.3
10.0
9.7
9.4
9.0
8.8
8.5
8.2
7.9
7.7
7.5
7.2
7.0
6.7
6.5
6.3
6.0
5.8
5.6
5.3
5.1
4.9
4.7
4.4
4.2
4.0
3.7
3.5
3.3
3.1
2.9
2.6
2.4
2.2
1.9
1.7
1.4
1.1
….
….
134
128
126
122
119
115
112
108
105
102
99
96
93
90
88
85
82
80
77
75
73
70
67
65
63
61
58
56
54
52
50
48
46
44
42
40
38
36
….
….
….
….
….
….
….
….
….
….
….
….
68
RIDSDALE- DIETERT ELECTRIC PERMMETER
I
GENERAL PRINCIPLES
This Permeability Meter employs the orifice method for the rapid determination of sand
permeability. Air at a constant pressure is applied to a standard test specimen (in a
specimen tube), and the drop in pressure is measured on a pressure gauge, which is
calibrated directly in permeability numbers.
II
DESCRIPTION
A high speed blower, with a pressure balancing mechanism, delivers air to the system at 100
mm water pressure. The speed of this blower is controlled by a rheostat on the right-hand
side of the instrument.
A three-way valve operated by a lever on the left-hand side of the instrument allows the air
to flow to either the pressure gauge or to the centre post.
By rotating the centre post an ‘O’ ring is expanded and forms an air-tight seal with a
specimen tube.
The hole in the centre post is threaded to accommodate one of the two calibrated orifices.
The pressure gauge dial has three separate graduations. The inner scale gives air pressure
in mm of water, and the other two are calibrated directly in permeability numbers one for
each orifice.
Two check jets are supplied with each instrument for checking the calibration.
69
RIDSDALE-DIETERT ELECTRIC PERMMETER (cont’d)
III
INSTALLATION
Place the unit on a rigid level base, and connect to appropriate power supply (see nameplate
for correct voltage and frequency).
IV
V
TEST PROCEDURE
(a)
Switch on blower motor by moving toggle switch to the “ON” position. Allow the
motor to run for at least one minute in order to obtain a stable reading on the gauge.
(b)
Select the orifice required for the sand sample to be tested. The general rule for
determining the orifice required is :(i)
If the permeability number of the sample is over 50, use the large orifice
marked ‘L’.
(ii)
If the permeability number of the sample is under 50, use the small orifice
marked ‘S’.
(c)
Place the specimen tube with the sand sample uppermost over the centre post of the
permmeter.
(d)
Rotate the knurled ring of the centre post anti-clockwise to seal the specimen tube.
(e)
Place the lever on the left-hand side of the permmeter body in the “CHECK” (forward)
position.
(f)
Adjust the motor speed control rheostat to obtain a pressure reading of exactly 100
mm or ‘O’ permeability on the pressure gauge.
(g)
Move the lever to the “TEST” (rear) position, and read permeability from the
appropriate scale according to the orifice in use.
(h)
Return lever to its “CHECK” position and confirm that a pressure of 100 mm is still
recorded.
(i)
Release the specimen tube by rotating the knurled ring in a clockwise direction.
CALIBRATION AND MAINTENANCE
This instrument can only be calibrated by comparison with sands of known permeability.
However, to check that the instrument is working correctly, and that the orifices have not
been damaged (or blocked), it is supplied with two check jets.
Each of these check jets is mounted in a rubber bung which can be placed in the end of a
specimen tube. The check jet marked 150 should be used for testing the large orifice and
the check jet marked 15 for testing the small orifice. The tube with the bung in one end is
placed on the instrument as in normal testing.
When using the check jets the permeability number indicated on the dial of the instrument
should correspond with the number stamped on the check jet, subject to a tolerance of ± one
division (ie, ±10 for the 150 jet and ±1 for the 15 jet).
70
RIDSDALE-DIETERT ELECTRIC PERMMETER (cont’d)
V
CALIBRATION AND MAINTENANCE (cont’d)
If the instrument appears to be out of calibration, blow out the calibrated orifices with clean,
dry compressed air.
NEVER CLEAN ORIFICES WITH METAL POINT OR WIRE
NOTE:
The check jets are not interchangeable and must only be used on the instrument with which
they are supplied – see instrument serial number stamped on jet.
If adjustment is required to obtain the necessary 100 mm air pressure, carry out the following
procedure :(a)
Switch on blower motor.
(b)
Place lever in check position.
(c)
Set rheostat in mid-way position of total travel.
(d)
Remove hex plug positioned on the top of the machine to right-hand side of the
centre post, to gain access (see (e)).
(e)
Slacken off 2BA brass nut using box spanner, pass screwdriver down through the
centre of the box spanner and turn screwed spindle in a clockwise direction till 100
mm reading is obtained. Retighten the locknut and replace hex plug.
Tools required – 2 BA Box Spanner and instrument screwdriver sufficiently long to
protrude through the centre of the box spanner.
NOTE:
Adjusting the air pressure does not affect the calibration of this instrument.
VI
RECOMMENDED SPARES
Part No.
2201
2202
2205
2206
Description
‘O’ Ring – sealing – centre post
‘O’ Ring – cushion – centre post
Sealing washer - orifice
Pressure gauge.
71
RIDSDALE-DIETERT MOULD PERMEABILITY ACCESSORY
I
GENERAL PRINCIPLES
This accessory can be used with either the Standard Permeability Meter or the Electric
Permmeter, to measure the permeability of the actual mould surface in permeability units.
II
DESCRIPTION
The unit consists of a special contact head fitted with a sponge rubber, sealing washer and
fixed aperture connected by a length of PVC tubing to a bell-shaped adaptor which fits onto
the centre post of either the Standard Permeability Meter or the Electric Permmeter.
By means of this accessory air at a known pressure can be forced through the mould
surface and from the drop in pressure across an orifice the permeability can be obtained.
The aperture in the contact head has been designed to give a reading on a standard test
specimen equivalent to that which would be obtained if the permeability of the specimen was
determined in the normal way.
A sliding metal collar inside the contact head ensures that the aperture remains constant
when pressed against a mould surface.
III
TEST PROCEDURE
(A)
Standard Permeability Meter
(a)
Seal the bell-shaped adaptor in position on the Permeability Meter.
(b)
Start the flow of air with suitable orifice in position as for normal permeability
tests.
(c)
Press contact head firmly against the mould surface and take reading of
pressure on manometer.
(d)
To obtain permeability number consult perm. table or use rapid reading
quadrant.
72
RIDSDALE-DIETERT MOULD PERMEABILITY ACCESSORY (cont’d)
III
TEST PROCEDURE (cont’d)
(B)
IV
Electric Permmeter
(a)
Fit the bell-shaped adaptor to the Permmeter in the same manner as for
carrying out a standard permeability test.
(b)
With suitable orifice in position start the flow of air by switching on the blower
motor.
(c)
Adjust zero.
(d)
Press the contact head firmly against the mould being tested and read the
permeability number direct on the appropriate scale according to the orifice
used.
MAINTENANCE
See that the rubber tubing is in good condition and the contact head is not damaged.
VI
RECOMMENDED SPARES
Part No
2207
2208
2209
Description
PVC Tube
Contact Head
Washer complete with brass insert – Contact head.
73
CORE PERMEABILITY TUBE
I
GENERAL PRINCIPLES
The Core Permeability Tube provides a means of determining the permeability of dried,
baked or cured core sand specimens after they have been stripped from the specimen tube.
II
DESCRIPTION
This specially shaped tube is fitted with an internal rubber lining which can be inflated using
the small hand pump provided. When inflated, the lining seals the curved surfaces of the
specimen so that, under test, air can only pass between the flat faces.
Two small one-way air valves in the body of the tube enable the operator to inflate and
deflate the rubber seal without removing the hand pump each time.
The dimensions of the Core Permeability Tube allow it to be used on either the Standard
Permeability Meter or the Electric Permmeter.
III
TEST PROCEDURE
(a)
Insert the specimen carefully into the Core Permeability Tube and position so that the
flat faces are equidistant from either end of the rubber lining.
(b)
Attach the hand pump and gently inflate the rubber lining until the specimen is
gripped firmly.
DO NOT OVER INFLATE
(c)
Transfer the tube to the Permeability Meter and determine permeability in the usual
way.
(d)
Remove the specimen by releasing the air through the second valve.
74
CORE PERMEABILITY TUBE (cont’d)
IV
RECOMMENDED SPARES
Part No
9275-4060
0592-0422
0592-0423
Description
Rubber sleeve
Valve
Hand pump.
75
BASE PERMEABILITY SCREENS
The base permeability is a standard comparison of permeability with zero water and zero
clay. It compares all sands on an equal basis.
TEST PROCEDURE
Place a Base Permeability Screen in the end of the specimen tube so that the flange faces
upward when the tube is seated in the pedestal cup.
Either weigh or measure the proper amount of dried clay-free sand to give a 2 inch (50 mm)
length rammed specimen.
Before ramming, place the second Screen in the specimen tube on top of the sand, with the
flange facing downwards.
Ram with three drops of the weight.
Remove the tube carefully from the rammer and attach it to the Permeability Meter. Read
permeability as for moulding sand.
76
RIDSDALE SHATTER INDEX TESTER (AFS)
I
GENERAL PRINCIPLES
This equipment is designed to allow the free fall of an AFS Standard 2 inch diameter x 2 inch
height specimen of moulding sand from a height of 6 feet onto a steel anvil. By measuring
the degree of disintegration of the specimen the toughness or plasticity can be determined.
II
DESCRIPTION
The cast iron base of the unit is machined to accept a 13.2 mm mesh BS sieve and retaining
pan. Through the centre of this assembly passes a solid steel anvil which is covered by a
removable cap onto which the sand specimen falls. Rising vertically from the rear of the
base is a 7 foot steel tube which carries the ejector mechanism for the sand specimens.
77
RIDSDALE SHATTER INDEX TESTER (AFS) (cont’d)
III
IV
INSTALLATION
(a)
Fit the ejector mechanism to the top of the steel tube, locate in position with the ¼”
BSW bolt supplied and secure the clamp.
(b)
Place the bottom end of the steel tube in the hole in the base casting. Rotate the
tube until the locating points line up with the tapped holes in the casting and secure
in position with the two set screws provided.
(c)
Fit the sieve assembly on the machined ring in the base casting and place the anvil
cap on top of the support.
(d)
Set the machine on a solid floor. Remove the chromium plated dome nuts covering
the two adjustable feet at the front of the base casting and level carefully by means of
the adjustable feet using the spirit level on the base, or a plumb line. Lock the feet in
position with the dome nuts.
TEST PROCEDURE
(a)
Prepare an AFS Standard 2 inch diameter specimen in a precision specimen tube
and record the weight of sand used to form the specimen.
(b)
Position the tube containing the sand specimen in the ejector mechanism, beneath
the plunger, with the specimen in the lower part of the tube.
(c)
Pull the handle of the mechanism downwards, slowly and evenly, so that the plunger
enters the specimen tube and ejects the sand specimen without giving it any
downward impetus.
(d)
The sand specimen should strike the anvil squarely in the centre. If it does not,
check that the base is set level.
(e)
Remove anvil cap, carefully lift off sieve assembly and remove sieve from pan.
78
RIDSDALE SHATTER INDEX TESTER (AFS) (cont’d)
IV
TEST PROCEDURE (cont’d)
(f)
For convenience, weigh the sand in the receiver and calculate the weight of sand
remaining on the sieve, including the cone of sand on the anvil cap, by subtracting
this weight from the total weight of the specimen.
Shatter Index = Wt. of sand remaining on 13.2 mm mesh sieve x 100
Total wt. of (sand) specimen
V
INTERPRETATION OF RESULTS
The Shatter Index value, in conjunction with the moisture content and the compression
strength, gives a useful guide to the mouldability of a sand, that is, the kind of “lift” which can
be obtained when a sand mould is removed from a pattern.
VI
MAINTENANCE
Keep the machine clean and oil the bearings on the plunger shaft with a little light oil.
VII
RECOMMENDED SPARES
Part No
802
803
804
819
820
Description
Lid – sieve assembly
13.2 mm mesh sieve – sieve assembly.
Receiver – sieve assembly.
Anvil
Anvil post.
79
RIDSDALE-DIETERT
GREEN COMPRESSION STRENGTH MACHINE (AFS)
I
GENERAL PRINCIPLES
This machine is designed to determine compression strength of prepared specimens of
green sands and unbaked core sands by applying a progressively increasing spring load to
the specimen until it collapses.
II
DESCRIPTION
The machine consists of a spring balance and a pair of self-aligning compression heads all
supported in a strong metal frame. By means of a hand-wheel, a load can be applied to a
sand specimen held in the compression heads, via the spring balance. The load required to
cause the specimen to collapse is recorded on the dial of the spring balance by means of a
slave pointer which indicates the compression strength in psi using an AFS 2 inch diameter x
2 inch height specimen.
80
RIDSDALE-DIETERT
GREEN COMPRESSION STRENGTH MACHINE (AFS) (cont’d)
II
DESCRIPTION (cont’d)
Three ranges of spring balance are available for this machine :0-4.5 psi,
0-12.5 psi and 0-31 psi on a 2 inch diameter x 2 inch height specimen.
A sample holder is provided with each machine to facilitate the positioning of the specimen
in the compression heads and in the case of the low capacity balance a special sample plate
is supplied on to which the specimen can be stripped directly from the split specimen tube
when dealing with very weak sand mixes.
III
IV
TEST PROCEDURE
(a)
Prepare a test specimen on an AFS Standard Rammer. For routine purposes this
can be made on a green sand test specimen after the permeability has been
determined. For research work a fresh specimen should be prepared.
(b)
Carefully transfer the test specimen to the compression machine by means of the
sand pan provided and place centrally on the lower compression head.
(c)
If the sand is very weak prepare a specimen in a split specimen tube and use a low
capacity spring balance, with a more open scale, having a maximum reading of 4.5
psi on an AFS 2 inch diameter x 2 inch height specimen. In this case the specimen
should be stripped directly on to the special sample plate provided with the low
capacity balance.
(d)
Rotate the hand-wheel in a clockwise direction until the weight of the specimen is
supported by the spring balance. Zero the moving pointer by means of the knurled
screw on the top of the balance. Set the slave pointer to zero.
(e)
Ensure that the compression heads are free to self-align and turn the hand-wheel in
a clockwise direction until the load begins to the applied to the specimen. Turn the
handle slowly, at the rate of about 30 lb per minute, until the specimen collapses.
(This is achieved most easily by using both hands on the rim of the hand-wheel).
(f)
Record the compression strength as indicated by the slave pointer.
MAINTENANCE
Keep the machine clean and the hand-wheel shaft lightly oiled.
compression head is free to move and therefore self-aligning.
V
Ensure that the lower
RECOMMENDED SPARES
Part No.
607
628
629
630
Description
Sand pan
0-4.5 psi capacity spring balance
0-12.5 psi capacity spring balance.
0-31 psi capacity spring balance.
81
RIDSDALE-DIETERT
HAND OPERATED UNIVERSAL SAND STRENGTH MACHINE (AFS)
I
GENERAL PRINCIPLES
The Universal Sand Strength Machine, together with the appropriate accessories, will
determine the compression, shear, tensile, transverse and splitting strengths of moulding
and core making materials by means of dead weight loading.
II
DESCRIPTION
This machine consists of three major parts: frame, pendulum weight and pusher arm. The
pusher arm is motivated by means of a small handwheel which, through a gear box, rotates
a pinion engaged in a rack on the quadrant. The pendulum weight swings on ball bearings
and can be moved by the pusher arm, via a test specimen, from a vertical position, through
90°, to a horizontal position, with a consequent increase of load on the test specimen. A
magnetic rider is moved up a calibrated scale by the pendulum weight and indicates the
point at which specimen collapse occurs. The machine is calibrated in psi for 2 inch
diameter x 2 inch height standard sand specimens.
The accessories required for the determination of shear, dry, tensile, transverse and splitting
strengths are described separately.
82
RIDSDALE-DIETERT
HAND OPERATED UNIVERSAL SAND STRENGTH MACHINE (AFS) (cont’d)
III
IV
INSTALLATION
(a)
Set the machine on a rigid bench and level by means of the two adjusting screws
until the bubble of the spirit level is centred. The front edge of the pusher plate
should now coincide with the ‘O’ line on the scale and the pendulum weight should
swing freely in the frame, with the pusher plate just clearing the scale.
(b)
Place the coil spring in the hole in the gear box cover plate with the small brass wear
pad on the protruding end of the spring. Ensure that the felt washer is in position in
the recess of the hand-wheel boss and place the hand-wheel on the pinion shaft.
Adjust until the felt washer is nipped lightly between the hand-wheel and the gear box
cover plate and secure with the set screw in the hand-wheel boss, ensuring that this
locates on the flat on the pinion shaft.
TEST PROCEDURE
(A)
Green Compression Strength
(a)
Place the compression heads in the position shown on the illustration.
(b)
Raise the weight arm slightly and insert an AFS standard 2 inch diameter x 2
inch height test specimen between the compression heads so that the face
that was uppermost in the ramming operation is facing the right-hand
compression head. Care should be taken not to damage the specimen.
(c)
See that the magnetic rider is resting against the pusher plate and that there
is at least ¼ inch clearance between the rubber bumper and the lug on the
weight arm. If this clearance is not sufficient, it means that the specimen is
smaller than the permitted tolerance and should be discarded.
(d)
Apply a load to the specimen by turning the hand-wheel at a uniform rate
(approximately 7.5 psi green compression in 15 seconds)* until the specimen
collapses.
(e)
Record the reading shown on the lower edge of the magnetic rider, reading
the scale designated “Green Compression Strength”.
(f)
Return the weight to zero by reversing the rotation of the hand-wheel.
Remove the sand from the compression heads.
* This loading rate applies to all tests on the machine.
83
RIDSDALE-DIETERT
HAND OPERATED UNIVERSAL SAND STRENGTH MACHINE (AFS) (cont’d)
IV
TEST PROCEDURE (cont’d)
(B)
(C)
Green Shear Strength
(a)
Place the shear test heads in the lower position in the machine, with the head
having the half round holder attached to it in the pusher arm.
(b)
Raise the weight arm slightly and insert an AFS standard 2 inch diameter x 2
inch height specimen between the heads.
(c)
Ensure that the magnetic rider is resting against the pusher arm and that
there is ¼ inch clearance between the rubber bumper and the lug on the
weight arm.
(d)
Apply the load uniformly until the specimen shears.
(e)
Read the lower edge of the magnetic rider on the scale designated “Green
Shear”.
(f)
Remove the sheared specimen as under (A) “Green Compression Strength”,
section (f).
Dry Compression and Dry Shear Strengths
(a)
Place either the compression heads or the shear heads in the top position of
the machine. This position increases the load applied by a factor of 5.
(b)
Prepare AFS standard 2 inch diameter x 2 inch height test specimens in the
usual way and dry in an oven at 110 °C for 2 hours.
(c)
When cool, place in position between test heads and adjust clearance
between rubber bumper and lug on weight arm to approximately ½ inch using
the adjusting screw in the pusher arm.
(d)
Apply the load as for “Green Compression” and “Green Shear” until the
specimen collapses.
(e)
Read the scale designated “Dry Compression” or “Dry Shear” according to
the test heads being used.
(f)
Remove the broken specimen as under (A) “Green Compression Strength”,
section (f).
84
RIDSDALE-DIETERT
HAND OPERATED UNIVERSAL SAND STRENGTH MACHINE (AFS) (cont’d)
V
MAINTENANCE
Keep the machine clean, removing surplus sand and pieces of broken specimens with a soft
brush after each test. Oil the hand-wheel shaft once a month by means of the spring loaded
oiler located at the top of the gear box behind the hand-wheel. Lightly grease the path of the
hand-wheel brake pad from time to time to ensure smooth operation whilst loading the
specimen.
The mainshaft ball journals and the gear box of the pusher arm are pre-packed with grease
and require no attention.
The gear rack should be free from grease to prevent sand sticking to it.
It is important that the rubber bumper is in good condition to absorb the shock when the
specimen breaks and thus prevent damage to the gears. Replace when it has worn down to
⅛ inch thickness.
VI
RECOMMENDED SPARES
Part No
403
404
406
409
410
411
412
413
414
415
417
421
422
424
425
426
Description
Adjusting screw – pusher arm
Ball journal – mainshaft - weight
Levelling screw – main frame
Gear rack – main frame
Scale – main frame
Magnetic rider – scale – main frame
Pusher plate - weight
Rubber bumper – pusher arm
Handwheel
Felt washer - handwheel
Drive pinion – gear box – pusher arm
Brake spring - handwheel
Compression heads – pusher arm - weight
Rack pinion – gear box – pusher arm
Reduction gear – gear box – pusher arm
Pad – brake spring – handwheel.
85
RIDSDALE-DIETERT
MOTOR DRIVEN UNIVERSAL SAND STRENGTH MACHINE (AFS)
I
GENERAL PRINCIPLES
The Universal Sand Strength Machine, together with the appropriate accessories, will
determine the compression, shear, tensile, transverse and splitting strengths of moulding
and core making materials by means of dead weight loading.
II
DESCRIPTION
This machine consists of four major parts: frame, pendulum weight, pusher arm and motor.
The pusher arm is driven by a geared motor mounted on the pusher arm and coupled to the
handwheel shaft. The pendulum weight swings on ball bearings and can be moved by the
pusher arm, via a test specimen, from a vertical position, through 90°, to a horizontal
position, with a consequent increase of load on the test specimen. A magnetic rider is
moved up a calibrated scale by the pendulum weight and indicates the point at which
2
specimen collapse occurs. The machine is calibrated in lb/in for 2 inch diameter x 2 inch
height standard sand specimens.
86
RIDSDALE-DIETERT
MOTOR DRIVEN UNIVERSAL SAND STRENGTH MACHINE (AFS) (cont’d)
II
DESCRIPTION (cont’d)
Automatic operation is by means of push button stop/start control and micro-switches as
follows :(a)
Reverse switch.
This reverses the machine after the specimen has collapsed.
(b)
Stop switch.
This stops the machine when it returns to the zero position.
(c)
Limit switch.
This comes into operation if the specimen fails to collapse,
returning the pusher arm automatically to zero.
The accessories required for the determination of shear, dry, tensile, transverse and splitting
strengths are described separately.
III
INSTALLATION
(a)
Set the machine on a rigid bench and level by means of the two adjusting screws
until the bubble of the spirit level is centred. The front edge of the pusher plate
should now coincide with the ‘O’ line on the scale and the pendulum weight should
swing freely in the frame, with the pusher plate just clearing the scale.
(b)
Attach the stop bracket securely to the front of the main casting at the bottom lefthand side, by removing the nuts from the screws supplied and using the two tapped
holes provided. The adjustable stop is pre-set and normally does not require
adjustment.*
(c)
REMOVE THE LOCATING COLLAR AND WASHER FROM THE MAINSHAFT and
fit the pusher arm complete with motor unit, so that the stop micro-switch is jut clear
of the stop bracket and the reverse micro-switch is just clear of the lug of the weight
arm. Secure in position with the two set screws, ensuring that they locate in the
dimples in the shaft.
(d)
The limit switch has been removed for packing purposes. This requires refitting as
follows :Remove the two screws from the bracket, slide cable in slot in the frame
casting so that the rubber grommet sits in counter-bored hole in the
casting. Secure the bracket with the two screws in the tapped holes
provided.
(e)
Connect the motor unit to the control unit on the main frame by means of the eightpin plug and socket outlet.
(f)
Connect to appropriate power supply (see motor nameplate for correct voltage and
frequency) using a three-pin plug.
* In the event of the machine coming to rest away from the zero position this can be
rectified by slackening the knurled check nut on the stop bracket and screwing the
adjustable stop in or out as required.
87
RIDSDALE-DIETERT
MOTOR DRIVEN UNIVERSAL SAND STRENGTH MACHINE (AFS) (cont’d)
IV
TEST PROCEDURE
(A)
(B)
Green Compression Strength
(a)
Place the compression heads in the position shown on the illustration.
(b)
Raise the weight arm slightly and insert an AFS standard 2 inch diameter x 2
inch height test specimen between the compression heads so that the face
that was uppermost in the ramming operation is facing the right-hand
compression head. Care should be taken not to damage the specimen.
(c)
See that the magnetic rider is resting against the pusher plate and that there
is at least 0.25 inch clearance between the rubber bumper and the lug on the
weight arm. If this clearance is not sufficient it means that the specimen is
smaller than the permitted tolerance and should be discarded.
(d)
Press the “START” button. When the specimen collapses the machine will
reverse and return to zero automatically.
(e)
Record the reading shown on the lower edge of the magnetic rider, reading
the scale designated “Green Compression Strength”.
(f)
Remove the sand from the compression heads.
Green Shear Strength
(a)
Place the shear test heads in the lower position in the machine, with the head
having the half round holder attached to it in the pusher arm.
(b)
Raise the weight arm slightly and insert an AFS standard 2 inch diameter x 2
inch height specimen between the heads.
(c)
Ensure that the magnetic rider is resting against the pusher arm and that
there is 0.25 inch clearance between the rubber bumper and the lug on the
weight arm.
(d)
Press the “START” button. When the specimen shears the machine will
reverse and return to zero automatically.
(e)
Read the lower edge of the magnetic rider on the scale designated “Green
Shear”.
(f)
Remove the sand from the shear heads.
88
RIDSDALE-DIETERT
MOTOR DRIVEN UNIVERSAL SAND STRENGTH MACHINE (AFS) (cont’d)
IV
TEST PROCEDURE(cont’d)
(C)
Dry Compression and Dry Shear Strength
(a)
Place either the compression heads or the shear heads in the top position of
the machine. This position increases the load applied by a factor of 5.
(b)
Prepare AFS standard 2 inch diameter x 2 inch height test specimens in the
usual way and dry in an oven at 110 °C for 2 hours.
(c)
When cool, place in position between test heads and adjust clearance
between rubber bumper and lug on weight arm to approximately 0.5 inch
using the adjusting screw in the pusher arm.
(d)
Press the “START” button. When the specimen collapses the machine will
reverse and return to zero automatically.
(e)
Read the scale designated “Dry Compression” or “Dry Shear” according to
the test heads being used.
(f)
Remove the sand from the compression or shear heads.
NOTE:
If the specimen collapses and the machine does not reverse automatically, operate
the limit micro-switch manually and this will cause the machine to return to zero.
Slacken the two round headed screws in the slotted holes of the reverse micro-switch
mounting plate and move the switch nearer to the weight arm lug. Retighten the
round headed screws.
When testing sands of very high strength it is necessary to return the reverse microswitch to its original position in order to avoid possible damage to the switch when
the specimen collapses.
The machine can be stopped and restarted at any point on the quadrant in order to
facilitate the fitting of accessories.
V
MAINTENANCE
Keep the machine clean, removing surplus sand and pieces of broken specimens with a soft
brush after each test. Once a month remove the sand guard and oil the main drive pinion by
means of the spring loaded oiler located at the top of the gear box.
The mainshaft ball journals and the gear box of the pusher arm are pre-packed with grease
and require no attention.
The gear rack should be free from grease to prevent sand sticking to it.
THE RUBBER BUMPER MUST BE KEPT IN GOOD CONDITION TO ABSORB THE
SHOCK WHEN THE SPECIMEN BREAKS AND THUS PREVENT DAMAGE TO THE
MICRO-SWITCHES AND GEARS. REPLACE WHEN IT HAS WORN DOWN TO ⅛ inch
THICKNESS.
89
RIDSDALE-DIETERT
MOTOR DRIVEN UNIVERSAL SAND STRENGTH MACHINE (AFS) (cont’d)
VI
RECOMMENDED SPARES
Part No
403
406
409
410
411
412
413
417
422
424
425
448
449
450
451
452
Description
Adjusting screw – pusher arm.
Levelling screw – main frame
Gear rack – main frame
Scale – main frame
Magnetic rider – scale – main frame
Pusher plate - weight
Rubber bumper – pusher arm
Drive pinion – gear box – pusher arm
Compression heads – pusher arm - weight
Rack pinion – gear box – pusher arm
Reduction gear – gear box – pusher arm
Micro-switch – limit, stop and reverse
8-pin socket outlet and harness
8-pin plug and harness
Control box assembly and harness
Adjusting screw – stop bracket.
90
RIDSDALE-DIETERT
HIGH DRY STRENGTH ACCESSORY FOR USSM (AFS)
I
GENERAL PRINCIPLES
This accessory for the Universal Sand Strength Machine increases the Dry Compression
and the Dry Shear capacities of the machine by a factor of 3.
II
DESCRIPTION
This unit consists of two specially shaped arms which are hinged at one end by means of a
shaft mounted in ball bearings. The aluminium arm bolts onto the pusher arm of the
Universal Sand Strength Machine.
Compression heads which hold the sand specimen fit between the arms and load is applied
to the specimen by means of a ball point in the top lug of the pendulum weight which bears
onto a hardened steel pad on the end of the moving arm.
91
RIDSDALE-DIETERT
HIGH DRY STRENGTH ACCESSORYFOR USSM (AFS) (cont’d)
III
INSTALLATION
(a)
Insert the two spigots of the High Dry Strength Accessory into the top and bottom
holes on the pusher arm of the Universal Sand Strength Machine and secure in
position with the bolts and washers supplied.
NOTE:
Hand Operated Universal Motorised Universal -
(b)
IV
V
secure with one x ¼ inch BSW* x 1½ inch long bolt and
stepped collar and a 1½” BSW* bolt and flat washer.
secure with ¼ inch BSW* x 1½ inch long bolt and
stepped collar in top position, and ¼ inch BSW* x 2
inch long bolt and plain washer in lower position.
Place the ball point in the hole in the top lug of the pendulum weight and ensure that
it bears directly on the hardened steel pad on the end of the moving arm.
TEST PROCEDURE
(a)
Place a prepared metric standard 2 inch diameter x 2 inch height test specimen
between the compression heads as in the diagram.
(b)
Adjust screw to give the pendulum weight at least 1 inch clearance from the rubber
bumper on the pusher arm.
(c)
Check that the ball point is still bearing on the hardened steel paid.
(d)
Position the magnetic rider on the scale and apply the load in the recommended
manner until the specimen collapses.
(e)
Read the “Dry Compression” scale and multiply by 3 to obtain load in lb/in .
RECOMMENDED SPARES
Part No.
1804
403
1808
2
Description
Ball Point
Adjusting Screw
Stepped Collar.
* BSW is British Standard Whitworth thread.
92
RIDSDALE-DIETERT
TENSILE CORE STRENGTH ACCESSORY FOR USSM (AFS)
I
GENERAL PRINCIPLES
This accessory provides a means of uniformly pulling and breaking an AFS standard tensile
specimen of baked or cured core sand on the Universal Sand Strength Machine.
II
DESCRIPTION
These specially shaped aluminium alloy jaws with self-aligning contoured grips to hold the
specimen are used in the top test position of the Universal Sand Strength Machine. They
are mounted on fulcrum pins attached to the machine by two cast iron brackets. Adjustable
fulcrum screws bear in sockets in the fulcrum pins to allow self-alignment of the jaws.
Guide pins line up the two halves of the accessory when in position on the machine and
permit easy introduction of the specimen.
III
INSTALLATION
(a)
With the pusher arm and the pendulum weight arm in the perpendicular position, bolt
the short bracket to the pusher arm using the long bolt.
(b)
Raise the pusher arm and the pendulum weight arm to about the midway position on
the quadrant, pass the long bracket behind the pusher arm and bolt it to the
pendulum weight arm using the short bolt.
(c)
Return the pusher arm and the pendulum weight arm to the perpendicular position,
check that the fulcrum pins on the brackets are in line and tighten both bolts firmly.
(d)
Place the jaws on the fulcrum pins with the guide pins in position.
93
RIDSDALE-DIETERT
TENSILE CORE STRENGTH ACCESSORY FOR USSM (AFS) (cont’d)
IV
TEST PROCEDURE
(a)
Insert a prepared AFS (1 inch thick central section) standard tensile specimen into
the jaws of the accessory as follows :Raise the pendulum weight arm slightly, allowing the jaws to butt together, and place
the specimen carefully in position without scoring it.
(b)
Adjust the fulcrum screws so that a clearance of approximately 1 inch is obtained
between the rubber bumper on the pusher arm and the bottom lug on the pendulum
weight arm.
NOTE:
After adjustment the jaws must be free to swivel on the end of the fulcrum screws.
V
(c)
REMOVE THE GUIDE PINS.
(d)
Apply the load in the recommended manner until the specimen breaks.
(e)
Read the “Dry Shear” scale and multiply the reading by 5 to give tensile strength in
2
lb/in .
RECOMMENDED SPARES
Part No
2901
2902
1906
Description
Guide pin
Adjusting screw
Fulcrum pin.
94
RIDSDALE-DIETERT
TRANSVERSE CORE STRENGTH ACCESSORY FOR USSM (AFS)
I
GENERAL PRINCIPLES
This accessory provides a means of applying a transverse load to an AFS 1 inch x 1 inch x 8
inch long transverse specimen of baked or cured core sand.
II
DESCRIPTION
The cast aluminium support arms are fitted with hardened steel knife edges; two selfaligning knife edges, 6 inches apart in the left-hand arm and one fixed knife edge in the righthand arm.
When fitted to the Universal Sand Strength Testing Machine the single knife edge is
positioned midway between the two self-aligning knife edges, and as a result the load is
applied to the sand specimen exactly midway between the supporting knife edges.
95
RIDSDALE-DIETERT
TRANSVERSE CORE STRENGTH ACCESSORY FOR USSM (AFS) (cont’d)
III
INSTALLATION
(a)
NOTE:
Attach the support arm with the two knife edges to the pusher arm and the arm with
the single knife edge to the pendulum weight arm of the Universal Sand Strength
Machine by means of the bolts and washers provided.
Hand Operated Universal:
for hand operated universal machine, when fitting the
transverse core strength and transverse shell strength
accessory the 1¾” bolt will be substituted with a 1½”
bolt.
Motorised Universal:
secure the left hand part of the accessory with a 1½”
long x ¼” BSW* bolt plus collar in the top position and a
1¾” x ¼” BSW* bolt with a flat washer in the bottom
position.
The right hand part of the accessory will be secured
with a ½” x ¼” BSW* bolt with a stepped collar in top
and bottom positions.
IV
V
TEST PROCEDURE
(a)
Insert the core specimen between the arms as shown in the illustration, carefully
avoiding any scoring the specimen by the knife edges.
(b)
Apply the load in the recommended manner until the specimen breaks.
(c)
Read the “Dry Shear” scale direct in pounds load supported by the core.
RECOMMENDED SPARES
Part No.
2005
Description
Stepped collar.
* BSW is British Standard Whitworth thread.
96
RIDSDALE-DIETERT
TRANSVERSE SHELL STRENGTH ACCESSORY FOR USSM (AFS)
I
GENERAL PRINCIPLES
This accessory provides a means of applying a transverse load to an AFS 1 inch x 4 inches
x ¼ inch transverse specimen of baked or cured core sand.
II
DESCRIPTION
The cast aluminium support arms are fitted with hardened steel knife edges, two self aligning
knife edges which may be adjusted to give 2 inch or 3 inch centres. The right hand arm has
one fixed knife edge which has been extended to allow for the ¼ inch specimen.
97
RIDSDALE-DIETERT
TRANSVERSE SHELL STRENGTH ACCESSORY FOR USSM (AFS) (cont’d)
III
TEST PROCEDURE
(a)
NOTE:
Attach the support arm with the two knife edges to the pusher arm and the arm with
the single knife edge to the pendulum weight of the Universal Sand Strength Machine
by means of the bolts and washers provided.
Hand Operated USSM:
for hand operated universal machine, when fitting the
transverse core strength and transverse shell strength
accessory the 1¾” bolt will be substituted with a 1½”
bolt.
Motorised USSM:
Secure the left hand part of the accessory with a 1½”
long x ¼” BSW* bolt plus collar in the top position and a
1¾” x ¼” BSW* bolt with a flat washer in the bottom
position.
The right hand part of the accessory will be secured
with a ½” x ¼” BSW* bolt with a stepped collar in top
and bottom positions.
IV
(b)
Place the specimen on the supports of the testing machine so that the smooth side of
the specimen rests on the two bearing knives and the single-loading knife edge rests
on the side of the specimen that was strickled off.
(c)
Apply the load in the recommended manner until the specimen breaks.
(d)
Read the dry shear scale and multiply by 4 to give the load supported by the
specimen in pounds. Test at least 10 transverse test specimens. Specimens that
are manifestly faulty shall not be considered in determining the transverse strength.
The average of the acceptable values shall be reported as the transverse strength of
the group.
RECOMMENDED SPARES
Part No
Description
2005
Stepped Collar.
* BSW is British Standard Whitworth thread.
98
RIDSDALE-DIETERT
SHELL MOULD TRANSVERSE ACCESSORY (AFS)
I
GENERAL PRINCIPLES
The Shell Mould Transverse Accessory (AFS) provides a means of making 1 inch x 4 inches
x ¼ inch transverse specimens, and of determining their breaking strengths in conjunction
with the Transverse Shell Strength Accessory for the Universal Sand Strength Machine.
II
DESCRIPTION
The Shell Mould Transverse Accessory (AFS) includes a split 2-cavity pattern (former plates)
for making ¼ inch thick transverse specimens, and a hopper strike-off assembly,
III
TEST PROCEDURE
(a)
Heat the base plate to approximately 200 °C in an oven (or enclosed stove).
(b)
Stand the hopper strike-off assembly on to its broad edge and fill with pre-coated
sand mixture so that the mixture in the two pockets is level with the ends.
(c)
Place a pair of COLD split moulds in position on the heated base plates.
(d)
Spray all surfaces coming into contact with the sand mixture with a silicone (mould)
release agent.
(e)
Rest the strike-off edge of the hopper strike-off assembly against the edge of the
open cavities of the pattern, and dump the sand into the cavities in one swift motion.
99
RIDSDALE-DIETERT
SHELL MOULD TRANSVERSE ACCESSORY (AFS) (cont’d)
III
TEST PROCEDURE (cont’d)
WITHOUT DELAY :(f)
Place the strike-off edge along the longitudinal centre-line of the mould and, holding it
perpendicular to the mould surface, strike off the excess sand from the centre line
outwards, first from one side, then the other.
(g)
Place the filled mould in a suitable oven (or enclosed stove) for the appropriate time.
(h)
Remove the specimens from the mould and allow to cool to room temperature.
Check the thickness (¼ inch) of the specimens before testing.
(i)
The specimens can be tested on the Universal Sand Strength Machine using
the Transverse Shell Strength Accessory. Read the “Dry Shear” scale and
multiply by 4 to give load supported by specimen in psi.
(ii)
The swivel knife edges in the Transverse Shell Strength Accessory can be
adjusted to give loadings at 2 inch or 3 inch centres, and the fixed knife edge
is extended to allow for the thinner specimens.
NOTE:
It is important to remove the surplus resin bonded sand before sufficient heat has
penetrated through the split moulds to cause the surplus sand to coagulate and score
the surface of the specimen when strickled off.
IV
MAINTENANCE
Remove any adhering sand from former plates after use.
V
RECOMMENDED SPARES
Part No
1401
1402
Description
RH Former Plate )
LH Former Plate )
Supplied in pairs only.
100
RIDSDALE-DIETERT
SHELL MOULD TENSILE ACCESSORY (AFS)
I
GENERAL PRINCIPLES
The Shell Mould Tensile Accessory (AFS) is designed to produce an AFS standard tensile
specimen from shell moulding materials.
II
DESCRIPTION
The Shell Mould Tensile Accessory (AFS) includes a split 3-cavity pattern (former plates) for
making ¼ inch thick tensile specimens, a hopper strike-off assembly, and two inserts which
should be attached to the support straps at the back of the standard Tensile Core Strength
Accessory for testing on the Universal Sand Strength Machine.
III
TEST PROCEDURE
(a)
Heat the base plate to approximately 200 °C in an oven (or enclosed stove).
(b)
Stand the hopper strike-off assembly on to its broad edge and fill with pre-coated
sand mixture so that the mixture in the three pockets is level with the ends.
(c)
Place a pair of COLD split moulds in position on the heated base plates.
(d)
Spray all surfaces coming into contact with the sand mixture with a silicone (mould)
release agent.
(e)
Rest the strike-off edge of the hopper strike-off assembly against the edge of the
open cavities of the pattern, and dump the sand into the cavities in one swift motion.
101
RIDSDALE-DIETERT
SHELL MOULD TENSILE ACCESSORY (AFS) (cont’d)
III
TEST PROCEDURE (cont’d)
WITHOUT DELAY :(f)
Place the strike-off edge along the longitudinal centre-line of the mould and, holding it
perpendicular to the mould surface, strike off the excess sand from the centre line
outwards, first from one side, then the other.
(g)
Place the filled mould in a suitable oven (or enclosed stove) for the appropriate time.
(h)
Remove the specimens from the mould and allow to cool to room temperature.
Check the thickness (¼ inch) of the specimens before testing.
(i)
Ensure that the inserts have been fitted in the Tensile Core Strength
Accessory in order to centralise the Tensile Shell specimen.
(ii)
The Shell Mould Tensile specimens can be tested on the Universal Sand
Strength Machine. Read the “Dry Shear” scale and multiply by 20 to convert
to psi to allow for the thinner specimens.
NOTE:
It is important to remove the surplus resin bonded sand before sufficient heat has
penetrated through the split moulds to cause the surplus sand to coagulate and score
the surface of the specimen when strickled off.
IV
MAINTENANCE
Remove any adhering sand from former plates after use.
V
RECOMMENDED SPARES
Part No
1601
1602
Description
RH Former Plate )
LH Former Plate )
Supplied in pairs only.
102
RIDSDALE SPLITTING STRENGTH ACCESSORY (AFS)
(for use with the Hand Operated Universal Sand Strength Machine)
I
GENERAL PRINCIPLES
This accessory for the Hand Operated Universal Sand Strength Machine (USSM) provides a
means of determining the splitting strength of an AFS Standard 2 inch diameter x 2 inch
height test specimen, which is a measure of its resistance to breaking under a compression
load applied perpendicular to the circumference of the specimen.
II
DESCRIPTION
The Splitting Strength Accessory consists of two test heads, one of which has a swivel arm
attached for the purpose of locating the test specimen prior to applying load.
III
INSTALLATION
Attach the test head with arm attached to the weight arm of the USSM, and the other test
head to the pusher arm of the USSM.
IV
TEST PROCEDURE
Place the AFS Standard 2 inch diameter x 2 inch height test specimen between the test
heads with the arm in position to locate the specimen in such a way that load will be applied
perpendicular to its circumference. Slightly pre-load the specimen sufficient to retain it in
position, then swing the arm clear and apply load in the recommended manner (see
Operating Instructions for USSM) until the specimen collapses.
The splitting strength is read directly in psi from the “Green Shear” scale of the USSM.
103
RIDSDALE SPLITTING STRENGTH ACCESSORY (AFS)
(for use with the Green Compression Strength Machine)
I
GENERAL PRINCIPLES
This accessory for the Green Compression Strength Machine (GCSM) provides a means of
determining the splitting strength of an AFS Standard 2 inch diameter x 2 inch height test
specimen, which is a measure of its resistance to breaking under a compression load
applied perpendicular to the circumference of the specimen.
II
DESCRIPTION
The Splitting Strength Accessory consists of a specimen holder which has a swivel arm
attached for the purpose of locating the test specimen prior to applying load.
III
INSTALLATION
Locate the specimen holder on the lower compression head of the GCSM with the swivel
arm in the vertical position.
IV
TEST PROCEDURE
Place the AFS Standard 2 inch diameter x 2 inch height test specimen in the specimen
holder locating against the vertical swivel arm and the back stop so that the load from the
GCSM will be applied perpendicular to the circumference of the specimen, then swing the
arm clear and apply load in the recommended manner (see Operating Instructions for
GCSM) until the specimen collapses.
The splitting strength is read directly in psi from the GCSM scale.
104
RIDSDALE HIGH STRENGTH TESTING MACHINE (AFS)
I
GENERAL PRINCIPLES
The High Strength Testing Machine, together with the appropriate accessories will determine
the compression, tensile and transverse strengths of moulding and core making materials
beyond the capacity of the Ridsdale-Dietert Universal Sand Strength Machine.
II
DESCRIPTION
The machine consists of a twin column motorised screw system horizontally mounted in a
mechanically rigid frame and a control panel incorporating a cypher, with the option of a 16bit micro-processor indicator reading in psi.
Compression, tensile and transverse tests can be carried out on this machine up to a
maximum capacity of 1450 psi (20 kN).
The accessories are easily inserted into position and the range selected on the cypher.
Please see separate Instructions Manuals for detailed operation of accessories.
III
INSTALLATION
Set the machine and control panel housing the cypher onto a rigid bench and connect in turn
the various power cables, which are easily identifiable, into the back of the control panel.
Connect to the main power supply and the machine is ready for use.
IV
MAINTENANCE
Keep the machine clean, removing surplus sand and pieces of broken specimens with a soft
brush after each test.
105
RIDSDALE COMPRESSION STRENGTH ACCESSORY
FOR HIGH STRENGTH TESTING MACHINE
I
II
INSTALLATION
(a)
Press one of the “direction of travel” buttons on the cypher to obtain sufficient
clearance to insert the compression heads.
(b)
Screw in the compression head carriers; one into the load cell (a), the other into the
traversing ram (b).
(c)
Push the compression heads into the locating holes in the compression head carriers
ensuring the sample supports are positioned at the bottom to accept the specimens.
TEST PROCEDURE
(a)
Using one of the “direction of travel” buttons on the cypher, adjust the distance
between the compression heads to accommodate a standard sand specimen
allowing approximately 1/16” (1.5 mm) clearance.
(b)
Place the specimen between the compression heads, replace the Perspex safety
cover.
(c)
Before commencement of the test ensure that the cursor is displayed on the left
hand, bottom corner of the cypher display. To adjust the cursor, repeatedly press the
“max/min” button.
(d)
For compression testing select “Mode 2” button on the cypher.
(e)
Zero the display on the cypher using the “reset” and “zero” buttons.
(f)
To test, press one of the “direction of travel” buttons. (If using the software package
press F4 simultaneously).
(g)
Once the specimen has broken, press the “stop” button and remove the remains of
the previous test piece.
(h)
Repeat from Procedure (a) to carry out further tests.
106
RIDSDALE TENSILE CORE STRENGTH ACCESSORY
FOR HIGH STRENGTH TESTING MACHINE
I
II
INSTALLATION
(a)
Press one of the “direction of travel” buttons on the cypher to obtain sufficient
clearance to insert the tensile jaws.
(b)
Screw in the tensile jaw carriers; one into the load cell (a), the other into the
traversing ram (b) – (DO NOT TIGHTEN).
(c)
With back plate on the bottom of the accessory, put the locating pins through both
halves.
(d)
With the locating pins in position (ensuring the accessory is in line with the support
rods), tighten the tensile core strength carriers using the back nuts with the spanner
provided.
TEST PROCEDURE
(a)
Using one of the “direction of travel” buttons on the cypher, reduce the distance
between the tensile jaws to accommodate the tensile sand specimen allowing
approximately 1/16 inch (1.5 mm) clearance.
(b)
Place the specimen between the tensile jaws ensuring that the specimen is resting
flat on the back plates, replace the perspex safety cover.
(c)
Before commencement of test ensure that the cursor is displayed on the left hand top
corner of the cypher display. To adjust the cursor, repeatedly press the “max/min”
button.
(d)
For tensile testing select “Mode 4” button on the cypher.
(e)
Zero the display on the cypher using the “reset” and “zero” buttons.
107
RIDSDALE TENSILE CORE STRENGTH ACCESSORY
FOR HIGH STRENGTH TESTING MACHINE (cont’d)
II
TEST PROCEDURE (cont’d)
(f)
To test, press the “direction of travel” button (marked (2) as shown on diagram
above).
(If using software package press F4 simultaneously).
(g)
Once the specimen has broken, press the “stop” button and remove the remains of
the previous test piece.
(h)
Repeat from Procedure (a) to carry out further tests.
108
RIDSDALE TRANSVERSE CORE STRENGTH ACCESSORY
FOR HIGH STRENGTH TESTING MACHINE
I
II
INSTALLATION
(a)
Press one of the “direction of travel” buttons on the cypher to obtain sufficient
clearance to insert the transverse core strength accessory.
(b)
Ensure the socket head screws on the support arm carriers are loosened (using the
key provided) enabling the two parts of the accessory to swivel.
(c)
Screw in the large support arm carrier of the accessory into the load cell (a) at
approximately 45° ensuring that the sample support pin is located at the bottom of
the arm. Locate the other half of the accessory into the traversing ram (b).
(d)
Line up each half of the accessory using the locating pins and tighten up the socket
head screws on the support arm carriers (ensuring the accessory does not touch or
foul any part of the machine) and then remove locating pins.
TEST PROCEDURE
(a)
Using one of the “direction of travel” buttons on the cypher, adjust the distance
between the support arm carriers to accommodate a transverse sand specimen
allowing approximately 1/16 inch (1.5 mm) clearance.
(b)
Place the specimen between the knife edges, replace the perspex safety cover.
(c)
Before commencement of the test ensure that the cursor is displayed on the left hand
bottom corner of the cypher display. To adjust the cursor, repeatedly press the
“max/min” button.
109
RIDSDALE TRANSVERSE CORE STRENGTH ACCESSORY
FOR HIGH STRENGTH TESTING MACHINE (cont’d)
II
TEST PROCEDURE (cont’d)
(d)
for tranverse testing select “Mode 3” button on the cypher.
(e)
Zero the display on the
(f)
To test, press one of the “direction of travel” buttons. (If using software package,
press F4 simultaneously).
(g)
Once the specimen has broken, press the “stop” button and remove the remains of
the previous test piece.
(h)
Repeat from Procedure (a) to carry out further tests.
ipher using the “reset” and “zero” buttons.
110
RIDSDALE PEEL-BACK TESTER
(FOR INVESTMENT TESTING OF RESIN COATED SHELL SAND)
I
GENERAL PRINCIPLES
This apparatus assesses the proportion of resin coated sand which peels away from the
main body of the cured mould.
The Peel-Back Tester consists of a hopper assembly mounted above a 250 x 250 x 30 mm
hot plate, controllable to ± 10 °C, which is set in an elevated position and pivoted at the
centre to enable it to be rotated through 180°. A sample tray sits beneath the assembly to
collect the sand material which peels away.
When the required temperature of the hot plate has been reached and stabilised an
accurately weighed quantity of resin coated sand is released from the hopper onto the hot
plate. After a pre-determined time the hot plate is rotated through 180° in order to remove
the uncured sand, which falls on to the sample tray beneath the assembly.
Peel-Back quantity and curing speed factor are calculated from the proportion of sand falling
on to the sample tray, compared with the original weight.
SPECIFICATIONS:
II
PURPOSE:
Net Weight:
Dimensions:
Power Supply:
27.5 kg
580 x 300 x 500 mm
220/230V
To determine if cured sand separates and allows some to peel
away from the main body of the core or mould.
(a)
Switch on Peel-Back Tester and adjust the Eurotherm to 205 °C. When the
Eurotherm reaches the pre-set temperature carry out the following test procedure :-
(b)
Obtain a representative sample of the material to be tested of 300 grams, weighed
accurately. Make sure the heating plate is in the horizontal position.
111
RIDSDALE PEEL-BACK TESTER (cont’d)
II
PURPOSE: (cont’d)
(c)
Transfer the sample to the stainless steel funnel, placing a finger over the bottom of
the funnel to restrict sand flow.
(d)
Swing the funnel over to the centre of the hot plate and release the sand sample onto
the plate. Leave for 18 seconds and then invert the hot plate 180° and allow to set
for an additional one minute.
(e)
After one minute weigh the material that has been collected in the tray on the bottom
of the machine and subtract this weight from the sample weight used to give you a
percentage peel.
112
RIDSDALE CALIBRATION EQUIPMENT
PROVING RING
I
TEST PROCEDURE
(a)
Locate the two studs into the lower compression head position of the Universal Sand
Strength Machine.
(b)
Zero the dial gauge by rotating the bezel and lock in position using the locking
mechanism if required.
(c)
Place the gauge between the studs and locate the pivots on the steel ring into the
studs.
(d)
Using the table of certified readings provided with the instrument, start the machine
and stop at the appropriate points as detailed on the table. The tolerance allowed on
these readings is ± 1 division, ie .001 inches.
(e)
Reverse the machine using one of the micro switches and unload the Proving Ring.
113
RIDSDALE CALIBRATION EQUIPMENT
TUBE TYPE PERMEABILITY STANDARDS
(FOR ROUTINE CHECKING OF ELECTRIC PERMMETER)
I
TEST PROCEDURE
(a)
Switch on blower motor of the Electric Permmeter by moving toggle switch to the
“ON” position. Allow the motor to run for at least one minute in order to obtain a
stable reading on the gauge.
(b)
Remove rubber stoppers from tube and select orifice for the standard to be tested, ie,
●
●
for permeability standard marked LOW use orifice marked “S”.
for permeability standard marked HIGH use orifice marked “L”.
(c)
Place the specimen tube containing the permeability standard uppermost over the
centre post of the Permmeter.
(d)
Rotate the knurled ring of the centre post anti-clockwise to seal the specimen tube.
(e)
Place the lever on the left hand side of the Permmeter body in the “CHECK”
(forward) position.
(f)
Adjust the motor speed control rheostat to obtain a pressure reading of exactly
100 mm or “O” permeability on the pressure gauge.
(g)
Move the lever to the “TEST” (rear) position, and read permeability from the
appropriate scale according to the orifice in use.
(h)
Return lever to its “CHECK” position and confirm that a pressure of 100 mm is still
recorded.
(i)
Release the specimen tube by rotating the knurled ring in a clockwise direction.
114
RIDSDALE GAS DETERMINATOR
I
GENERAL PRINCIPLES
This method of determining the gas content of sands depends upon the introduction of a
weighed sample into a heated tube filled with an inert gas and measurement of the increase
in pressure due to the gas evolved from the sample.
Pressure readings are converted to volumes by means of a calibration graph prepared at the
operating temperature.
The tube is heated in a furnace with an inclined heating chamber which ensures that the
evolved gases remain in the hot zone and only the inert gas passes into the pressure
recorder.
II
DESCRIPTION
A fused silica tube, 18 in long x 2½ in outside diameter, sealed at one end is heated by
means of a thermostatically controlled electric furnace. The open end of the tube is fitted
with a water cooled metal closure to which is attached a spring-gun assembly, the latter
containing a trigger mechanism designed to eject the sample into the hot zone of the tube.
An inconel tube which extends to the closed end of the silica tube, is fitted to sweep the
apparatus out with nitrogen* which is supplied from a cylinder via a pressure reducing valve.
A further tube connects the interior of the silica tube to the pressure recorder. The metal
closure is secured to the silica tube with high melting-point wax, hence
WATER MUST ALWAYS BE PASSING THROUGH THE COOLING JACKET
WHEN THE TUBE IS HOT
(ie, when the furnace temperature is over 200 °C).
*It is recommended that oxygen-free (white spot) nitrogen be used as commercial grade
nitrogen may contain a trace of oxygen which would give false readings.
115
RIDSDALE GAS DETERMINATOR (cont’d)
III
INSTALLATION
(a)
Services
Place the silica tube in the furnace and connect the polythene tubes to the
appropriate points on the side of the console, making sure that :(i)
the “WATER SUPPLY” goes to bottom of the cooling jacket and
the “WATER DRAIN” to the top.
(ii)
the “GAS SUPPLY” goes to the inconel tube which runs the full
length of the silica tube, and the “GAS EXHAUST” to outlet point.
Connect the appropriate services to the three nipples at the bottom left hand
side of the unit marked “WATER SUPPLY”, “GAS SUPPLY” (NITROGEN)
and “WATER DRAIN”.
Connect the flexible cable to an appropriate power supply and earth (see furnace
manufacturer’s label for loading, correct voltage, etc.).
(b)
Chart Recorder
Loading
To swing out for loading the chart, raise the extreme left hand end of the unit with the
forefinger and pull forward.
(i)
Raise the top black chart spool holder (which is spring loaded) sufficiently to
allow it to turn and lock in the open position. Repeat for the lower holder
which is located on the underside of the unit.
(ii)
Place the chart roll in position and turn the holders until they drop back into
place.
(iii)
Take the free end of the chart and cut it so that the loading edge is vertical for
the whole width of the chart.
(iv)
When viewed from the back, there is a spring loaded flap at the extreme left
hand end swinging on a vertical rod. Pass the free end of the chart between
the flap and the rod and, springing the flap slightly, pass the chart out
between the flap and the drive shaft sprockets against which the flap bears.
(v)
Release the flap, swing the chart unit round so that the chart is seen
protruding from under the flap, now at the right hand end.
(vi)
Raise the flap and gently adjust the chart so that the holes engage the drive
sprocket teeth and ensure that the chart is not one hole out of position at top
or bottom. The time lines should be parallel with the edge of the flap.
116
RIDSDALE GAS DETERMINATOR (cont’d)
III
INSTALLATION (cont’d)
(b)
Chart Recorder (cont’d)
(vii)
Turn the knurled adjusting knob (which also serves as a pulley) clockwise
when viewed from the top, and, as the chart advances, ensure that it enters
the guide channels at top and bottom of the platen.
Swing the unit back into place and by slight pressure at the left hand end
push it over the ramp which holds it in the working position. The unit will drop
into place when the correct position is reached. At this position it is possible
to feel a positive stop in each direction preventing further swinging action
about its pivots.
Cutting Off Chart
This may be carried out at any time but the entire roll can be rewound if required.
Use a sharp knife or razor blade and make a straight cut as nearly vertical as
possible. This can be anywhere within the 4½” to the left of the pen. Gently ease the
chart out from the guide channels in order to cut the extreme edge if necessary and
ensure that the leading edges are re-entered into the channels.
Remove the belt from the left hand pulley and tilt the re-wind shaft to the left until the
roll clears the chart unit top plate then lift the shaft out of its bottom socket.
Grip the roll firmly and turn the pulley anti-clockwise for about half a turn to release
the trapped leading edge of the chart.
Pull the shaft upwards and it should slide out of the rewound roll.
Refit the rewind shaft, inserting the lower end into its socket first, then swinging the
shaft into the slot in the top plate. Give the shaft a turn or two in a clockwise direction
to ensure that it is free, then refit the belt.
The Chart should now be picked up automatically and rewound when it reaches the
rewind shaft.
The pen used on the Arkon 63 Pressure Recorder is now a fibre-tip throwaway type.
To replace exhausted fibre-tip pen, pull out from the holder and push in replacement.
After refitting ensure that the fixing boss lies parallel with the chart face. The nib is
designed to work in this position. If the nib is at right angles to the chart, the pen
will be trapped when the door is closed.
Zero Adjustment
This is controlled by a screw in the top left hand corner of the case flange which is
visible when the door is open. A screwdriver is needed for adjusting the position.
This is to discourage unauthorised or unwitting adjustments. Turn clockwise to raise
the pen and anti-clockwise to lower the pen.
117
RIDSDALE GAS DETERMINATOR (cont’d)
(b)
Chart Recorder (cont’d)
MANUFACTURERS :
ARKON INSTRUMENTS LTD.
(T.E.M.E.),
2A THE CROFT,
CROFT STREET
LECKHAMPTON
GLOS., GL53 0ED
(Tele:) 01242 228745.
(c)
Temperature Controller
See Eurotherm Operating Manual.
IV
TEST PROCEDURE
TURN on the cooling water and switch on the furnace.
SET the temperature controller to the required temperature (850 °C) and allow the furnace to
attain equilibrium at this temperature.
INTRODUCE a weighed quantity (1 – 2 g) of sand into one of the special thin-walled copper
sample tubes (3 in long x ¼ in diameter, closed at one end) and plug the open end with
ignited aluminium silicate fiberfax.
UNSCREW the spring-gun assembly and insert the sample tube with the gun in the ‘loaded’
position.
REPLACE the gun assembly and pass a stream of oxygen-free nitrogen through the
apparatus at a rate of about 1 litre per minute with the “GAS INLET” and “EXHAUST” taps in
the open position and the “RECORDER” tap shut. After two minutes all oxygen (or gases
from a previous test) should have been expelled.
SHUT OFF the supply of nitrogen, then :(a)
Turn “GAS INLET” to “shut”.
(b)
Turn “RECORDER” to “open” and wait for two minutes to allow the gas in the tube to
attain furnace temperature.
(c)
Turn “EXHAUST” to “shut”.
(d)
Switch on the recorder.
(e)
Inject the sample tube into the hot zone.
118
RIDSDALE GAS DETERMINATOR (cont’d)
IV
TEST PROCEDURE (cont’d)
(f)
Switch off the recorder as soon as the pen stops rising.
The rate of gas evolution can be observed from the pressure curve traced out on the
recorder.
The total volume of gas evolved (corrected to NTP), or the volume of gas evolved after any
period of time after injecting the sample into the hot zone of the furnace, can be obtained by
reference to a pressure/volume graph which can be prepared as in Section V, Calibration.
V
CALIBRATION
A pressure-volume graph can be prepared as follows :Weigh increments of Analar potassium hydrogen carbonate (KHCO3), previously dried for 30
minutes at 105 °C, into copper sample tubes and plug with ignited aluminium silicate
fiberfax.
Inject these specimen tubes into the furnace as for the sand samples and record the
maximum pressure attained.
Plot maximum pressure against theoretical volume of gas evolved at NTP, ie, 224 ml per
gramme of dry KHCO3.
Wt. of KHCO3
0.05 g
0.10 g
0.15 g
0.20 g
0.25 g
Theoretical Vol. at NTP
11.2 ml
22.4 ml
33.6 ml
44.8 ml
56.0 ml.
NOTE:
After the copper sample tubes have been used with potassium hydrogen carbonate for
calibration purposes, they should be boiled and carefully dried before being re-used. This is
necessary to remove any hygroscopic potassium salts that are formed at ignition
temperature and tend to interfere with subsequent determinations.
VI
MAINTENANCE
(a)
Replacement of Furnace Elements
This furnace is wound with a high-grade resistance wire and is suitable for maximum
operating temperature of 1100 °C.
In the event of a furnace element failing it is possible for the customer to fit a
replacement element himself. Alternatively if he contacts the furnace manufacturer a
Service Engineer will deliver and fit a new element with a minimum of delay.
119
RIDSDALE GAS DETERMINATOR (cont’d)
VI
MAINTENANCE (cont’d)
(a)
Replacement of Furnace Elements (cont’d)
If the customer decides to fit the element himself, the furnace unit should be
withdrawn from the console as follows :(i)
Disconnect from the mains.
(ii)
Remove the top left hand side panel from the console.
(iii)
Remove the screws from the panel holding the temperature control unit
situated top left hand front of console.
(iv)
Slide the module out until the thermocouple terminal block is exposed.
(v)
Disconnect the thermocouple.
(vi)
Carefully withdraw the thermocouple.
(vii)
Remove the main input leads from the two brass terminal posts.
(viii)
Remove the eight securing screws from the perimeter of the Sindanyo endplate on the right hand side of the console.
(ix)
Carefully withdraw the whole furnace unit, slacken the bolts holding the
element tails in the brass terminal posts and remove the Sindanyo top plate
secured by four screws.
(x)
Empty out the Vermiculite insulation. Loosen the retaining yokes and remove
the faulty element and former.
(xi)
Fit replacement element supplied by the furnace manufacturer and reassemble, taking care to ensure that the element tails do not come in contact
with the cement coated windings or a short circuit will occur.
(xii)
After re-assembly bring the furnace up to temperature as quickly as possible
to ensure the effective curing of the cement used on the windings.
PLEASE NOTE:
THERE ARE LIVE WIRES INSIDE THE CASING. DO NOT REMOVE ANY
PANELS UNLESS THE FURNACE IS DISCONNECTED FROM POWER SUPPLY.
FURNACE MANUFACTURERS :CARBOLITE FURNACES LTD.,
PARSONS LANE
HOPE
SHEFFIELD,
S30 2RR
(Tele) 01433 620011.
(Fax) 01433 621198.
120
RIDSDALE-DIETERT
GREEN HARDNESS TESTER ‘B’ SCALE
I
GENERAL PRINCIPLES
This instrument is designed for measuring the surface hardness of green sand moulds and
green cores. The test is similar to the Brinell Hardness Test – the softer the mould surface,
the greater the penetration of the probe into the mould.
The hardness number indicated is the measurement of the depth of penetration of the probe
in thousandths of an inch. A mould offering no resistance to penetration has a zero
hardness reading and one which completely resists penetration has a hardness reading of
100.
II
DESCRIPTION
The tester has a dial gauge, calibrated in thousandths of an inch, which is operated by a
spring loaded probe of ½” radius. The dial bezel can be rotated and the pointer held in any
position by pressing the locking button.
The instrument can be carried in the pocket and is most useful for checking the degree or
uniformity of ramming of a mould.
III
TEST PROCEDURE
(a)
Press the Hardness Tester down on to a hard, flat surface until the anvil plate which
surrounds the probe makes even contact with the surface. Slacken the clamping
screw and turn the milled bezel until the pointer reads 100. Re-clamp the bezel.
(b)
Press the tester firmly down on to any flat surface of a mould until the anvil plate is in
contact with the mould surface. The penetration of the probe into the mould surface
is registered on the dial and is read direct as Green Hardness ‘B’ Scale.
121
RIDSDALE-DIETERT
GREEN HARDNESS TESTER ‘B’ SCALE (cont’d)
TEST PROCEDURE (cont’d)
(c)
When testing in places where the dial cannot be seen easily, hold the pointer in the
test position by pressing the locking button on the front of the tester. Remove the
instrument from the mould and take the reading.
(d)
The pointer is released ready for the next test by pressing the button on the back of
the tester while holding the thumb on the probe to prevent the sudden return of the
pointer to zero and hence possible damage.
(e)
Readings are empirical and bear no direct relationship to any definite pressure per
unit area. They are, however, valuable for comparative purposes.
(f)
For moulds with surface hardness values in excess of 85 ‘B’ Scale, eg, moulds
produced by high pressure moulding methods, a Green Hardness Tester ‘C’ Scale is
recommended.
RELATIONSHIP BETWEEN "C" SCALE & "B" SCALE
GREEN HARDNESS TESTERS
90
80
70
60
"C" SCALE
III
50
40
30
20
10
60
65
70
75
80
85
90
95
100
"B" SCALE
MOULD HARDNESS No ‘B’ SCALE
RELATIONSHIP BETWEEN
MOULD HARDNESS SCALES
122
RIDSDALE-DIETERT
GREEN HARDNESS TESTER ‘C’ SCALE
I
GENERAL PRINCIPLES
This instrument is designed for measuring the surface hardness of green sand moulds
where the surface hardness values are in excess of 85 ‘B’ Scale, eg, moulds produced by
high pressure moulding methods. Hardness values of 85 – 100 ‘B’ Scale are equivalent to
values of 30 – 85 on the ‘C’ Scale tester making the instrument more sensitive in the higher
ranges of mould hardness.
The test is similar to the Brinell Hardness Test – the softer the mould surface, the greater the
penetration of the probe into the mould surface.
The hardness number indicated is the measurement of the depth of penetration of the probe,
in thousandths of an inch. A mould offering no resistance to penetration has a zero
hardness reading and one which completely resists penetration has a hardness of 100.
II
DESCRIPTION
The tester has a dial gauge, calibrated in thousandths of an inch, which is operated by a
conical probe. The dial bezel can be rotated and the pointer held in any position by pressing
the locking button. This locking button is used when testing in blind positions of a mould.
III
TEST PROCEDURE
(a)
Press the Hardness Tester down on to a hard, flat surface until the anvil plate which
surrounds the probe makes even contact with the surface. Slacken the clamping
screw and turn the milled bezel until the pointer reads 100. Re-clamp the bezel.
(b)
Press the tester firmly down on to any flat surface of a mould until the anvil plate is in
contact with the mould surface. The penetration of the probe into the mould surface
is registered on the dial and is read direct as Green Hardness ‘C’ scale.
123
RIDSDALE-DIETERT
GREEN HARDNESS TESTER ‘C’ SCALE (cont’d)
III
TEST PROCEDURE (cont’d)
(c)
When testing in places where the dial cannot be seen easily, hold the pointer in the
test position by pressing the locking button on the front of the tester. Remove the
instrument from the mould and take the reading.
(d)
The pointer is released ready for the next test by pressing the button on the back of
the tester while holding the thumb on the probe to prevent the sudden return of the
pointer to zero and hence possible damage.
(e)
Readings are empirical and bear no direct relationship to any definite pressure per
unit area. They are, however, valuable for comparative purposes.
124
RIDSDALE-DIETERT
CORE HARDNESS TESTER
I
GENERAL PRINCIPLES
This instrument is used to determine accurately the surface hardness of cores. The surface
of the core is subjected to controlled abrasion by a four-point penetrator and the depth of
penetration measured on a horizontally mounted dial gauge.
II
DESCRIPTION
It consists of a probe or penetrator which can be rotated by means of an external knurled
ring, indexed so that the number of rotations can be counted, and a horizontally mounted
dial gauge which measures the depth of penetration of the probe.
III
TEST PROCEDURE
(a)
Hold the curved section of the tester body with the thumb and forefinger. Turn the
knurled index ring assembly until the line on the index ring is opposite the reference
line on the housing projection. Do not move the dial indicator bezel.
(b)
Press the base of the instrument firmly against the core and rotate the ring assembly
clockwise through two revolutions, until the lines are again matched. Read the
hardness directly from the indicator. As long as the reference lines are together no
further resetting of the unit is required for the next test.
(c)
For routine testing two revolutions may be considered as the standard procedure. To
increase the sensitivity of the instrument when testing harder cores, three or more
revolutions should be employed, and for very weak cores it may be desirable to use
only one revolution. The number of revolutions should be recorded along with the
hardness value.
125
RIDSDALE-DIETERT
CORE HARDNESS TESTER(cont’d)
IV
METHOD OF CALIBRATION
Press the Core Hardness Tester against a hard flat surface and note the dial reading. The
unit should read 100. If the reading is incorrect check for sand grains or a burr on the anvil
plate which would cause the error.
If the surface is clear and the reading is still incorrect, loosen the indicator bezel clamping
screw while holding the tester firmly against the hard flat surface and turn the bezel to obtain
a reading of 100. Re-tighten the clamping screw.
V
RECOMMENDED SPARES
Part No.
1301
Description
Four-point penetrator.
126
RIDSDALE IMPACT PENETRATION TESTER
I
GENERAL PRINCIPLES
This instrument will determine the safe stripping time for moulds and cores made from cold
self-hardening sand mixtures and measure the sub-surface strength of CO2 – silicate
moulds and cores.
A graduated probe is driven into the mould or core by a series of blows of equal impact. The
number of blows required to cause a given penetration of the probe can be related to the
sub-surface hardness of the material being tested, harder layers requiring more impacts to
cause an equivalent depth of penetration.
II
DESCRIPTION
The instrument consists of a pointed hardened steel probe, graduated in one centimetre
divisions attached to a hand operated, spring loaded hammer mechanism for subjecting the
probe to a series of blows of equal impact.
The knurled knob on the end of the body of the instrument can be turned to alter the spring
loading on the hammer to suit different requirements.
III
TEST PROCEDURE
Before screwing in one of the two probes, give the hammer mechanism a few operations
with the knurled knob in the fully extended position (turn anti-clockwise) by pressing it
against a rigid surface to ensure freedom of the mechanism.
NOTE:
To prevent damage to the probe holder use a wooden surface.
127
RIDSDALE IMPACT PENETRATION TESTER (cont’d)
III
TEST PROCEDURE (cont’d)
(a)
Screw one of the two probes firmly into the probe holder at the end of the instrument.
(b)
If the mould or core to be tested is expected to be very hard, turn the knurled knob
clockwise as far as it will go to give maximum spring pressure on the hammer.
Should the mould or core be relatively soft, the knurled knob should be turned anticlockwise until it is in the fully extended position to give the minimum spring pressure
on the hammer.
By turning the knurled knob one full rotation, until the index mark is in line with the
longitudinal line on the body of the instrument, any one of five intermediate positions
can be selected. This means that the instrument may be readily reset to a predetermined spring pressure between minimum and maximum for any particular
application.
(c)
Place the point of the probe on the mould surface. Hold the instrument at right
angles to the surface and press the instrument firmly inwards until a definite impact is
felt. It is important that the spring loaded hammer in the body of the instrument
should be responsible for forcing the probe into the surface and hence only sufficient
pressure should be applied by the operator to release the hammer mechanism.
(d)
Repeat this operation without withdrawing the probe from the surface and record the
number of impacts necessary to bring the first one centimetre graduation mark level
with the mould surface.
(e)
Continue impacting the probe into the mould, maintaining it at right angles to the
surface, and record the number of impacts necessary for each centimetre of the
probe to penetrate the mould.
NOTE:
To avoid damage to the probe, care should be taken to keep the body of the
instrument in line with the probe during penetration.
IV
INTERPRETATION OF RESULTS
It is known that uniform hardening is not normally achieved from the surface to the interior of
a mould or core during the hardening process. It is generally desirable to strip a mould from
its box as soon as sufficient hardening has developed to avoid distortion or breakage. As a
rule the time required for this is much less than that for full uniform hardness development.
By plotting the number of impacts per centimetre of probe penetration against the depth of
penetration it is possible to assess the hardness at varying distances from the mould
surface.
Routine acceptance tests on cold self-hardening sand mixtures can be carried out with this
instrument by assessing the number of impacts required to penetrate the probe a given
distance into the mould surface when the required sub-surface hardness for stripping has
been achieved.
V
RECOMMENDED SPARES
Part No.
2701
Description
Graduated Probe.
128
RIDSDALE-DIETERT
MOULD STRENGTH TESTER (AFS)
I
GENERAL PRINCIPLES
The Mould Strength Tester is used to measure the green compression strength of moulds on
the foundry floor. Any reasonable flat or gently curved mould surface may be used. The
tester can be operated at any angle, thus making it possible to take strength measurements
on vertical surfaces of a mould.
A reading is obtained, which is comparable to the green compression strength test, obtained
on a standard test specimen, rammed to the same degree as the mould.
II
DESCRIPTION
This instrument is a dial gauge indicator calibrated in psi with a specially shaped, spring
loaded probe, marked with a graduation line ⅜ inch from the tip.
It is designed as a pocket instrument and has a capacity of 0-30 psi.
III
TEST PROCEDURE
(a)
Release the bezel clamping screw and rotate the milled bezel until the indicating
pointer is at zero. Re-clamp the bezel. Turn the centre button to bring the slave
pointer to rest against the indicating pointer.
(b)
Holding the tester at right angles to the mould surface, press the probe slowly into
the sand. The force applied should be only enough to keep the probe just moving
into the surface.
129
RIDSDALE-DIETERT
MOULD STRENGTH TESTER (AFS) (cont’d)
III
TEST PROCEDURE (cont’d)
(c)
Stop applying pressure when the graduation on the probe is level with the mould
surface. The green compression strength of the mould is indicated by the maximum
reading slave pointer.
NOTE:
Since this test is subject to an operator variable, it is suggested that the operator
make practice tests on an AFS 2 inch diameter x 2 inch length test specimen, resting
on the stripping post before it is stripped from the specimen tube. Other specimens
of the same sand can be tested with the Green Compression Strength Machine, or
the Universal Sand Strength Testing Machine, so that the operator can observe the
desired loading rate and have reference values for evaluating his test procedure.
130
RIDSDALE-DIETERT
FOUNDRY HYDROMETER (0 – 90 Baumé)
I
GENERAL PRINCIPLES
The instrument is used to determine the specific gravity
of all types of foundry washes, sprays and coating
materials which are heavier than water.
II
DESCRIPTION
The hydrometer consists of a transparent plastic tubing
which is resistant to organic solvents and has a specially
designed stainless steel tip for stability.
III
TEST PROCEDURE
(a)
Check the hydrometer and ensure that it is clean and dry.
(b)
Gently stir the sample for five minutes. Care should be taken
to ensure that no air is introduced into the sample.
(c)
Stop the stirring unit and allow the sample to come to rest (no detectable motion).
(d)
Place the hydrometer into the sample. Care should be taken to position the
hydrometer at least half an inch from the edge of the container or the mixer blade.
(e)
When placing the hydrometer in the liquid ensure that it does not drop too far. The
hydrometer should be allowed to slide gently from the hand so that it settles slowly
into the liquid after being released.
(f)
If the hydrometer is observed to rise after its initial release it has not been properly
placed in the sample and the test must be repeated starting at step (a).
(g)
After the hydrometer is placed in the sample it should be allowed to settle for one
minute. At this time the value can be read directly from the hydrometer scale.
(h)
After the value has been taken measure the temperature of the sample and record.
131
RIDSDALE-DIETERT
FOUNDRY HYDROMETER (0 – 90 Baumé) (cont’d)
IV
CALIBRATION
The Baumé Hydrometer has a zero line on the scale and this can be checked using fresh
water at the temperature specified by the manufacturer.
(a)
Place the Foundry Hydrometer in a glass container with the inside diameter of at
least three times that of the outside diameter of the hydrometer.
(b)
Allow the gauge to equilibrate without touching the bottom of the container.
132