1
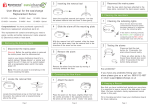
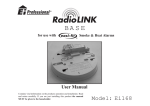
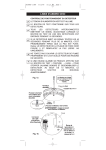
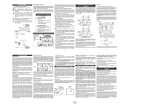
3
Insert the removal tool
1
User M a n u a l f o r t h e e a s i c h a n g e
Replacement Series:
E i151EK - Ion i s a t i o n
Ei154EK - Heat
E i 1 5 6 E K - O p t i c al
Congratulations! You have purchased a genuine Ei
Electronics replacement smoke/heat alarm kit.
1
D i s c o n n e c t t h e mains power
Warning! Before the existing alarm is removed
the mains power must be disconnected.
Look on your mains distribution board for a
switch marked “Smoke Alarms” or similar and
switch this off. If there isn’t a switch marked
with a recognisable label, switch the mains
power off.
Note: This will cut power to everything in the
house including the lights.
2
L o c a t e t h e t a m per catch
Connect the terminal block
Insert the supplied removal tool into the left hand
side of the tamper catch and lever it down gently.
4
Slide the alarm off the mounting pl a t e
This replacement kit contains everything you need to
easily, quickly and safely replace your mains powered,
Ei Electronics smoke or heat alarm.
1. R e m o v i n g t h e E x i sting Alarm
2. Connecting the New Alarm
Plug the power and interconnection terminal block
into the back of the new alarm.
Note: The block will only connect one way.
2
Attach the alarm
With the removal tool still inserted, slide the lower
half of the alarm away from the removal tool, the
alarm will detach from the base.
5
Remove the alarm
Place the alarm on the base plate and slide it
towards the tamper catch until it “clicks” into place.
3
After the new alarm has been attached to the
base plate, reconnect the mains power supply.
Gently move the alarm vertically towards the floor.
It is important to do this slowly as the alarm is still
attached with its power and interconnection cable.
6
Unplug the terminal block
Reconnect the mains power
3. Checking the new Alarm
1
Checking the indicating lights
Once the new alarm has been
connected and the mains power
has been restored it is important
to check the indicating lights.
The tamper catch is located on the opposite side to
the alarm hinges (as shown in the above image).
Page 1
Unplug the power and interconnection terminal block
from the back of the alarm.
Care should be taken to pull the terminal block and
not the cables.
Page 2
If the alarm is working
correctly the GREEN LIGHT
(mains indicating light) should be
on constantly and the RED LIGHT
should flash once every 40 sec.
Page 3
2
Te s t i n g t h e A l a rms
Press and hold the test
button for 10 seconds, the
alarm should sound loudly and
the R E D L I G H T should flash
while the alarm is sounding.
If there are other alarms in the
house these should also sound
within 5 seconds of the test
button being pressed.
Any P r o b l e m s ?
If yo u h a v e a n y p r o b l ems fitting your new
alarm p l e a s e g i v e u s a call on: 0800 612 483 7
or em a i l s u p p o r t @ e a sichange.co.uk
Test weekly - press and hold the test button
on the alarm for 10 seconds. The alarm will
sound loudly and the red light should flash
rapidly. All other interconnected alarms
should also sound.
Remove or completely cover your alarm
when decorating to prevent dust and
contamination damaging the unit.
Do not allow paint, water or dust to
contaminate your alarm.
Your alarm is a mains 230V AC electrical
appliance. Do not open or insert anything
into the alarm.
Do not paint your alarm - It may alarm or
cease to operate.
4. K e e p i n g a R e c o r d
Now that you have installed and tested your new alarm,
it is essential to keep a record of the date when it was
fitted. We have included a handy replacement record
sticker in this pack.
Fill in the date and stick it near your distribution board
for future reference.
If your alarm sounds for no reason and will
not reset, it can be removed by releasing
the clip on the base. (See “Removing the
Existing Alarm” section on page 1)
Page 4
Check all your alarms at least weekly, and also after
re-occupation following a holiday etc.
1. Check that the green mains indicator light is on, If
it is off check circuit breakers, fuses and wiring etc.
Check that the red light behind the button or on the
cover flashes every 40 seconds.
2. Press the test button for up to 10 seconds to ensure
the sensor chamber, electronics and sounder are
working. A red light behind the test button or on the
cover, will flash while horn is sounding. The alarm
will stop when the button is released. Pressing the
test button simulates the effect of smoke or heat
during a real fire and is the best way to ensure the
alarm is operating correctly.
WARNING: DO NOT TEST WITH FLAME
The can damage the alarm and can be a fire risk
We do not recommend testing the alarms with smoke or
heat as the results can be misleading unless special
apparatus is used.
3. Check for any sign of contamination such as
cobwebs or dust and clean the alarm as described
below if necessary.
Test the first unit by pressing the test button for 10
seconds. All the detectors should alarm within about 5
seconds of the first horn sounding and the red light on
the first unit only will flash about once a second. Check
all the other units similarly.
Regularly check that the green mains
Indicator light on the cover is lit.
Clean your alarm regularly. This will reduce
the risk of false alarms.
Checking your Alarms
Interconnected Alarms
5. I m p o r t a n t I n f o r m a tion
If a nuisance alarm occurs, fan the alarm
v igorously with a newspaper to help clear
the sensor (on the Ei151EH press the hush
button in the corner of the cover).
7 . Te s t i n g & M a i n t a i n i n g Yo u r A l a r m
Note: Ionisation and heat alarms signal to other
interconnected alarms within about 4 seconds of their
own sounder being activated, optical alarms signal
within approximately 1 second.
The rechargeable cells may require a few
days to charge after first being connected
to the mains.
It may give a short beep every 40 seconds
for up to 2 hours while it is charging.
Page 5
Checking the Rechargeable Cells
When the Alarm is Beeping
The Alarm automatically monitors the cells every 40
seconds to ensure they are satisfactory. If a problem is
identified it will give a short beep every 40 seconds. If
the unit is giving beeps then check the following:
Page 6
1. Check that the green mains power light is on. If it is
off the alarm has been powered from the cells and
the beeps indicate they are depleted. Reconnect the
mains, check fuse, circuit breakers and wiring. If
in doubt contact a qualified electrician. The beep s
should cease within 2 hours as the cells charge up.
2. Check that the hush button has not been pressed
inadvertently (Ei151EH only). This also causes
beeps every 40 seconds for up to 15 minutes. Press
the test button to cancel hush mode beeps.
3. The cells may be depleted. The beeps should cease
within 2 hours as they charge up. Fully charged, the
cells will provide up to 6 months back-up without
mains power.
4. On the Optical Smoke Alarms only (Ei156EH) if the
unit beeps and the red light does not flash at the
same time it indicates a problem with the smoke
chamber - see Cleaning the Smoke Alarm.
If all of the above possible causes of beeps have been
ruled out but the beeping has still persisted for over 2
hours with the green light on - the rechargeable cells
are probably defective. The smoke alarm must be
returned to us at one of the addresses on the back page
for examination and analysis.
Manual Testing
We recommend that the functioning of the rechargeable
cells is checked periodically (at least yearly) as follows:
1. Ensure that the alarm has been connected to the
mains, with green light on, for a least 2 days for the
cells to charge.
2. Turn off the mains power at the distribution board
and check that the green indicator light is extin guished. Do not remove the plug from the rear as
this will disconnect the cells.
3. Press the test button and ensure the horn sounds
loudly for 10 seconds.
4. Release the test button and watch it carefully for
one minute:
-
The red light behind the test button or on the
cov er will flash at least once.
-
The unit must not give a beep which indicates
the battery is low.
5. Turn on the mains supply at the distribution board
only if the unit passes all the above tests.
Page 7
Note: If the mains is disconnected and the battery is
almost depleted the unit will beep every 40 seconds for
at least 72 hours. This is to remind you to re-connect
the mains supply. The unit will operate from the mains
alone, even with a fully depleted or a defective battery,
though it may not give sufficient warning of fire if the
mains supply is disconnected for any reason.
If there are any problems get a qualified electrician to
inspect the house wiring and connections to the alarms.
If there are still problems the smoke alarm must be
returned to us at one of the addresses on the back page
for examination and analysis.
9. Cleaning Your Alarm
WARNING: Electrical shock hazard. Disconnect the AC
mains at the fuse box or circuit breaker powering the
alarm before following the cleaning instructions.
Clean your Alarm regularly, particularly in dusty ar eas. Use the narrow nozzle attachment of your vacuum
cleaner to remove dust, insects and cobwebs from the
sides and cover slots where the smoke or heat enters.
To clean the cover, wipe with a damp cloth. Dry cover
thoroughly with a lint free cloth. If the contamination
around the outer case indicates that the area is
particularly dirty, remove the alarm from the ceiling (See
“Removing the Existing Alarm” section on page 1).
1. Check that the openings in the black smoke sensing
chamber are not clogged by visually inspecting them
through the large openings around the edges of the
smoke alarms. If they are clogged (an extremely rare
occurance) the Smoke alarm must be replaced.
WARNING: Do not paint your Alarm.
Other than the cleaning described above, no other
customer servicing of this product is required. Repairs,
when needed, must be performed by the manufacturer.
All alarms are prone to dust and insect ingress which
can cause false alarms or failure to alarm.
T h e l a t e s t d e s i g n , m a t e r i a l s a n d m a n u f a c t u r i n g t e c h n i q u e s have been
u s e d i n t h e c o n s t r u c t i o n o f t h e a l a r m t o m i n i m i s e t h e e ff e c t s of
c o n t a m i n a t i o n . H o w e v e r i t i s i m p o s s i b l e t o c o m p l e t e l y e l i m i nate the
e ff e c t o f d u s t a n d i n s e c t c o n t a m i n a t i o n , a n d t h e r e f o r e , t o p rolong the
l i f e o f t h e a l a r m y o u m u s t e n s u r e t h a t i t i s k e p t c l e a n s o t h at excess
d u s t d o e s n o t b u i l d u p . A n y i n s e c t s o r c o b w e b s i n t h e v i c i n i ty of the
alarm should be promptly removed.
Page 8
In certain circumstances even with regular cleaning, contamination can
build up in the smoke sensing chamber causing the alarm to sound or
fail. If this happens the alarm must be returned to us for
servicing or replacement. Contamination is beyond our control, it is
totally unpredictable and is considered normal wear and tear. For this
reason, contamination is not covered by the guarantee and a charge is
made for servicing such alarms.
If you experience persistent false alarms, in particular
locations, due to contamination of the smoke chamber
you could consider replacing optical smoke alarms with
ionisation smoke alarms. Ionisation type alarms are less
susceptible to dust than optical type alarms.
10. Nuisance Alarms
Alarms caused by cooking fumes etc. can be readily
silenced by fanning the unit with a newspaper or similar.
On the Ei151EH units, simply press the hush button.
If, when the alarm goes off, there is no sign of smoke,
heat or noise to indicate that there is a fire, you should
get your family into a safe place before you start
investigating.
Check the house carefully in case there is a small fire
smouldering somewhere.
Check whether there is some source of smoke or fumes,
for example cooking fumes being drawn past the smoke
alarm by an extractor.
If there are frequent nuisance/false alarms it may be
necessary to re-locate the device away from the source
of the fumes.
If for some reason the alarm continues to sound without
smoke or heat being present (due to insect infestation
or contamination build-up for example) switching off the
mains power alone will not silence the alarm as it will
still be powered by the cells. Switch off the mains and
remove the plug from the rear of the alarm to disconnect
the cells. If cleaning the smoke alarm does not correct
the problem it can be returned to one of the addresses
on the back page for examination and analysis.
Hush Feature
The smoke alarms (Ei151EH only) have a hush button to
help you control nuisance false alarms.
Page 9
1. To cancel a false alarm, press the Hush Button lo cated on the lower right-hand corner. The Alarm will
automatically switch to a reduced sensitivity condi tion (very large levels of smoke from a nearby fire
will override the Hush). This condition allows
unwanted alarms to be silenced for a period of
approximately 10 minutes. The unit will give a short
beep every 40 seconds during this time to let you
know the unit has been silenced.
On interconnected Smoke Alarms, pressing the Hush
Button on the one sensing smoke (i.e. the one with the
red light flashing every se cond) will silence all alarms.
Pressing the Hush Button on any other smoke alarm will
not cancel the alarm.
2. The unit will reset to normal sensitivity at the end
of the silenced period. If additional silenced time is
required, simply push the Hush Button again.
3. To quickly return to normal non-silenced operation,
simply push the Test Button; the alarm will sound
briefly and return to its normal sensitivity and
operatio n.
3. After installation, your Smoke Alarm may beep ap proximately every 40 seconds for 15 minutes. This
indicates it is in the H ush mode. To put it into nor mal operating mode, push and hold the Test Button
until the alarm sounds.
11. Tr o u b l e s h o o t i n g
Alarm Sounds for no Apparent Reason:
1. Identify the alarm source. On interconnected units
the red light under the test button or on the cover
will flash rapidly only on the unit which is the source
of the alarm.
2. Check for fumes, steam etc. from the kitchen or
bathroom. Paint and other fumes can cause nuisance
alarms.
3. Fan the unit vigourously with a newspaper to
disperse fumes.
4. If alarm does not stop, switch off the mains power
and remove unit (See “Removing the Existing Alarm”
section on page 1).
1. If the above fails to turn on the green light, a fault
may exist. Switch off the mains power and remove
the unit (See “Removing the Existing Alarm” section
on page 1).
2. If the green mains light is on and the action in (1)
above has not silenced the beeping, a fault may
exist. Switch off the mains power and remove the
unit (See “Removing the Existing Alarm” sect ion on
page 1).
Interconnected Alarms do not all Sound:
1. Hold test button for 10 seconds after first alarm has
sounded to ensure signal is transmitted to all units.
2. Switch off mains and check that live, neutral and
interconnect cables have been correctly connected
and that the connections are tight.
If Frequent Nuisance Alarms Occur:
1. Close kitchen/bathroom door when in use.
2. Ensure that the alarm is sited at least 6m away from
sources of fumes.
3. Contamination from insects, paint or paint fumes
may have occured. Clean the alarm.
4. If the problem persists, resiting of the unit should
be considered. Alternatively, replace the unit with
an optical unit, assuming that the problem is with an
Ionisation type alarm.
C o n s t r u c t i o n P r o d u c t Ty p e : S m o k e A l a r m D e v i c e s
European Standard: EN14604:2005
Certificate of Conformity: 0086-CPD-537430
Model
Type
Ei141
Ionisation 230V Smoke Alarm
Ei146
Optical 230V Smoke Alarm
Ei161
Ionisation 230V Smoke Alarm
Ei166
Optical 230V Smoke Alarm
0086
08
Alarms Beep Continuously:
1. Alarms may be in ‘hush mode’. Press the test button
for 10 seconds to reset the unit (Ei 151EH only).
2. Cells may be flat due to mains failure. Check the
green mains indicator light is on.
Page 10
P a g e 11
1 2 . F i v e Ye a r G u a r a n t e e
Ei Electronics guarantees this alarm for five years from
date of purchase against any defects that are due to
faulty materials or workmanship. This guarantee only
applies to normal conditions of use and service, and
does not include damage resulting from accident,
neglect, misuse, unauthorised dismantling, or
contamination howsoever caused. This guarantee
excludes incidental and consequential damage. If this
alarm should become defective within the guarantee
period, it must be returned, with proof of purchase,
carefully packaged, with the problem clearly stated. We
shall at our discretion repair or replace the faulty unit.
Do not interfere with the alarm or tamper with it. This
will invalidate the guarantee, but more importantly may
expose the user to shock or fire hazards.
This guarantee is in addition to your statutory rights as
a consumer.
Distributed By:
easichange . c/o Safelincs Ltd, Unit 1 Farlesthorpe
Road, Lincolnshire, LN13 9PS U.K.
Tel: 0800 612 4837
www.easichange.co.uk
Manufactured By:
Ei Electronics. Shannon, Co Clare, Ireland
Tel: +353 (0)61 471377
www.eielectronics.co.uk
Aico Ltd. Mile End Business Park, Maesbury Rd,
Oswestry, Shropshire, SY10 8NN, U.K.
Tel: 0870 758 4000
www.aico.co.uk
The crossed out wheelie bin symbol that is on
your product indicates that this product should
not be disposed of via the normal household
waste stream. Proper disposal will prevent
possible harm to the environment or to human
health. When disposing of this product please
separate it from other waste streams to ensure
that it can be recycled in an environmentally
sound manner. For more details on collection
and proper disposal, please contact your local
government office or the retailer where you
purchased this product.
Page 12