1
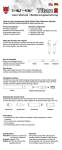
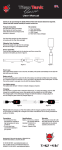
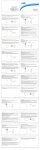
USER MANUAL / BEDIENUNGSANLEITUNG
2
Your e-lectron•C3 Mega / Ihre Electron•C3 Mega
Congratulations on purchasing your new
Totally Wicked e-lectron•C3 Mega Electronic Cigarette.
Wir gratulieren Ihnen zum Kauf der
Totally Wicked Electron•C3 Mega E-Zigarette.
Your e-lectron•C3 Mega / Ihre Electron•C3 Mega
A
B
C
D
E
A: Battery B: Atomizer base C: C3 atomizer head D: Tank E: Mouthpiece
A: Akku B: Verdampferbasis C: C3 Verdampferkopf D: Tank E: Mundstück
3
4
Using your e-lectron•C3 Mega / Bedienung Ihrer Electron•C3 Mega
Power on and off:
Press the power button 5 times in quick
succession, the button light will flash 5 times to
indicate the e-lectron•C3 Mega is on and ready
to use. In the same way, to turn the e-lectron•C3
Mega off, press the power button 5 times in
succession.
Vaping: Press the button as you inhale. When
the button is held down, the button light will be
illuminated and will gradually go out when the
button is released.
Ein-/ Ausschaltung:
Taster 5 Mal hintereinander drücken, der Taster
blinkt auf und signalisiert die Aktivierung der
Electron•C3 Mega. Für die Deaktivierung Taster 5
Mal hintereinander drücken, Taster blinkt auf und
das Gerät schaltet sich ab.
Dampfen:
Taster drücken und währenddessen am
Mundstück langsam für ca. 2-5 Sekunden ziehen.
Wenn nicht mehr inhaliert wird, Taster loslassen.
Using your e-lectron•C3 Mega / Bedienung Ihrer Electron•C3 Mega
To fill the tank:
Invert the e-lectron•C3 Mega and unscrew the
battery and atomizer base from the tank. Fill the
tank through the narrow gap around the central
tube.
Tank mit E-Liquid befüllen:
Electron•C3 Mega Tank umdrehen und die
Verdampferbasis abschrauben. E-Liquid seitlich
einfüllen und die in der Mitte gelegene Luftführung
von E-Liquid freihalten.
5
6
Adjusting Voltage Output / Spannungsregulierung
Voltage output can be adjusted by rotating the
regulation ring (voltage scale shown). Output can
be varied from 3.3V to 5.5V in 4 increments.
Die Spannung kann mittels Drehrad am unteren
Ende des Akkus zwischen 3.3V und 5.5V
eingestellt werden.
Charging the Battery / Akku aufladen
7
Simply charge the e-lectron•C3 Mega battery via the USB cable connected
to a powered USB port or wall adapter. The power button will flash to
indicate the battery is charging, when it is fully charged, the power button
will remain lit until the USB cable is removed. The e-lectron•C3 Mega can
still be used whilst the cable is connected and charging the battery.
Die Aufladung der Electron•C3 Mega erfolgt mit dem USB Kabel an einem
USB Port oder USB Netzstecker. Durch das kontinuierliche Aufblinken des
Tasters wird der Ladevorgang signalisiert. Bei vollem Ladestand leuchtet
der Taster durchgehend bis das USB Kabel entnommen wird. Die Electron•
C3 Mega kann auch während des Ladevorganges genutzt werden.
8
Battery Operation
Battery charge indication:
When the power button is pressed the LED beside
the switch button will indicate the remaining
battery life. The light will remain steadily on for
5 seconds if the remaining battery life is greater
than 60%; below this the light will pulsate at an
increasing speed as the battery life is drained.
When the battery reaches below 10% charge
remaining, the light will pulsate rapidly.
Akku Merkmale
Low battery warning:
When the battery is completely drained, the button
light will flash 40 times, and the device will shut
down automatically.
Short circuit protection:
If short circuit occurs, the button light will flash 5
times and the e-lectron•C3 Mega will shut down.
To resume operation remove the fault (for example
a faulty atomizer) and press the power button 5
times to reset the battery.
Akku Ladestandanzeige:
Bei Betätigung des Tasters wird der Ladestand
des Akkus mittels einer LED angezeigt, die bei
60% oder höher für ca. 5 Sekunden aufleuchtet.
Unter 60% beginnt die LED mit zunehmender
Geschwindigkeit zu pulsieren.
Ladestand-Warnung:
Wenn der Akku leer ist, blinkt die LED 40 Mal auf
und das Gerät schaltet sich automatisch ab.
Kurschlussschutz:
Bei einem Kurzschluss blinkt der Taster 5 Mal
auf und die Electron• C3 Mega schaltet sich
ab. Fehlerquelle suchen (evtl. Verdampferkopf
wechseln) und anschließend den Akku über die
5-Klickschaltung wieder aktivieren.
9
10 Atomizer Head Replacement / Verdampferkopf wechseln
Atomizer Head Replacement / Verdampferkopf wechseln 11
•U
nscrew the battery from the atomizer base.
•U
nscrew the atomizer base from the tank.
•U
nscrew the atomizer head and remove from
the atomizer base. Screw the new C3 atomizer
head into the atomizer base and firmly tighten.
•R
efit the atomiser base into the tank.
•C
onnect the assembled atomizer to the battery
and the e-lectron•C3 Mega is ready to use.
• Tank vom Akku abschrauben.
• Verdampferbasis vom Tank abschrauben.
• Verdampferkopf aus der Verdampferbasis
schrauben. Neuen C3 Verdampfer handfest
reinschrauben.
• Verdampferbasis auf den Tank schrauben.
• Tank an den Akku schrauben, danach ist die
Electron• C3 Mega für die Nutzung bereit.
12 Atomizer Operation / Verdampfer in Betrieb
Atomizer protection: During operation, if the
button is held down for longer than 10 seconds the
button light will flash 10 times and the device will be
automatically disabled to protect against possible
damage. Normal operation will commence after the
power button is released.
Atomizer detection: The button light will flash at 1
second intervals if there is no connection between
the atomizer and battery. Ensure the atomizer is
correctly fitted into the tank and that the battery is
firmly screwed to the tank.
Verdampferschutz:
Wird während der Nutzung der Taster länger als
10 Sekunden gedrückt, blinkt der Taster 10 Mal
auf und das Gerät schaltet sich automatisch ab,
um Schäden am Verdampfer zu vermeiden.
Verdampfer-Erkennung:
Wenn zwischen dem Akku und dem Verdampfer
keine Verbindung besteht, blinkt der Taster in
Sekunden-Intervallen auf. Sicherstellen, dass der
Verdampferkopf richtig eingesetzt wurde und der
Verdampfer am Akku fest angebracht ist.
Precautions 13
DO’s
•S
tore the e-lectron•C3 Mega and its accessories
away from children whilst not in use.
•R
emove the battery when you do not intend to
use the e-lectron•C3 Mega for several days.
•P
lease only use the charging cable provided.
•P
lease dispose of dead batteries in accordance
with your country’s appropriate legislation.
DON’Ts
•D
o not charge the battery in a damp
environment.
•D
o not carry batteries in a pocket or bag with
other metallic objects.
•D
o not attempt to repair a faulty battery or
e-lectron•C3 Mega as these are sealed units
with no serviceable parts. Attempted repairs will
void the warranty.
14 Vorsichtsmaßnahmen
Gebote
• Bewahren Sie die Electron• C3 Mega und das
Zubehör außerhalb der Reichweite von Kindern
und Tieren auf.
• Bei Nichtnutzung über mehrere Tage, den
Verdampfer vom Akku abschrauben.
• Nur mitgelieferte Ladegeräte/Kabel verwenden.
• Alte oder defekte Akkus nach gesetzlichen
Bestimmungen entsorgen.
Warranty / Garantie 15
Verbote
•A
kkus nicht in feuchter Umgebung aufladen.
•A
kkus nicht in Taschen mit metallischen
Gegenständen aufbewahren.
•V
ersuchen Sie nicht einen defekten Akku oder
die Electron• C3 Mega zu reparieren. Beim
Versuch der Reparatur erlischt die Garantie.
Warranty
The e-lectron•C3 Mega components contained
in each kit have a 28-day parts warranty, with
the exception of the atomizer heads which are
covered by our Dead On Arrival warranty only.
The USB cable supplied has a 12-month warranty
which does not cover damaged wiring or improper
use.
Garantie
Der Electron• C3 Mega Akku und der Tank haben
eine 28 Tage Garantie. Die Verdampferköpfe
werden als Einwegartikel mit einer DOA
Regulierung und das USB Ladekabel mit einer 12
Monate Garantie ausgeliefert. Sollte ein Produkt
fehlerhaft sein, bitten wir Sie den Totally Wicked
Kundenservice zu kontaktieren.
Manufactured in China by Joyetech under the authority of Pillbox38
UK Ltd, Stancliffe Street, Blackburn, Lancashire, BB2 2QR.
UK: Tel 0845 602 9661 www.totallywicked-eliquid.co.uk
USA: Tel 1(888) 761-9425 www.totallywicked-eliquid.com
GERMANY: Tel 01803 942533 www.totallywicked-eliquid.de