1
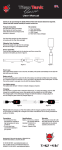
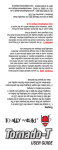
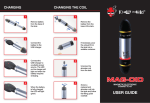
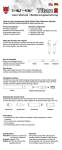
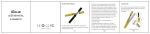
USER MANUAL
2
Your e-lectron•M
Congratulations on purchasing your new
Totally Wicked e-lectron•M Electronic Cigarette.
Your e-lectron•M
A
B
F
A. Battery
B. Atomizer base
C. C2 atomizer head
D. Tank
E. Mouthpiece
C
D
G
F. A
ir-flow adjustment and
atomizer removal tool
G. Mouthpiece connector
E
3
4
Using your e-lectron•M
Power on and off: Press the power button 5
times in quick succession, the button light will
flash 5 times to indicate the e-lectron•M is on
and ready to use. In the same way, to turn the
e-lectron•M off, press the power button 5 times
in quick succession.
Filling the Tank
Vaping: Press the button as you inhale. When
the button is held down, the button light will be
illuminated and will gradually go out when the
button is released.
Mouthpiece connector: The mouthpiece
connector supplied can be used to accept
any 510 mouthpiece.
To fill the tank: Unscrew the mouthpiece from
the atomizer tube.The filling hole is located
opposite the air inlet valve.
FILLING HOLE
5
6
Operating Modes
Changing operation mode between
Variable Voltage (VV) and Variable
Wattage (VW)
When the device is in power-off state,
press and hold down the button for
more than 1.5 seconds, the mode
light will be illuminated. Continue to
hold the button to toggle between
modes. The next time the e-lectron•M
is powered on, it will remain in the
selected mode.
Operating Modes
VV mode (3.3V – 4.8V): In this mode,
voltage output can be adjusted by rotating
the regulation ring (Voltage scale (V).
VW mode (4.5W– 9.6W): In this mode,
wattage output can be adjusted by rotating
the regulation ring (Wattage scale (W).
VOLTAGE
SCALE
WATTAGE
SCALE
REGULATING RING
7
8
Charging the Battery
Simply charge the e-lectron•M
battery via the USB cable
connected to a powered USB
port or wall adapter (fig6).
The power button will flash to
indicate the battery is charging,
when it is fully charged, the
power button will remain lit until
the USB cable is removed. The
e-lectron•M can still be used
whilst the cable is connected
and charging the battery.
Battery Operation
Battery charge indication: When the power
button is pressed the selected mode light will
indicate the remaining battery life. The light will
remain steady on for 5 seconds if the remaining
battery life is greater than 60%, below this the
light will pulsate at an increasing speed as the
battery life is drained. When the battery reaches
below 10% charge remaining, the light will
pulsate rapidly.
9
Low battery warning: When the battery
is completely drained, the button light will
flash 40 times, and the device will shut down
automatically.
Short circuit protection: If short circuit occurs,
the button light will flash 5 times and the
e-lectron•M will shut down. To resume operation
remove the fault (for example a faulty atomizer)
and press the power button 5 times to reset the
battery.
10 Atomizer Head Replacement
Using the special tool,
unscrew the atomizer tube
from the battery.
Unscrew the atomizer base
from the atomizer tube.
Atomizer Head Replacement 11
Rotate the atomizer head
clockwise and remove from
the atomizer base.
Insert the new C2 atomizer
head into the atomizer base and
gently rotate counter-clockwise
so it is retained.
Refit the atomiser base into
atomizer tube and tighten with
the tool provided.
Connect the assembled
atomizer to the battery and
screw on the mouthpiece and
the e-lectron•M is ready to use.
12 Atomizer Operation
Atomizer protection: During operation, if the
button is held down for longer than 10 seconds
the button light will flash 10 times and the
device will be automatically disabled to protect
against possible damage. Normal operation will
commence after the power button is released.
Adjusting the Airflow 13
Atomizer detection: The button light will flash
at 1 second intervals if there is no connection
between the atomizer and battery. Ensure the
atomizer is correctly fitted into the tank and that
the battery is firmly screwed to the tank.
To adjust the airflow: Unscrew the
mouthpiece from the atomizer to access
the air inlet valve. Use the special tool
provided to adjust the inlet valve. When
the inlet is adjusted as in (fig1) the draw
will feel tighter. If it is adjusted as in (fig2)
the draw will be normal, and when it is
adjusted as in (fig3), the draw will be light.
FIG. 1
FIG. 2
FIG. 3
14 Precautions
DO’s
• Store the e-lectron•M and its accessories
away from children whilst not in use.
• Remove the battery when you do not
intend to use the e-lectron•M for several days.
• Please only use the charging cable provided.
• Please dispose of dead batteries
in accordance with your country’s
appropriate legislation.
Warranty 15
DON’Ts
• Do not charge the battery
in a damp environment.
• Do not carry batteries in a pocket or bag
with other metallic objects.
• Do not attempt to repair a faulty battery
or e-lectron•M as these are sealed units with
no serviceable parts. Attempted repairs
will void the warranty.
Warranty
The e-lectron•M components contained in each kit have a 28-day parts warranty. The USB cable
supplied has a 12-month warranty. If any parts are found to be faulty within this time please contact
our customer service team, whose details are on the back page of this booklet and we will arrange
for a replacement. We may require the goods to be returned for further investigation.
Manufactured in China under the authority of Pillbox38 UK Ltd,
Stancliffe Street, Blackburn, Lancashire, BB2 2QR.
UK: Tel 0845 602 9661 www.totallywicked-eliquid.co.uk
USA: Tel 1(888) 761-9425 www.totallywicked-eliquid.com
GERMANY: Tel 01803 942533 www.totallywicked-eliquid.de