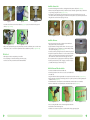
1
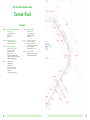
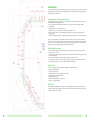
Self-Build
Eco Wooden Pool
Corner Pool
Installation Manual
it’s
WPM 05
January 2010 edition
www.plasticapools.com
Self Build Eco Wooden Pool
Corner Pool
Contents
Introduction
Recommendations for Storage
after Delivery
General Safety Precautions
Required Tools
Kit Contents
Section D:
Filtration Equipment
General Description
Positioning the Equipment
Plumbing the Pipe Work
Fill the Pool
Section A:
Preparation of the Base
Option I: Subsoil Base
Option II: Concrete Base
Section E:
Section B:
Assembly of the Shell
Decide the Layout of your Pool
Assemble the Pool Walls
Install the Return inlet
Install the Skimmer
Build the External Wooden Ladder
Fitting the Wooden Vertical Support Planks
Fitting the Top Shelving Brackets
Fitting the Top Shelving
Position the Top Shelving
Create Hinged Skimmer Door
Fix the Top Shelving Corner Bracket
Secure the Top Shelving
Fix the Plastic Corner Covers
Section F:
Fitting the Ladders
Fitting the External Wooden Ladder
Fitting the Internal Metal Ladder
Section C:
1
Fitting the Liner
Fitting the Linerlock
Levelling the Floor
Laying the Floor Felt Underlay
Preparation for Liner Fitting
Fitting the Liner
Cutting in the Pool Flow Fittings
18
Introduction
You are advised to read this whole book before starting your project. In the event of any problems or questions please contact your
dealer immediately who will be please to help. Warranty claims will not be entertained if there is delay in reporting a problem or
these instructions have not been followed.
Recommendations for Storage after Delivery
In the pre-assembly period the wood is sensitive to variations in temperature and humidity. It is therefore necessary that you take
the following precautions immediately after delivery.
• Do not store the wood in direct sunlight or under a black cover as this will cause distortion which will make installation
extremely difficult.
• Assemble the structure as soon as possible after receipt.
• Assemble the structure in one go, preferably in the morning while the temperature is cool.
• If the pool must be stored then use a cool well-ventilated place, sheltered from sun and rain. If possible keep the pool in its
original packaging.
• Components that are damaged, cracked or distorted due to bad storage and /or handling on site are not covered by warranty.
Wood is a living material and once cut the appearance of cracks, slight movements or changes in colour are normal and the
planks (except in extreme circumstances) do not need replacing. The planks will have been recently treated and may be delivered
to you still moist. In case of a rapid change in temperature; these planks can dry very rapidly and lose 1 or 2mm of height. This
might give you the impression that they are lifting up while they are actually shrinking.
General Safety Precautions
• Unless your filtration kit (filter, pump and any optional heating) is housed within a secure waterproof enclosure it should be
placed at least 2m from the shell.
• It is important to ensure the electricity supply for the pump or any other electrical item has 30mA RCD protection and conforms to
present electrical regulations.
• Never leave children unattended around the pool when completed or at any stage of construction.
• The pool is designed for domestic use. Running along the top rail, diving or jumping into the water from the edge must not be
allowed under any circumstances. The pool is not suitable for the addition of diving boards.
Required Tools
There are no specialist tools required but in addition to regular hand tools the following will be useful.
• Heavy mallets for assembling walls.
• Large spirit level and set square.
• Quality battery drill with screw driver bits, drill bits and counter sink.
• Wet & dry type vacuum cleaner for fitting the liner.
• Clamps for holding components.
• Mitre block with 22½ degree slots for cutting liner lock.
• Large scissors for cutting underlay felt.
Kit Contents
Both the equipment box and the pallet of wooden planks contain a packing list detailing the contents. As you unpack your pool
check you have all parts required and that their condition is satisfactory. Contact your dealer immediately if you are in any doubt
or believe parts may be missing / damaged.
17
2
SECTION A: Preparation of the Base
OPTION I: Subsoil Base
OPTION II: Concrete Base
•
•
•
•
• The recommended minimum base is a 100mm (4”) thick concrete pad. Using a steel reinforcing grid in the concrete will greatly
increase its strength and is recommended. Every site is different so give due consideration to increasing this specification if you
have unstable ground or any other concerns. If in doubt seek the advice of a ground working contractor or a civil engineer.
• Never construct your pool on made up ground, always dig down to undisturbed subsoil.
• The minimum size concrete base for your pool size is shown in the Concrete Base Layout Drawing [see page 16].
• Ensure that your finished concrete is absolutely level over the whole pool area. If your base is not level the pool water level will
show this after filling.
• Ensure that your finished concrete is absolutely flat over the whole pool area. Any high and low areas will cause difficulties with
construction and spoil the finished look of the liner floor.
• Ensure that your finished concrete is absolutely smooth. Rough concrete can damage the pool liner. The swimming pool liner and
felt will not hide imperfections; tamp lines or trowel marks will show through when the pool is filled.
• Allow your concrete to cure before assembling your pool.
Maximum base sized underlined.
Consider extending the base area on one side for the external ladder.
Consider extending another side for placing the pump and filtration.
Note that the skimmer can not be on the same wall as the ladder or optional filtration enclosure.
• Although the recommended base is concrete (see Option II below) you may choose to construct your pool on undisturbed
subsoil. You must satisfy yourself that your site conditions are suitable. If your site is wet and prone to ground water or flooding
use a concrete base.
• Never construct your pool on made up ground, always dig down to undisturbed subsoil.
• Clear an area at least the size of the appropriate concrete base.
• Ensure that the cleared area is flat, level and smooth and that all vegetation has been removed.
• Ensure that all stones, sharp objects and roots are removed. Failure to prepare the ground will result in a damaged liner. Any
damage caused to the liner by not using the recommended concrete base is specifically excluded from any warranty.
• Dig out the marked area to a depth of 100mm / 4”.
• Please refer to the later section Levelling the Floor (in Section C) as extra work may be required at that stage if a concrete base
has not been used.
3
16
Secure the Top Shelving
• If necessary remove temporary screws added earlier.
• Use the 4mm x 63mm screws to fix the top shelving down to the shelving support brackets and pool wall.
• Pilot drill and countersink each hole.
• At each shelving support position it is usual to have two screws in the outer top shelving plank and two screws in the inner plank.
Ensure that the innermost screw goes into the middle of the pool wall and can not puncture the pool liner.
• At each corner screw the top shelving planks down to the extended wall planks.
• On the large octagon Stretched additional strength will be achieved by screwing the top shelving down to the vertical support
planks as well as the top shelving support brackets.
Fix the Plastic Corner Covers
• Position each plastic corner cover on top of the wooden top shelving so it covers the
bolts used to fix the top shelving corner brackets [see figure 53].
• Pilot drill (4mm) through the inner two holes into the top shelving wood to a depth of
about 15mm. Be careful not to go right through the top shelving.
• Fix the inner two 5mm x 25mm screws
• Repeat this procedure for the outer two screws and then the inner four screws.
Decide the Layout of your Pool
• Refer to the Pool Layout drawing.
• Decide where you would like the pool ladders. Choose a convenient position to have your ladders that will suit your long term
pool usage. If you plan to use a roller system with a solar cover in the future this will effect your ladder position.
• Decide which end you would like the skimmer and return flow fittings. Please refer to Section D: Filtration Equipment and Pipes
which will help you decide. The skimmer is best fitted facing into the prevailing wind so that floating debris is blown into the
skimmer. These fittings can not go on the same sides as the ladders or optional filtration enclosure.
• If you are planning to use an underwater light decide which side to install it on. A light would usually be sited in the middle of
one side, not behind the ladder and where the external wires will not appear unsightly.
• You may find it useful to sketch your equipment positions onto the Pool Layout drawing.
Assemble the Pool Walls
Figure 53
SECTION F: Fitting the Ladders
Fitting the External Wooden Ladder
• Offer up the wooden ladder to your chosen pool wall and position by laying a spirit
level on a ladder tread [see figure 54].
• On the corner pool the external ladder should be tight against top shelving supports
and/or vertical wooden support planks.
• Use a 10mm drill to make holes through the ladder and shelf support or wooden
vertical support plank.
• Take the 10mm coach bolt and pass it through the hole from the inner side. Fix on
the washer and nut from the outer side so that people do not catch their feet on the
protruding fixings [see figure 54].
SECTION B: Assembly of the Shell
• Carefully unpack the pallet of wooden planks and stack them in the middle of your pool area. Assembly will be faster if you sort
the planks into their different types at this stage.
• Knocking blocks are provided to protect the pool wall planks as they are knocked together. Place the wooden block so its
grooves align with the tongues of the plank being hit. Never hit a plank with mallet or hammer but always use the knocking
blocks provided.
• Each plank must have 2 tongues facing upwards and 2 grooves facing downwards.
• Each plank must be fully tapped home along its entire length [see figure 1 & 2].
• If a plank is difficult to fit first make sure no object like a small stone has become lodged in any groove.
• If a plank is still difficult to fit try it in another location
• If a plank is warped start fitting from one end and using the tongue and groove as rails “zip” the plank down by gradually
working along the length striking firmly with a mallet and the wooden block. Using a clamp may be helpful.
• Do not start a new layer of planks without making sure every preceding plank is full interlinked.
Figure 54
Fitting the Internal Metal Ladder
• Assemble the stainless steel ladder in accordance with its own supplied instructions.
• Remember to fit the ladder cushions to the bottom of the ladder or you will damage your liner.
• Place the ladder on the top shelving directly above the wooden ladder [see figure 55].
• Use a spirit level to position the ladder vertically and make sure the ladder cushions are resting against the pool liner.
• Mark the position of the 6 holes in the fixing flanges.
• Remove the ladder and drill 8mm holes through the top shelving.
• Reposition the ladder and fit the 6 ladder bolts down through the ladder flange and top shelving [see figure 56].
• Underneath the top shelving fit a washer and nut onto each bolt and tighten [see figure 57].
Figure 55
15
Figure 56
Figure 1
Figure 2
Figure 57
4
• Please note that although you are constructing a Corner Pool all of the pools we manufacture as standard, are of an
octagonal form.
• Find two standard half height planks that have flat bases and have two tongues facing upwards. Place these flat side down on
your pool base.
• Find the other two standard half height planks that have flat bases and have two tongues facing upwards. Place these flat side
down on your pool base at each end.
• With four standard planks form the first layer into the outline of the Corner Pool . The 45 degree interlocking slot at each plank
end will form the octagon [see figures 3 & 4].
Figure 3
Figure 4
SECTION E: Fitting the Top Shelving
Position the Top Shelving
• The top shelving comes as 16 pieces, 8 inner planks and 8 outer planks.
• Lay the inner planks around the pool, resting them on the pool wall and top shelving brackets.
• The inner planks are designed to slightly overhang the installed liner, ensure that this overhang is consistent all around the pool.
• Lay the outer planks leaving a gap of approximately 4mm between the inner and outer planks [see figure 47].
• Take the 8 plastic corner covers and trial fit them in place. Note there is a tab on the underside that determines the spacing
between the inner and outer planks [see figure 48].
Figure 5
• Fit the next layer of planks so each side has two layers [see figure 5].
• At this stage and after every couple of plank layers, check that the pool shell is correctly aligned on the concrete base and that
the diagonal measurements across the corners are equal to ensure the structure is square. Also use a spirit level to check the pool
is horizontal.
• Fit the plank which has the return inlet hole on the end wall that you have determined will have the skimmer and started with a
half plank. It is usual to position the inlet plank as the third whole plank up, e.g. a half plank on the concrete base, two standard
planks and then the inlet plank [see figure 6].
Figure 47
Figure 48
Figure 49
• It is worth taking time to arrange the inner and outer planks carefully, ensuring they are parallel to each other, the pool overhang
is consistent and they are correctly spaced apart. Above the skimmer [see figure 49] be aware of the hinged trap door to be
formed, see below.
• It is quite usual to have expansion space at the end of each top shelving plank.
• Temporarily fix each top shelving plank into place by using one screw at each end.
Create Hinged Skimmer Door
Figure 6
Figure 7
Figure 8
• Continue to build up the walls checking alignment as you go.
• The hole for the skimmer is formed on the wall that you started with a half plank and where the return inlet plank is fitted.
• Refer to the instructions supplied with the skimmer.
• The top skimmer plank is extra long and has a flat top. Fit this with the “U” facing downwards so the flat top aligns with the
other extend top planks [see figures 7 & 8].
• The top layer of planks are extra long and have flat tops. Once these are in place the pool wall is complete and should be an
equal height all round.
• For access to the skimmer a hinged “trap door” needs to be formed [see figure 50].
• On the outer plank of the top shelving that passes over the skimmer mark both sides
of each shelving support.
• Remove this top shelving plank and mark positions to cut it. The cuts need to be
positioned so the hinged trap door will rest on about 15mm of either shelving
support. Also position the cut so the non-hinged part of the top shelving can be
screwed to the shelving supports [see figure 51].
• Re-position the top shelving plank on the pool to double check the cut positions.
Check that: the skimmer lid will be removable, the main parts of the top shelving can
be screwed to shelving supports and the hinged part will also rest on the shelving
supports [see figure 50].
• Cut the outer top shelving plank and fix it to the inner plank with the supplied hinges
and screws.
Fix the Top Shelving Corner Brackets
• Locate the 8 stainless steel top shelving corner Brackets, the thirty two M5 x 40mm
bolts and thirty two nyloc nuts.
• The brackets are designed to span all 4 top shelving planks underneath each corner.
One screw goes through each inner plank, and one screw through each outer plank.
• Hold the bracket in position on the underside of the top shelving and trial fit a plastic
corner cover to check it will hide the top shelving conrner brackets fixing bolts.
• Clamp the bracket in position. Using a 5mm drill make a hole upwards through the
top shelving. Countersink the top of this hole and pass a bolt down through the top
shelving and corner bracket making sure that the bolts head does not protrude. Fit
the nut onto the bolt and tighten against the corner bracket [see figure 52].
• Check the bracket is still in the right place and repeat for the remaining 7 brackets.
5
Figure 50
Figure 51
Figure 52
14
Install the Return Inlet
• Locate the return flow fitting. Ensure that all screws, rubber gaskets and other parts are carefully stored [see figure 9].
• Take the main body of the fitting and fit it into the pool wall from the inside so the flat face is against the inside pool wall and the
1½” pipe fitting is pointing to the outside [see figures 10 & 11]
• From inside the pool fix the main body to the pool wall with two 3.5mm x 20mm screws from the fixings kit. Do not use the
screws that came with the return flow fitting, they are used later for the liner face plate. The screws should not protrude above the
fitting’s face and be careful not to form sharp edges on the screws.
Figure 42
Figure 43
Figure 44
• Connect the other end of the hose to the inlet return ball valve [see figure 42]. Now connect the hose from the pump to the
skimmer [see figures 43 & 44].
Figure 9
Figure 10
Figure 11
Install the Skimmer
Figure 45
Figure 46
• When you have completed all of the pipe work open the ball valves, also make sure the filtration system is more than 2 metres
away from the pool, unless it is enclosed in an optional fitration enclosure available from your dealer [see figures 45 & 46].
Fill the Pool
• When the pipe work has been completed the pool can be filled.
• The usual operating level is the water level half way up the skimmer opening.
• Once there is water in the pool start chemical water treatment and filtration.
• Refer to the instructions that came with your skimmer and ensure that all screws,
rubber gaskets and other parts are carefully stored.
• Pay particular attention to making sure that the skimmer is the correct way up, look
for the marking “top”. Also ensure the skimmer is mounted horizontally by checking
with a spirit level during fixing. [see figures 12 & 13]
• Locate the screws from the pool fixings kit and secure the skimmer into the pool wall
through the holes provided in the skimmer. Do not use the screws that come with the
skimmer, they are used later for the liner face plate The screws should not protrude
above the skimmer face and be careful not to form sharp edges on the screws.
• If a two part skimmer has been supplied glue the main skimmer body to the skimmer
throat that you have fixed to the pool. This is a large glue joint and is a two person
job. Hold the skimmer body in position while the glue sets.
Figure 12
Build the External Wooden Ladder
• Locate the wooden ladder treads and wooden ladder sides.
Figure 13
• From the fixings kit locate the 5mm x 65mm screws used to secure the ladder treads
to the ladder sides.
• Using a 4mm drill bit make holes through the ladder sides to accept the screws, two holes in each slot [see figures 14 & 15].
• Place one ladder side on a flat surface with slots facing upwards. You may wish to protect the wood surface by padding it with
cardboard or similar [see figure 15].
• Fit each ladder tread into a slot and tap home. Do not hit the ladder sides or treads directly but use a wooden block.
• Place the second ladder side over the top and tap home so the treads are firmly in place [see figure 16].
Figure 14
Figure 15
Figure 16
• Fit two screws through the ladder side into each tread using the holes drilled earlier.
• Turn the ladder over and fit the remaining screws.
• The ladder is not connected to the pool now but is needed to check the shelving support spacings later.
13
6
Fitting the Wooden Vertical Support Planks
• Locate the wooden vertical support planks and 5mm x 100mm screws
• Refer to your pool layout drawing for the positions.
• The vertical support planks are designed to be fixed so their edge is against the pool
wall [see figure 17].
• Each vertical support will need cutting to match the pool wall height. If the vertical
support plank is cut too long it will make fitting the top shelving difficult. It is
advisable to number each vertical support with its position and cut to suit that
position. Cut each vertical support so that it is level with the top of the pool wall.
• It will be easiest to fit the vertical supports by having one person in the pool and
another outside holding each support.
Figure 17
• Position each vertical support so it is level with the top of the pool wall, a set square
will assist. The top shelving will eventually rest on the vertical support planks, the
triangular top shelving brackets and the pool wall. From inside the pool pilot drill
(4mm) through the top plank and into vertical support and fix with a screw.
• Ensure that the screw pulls the vertical support tight against the pool wall.
• Use a spirit level to position the vertical support plank vertically and draw a corresponding vertical line down the inside of the
pool. This line should mark the centre of the vertical support plank.
• Pilot drill (4mm) through the bottom plank and into vertical support and fix with a screw. Again ensure that the screw pulls the
vertical support brace tight against the pool wall.
• In a similar way fix a screw through each horizontal plank into the support plank.
Fitting the Top Shelving Brackets
• The top shelving that runs around the perimeter is supported by wooden brackets.
These triangular brackets are fixed against the pool wall [see figure 18].
• Locate the top shelving brackets and place them on top of the pool wall in
approximately the positions indicated on the Pool Layout drawing of your sized
swimming pool.
• From the fixings kit locate the 5mm x 100mm screws, two are required for each
shelving bracket.
• With a pencil mark the centre position of each shelving bracket on the top of the
Figure 18
pool wall according to the dimensions on the Pool Layout drawing.
• Position the wooden external ladder in the middle of your chosen wall. On each side
hold a shelving support tight against the outside of the ladder and mark its position. The ladder is later bolted onto these
shelving supports.
• It will be easiest to fit the top shelving brackets by having one person in the pool and another outside holding each bracket.
• Level the top of the shelving bracket with the top of the pool wall, a set square will assist. The top shelving will eventually rest on
both the shelving bracket and the pool wall. Pilot drill (4mm) the top hole through the pool wall and fix the screw horizontally
into the shelving bracket.
• Make sure the bracket is vertical with a spirit level and then pilot drill and fix the lower screw.
• Repeat this procedure for all the top shelving brackets.
7
SECTION D: Filtration Equipment
General Description
• To keep your swimming pool water clear and healthy it needs to be filtered and treated with chemicals. For details about
chemical water treatment please consult your supplying dealer.
• Swimming pool water is drawn through the skimmer into the pump. The pump then pushes the water through the sand filter
where dirt is trapped. The water then passes through any optional heating and back to the pool via the inlet return.
• Extra pipe and fittings are available from your dealer if you should need to install the filtration at a greater distance from the
pool or wish to include heating.
• A valve is supplied so that the pool can be isolated allowing the pump strainer basket to be cleaned without draining the pool.
Positioning the Equipment
• Unpack the pump and filter set and assemble according to its own supplied
instructions [see figure 36].
• Decide on the filter position before filling with sand as it will be heavy and difficult
to move afterwards.
• Fill the filter tank with filter media as per its own instructions.
• If you have optional heating equipment unpack this and assemble as per its own
supplied instructions. Heaters are installed so that clean water from the filter is
pushed through them, e.g. heating is installed “down stream” from the filter. It is
likely you will require extra fittings to install heating, consult with your supplying
dealer.
Figure 36
Fitting the Pipe Work
• When fitting threaded joints use the PTFE tape supplied to achieve a watertight join.
• If you are using any glue to permanently fix any items together, completely assemble the filtration set up and pipe work first to
avoid mistakes.
• On the bottom of the skimmer fit the 2” to 1.5” threaded reducer supplied in the skimmer box [see figure 37].
• Next fit the filtration conversion parts to the skimmer and return inlet [see figures 37 & 38].
• Fit the ball valves which are supplied with the filter pump to the inlet and skimmer [see figures 39 & 40].
• Connect the flexible hose on the multiport Valve of the filter marked as “out” [see figure 41].
Figure 36
Figure 37
Figure 38
Figure 39
Figure 40
Figure 41
12
Cutting in the Pool Flow Fittings
• Cutting the liner and fitting the flow fittings should be done with care and not rushed, it is wise to have a person outside the pool
so they can pass you tools and equipment.
• Do not cut the liner until you are completely happy with the liner position.
• Locate the screws, faceplates, gaskets and all other parts of the inlet, skimmer and optional under water light. Manufacturers
vary their designs so read through the instructions that came with each item.
• Feel the position of the screws in the return flow fitting. Take a Stanley knife or similar and make two small cuts in a cross shape
on top of each screw head. Remember that you positioned the screw with the cross head in the 12, 3, 6 & 9 O’clock positions
and make the cuts so that your knife blade pierces the liner and goes into the screw head [see figure 30].
SECTION C: Fitting the Liner
Fitting the Linerlock
• Linerlock is the white plastic extrusion that the pool liner hangs from.
• Although the linerlock can be cut straight at a 90 degree angle a neater finish and better fixed liner will be achieved by cutting
at 22½ degrees. A mitre block will help with this.
• Take a length of linerlock and trim one end to approximatley 22½ degrees [see figures 19 & 20].
Figure 19
Figure 30
Figure 31
Figure 32
Figure 33
Figure 34
Figure 35
• With finger tips surrounding the screw tension the liner evenly so that the screw head pops through the liner. It may be necessary
to increase the cut size on top of the screw head but keep these as small as possible [see figure 31].
• Repeat this procedure for the second screw and then remove both screws.
• Loosely fit the return faceplate by replacing the screws just removed. Tighten these screws so the cone of the faceplate is just
starting to tension the liner [see figure 32].
• Take the remaining two screws and using the premade screw holes in the faceplate as a guide pierce the liner with them and
tighten to just tension the liner all around [see figure 33].
• Use your knife to cut out the neat circle of liner material that is outlined by the cone of the faceplate [see figure 34].
• Tighten the screws evenly so that the faceplate is flat against the liner forming a water proof seal.
• Screw in the return faceplate and eyeball. Do not over tighten this [see figure 35].
• Use the same method for the skimmer and optional light but note that these fittings often come with a second gasket which is
fitted between the liner and faceplate, e.g. on these fittings there is a gasket either side of the liner.
Figure 20
• Clamp or hold this length of linerlock along the inside of one pool wall and mark the length. The correct length is to have the
linerlock for each wall meeting in the corner with only a minimal gap. Cut the other end to 22½ degrees.
• Lay the trimmed linerlock along the top of the pool wall and use a 3mm drill bit to make pilot holes starting 25mm in from each
end and at approximately 200mm - 250mm centres.
• Use the 3.5mm x 40mm screws to fix the linerlock to the inside of the wall [see figure 20].
• The linerlock must be exactly flush with the top of the wall.
• Repeat this procedure for each wall ensuring that where the linerlock meets in the corners it is at the same level.
• It may be necessary to make some sections from two pieces as the Iinerlock is supplied in standard lengths, which do not divide
exactly into the correct sizes for all pools.
• Ensure that no linerlock screws are left protruding and have no sharp edges that could damage the liner.
Levelling the Floor
• If you have assembled your pool on a subsoil base rather than a concrete pad it is likely that the area inside the pool will have
become disturbed while you worked. If you used a concrete base this section is not required.
• Although the floor felt and liner could be fitted on uneven subsoil it is not recommended and a better finish with longer liner life
will be achieved by levelling the floor as follows.
• Draw a pencil line all around the inside on the pool wall 20mm up from the bottom.
• Remove any loose dirt from inside the pool.
• Use a dry mix of 5 parts sharp sand to 1 part cement and spread evenly over the floor.
• Use a straight edge and plastering float to achieve a flat, level finish.
• Do not let the sand and cement level go any higher than 20mm above the base of your pool where you made your pencil line.
• Moisture in the air and soil base will cure the sand and cement mix.
• Let the floor harden before proceeding.
Laying the Floor Felt Underlay
• Ensure the pool floor is clean and that no objects can fall into the pool. Any objects or dirt that remain in the pool when the liner
is fitted can either damage the liner or be unsightly for years to come.
• While climbing in and out of the pool make sure no dirt or debris is brought in. It is advisable to lay the floor felt underlay with
bare feet or just wearing socks.
• Locate the roll of underlay felt and underlay tape. Never use any other type of tape where it will come into contact with the liner.
• Lay out the felt to completely cover the pool floor, it will be necessary to trim the felt with scissors and join strips together using
the supplied underlay tape.
• Ensure that the felt is not overlapped at any point or creased as the double thickness will show through the liner.
• Where strips are laid side by side ensure the joint is butted up closely with no gap. Join sections of felt with the underlay tape.
• Avoid joining together edges that you have cut on site, most likely a neater finish will be achieved by joining machine cut edges.
11
8
• Around the perimeter of the pool where the wall meets the floor cut the felt with scissors to be an exact fit [see figures 21 & 22].
Figure 21
Fitting the Liner
• It is absolutely essential that ALL foreign bodies are excluded from between the liner and the underlay, which means that the
underlay and the liner should be thoroughly cleaned (vacuumed) before installation.
• Before fitting the liner ensure each fitting (return, skimmer & light) has gaskets fitted and marker screws installed.
• The people installing the liner should be barefoot and wearing shorts ready for filling the pool.
• Locate the bag of linerlock wedge sections and underlay tape.
• Place the liner in the pool. Note that the pool liner will have been made slightly smaller than the pool, the weight of water
stretches it into position.
• Unfold the liner and approximately lay it out.
• On the floor to wall liner weld seam locate a corner and with your toes position this point into a pool corner.
• The liner has a wedge shaped “beading” around the top which slots into the linerlock. The weight of the liner holds this in
position and small sections of linerlock wedge are used to assist in the corners. [see figures 27, 28 & 29 ]
Figure 22
Preparation for Liner Fitting
• The liner will be much easier to fit on a warm sunny day as this makes the material supple. Before fitting place the liner in a
warm sunny position.
• With underlay tape completely seal the outside of the skimmer, return and optional light. The idea is to make the wall structure as
airtight as possible [see figures 23 & 24].
Figure 27
Figure 23
Figure 24
Figure 25
• Working inside the pool use underlay tape to cover all screw heads that would come into contact with the liner. Also use
underlay tape to cover any imperfections in the wood that could damage the liner. Only use the tape supplied with the pool kit.
• Position your vacuum cleaner in the middle of one wall so that its hose can hang down the inside of the pool wall to
approximately floor level if possible. Use just the hose, not the head attachment. Ensure that no part of the hose or vacuum
nozzle can become detached and get stuck behind the liner.
• Locate a water proofing gasket for the skimmer, return and optional light. Refer to each item’s own instructions.
• Stick a self adhesive gasket on each fitting making sure the holes in the gasket line up with the screw holes in the fitting.
• Locate the screws for each fitting that are used to secure its faceplate.
• Take four skimmer screws and fit them in the pre-made holes at each corner. Do not fit all the screws, just one at each corner. Do
not completely tighten the screws. Leave each screw so that the cross in the head is located at the 12, 3, 6 & 9 O’clock positions
[see figure 25].
• Take two screws for the return and for the optional light. Fit them in two opposite pre-made holes (usually top and bottom) on
each fitting. Do not fit all the screws, just two per fitting. Do not completely tighten the screws. Leave each screw so that the cross
in the head is located at the 12, 3, 6 & 9 O’clock positions [see figure 26].
• If you are fitting an optional underwater light fit its gasket and two screws using the same method.
Figure 28
Figure 29
• Lift the wall of the liner and fit the beading that runs around the top of the liner into the linerlock.
• Repeat this procedure for each corner until the liner is approximately hung in the correct position.
• Return to each corner and ensure that the liner does not twist to the left or right as it goes up, e.g. make sure the top of the liner
is correctly positioned in relation to the corner. It is possible to slide the liner left or right in the linerlock.
• When you are happy with the position of each corner fit a section of linerlock wedge into the linerlock. The wedge goes above
the liner in the linerlock channel.
• On each wall fit the liner beading into the linerlock using linerlock wedge sections to help hold the liner in place as required.
• With your heels push the floor to wall liner seam against the pool wall continuing to pay particular attention to the corners.
• Unhook a small section of liner and drop the vacuum cleaner hose down between the liner and the foam underlay. Clip as much
liner as possible back into position and use linerlock wedge sections to secure it.
• Use underlay tape to make an air tight seal between the vacuum hose, liner and pool wall.
• Turn on the vacuum cleaner to extract the trapped air from between the pool wall and the liner.
• With two people work opposite each other pushing the floor to wall liner seam against the pool wall. Continue adjusting the
liner removing as many creases as possible.
• Occasionally it is necessary to let the liner hang in position in the sun for an hour or two, becoming more supple. It may also be
necessary to switch off the vacuum to adjust the liner position and the restart it.
• When you are happy with the liner position start to fill the pool with a garden hose.
• It is advisable to stay in the pool while first filling making adjustments as required.
• Keep the vacuum switched on until the water reaches about 50mm / 2” from the bottom of the return fitting.
• Turn off the vacuum and then remove the underlay tape, linerlock wedge sections and vacuum hose.
• Refit the liner where the vacuum hose was positioned.
• Do not continue filling the pool until the flow fittings have been cut in and the filtration pipe work completed.
Figure 26
9
10
Cutting in the Pool Flow Fittings
• Cutting the liner and fitting the flow fittings should be done with care and not rushed, it is wise to have a person outside the pool
so they can pass you tools and equipment.
• Do not cut the liner until you are completely happy with the liner position.
• Locate the screws, faceplates, gaskets and all other parts of the inlet, skimmer and optional under water light. Manufacturers
vary their designs so read through the instructions that came with each item.
• Feel the position of the screws in the return flow fitting. Take a Stanley knife or similar and make two small cuts in a cross shape
on top of each screw head. Remember that you positioned the screw with the cross head in the 12, 3, 6 & 9 O’clock positions
and make the cuts so that your knife blade pierces the liner and goes into the screw head [see figure 30].
SECTION C: Fitting the Liner
Fitting the Linerlock
• Linerlock is the white plastic extrusion that the pool liner hangs from.
• Although the linerlock can be cut straight at a 90 degree angle a neater finish and better fixed liner will be achieved by cutting
at 22½ degrees. A mitre block will help with this.
• Take a length of linerlock and trim one end to approximatley 22½ degrees [see figures 19 & 20].
Figure 19
Figure 30
Figure 31
Figure 32
Figure 33
Figure 34
Figure 35
• With finger tips surrounding the screw tension the liner evenly so that the screw head pops through the liner. It may be necessary
to increase the cut size on top of the screw head but keep these as small as possible [see figure 31].
• Repeat this procedure for the second screw and then remove both screws.
• Loosely fit the return faceplate by replacing the screws just removed. Tighten these screws so the cone of the faceplate is just
starting to tension the liner [see figure 32].
• Take the remaining two screws and using the premade screw holes in the faceplate as a guide pierce the liner with them and
tighten to just tension the liner all around [see figure 33].
• Use your knife to cut out the neat circle of liner material that is outlined by the cone of the faceplate [see figure 34].
• Tighten the screws evenly so that the faceplate is flat against the liner forming a water proof seal.
• Screw in the return faceplate and eyeball. Do not over tighten this [see figure 35].
• Use the same method for the skimmer and optional light but note that these fittings often come with a second gasket which is
fitted between the liner and faceplate, e.g. on these fittings there is a gasket either side of the liner.
Figure 20
• Clamp or hold this length of linerlock along the inside of one pool wall and mark the length. The correct length is to have the
linerlock for each wall meeting in the corner with only a minimal gap. Cut the other end to 22½ degrees.
• Lay the trimmed linerlock along the top of the pool wall and use a 3mm drill bit to make pilot holes starting 25mm in from each
end and at approximately 200mm - 250mm centres.
• Use the 3.5mm x 40mm screws to fix the linerlock to the inside of the wall [see figure 20].
• The linerlock must be exactly flush with the top of the wall.
• Repeat this procedure for each wall ensuring that where the linerlock meets in the corners it is at the same level.
• It may be necessary to make some sections from two pieces as the Iinerlock is supplied in standard lengths, which do not divide
exactly into the correct sizes for all pools.
• Ensure that no linerlock screws are left protruding and have no sharp edges that could damage the liner.
Levelling the Floor
• If you have assembled your pool on a subsoil base rather than a concrete pad it is likely that the area inside the pool will have
become disturbed while you worked. If you used a concrete base this section is not required.
• Although the floor felt and liner could be fitted on uneven subsoil it is not recommended and a better finish with longer liner life
will be achieved by levelling the floor as follows.
• Draw a pencil line all around the inside on the pool wall 20mm up from the bottom.
• Remove any loose dirt from inside the pool.
• Use a dry mix of 5 parts sharp sand to 1 part cement and spread evenly over the floor.
• Use a straight edge and plastering float to achieve a flat, level finish.
• Do not let the sand and cement level go any higher than 20mm above the base of your pool where you made your pencil line.
• Moisture in the air and soil base will cure the sand and cement mix.
• Let the floor harden before proceeding.
Laying the Floor Felt Underlay
• Ensure the pool floor is clean and that no objects can fall into the pool. Any objects or dirt that remain in the pool when the liner
is fitted can either damage the liner or be unsightly for years to come.
• While climbing in and out of the pool make sure no dirt or debris is brought in. It is advisable to lay the floor felt underlay with
bare feet or just wearing socks.
• Locate the roll of underlay felt and underlay tape. Never use any other type of tape where it will come into contact with the liner.
• Lay out the felt to completely cover the pool floor, it will be necessary to trim the felt with scissors and join strips together using
the supplied underlay tape.
• Ensure that the felt is not overlapped at any point or creased as the double thickness will show through the liner.
• Where strips are laid side by side ensure the joint is butted up closely with no gap. Join sections of felt with the underlay tape.
• Avoid joining together edges that you have cut on site, most likely a neater finish will be achieved by joining machine cut edges.
11
8
Fitting the Wooden Vertical Support Planks
• Locate the wooden vertical support planks and 5mm x 100mm screws
• Refer to your pool layout drawing for the positions.
• The vertical support planks are designed to be fixed so their edge is against the pool
wall [see figure 17].
• Each vertical support will need cutting to match the pool wall height. If the vertical
support plank is cut too long it will make fitting the top shelving difficult. It is
advisable to number each vertical support with its position and cut to suit that
position. Cut each vertical support so that it is level with the top of the pool wall.
• It will be easiest to fit the vertical supports by having one person in the pool and
another outside holding each support.
Figure 17
• Position each vertical support so it is level with the top of the pool wall, a set square
will assist. The top shelving will eventually rest on the vertical support planks, the
triangular top shelving brackets and the pool wall. From inside the pool pilot drill
(4mm) through the top plank and into vertical support and fix with a screw.
• Ensure that the screw pulls the vertical support tight against the pool wall.
• Use a spirit level to position the vertical support plank vertically and draw a corresponding vertical line down the inside of the
pool. This line should mark the centre of the vertical support plank.
• Pilot drill (4mm) through the bottom plank and into vertical support and fix with a screw. Again ensure that the screw pulls the
vertical support brace tight against the pool wall.
• In a similar way fix a screw through each horizontal plank into the support plank.
Fitting the Top Shelving Brackets
• The top shelving that runs around the perimeter is supported by wooden brackets.
These triangular brackets are fixed against the pool wall [see figure 18].
• Locate the top shelving brackets and place them on top of the pool wall in
approximately the positions indicated on the Pool Layout drawing of your sized
swimming pool.
• From the fixings kit locate the 5mm x 100mm screws, two are required for each
shelving bracket.
• With a pencil mark the centre position of each shelving bracket on the top of the
Figure 18
pool wall according to the dimensions on the Pool Layout drawing.
• Position the wooden external ladder in the middle of your chosen wall. On each side
hold a shelving support tight against the outside of the ladder and mark its position. The ladder is later bolted onto these
shelving supports.
• It will be easiest to fit the top shelving brackets by having one person in the pool and another outside holding each bracket.
• Level the top of the shelving bracket with the top of the pool wall, a set square will assist. The top shelving will eventually rest on
both the shelving bracket and the pool wall. Pilot drill (4mm) the top hole through the pool wall and fix the screw horizontally
into the shelving bracket.
• Make sure the bracket is vertical with a spirit level and then pilot drill and fix the lower screw.
• Repeat this procedure for all the top shelving brackets.
7
SECTION D: Filtration Equipment
General Description
• To keep your swimming pool water clear and healthy it needs to be filtered and treated with chemicals. For details about
chemical water treatment please consult your supplying dealer.
• Swimming pool water is drawn through the skimmer into the pump. The pump then pushes the water through the sand filter
where dirt is trapped. The water then passes through any optional heating and back to the pool via the inlet return.
• Extra pipe and fittings are available from your dealer if you should need to install the filtration at a greater distance from the
pool or wish to include heating.
• A valve is supplied so that the pool can be isolated allowing the pump strainer basket to be cleaned without draining the pool.
Positioning the Equipment
• Unpack the pump and filter set and assemble according to its own supplied
instructions [see figure 36].
• Decide on the filter position before filling with sand as it will be heavy and difficult
to move afterwards.
• Fill the filter tank with filter media as per its own instructions.
• If you have optional heating equipment unpack this and assemble as per its own
supplied instructions. Heaters are installed so that clean water from the filter is
pushed through them, e.g. heating is installed “down stream” from the filter. It is
likely you will require extra fittings to install heating, consult with your supplying
dealer.
Figure 36
Fitting the Pipe Work
• When fitting threaded joints use the PTFE tape supplied to achieve a watertight join.
• If you are using any glue to permanently fix any items together, completely assemble the filtration set up and pipe work first to
avoid mistakes.
• On the bottom of the skimmer fit the 2” to 1.5” threaded reducer supplied in the skimmer box [see figure 37].
• Next fit the filtration conversion parts to the skimmer and return inlet [see figures 37 & 38].
• Fit the ball valves which are supplied with the filter pump to the inlet and skimmer [see figures 39 & 40].
• Connect the flexible hose on the multiport Valve of the filter marked as “out” [see figure 41].
Figure 36
Figure 37
Figure 38
Figure 39
Figure 40
Figure 41
12
Install the Return Inlet
• Locate the return flow fitting. Ensure that all screws, rubber gaskets and other parts are carefully stored [see figure 9].
• Take the main body of the fitting and fit it into the pool wall from the inside so the flat face is against the inside pool wall and the
1½” pipe fitting is pointing to the outside [see figures 10 & 11]
• From inside the pool fix the main body to the pool wall with two 3.5mm x 20mm screws from the fixings kit. Do not use the
screws that came with the return flow fitting, they are used later for the liner face plate. The screws should not protrude above the
fitting’s face and be careful not to form sharp edges on the screws.
Figure 42
Figure 43
Figure 44
• Connect the other end of the hose to the inlet return ball valve [see figure 42]. Now connect the hose from the pump to the
skimmer [see figures 43 & 44].
Figure 9
Figure 10
Figure 11
Install the Skimmer
Figure 45
Figure 46
• When you have completed all of the pipe work open the ball valves, also make sure the filtration system is more than 2 metres
away from the pool, unless it is enclosed in an optional fitration enclosure available from your dealer [see figures 45 & 46].
Fill the Pool
• When the pipe work has been completed the pool can be filled.
• The usual operating level is the water level half way up the skimmer opening.
• Once there is water in the pool start chemical water treatment and filtration.
• Refer to the instructions that came with your skimmer and ensure that all screws,
rubber gaskets and other parts are carefully stored.
• Pay particular attention to making sure that the skimmer is the correct way up, look
for the marking “top”. Also ensure the skimmer is mounted horizontally by checking
with a spirit level during fixing. [see figures 12 & 13]
• Locate the screws from the pool fixings kit and secure the skimmer into the pool wall
through the holes provided in the skimmer. Do not use the screws that come with the
skimmer, they are used later for the liner face plate The screws should not protrude
above the skimmer face and be careful not to form sharp edges on the screws.
• If a two part skimmer has been supplied glue the main skimmer body to the skimmer
throat that you have fixed to the pool. This is a large glue joint and is a two person
job. Hold the skimmer body in position while the glue sets.
Figure 12
Build the External Wooden Ladder
• Locate the wooden ladder treads and wooden ladder sides.
Figure 13
• From the fixings kit locate the 5mm x 65mm screws used to secure the ladder treads
to the ladder sides.
• Using a 4mm drill bit make holes through the ladder sides to accept the screws, two holes in each slot [see figures 14 & 15].
• Place one ladder side on a flat surface with slots facing upwards. You may wish to protect the wood surface by padding it with
cardboard or similar [see figure 15].
• Fit each ladder tread into a slot and tap home. Do not hit the ladder sides or treads directly but use a wooden block.
• Place the second ladder side over the top and tap home so the treads are firmly in place [see figure 16].
Figure 14
Figure 15
Figure 16
• Fit two screws through the ladder side into each tread using the holes drilled earlier.
• Turn the ladder over and fit the remaining screws.
• The ladder is not connected to the pool now but is needed to check the shelving support spacings later.
13
6
• Please note that although you are constructing a Corner Pool all of the pools we manufacture as standard, are of an
octagonal form.
• Find two standard half height planks that have flat bases and have two tongues facing upwards. Place these flat side down on
your pool base.
• Find the other two standard half height planks that have flat bases and have two tongues facing upwards. Place these flat side
down on your pool base at each end.
• With four standard planks form the first layer into the outline of the Corner Pool . The 45 degree interlocking slot at each plank
end will form the octagon [see figures 3 & 4].
Figure 3
Figure 4
SECTION E: Fitting the Top Shelving
Position the Top Shelving
• The top shelving comes as 16 pieces, 8 inner planks and 8 outer planks.
• Lay the inner planks around the pool, resting them on the pool wall and top shelving brackets.
• The inner planks are designed to slightly overhang the installed liner, ensure that this overhang is consistent all around the pool.
• Lay the outer planks leaving a gap of approximately 4mm between the inner and outer planks [see figure 47].
• Take the 8 plastic corner covers and trial fit them in place. Note there is a tab on the underside that determines the spacing
between the inner and outer planks [see figure 48].
Figure 5
• Fit the next layer of planks so each side has two layers [see figure 5].
• At this stage and after every couple of plank layers, check that the pool shell is correctly aligned on the concrete base and that
the diagonal measurements across the corners are equal to ensure the structure is square. Also use a spirit level to check the pool
is horizontal.
• Fit the plank which has the return inlet hole on the end wall that you have determined will have the skimmer and started with a
half plank. It is usual to position the inlet plank as the third whole plank up, e.g. a half plank on the concrete base, two standard
planks and then the inlet plank [see figure 6].
Figure 47
Figure 48
Figure 49
• It is worth taking time to arrange the inner and outer planks carefully, ensuring they are parallel to each other, the pool overhang
is consistent and they are correctly spaced apart. Above the skimmer [see figure 49] be aware of the hinged trap door to be
formed, see below.
• It is quite usual to have expansion space at the end of each top shelving plank.
• Temporarily fix each top shelving plank into place by using one screw at each end.
Create Hinged Skimmer Door
Figure 6
Figure 7
Figure 8
• Continue to build up the walls checking alignment as you go.
• The hole for the skimmer is formed on the wall that you started with a half plank and where the return inlet plank is fitted.
• Refer to the instructions supplied with the skimmer.
• The top skimmer plank is extra long and has a flat top. Fit this with the “U” facing downwards so the flat top aligns with the
other extend top planks [see figures 7 & 8].
• The top layer of planks are extra long and have flat tops. Once these are in place the pool wall is complete and should be an
equal height all round.
• For access to the skimmer a hinged “trap door” needs to be formed [see figure 50].
• On the outer plank of the top shelving that passes over the skimmer mark both sides
of each shelving support.
• Remove this top shelving plank and mark positions to cut it. The cuts need to be
positioned so the hinged trap door will rest on about 15mm of either shelving
support. Also position the cut so the non-hinged part of the top shelving can be
screwed to the shelving supports [see figure 51].
• Re-position the top shelving plank on the pool to double check the cut positions.
Check that: the skimmer lid will be removable, the main parts of the top shelving can
be screwed to shelving supports and the hinged part will also rest on the shelving
supports [see figure 50].
• Cut the outer top shelving plank and fix it to the inner plank with the supplied hinges
and screws.
Fix the Top Shelving Corner Brackets
• Locate the 8 stainless steel top shelving corner Brackets, the thirty two M5 x 40mm
bolts and thirty two nyloc nuts.
• The brackets are designed to span all 4 top shelving planks underneath each corner.
One screw goes through each inner plank, and one screw through each outer plank.
• Hold the bracket in position on the underside of the top shelving and trial fit a plastic
corner cover to check it will hide the top shelving conrner brackets fixing bolts.
• Clamp the bracket in position. Using a 5mm drill make a hole upwards through the
top shelving. Countersink the top of this hole and pass a bolt down through the top
shelving and corner bracket making sure that the bolts head does not protrude. Fit
the nut onto the bolt and tighten against the corner bracket [see figure 52].
• Check the bracket is still in the right place and repeat for the remaining 7 brackets.
5
Figure 50
Figure 51
Figure 52
14
Secure the Top Shelving
• If necessary remove temporary screws added earlier.
• Use the 4mm x 63mm screws to fix the top shelving down to the shelving support brackets and pool wall.
• Pilot drill and countersink each hole.
• At each shelving support position it is usual to have two screws in the outer top shelving plank and two screws in the inner plank.
Ensure that the innermost screw goes into the middle of the pool wall and can not puncture the pool liner.
• At each corner screw the top shelving planks down to the extended wall planks.
• On the large octagon Stretched additional strength will be achieved by screwing the top shelving down to the vertical support
planks as well as the top shelving support brackets.
Fix the Plastic Corner Covers
• Position each plastic corner cover on top of the wooden top shelving so it covers the
bolts used to fix the top shelving corner brackets [see figure 53].
• Pilot drill (4mm) through the inner two holes into the top shelving wood to a depth of
about 15mm. Be careful not to go right through the top shelving.
• Fix the inner two 5mm x 25mm screws
• Repeat this procedure for the outer two screws and then the inner four screws.
Decide the Layout of your Pool
• Refer to the Pool Layout drawing.
• Decide where you would like the pool ladders. Choose a convenient position to have your ladders that will suit your long term
pool usage. If you plan to use a roller system with a solar cover in the future this will effect your ladder position.
• Decide which end you would like the skimmer and return flow fittings. Please refer to Section D: Filtration Equipment and Pipes
which will help you decide. The skimmer is best fitted facing into the prevailing wind so that floating debris is blown into the
skimmer. These fittings can not go on the same sides as the ladders or optional filtration enclosure.
• If you are planning to use an underwater light decide which side to install it on. A light would usually be sited in the middle of
one side, not behind the ladder and where the external wires will not appear unsightly.
• You may find it useful to sketch your equipment positions onto the Pool Layout drawing.
Assemble the Pool Walls
Figure 53
SECTION F: Fitting the Ladders
Fitting the External Wooden Ladder
• Offer up the wooden ladder to your chosen pool wall and position by laying a spirit
level on a ladder tread [see figure 54].
• On the corner pool the external ladder should be tight against top shelving supports
and/or vertical wooden support planks.
• Use a 10mm drill to make holes through the ladder and shelf support or wooden
vertical support plank.
• Take the 10mm coach bolt and pass it through the hole from the inner side. Fix on
the washer and nut from the outer side so that people do not catch their feet on the
protruding fixings [see figure 54].
SECTION B: Assembly of the Shell
• Carefully unpack the pallet of wooden planks and stack them in the middle of your pool area. Assembly will be faster if you sort
the planks into their different types at this stage.
• Knocking blocks are provided to protect the pool wall planks as they are knocked together. Place the wooden block so its
grooves align with the tongues of the plank being hit. Never hit a plank with mallet or hammer but always use the knocking
blocks provided.
• Each plank must have 2 tongues facing upwards and 2 grooves facing downwards.
• Each plank must be fully tapped home along its entire length [see figure 1 & 2].
• If a plank is difficult to fit first make sure no object like a small stone has become lodged in any groove.
• If a plank is still difficult to fit try it in another location
• If a plank is warped start fitting from one end and using the tongue and groove as rails “zip” the plank down by gradually
working along the length striking firmly with a mallet and the wooden block. Using a clamp may be helpful.
• Do not start a new layer of planks without making sure every preceding plank is full interlinked.
Figure 54
Fitting the Internal Metal Ladder
• Assemble the stainless steel ladder in accordance with its own supplied instructions.
• Remember to fit the ladder cushions to the bottom of the ladder or you will damage your liner.
• Place the ladder on the top shelving directly above the wooden ladder [see figure 55].
• Use a spirit level to position the ladder vertically and make sure the ladder cushions are resting against the pool liner.
• Mark the position of the 6 holes in the fixing flanges.
• Remove the ladder and drill 8mm holes through the top shelving.
• Reposition the ladder and fit the 6 ladder bolts down through the ladder flange and top shelving [see figure 56].
• Underneath the top shelving fit a washer and nut onto each bolt and tighten [see figure 57].
Figure 55
15
Figure 56
Figure 1
Figure 2
Figure 57
4
SECTION A: Preparation of the Base
OPTION I: Subsoil Base
OPTION II: Concrete Base
•
•
•
•
• The recommended minimum base is a 100mm (4”) thick concrete pad. Using a steel reinforcing grid in the concrete will greatly
increase its strength and is recommended. Every site is different so give due consideration to increasing this specification if you
have unstable ground or any other concerns. If in doubt seek the advice of a ground working contractor or a civil engineer.
• Never construct your pool on made up ground, always dig down to undisturbed subsoil.
• The minimum size concrete base for your pool size is shown in the Concrete Base Layout Drawing [see page 16].
• Ensure that your finished concrete is absolutely level over the whole pool area. If your base is not level the pool water level will
show this after filling.
• Ensure that your finished concrete is absolutely flat over the whole pool area. Any high and low areas will cause difficulties with
construction and spoil the finished look of the liner floor.
• Ensure that your finished concrete is absolutely smooth. Rough concrete can damage the pool liner. The swimming pool liner and
felt will not hide imperfections; tamp lines or trowel marks will show through when the pool is filled.
• Allow your concrete to cure before assembling your pool.
Maximum base sized underlined.
Consider extending the base area on one side for the external ladder.
Consider extending another side for placing the pump and filtration.
Note that the skimmer can not be on the same wall as the ladder or optional filtration enclosure.
• Although the recommended base is concrete (see Option II below) you may choose to construct your pool on undisturbed
subsoil. You must satisfy yourself that your site conditions are suitable. If your site is wet and prone to ground water or flooding
use a concrete base.
• Never construct your pool on made up ground, always dig down to undisturbed subsoil.
• Clear an area at least the size of the appropriate concrete base.
• Ensure that the cleared area is flat, level and smooth and that all vegetation has been removed.
• Ensure that all stones, sharp objects and roots are removed. Failure to prepare the ground will result in a damaged liner. Any
damage caused to the liner by not using the recommended concrete base is specifically excluded from any warranty.
• Dig out the marked area to a depth of 100mm / 4”.
• Please refer to the later section Levelling the Floor (in Section C) as extra work may be required at that stage if a concrete base
has not been used.
3
16
Introduction
You are advised to read this whole book before starting your project. In the event of any problems or questions please contact your
dealer immediately who will be please to help. Warranty claims will not be entertained if there is delay in reporting a problem or
these instructions have not been followed.
Recommendations for Storage after Delivery
In the pre-assembly period the wood is sensitive to variations in temperature and humidity. It is therefore necessary that you take
the following precautions immediately after delivery.
• Do not store the wood in direct sunlight or under a black cover as this will cause distortion which will make installation
extremely difficult.
• Assemble the structure as soon as possible after receipt.
• Assemble the structure in one go, preferably in the morning while the temperature is cool.
• If the pool must be stored then use a cool well-ventilated place, sheltered from sun and rain. If possible keep the pool in its
original packaging.
• Components that are damaged, cracked or distorted due to bad storage and /or handling on site are not covered by warranty.
Wood is a living material and once cut the appearance of cracks, slight movements or changes in colour are normal and the
planks (except in extreme circumstances) do not need replacing. The planks will have been recently treated and may be delivered
to you still moist. In case of a rapid change in temperature; these planks can dry very rapidly and lose 1 or 2mm of height. This
might give you the impression that they are lifting up while they are actually shrinking.
General Safety Precautions
• Unless your filtration kit (filter, pump and any optional heating) is housed within a secure waterproof enclosure it should be
placed at least 2m from the shell.
• It is important to ensure the electricity supply for the pump or any other electrical item has 30mA RCD protection and conforms to
present electrical regulations.
• Never leave children unattended around the pool when completed or at any stage of construction.
• The pool is designed for domestic use. Running along the top rail, diving or jumping into the water from the edge must not be
allowed under any circumstances. The pool is not suitable for the addition of diving boards.
Required Tools
There are no specialist tools required but in addition to regular hand tools the following will be useful.
• Heavy mallets for assembling walls.
• Large spirit level and set square.
• Quality battery drill with screw driver bits, drill bits and counter sink.
• Wet & dry type vacuum cleaner for fitting the liner.
• Clamps for holding components.
• Mitre block with 22½ degree slots for cutting liner lock.
• Large scissors for cutting underlay felt.
Kit Contents
Both the equipment box and the pallet of wooden planks contain a packing list detailing the contents. As you unpack your pool
check you have all parts required and that their condition is satisfactory. Contact your dealer immediately if you are in any doubt
or believe parts may be missing / damaged.
17
2
Self Build Eco Wooden Pool
Corner Pool
Contents
Introduction
Recommendations for Storage
after Delivery
General Safety Precautions
Required Tools
Kit Contents
Section D:
Filtration Equipment
General Description
Positioning the Equipment
Plumbing the Pipe Work
Fill the Pool
Section A:
Preparation of the Base
Option I: Subsoil Base
Option II: Concrete Base
Section E:
Section B:
Assembly of the Shell
Decide the Layout of your Pool
Assemble the Pool Walls
Install the Return inlet
Install the Skimmer
Build the External Wooden Ladder
Fitting the Wooden Vertical Support Planks
Fitting the Top Shelving Brackets
Fitting the Top Shelving
Position the Top Shelving
Create Hinged Skimmer Door
Fix the Top Shelving Corner Bracket
Secure the Top Shelving
Fix the Plastic Corner Covers
Section F:
Fitting the Ladders
Fitting the External Wooden Ladder
Fitting the Internal Metal Ladder
Section C:
1
Fitting the Liner
Fitting the Linerlock
Levelling the Floor
Laying the Floor Felt Underlay
Preparation for Liner Fitting
Fitting the Liner
Cutting in the Pool Flow Fittings
18
Self-Build
Eco Wooden Pool
Corner Pool
Installation Manual
it’s
WPM 05
January 2010 edition
www.plasticapools.com