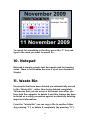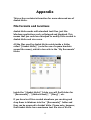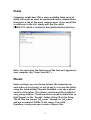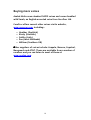
1
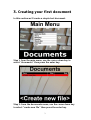
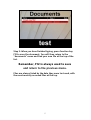
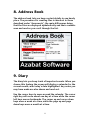
Azabat Write
User Manual
azabat
S
O
F
July 7, 2011
T
W
A
R
E
1. Overview
Azabat Write is an easy to use talking text editor that allows
you to create, modify and print documents. The programme
also features an address book, for keeping contact details of
friends and family, and a diary. An additional module enables
you to send and receive email messages as easily as using
documents.
With Azabat Write there is no complicated installation or set
up procedure. Simply insert the CD into the computer and the
programme should load automatically and present you with a
menu.
The documents you create are all saved in a directory on the
computer’s hard drive as plain text files (TXT format). A USB
Pen Drive version of Azabat Write is also available, which
allows you to carry your documents with you and access
them on other computers.
Azabat Write comes with an English-accented voice you can
install, called Sarah, from CereProc Ltd. The programme uses
SAPI 5, so there are a variety of other voices available
commercially, and you can easily switch between voices.
The programme uses a split screen – the top 80% of the
screen is used as the working area and the bottom 20% is
used as the zoom area, which magnifies the current word or
option. You can change the size of these areas to suit your
needs, as well as the font size and foreground and
background colours.
1
2. Getting started
When you insert the CD into your computer the programme
should start automatically. Initially, the programme will
start in “demonstration mode” – you will need to enter a
serial number, which can be found on the inside of the CD
case, to use the programme fully. To do this, press function
key F5, then type your serial number and press the enter
key.
If you purchase the “E-mail facility” upgrade you simply
enter the new serial number to unlock the e-mail features.
Once you have registered the product the computer will ask
you if you want to install the Sarah voice. Press the enter
key to install it or the escape key if you do not wish to install
it.
2
3. Creating your first document
In this section we’ll create a simple text document.
Step 1: from the main menu, use the cursor down key to
select “documents” then press the enter key.
Step 2: from the documents menu, use the cursor down key
to select “create new file” then press the enter key.
3
Step 3: You will be asked to give a name for the document –
in this example we will use “test”.
Step 4: You can now type in the document. The zoom screen
at the bottom magnifies each word as you type it. By default,
the computer will say each letter as you type, but you can
turn this feature off. It will also say each word as you finish
it and check the spelling, making a sound to alert you if it is
not found in its dictionary.
4
Step 5: When you have finished typing, press function key
F12 to save the document. You will then return to the
“documents” menu and find your new file at the top of the
list.
Remember, F12 is always used to save
and return to the previous menu.
Files are always listed by the date they were last used, with
the most recently accessed files at the top.
5
4. Changing the settings
You can change the appearance and the way in which the
programme works by choosing the “settings” option in the
main menu.
Use the cursor up and cursor down keys to select the feature,
then use the cursor right and cursor left keys to switch
between the options. Finally, press the function key F12 to
save the settings and to return to the main menu.
There are 6 features you can change, which are:“Voice”, which lets you switch between any of the built-in
(SAPI 5) voices currently installed in your computer.
“Speed”, which lets you vary the talking speed between 0
(normal) and 5 (very fast).
“Font”, which lets you choose between several typefaces,
such as Times, Arial, Verdana and Courier. The list contains
only a few of the dozens of fonts available in Windows and
you can, in fact, add other fonts to this list (see Appendix).
6
“Size”, which lets you choose one of several preset font
sizes, ranging from 12 point through to 144 point. Please
note that this affects the working portion of the screen but
not the zoom portion.
“Window size”, which lets you change the size of the zoom
portion of the screen. The options are 0%, 20%, 40%, 60%
and 80%, but the bigger you go the less space there is for
the working portion – at 60 or 80% you can’t read the menus
in the top part of the screen but you may prefer to work just
from the zoom portion.
“Say letters”, which lets you disable the “speak per letter”
feature as you type. There is a third option, “alpha”, which
says the letter using the international phonetic alphabet (ie
alpha, bravo, Charlie) and a fourth option, “phonic”, which
has been included for the benefit of teaching young children
to type.
Finally, a note of the function keys used in Azabat Write.
F1
Help
F2
Reverse screen colours (press a second time to revert
to the original colours)
F4
Settings menu – works from within a document without
having to return to the main menu
F5
Command line options (see Appendix)
F12
Save and return
7
5. Main menu
Azabat Write allows you to create and modify your own
documents. The documents are called files and they are
stored on the computer in places called folders. There are a
few standard folders that are built in to the programme,
such as “Documents”, “Address Book” and “Diary”.
The built-in folders should be sufficient for most beginners
but as you advance you might wish to create your own
folders, so that you can organise your documents.
To create a new folder just press function key F9. You will
then be prompted for a new name. Type in the name for your
new folder and press the enter key. The new folder will
appear in the list and work exactly like the “documents”
folder – in other words, whenever you go into this new folder
it will list the files that have been created there as well as
giving you the option to create a new file.
6. Documents
When you select “documents” from the main menu you are
given a list of files with a “create new file” option at the top.
Use the cursor keys, or arrow keys, to select an existing file,
or choose "create new file" to start a new one. If you want to
go back to the list of folders just press function key F12.
There are several “house-keeping” options here, although
you probably won’t need these if you are a beginner:Rename file: If you'd like to give your file a different name,
press the letter “R” key. You will then be prompted for a
new name. Type in the new name and press the enter key.
8
Delete file: If you'd like to delete your file, press the letter
“X” key. You will then be asked to confirm the action by
pressing the enter key, or you can press the escape key to
cancel it. Please note, when a file is deleted a copy of the file
is kept in the folder called “Waste Bin”, so it is possible to
retrieve the document if you delete it by accident. However,
if you delete it from the “Waste Bin” it will be deleted
permanently.
Copy file: If you'd like to make a copy of your file, which will
be placed in a different folder, press the letter “C” key. You
will then be given a list of folders. Use the arrow keys to
choose the folder and press the enter key. A copy of the file
will then be saved in the new location.
7. Typing
In typing mode you can create or modify your document and
save it by pressing function key F12. The computer normally
speaks each letter as you type and checks your spelling after
each word. You will hear a blip from the computer if it thinks
you've made a mistake.
Navigation
You can move around your document using the arrow keys,
either by a character at a time with the left or right arrow
keys, or a line at a time by pressing the up or down arrow
keys. Pressing the home key takes you to the beginning of
the current line and the end key takes you to the end of the
current line. You can also use page up and page down keys to
move through the document.
If you hold down the control key while pressing either the
left of right arrow key, the cursor moves to the start of
9
either the next word or the previous word. This is useful
because the computer will read each word as you move.
If you want to jump to the start of the document, hold down
the control key and press the home key. To jump to the end
of the document, just press “control end”.
Reading the document
The programme can read part or all of a document to you by
simply pressing the ALT key, which is usually located just
left of the space bar. If you press it again, it stops reading. It
starts from the cursor location and reads a sentence at a
time. If you stop it in the middle of a sentence, then start it
again, the computer will resume reading from the beginning
of this sentence.
Printing
You can print the document by holding down the control key
and pressing the letter P. The programme will tell you that
you are about to print the document and ask for
confirmation. The typeface and font size can be changed in
the settings menu, under the folder options.
Cut, Copy and Paste
You can select a section of your document by holding down
the shift key and using the arrow keys. Once you've defined
a section you can either press control C to copy it into
memory, or control X to remove it. To paste, press control V.
Note that you can only keep one section of text in memory.
10
8. Address Book
The address book lets you keep contact details in one handy
place. The procedure for creating files is identical to those
described under “documents”, the main differences being
that the files are displayed alphabetically and their contents
seen and read as you scroll through the list.
9. Diary
The diary lets you keep track of important events. When you
choose this feature the screen will display a calendar for the
current month, with today’s date highlighted. Any notes you
may have made are also shown and read out.
Use the cursor keys to move around the calendar. The cursor
right key will move ahead one day at a time while the cursor
left keys moves backwards. The cursor up and cursor down
keys move a week at a time, while the page up and page
down keys move a month at a time.
11
To search for something in the diary press the “F” key and
type in the word you want to search for.
10. Notepad
Notepad is simply a single text document used for keeping
notes. There is no filename because it’s just one document.
Simple!
11. Waste Bin
Documents that have been deleted are automatically moved
to the “Waste Bin”, rather than being deleted completely.
This means that you can access a document even after you
have told the computer to delete it and this feature has been
included as a safety precaution against accidentally deleting
important information.
From the “Waste Bin” you can copy a file to another folder
(by pressing “C”) or delete it completely (by pressing “X”).
12
12. E-mail facility
This section describes the e-mail facility, which is sold as an
upgrade to Azabat Write. Once you have registered the
upgrade two extra items appear on the main menu – e-mail
and sent items – and, of course, you’ll need to have an
Internet connection (ie Broadband) in place in order to use it.
Configuring e-mail
Before you can send and receive e-mail in Azabat Write you’ll
need to create an e-mail address for yourself. But don’t
worry - this is incredibly easy to do.
When you go into e-mail for the first time the computer will
check that you are connected to the Internet and will then
ask you for some basic details, which are needed to set up
the e-mail address. These are:1. Your name – so people who receive your messages can
see where they came from.
2. E-mail name – you can choose the first part of your
e-mail address. For example, if your name is Bob Jones
you might type “bob”. The server for Azabat e-mail will
then check availability and, if ok, create the address –
in this example, [email protected]
3. PIN number – type a 4 digit number that you can easily
remember, such as part of a phone number.
There is a good reason for the PIN number. Suppose you
have access to more than one computer and you set up your
e-mail address as [email protected]. If you then use a
different computer, the server will detect that an e-mail
address already exists and you’ll be asked for the PIN
number, rather than creating a new account.
13
Receiving e-mail
Once you have an address set up, whenever you choose email from the main menu the computer will check to see if
you have received new e-mail and take you to your
messages. You can access and read this in exactly the same
way as regular documents. If you want to reply to a message,
just press function key F9 – you won’t need to specify the
recipient’s e-mail address because the computer already
knows it.
Creating e-mail
The procedure is just like creating a normal document but
with a couple of extra steps.
To create and send an e-mail, choose the e-mail option from
the main menu. Wait until the computer has checked for and
downloaded any new messages, and then choose “create new
message” from the menu.
You will be asked for the recipient’s e-mail address, which
you should type carefully before pressing the enter key. You
can also set up entries in your address book to include
people’s e-mail addresses and you will only need to type part
of their name, not their full e-mail address, to find them.
Next, you will be asked for a subject for the e-mail, so type
an appropriate title and press the enter key.
You will then be able to type your e-mail message in exactly
the same way that you would type a document.
When you have finished, press function key F12 and you will
be asked if you want to send the message immediately.
Press the enter key to send the e-mail message or, if you
prefer, press the escape key to send the message later.
14
Appendix
This section contains information for more advanced use of
Azabat Write.
File formats and locations
Azabat Write works with standard text files, just like
Windows applications such as Notepad and Wordpad. This
means that you could use Wordpad to modify files created in
Azabat Write and vice versa.
All the files used by Azabat Write reside inside a folder
called “[Azabat Write]” (note the use of square brackets
around the name), which in turn sits in the “My Documents”
folder.
Inside the “[Azabat Write]” folder you will find folders for
“[Documents]”, “[Address Book]”, “[Diary]”, etc.
If you have text files created elsewhere you can drag and
drop them in Windows into the “[Documents]” folder and
they can be accessed in Azabat Write. Please note, however,
that Azabat Write has a maximum text file size of 64 Kb.
15
Commands
Azabat Write uses a simple command language for accessing
some advanced features whilst in editing mode.
The commands are initiated by pressing function key F5 and
each command consists of a two letter abbreviation,
sometimes followed by parameters. Once you have typed a
command, you simply press the enter key to execute it.
There are currently 5 commands, which are:ST
Store – the programme saves your document and quits,
returning you back to Windows.
QU
Quit – the programme abandons any changes you may
have made to the current document and returns you to
Windows.
AB
Abort – the programme abandons any changes you may
have made to the current document and returns you to
the menu.
RO
Read only – the programme sets the current document
to read only mode, which is a form of protection and
means that you cannot make changes to it in Azabat
Write. You can reverse a file that has been set to read
only by using the command RO-
PR
Print – this gives you more choice in printing because
you can select the page or pages to print, rather than
printing the entire document. The full format is
PR (from)-(to), so let’s look as some examples:
PR 2
PR 2-4
PR 2-
prints only page 2
prints pages 2, 3 and 4
prints page 2 onwards, to the end
16
Fonts
Computers might have 100 or more available fonts, most of
which will never be used. As mentioned earlier, Azabat Write
shows just a few of the more common ones. If you would like
to add more to the list, simply edit the file called
FONTS.TXT, which is located in the [Azabat Write] directory.
Note: You must give the full name of the font as it appears in
your computer (eg “Comic Sans MS”).
Phonic
Under settings, you can choose to have the computer say
each letter as you type it, or not to say it, or to say the letter
using the International Phonetic Alphabet, or to say a phonic
version of the letter. This phonic version would be useful for
very young children. These sounds are saved in audio files, in
WAV format, in the “Sounds” folder of the CD or Pen Drive.
The 26 files are named “ph_a.wav” through to “ph_z.wav”
and are recorded at 22Khz, 16 bit, mono. You could,
therefore, create your own version of these files.
17
Buying more voices
Azabat Write uses standard SAPI5 voices and comes bundled
with Sarah, an English-accented voice from CereProc Ltd.
CereProc offers several other voices via its website,
www.cereproc.com, including:•
•
•
•
•
Heather (Scottish)
Kirsty (Scottish)
Caitlin (Irish)
Sue (West Midlands)
William (Southern UK)
Other suppliers of voices include: Acapela, Nuance, Cepstral,
Neospeech and AT&T. These are available from a number of
resellers and you can listen to most of these at
www.nextup.com.
18