1
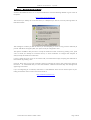
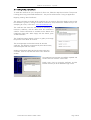
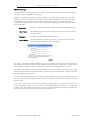
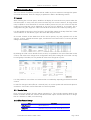
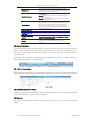
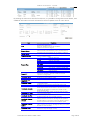
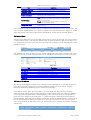
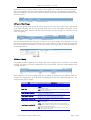
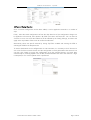
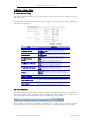
WebCom User Manual
V 3.3
July 2007
WebCom User Guide V3.3 – July 2007
1. Introduction To WebCom ...................................................................................................... 3
2. WebCom – First Use & Security Certificates ............................................................................ 4
2.1 Installing the Security Certificate ..............................................................................5
2.2 WebCom Login .....................................................................................................6
3. WebCom Functions – Ocius .................................................................................................. 7
3.1 Accounts ...............................................................................................................7
3.2 Account Permissions ...............................................................................................8
3.3 Terminals ..............................................................................................................8
3.4 Terminal Users.....................................................................................................10
3.5 Terminal Permissions ............................................................................................10
3.6 Terminal User Groups ..........................................................................................11
3.7 Terminal Config ...................................................................................................11
3.8 Terminal Config Allocation ...................................................................................13
4. WebCom Functions – Nectar .............................................................................................. 14
4.1 Nectar Standard Config .......................................................................................14
4.2 Nectar Promotions ...............................................................................................14
4.3 Nectar Voucher ...................................................................................................16
4.4 Nectar Images .....................................................................................................16
4.5 Nectar Reports.....................................................................................................17
5. WebCom Functions – Transactions ...................................................................................... 18
5.1 EFT Report ..........................................................................................................18
5.2 Transaction Search ..............................................................................................18
5.3 Create Reports.....................................................................................................19
6. WebCom Functions – WebCom Setup ................................................................................. 22
6.1 Users ..................................................................................................................22
6.2 User Groups........................................................................................................22
6.3 WebCom SuperUsers ...........................................................................................24
Commidea Ocius & ICP © 2002 - 2007
Page 2 of 24
WebCom User Guide V3.3 – July 2007
1. Introduction To WebCom
Commidea’s WebCom is provided free of charge as part of any other supported Commidea Application
or service. Supported products include:
• Ocius V2 – VeriFone Terminals
• Ocius for PC (All Derivatives)
• ICP XML V2 Interface
WebCom is a browser based tool – accessible from any internet connection worldwide. Access to the
system is provided by a secure login process, ensuring the security of your data and system configuration.
Login details will be provided to you when your product or service is activated.
WebCom provides a variety of tools and applications to help manage your system, or estate across
multiple sites – as well as a suite of comprehensive reporting facilities.
This document serves as a guide to WebCom’s functions, configuration and reporting functionality.
In the unlikely event that you encounter any problems whilst using the WebCom service – please contact
the Merchant Helpdesk for assistance.
[email protected]
+44 (0) 870 900 8580
Commidea Ocius & ICP © 2002 - 2007
Page 3 of 24
WebCom User Guide V3.3 – July 2007
2. WebCom – First Use & Security Certificates
Access to the WebCom service is via any Internet Browser. Enter the following address to gain access to
the system.
https://www.commideaweb.com
The first time you attempt to access the service, it is likely that you will see a security warning similar to
that shown below:
This message is to inform you that the service you are attempting to access is using a secure certificate (to
provide 128-Bit SSL encryption) that your system is not yet configured to trust.
The options available at this point are to accept the certificate on this occasion by pressing “Yes”, press
“No” to cancel your attempt to access the service, or “View Certificate” to configure this computer to
always accept this certificate in the future.
If using a public PC such as one in an internet Café, we would advise simply accepting the certificate on
this occasion by pressing “Yes”.
However, when using on your own computer, where you are likely to want to gain access to the system in
the future – we recommend that you view and install the certificate which will stop the message from
appearing in the future.
If you are integrating to our solution, then there is a test WebCom which can be used to report on your
testing transactions and accounts. This can be found at:
http://testweb.commidea.com
Commidea Ocius & ICP © 2002 - 2007
Page 4 of 24
WebCom User Guide V3.3 – July 2007
2.1 Installing the Security Certificate
To install the certificate on your computer for future use, follow the steps shown below. This process
is taking place using a Microsoft Windows PC – the process will be similar if using an Apple Mac.
Begin by pressing “View Certificate”
The system will show you details of the certificate you are viewing. Check the details to ensure that
the certificate is genuine, making sure that the “Issued To” entry matches the address that you are
attempting to access, in this case: www.commideaweb.com.
The certificate also shows the CA (Certificate Authority) who
issued the certificate, and the dates which the certificate is
valid for. Further information is available on the Details and
Certification Path tabs. When happy with the details, press
“Install Certificate”
The Certificate Import Wizard will start to guide you through
the process. Press “Next” to continue.
The wizard prompts to select the location to store the
certificate. The default is to automatically select the location,
select this option and click “Next”.
Another confirmation dialog to show that the import was
successful. Click on OK, then OK on the main certificate
window.
The certificate has now been successfully imported and
saved to the local machine. Click Finish
Finally, press “Yes” to accept the certificate, and the
browser will take you to the WebCom login screen.
Commidea Ocius & ICP © 2002 - 2007
Page 5 of 24
WebCom User Guide V3.3 – July 2007
2.2 WebCom Login
Having installed the security certificate, or accepting its use on this occasion, your browser will now
direct you to the main WebCom login page.
Initially it is necessary to register your login to WebCom, and after authenticating your account by
entering a merchant number from one of the accounts within that System ID. Once that has been
completed you will only need your user name and password, and you can select ‘Existing Users’
from the landing page. Here is the information required for registration, for which you will need to
select ‘New Users’:
System ID
A numeric unique System ID that identifies the merchant details to access.
User Name
The WebCom User name used to authenticate the user. This is normally
an e-mail address.
Password
The password associated with that user name.
Email address
The email address you wish to use as your user name in future, and of
where the password for the account will be sent.
Any system can support multiple WebCom users, each with their own level of access permissions.
This enables, for example, IT staff to be allocated access to the system configuration sections without
being able to view financial detail, and for finance staff to have the opposite level of access.
The admin login details are generated automatically when a new system is configured. Your login
details will be e-mailed to you automatically. If you have not yet received them, please contact the
merchant helpdesk for assistance.
Each user can be configured to have access to a default page, so when users are configured in this
way, the entry point to the system can be different. However, the default setting is to direct users to
the users page.
If you have a superuser account, then this will direct you after login to a page which contains a list
of all the merchant systems you have access to. The intention of this kind of login is that resellers or
customers with wide enterprises can have access to all required systems as quickly as possible. For
more information on SuperUser accounts, please see section 6.3.
Commidea Ocius & ICP © 2002 - 2007
Page 6 of 24
WebCom User Guide V3.3 – July 2007
3. WebCom Functions – Ocius
The Ocius section of WebCom provides tools to enable any Ocius customer to manage their system
and estate of terminals. Each sub-category is explained in detail in the following sections.
3.1 Accounts
When selecting the accounts option, WebCom will display all accounts that are present within the
merchant system. In many cases, this screen will show only one account. However, for large estates
many hundreds or even thousands of accounts could be present. As such, the screen will limit the
number of accounts that can be displayed at any one time, by default to 10 accounts. This is
configurable using the “Page Size” value in the left of the Accounts screen and then pressing “Go”.
It is also possible to search any list of accounts, using the filter options at the top of the form. Select
“Account Name” or “Site Name”, type in the search text and press “Filter”.
An account contains all the details that will be used to process any card payments such as the
acquirer, currency, allowed transaction types, merchant ID’s and Terminal ID’s. A summary of those
settings is shown below.
By selecting the “Edit” icon to the left of each account, it is possible to view more information on the
account, and make some changes to its configuration. Many of the settings for an account can only
be changed by Commidea, but it is possible to make some changes at any time.
It is also possible to view all the card schemes that are enabled by expanding the desired merchant
account.
In order for changes to take effect at a terminal level, an account update will need to take place to
each device. See section 3.3 for information on Terminal updates.
3.1.1 Voucher Setup
Each account has specific Voucher settings assigned to it. This includes separate detail for the
header and footer of both the customer and the merchant copies. Voucher text must be no longer
than 21 characters in width, and 6 lines long.
3.1.2 Other Account Settings
Item
Refund Password
Refund PIN
Description
The refund password is used when processing refunds via
the ICP XML service.
The refund PIN is used to allow the processing of a refund
transaction on any Ocius Terminal. A blank PIN will remove
Commidea Ocius & ICP © 2002 - 2007
Page 7 of 24
WebCom User Guide V3.3 – July 2007
Purchase PIN
Merchant Reference
Gratuity Check
Allow VR Floor Limit
VR Floor Limit
Below VR Floor Limit
Auth Code
Merchant ICC Receipt
Required
Gratuity
this prompt on the terminal.
The purchase PIN can be enabled to restrict users from
being able to process transactions without first confirming
their access levels by knowing the PIN.
Not Supported: Disables the “Enter Reference” prompt on
Ocius terminals.
Optional: Prompts for a reference, but will allow a blank
reference to be entered.
Required: Does not allow the transaction to continue until a
reference has been keyed in.
When gratuities are enabled on an account, the value in this
field allows you to prompt for confirmation of the gratuity
amount, if over a certain percentage of the transaction
value. E.g. if this field was sent to 25 it would prompt the
operator to confirm that the gratuity is acceptable if over
25% of the transaction value
Reserved
Reserved
Reserved
This provides the ability to disable the PIN verified receipt.
This can only be disabled if there is an agreement in place
with your acquirer to that effect
This check box allows the administrator to enable or disable
gratuity on the account without having to contact
Commidea
3.2 Account Permissions
Account Permissions allow the configuration of specific Terminal User Groups to have access to
specific system accounts. Particularly useful when managing an estate with multiple stores, it is
common to setup a specific Terminal User Group to each Store, and then more specific terminal
users below that.
Existing Account Permissions are displayed when first selecting this form. It is possible to delete or
edit the existing permissions, or add new ones.
3.2.1 Edit An Existing Entry
When editing an existing entry, it is not possible to change the account or user group that has been
configured. However, allowed transaction types and the maximum refund value can all be changed.
3.2.2 Add New Account Permission
Adding a new entry into this table shows the same options, but allows you to select the appropriate
account and terminal user group for the new settings.
3.3 Terminals
This section of WebCom lists all the Ocius terminals, of any type, that are part of this merchant
system.
Commidea Ocius & ICP © 2002 - 2007
Page 8 of 24
WebCom User Guide V3.3 – July 2007
By selecting the edit icon to the left of each device, it is possible to change the terminal details, enter
additional information and make selections for terminal updates to one or more devices.
Item
PTID
Terminal Name
Current Version
Download Version
Terminal Type
Terminal IP
Downloads: Menu
Downloads: Software
Downloads: User
Permissions
Downloads: Config
Downloads: Voucher
Downloads: Accounts
Downloads: IIN Table
Downloads: Key Files
Downloads: SC5000
Attached
Downloads: SC5000
Updater
Downloads: Fonts
Description
Permanent Terminal ID.
8 Characters, Alphanumeric.
Prefix “PC” Identifies Ocius for PC installation.
All others manufacturer assigned.
50 Characters, Alphanumeric.
Allows terminals to be identified by name. This information is
not stored on the terminal itself, only accessible via WebCom.
The version of Ocius software currently in use by this terminal.
The version of Ocius software to be sent to the terminal when
running a Software Update.
3600W
VeriFone 3600 WiFi
3750E
VeriFone 3750 Ethernet
3600P
VeriFone 3600 GPRS
VX610GPRS
VeriFone Vx610 GPRS
VX610WiFi
VeriFone Vx610 WiFi
VX510
VeriFone Vx510 Ethernet
PCSC5000
Ocius for PC – VeriFone SC5000 (V1)
PCSC5K
Ocius for PC – VeriFone SC5000 (V2)
PCSECURA
Ocius for PC – VeriFone Secura (V2)
XPLORER
VeriFone Xplorer
Optional – Can be used to keep records of the IP address
assigned to each device. This has no effect on terminal
operation or configuration.
Prompt for an Ocius menu update.
Prompt for an Ocius software update.
Prompts for an Ocius User Permissions update.
Prompt for an Ocius Terminal Config update. Includes Nectar
configuration details.
Prompt for an Ocius Voucher Format update (layout only).
Prompt for an Ocius Account update. Includes all account
detail and permissions relevant to the current terminal user. Also
includes the refund PIN, max refund value and all voucher
header & footer detail.
Prompt for an IIN Table update. Includes the latest accepted
card and transaction types.
Prompt for a Key Files update to the terminal. This includes all
the files that allow the unit to read the card chips.
When using a VeriFone SC5000 PED attached to either a
VeriFone 3750 or Vx510 device, this flag will also update the
SC5000 software as well as the main Ocius software. Must be
used in conjunction with the main Ocius Software update.
When using a VeriFone SC5000 PED attached to ether a
Verfine 3750 or Vx510 device, this flag will allow you to update
the software on the SC5000.
Prompts for an update of the font files which allows the
terminals to output the display correctly
Commidea Ocius & ICP © 2002 - 2007
Page 9 of 24
WebCom User Guide V3.3 – July 2007
Item
Downloads: Hospitality
Downloads: Nectar
Downloads: E Top-Up
Terminal Download
Download Type
Configuration Name
Description
Update your terminal to allow Bill Lodging by ticking this box. If
it is left unchecked then Bill Lodging will not be available.
Reserved
Reserved
Allows the chosen settings to be applied to just this terminal, or
all terminals in the merchant system.
Force – when the terminal next checks for updates you will not
be presented with the option to download the update, it will be
performed automatically
Prompt – it is necessary for you to confirm acceptance of an
update when checking for updates
Can be used to select a pre-determined terminal configuration
set for download.
Ocius terminals check for available updates at different times dependant on their configuration. The
most common implementation is to check for updates each time the terminal is logged in. At this
stage, the terminal will communicate with the ICP database, and be sent the selected updates.
3.4 Terminal Users
Terminal users defines the User ID and PIN used to login to any Ocius terminal. This in turn links to
a Terminal User Group, and ultimately dictates what accounts and features that user is able to use.
It is common for this to be used more like a site code than a specific user ID, although that is also
possible of course.
The Terminal User form will show all users currently configured in the system. Click the edit icon to
the left of any entry to make changes to that user, or Add New Terminal User to create a new entry.
Item
PED User ID
PED User PIN
User Name
User Group
Store ID
Store Name
Description
Description
2 - 8 numeric. Login ID for use at the terminal.
2 - 8 numeric. Login PIN for us at the terminal.
Name associated with the user.
User group, and therefore level of access, assigned to this user
Used only for Nectar - Merchant Specific.
Used only for Nectar - Merchant Specific.
Description for storing more information on this user.
3.5 Terminal Permissions
This section within WebCom allows you to customise exactly what options are available to that user
within the terminal once logged on. It is then possible to link this to the User Group using the
Permission Profile drop down box (see 3.6 Terminal User Groups).
To enable this section within the Ocius option, you must adjust your Webcom Setup. Choose
“Webcom Setup” from the top list of four options, then take note of which user group your Webcom
user is assigned to (by default this is “Default Admin”). Then select User Groups, and expand the
group you are a member of, by clicking the “+” next to that group. When the list of Component
Names appears, expand the Ocius component and from the list of “Allowed Actions”, ensure that all
the Terminal Permissions options are ticked. Click “Save All” and then if you return to the “Ocius”
menu using the list at the top of the screen, you should now have a “Terminal Permissions” option to
choose from.
Commidea Ocius & ICP © 2002 - 2007
Page 10 of 24
WebCom User Guide V3.3 – July 2007
Within here you can create a profile and then edit the profile. This enables you to select which parts
of the menu system on the terminal this profile is allowed access to, once logged on. As with other
sections of WebCom, you can view or edit the settings of each entry using the relevant buttons to the
left of the record.
3.6 Terminal User Groups
Terminal user groups allow groups of users to be given the same access rights. This is particularly
useful when assigning user id’s to individuals rather than to sites. All existing user groups will be
displayed at this stage. Select the edit icon next to each one to make changes, or add new to create
a new user group.
The User Group itself is little more than a name to use to join multiple users, although it can just
have one user if that suits the environment of use. A user must be a member of a group. Groups are
then used to allocate permissions on a per account basis. See section 3.2 for more information on
Account Permissions.
3.7 Terminal Config
It is possible to store multiple terminal configuration sets, and apply them to terminals in your estate
remotely. This system will list any Configuration sets currently stored, allow you to edit existing entries
and add new ones.
When adding a new terminal configuration set, or editing an existing one, the following fields are
available for configuration. Some of these are populated with the Ocius default settings for a live
environment to get you started.
Item
Config Name
Config Description
Setup Type
Local Link Server: Local IP
Local Server: Local Port
Local Server: Local SSL Port
Local Server: Local Use SSL
Description
The name assigned to identify this configuration set.
A description of the configuration set.
Hosted – if the terminal is configured to authorise using our
hosted solution (ICP).
Local – if the system is configured to use a local ILink server to
authorise the transactions
The IP Address of a local I-Link server if being used for Bill
Lodging / Hospitality purposes.
The Non-SSL Port used for non-secure messages to the
transaction server such as login/logout commands.
The SSL port, used for all secure messaging such as
transaction processing.
Off (Default)- Do Not Use SSL Encryption (Can be used safely
on local networks)
Partial - Only encrypts sensitive data such as card numbers,
but all other parts of the message are un-encrypted making the
transaction process slightly faster.
Full - All messages are encrypted for maximum security, this
has a minor impact on speed.
Commidea Ocius & ICP © 2002 - 2007
Page 11 of 24
WebCom User Guide V3.3 – July 2007
Item
Update Server: Update IP
Update Server: Update Port
Update Server: Update SSL
Port
Update Server: Update Use
SSL
Host Server: Host IP
Host Server: Port
Host Server: Host SSL Port
Host Server: Use SSL
Training Server: Training IP
Training Server: Training Port
Training Server: Training SSL
Port
Training Server: Training Use
SSL
Download Server: Download
IP
Download Server: Download
Port
Auth Timeout
Allow Offline
RS232 Flag
External Pin Pad
Swipe Only
Pin Bypass
Auto Update
Training Login
PED idle message
Description
The IP Address of the updates server, for account and software
updates.
The Non-SSL Port used for non-secure messages to the
transaction server such as login/logout commands.
The SSL port, used for all secure messaging such as
transaction processing.
Off (Default)- Do Not Use SSL Encryption (Can be used safely
for software updates as the data is not sensitive)
Partial - Only encrypts sensitive data such as card numbers,
but all other parts of the message are un-encrypted making the
transaction process slightly faster.
Full - All messages are encrypted for maximum security, this
has a minor impact on speed.
The Host IP address for the transaction server.
The Non-SSL Port used for non-secure messages to the
transaction server such as login/logout commands.
The SSL port, used for all secure messaging such as
transaction processing.
Off - Do Not Use SSL Encryption (Only for use on local
networks, must not be used in conjunction with ICP)
Partial - Only encrypts sensitive data such as card numbers,
but all other parts of the message are un-encrypted making the
transaction process slightly faster.
Full (Default) - All messages are encrypted for maximum
security, this has a minor impact on speed.
The IP address for the training server.
The Non-SSL Port used for non-secure messages to the
training server such as login/logout commands.
The SSL port, used for all secure messaging such as
transaction processing.
Off - Do Not Use SSL Encryption (Only for use on local
networks, must not be used in conjunction with ICP)
Partial - Only encrypts sensitive data such as card numbers,
but all other parts of the message are un-encrypted making the
transaction process slightly faster.
Full (Default) - All messages are encrypted for maximum
security, this has a minor impact on speed.
The IP address for the download server.
The port used for connecting to the download server on the
configured IP address.
In seconds. The amount of time allowed for an authorisation to
complete before the terminal times out. Default = 60 seconds.
Allow offline transaction processing in the event of a network
failure.
Disables IP socket based integration to enable integration via
an RS232 Serial Connection instead.
Is an external Pin Pad attached to the master device (e.g.
VeriFone SC5000 attached to the 3750/Vx510)
Swipe only transaction processing. All Chip & Pin functionality
will be disabled.
Allow Pin Bypass attempts (may be required for foreign
cardholders).
Automatically check for updates at login.
Login ID used for logging onto the training server. The value
set here results in the User ID and User PIN both being this
value.
Message displayed on the terminal when the PED sits idle
waiting for a transaction to be processed. This replaces the
“READY” message usually displayed.
Commidea Ocius & ICP © 2002 - 2007
Page 12 of 24
WebCom User Guide V3.3 – July 2007
3.8 Terminal Config Allocation
Once a terminal configuration set has been added, it can be applied to terminals in a number of
ways.
Firstly - select the saved configuration set from the drop down list. If this configuration change is to
be applied to all terminals, then deselect “By PTID” and select “All Terminals”. You can then hit
“Preview” to view a list of all the PTIDs that will be affected by the Config Change, and then click
apply at the very bottom of the screen to confirm the allocation.
Alternatively, select one specific terminal by having “By PTID” enabled and entering the PTID or
selecting the PTID for the drop down list.
To ensure that desired current configurations are not overwritten, it is necessary to click “Preview” to
view a list of all the terminals chosen and the configuration currently allocated to the terminal. You
can then click “Apply” to assign the configuration set to the specified devices, and mark them
automatically for a Config Update. This will then be downloaded to the device the next time a login
is attempted, or if a manual update check is performed.
Commidea Ocius & ICP © 2002 - 2007
Page 13 of 24
WebCom User Guide V3.3 – July 2007
4. WebCom Functions – Nectar
4.1 Nectar Standard Config
The Nectar Standard Config screen allows Nectar card processing to be configured for this
Merchant System.
Nectar settings cannot be account specific, so must apply to all terminals in this estate, regardless of
what store they might be in.
Item
Supplier ID
Redemption Methods
Refund Methods
Print Balance Enquiry
Voucher
Print Merchant Txn Voucher
Print Customer Txn Voucher
Reference
Refund Pin Required
Refund PIN
Cash Equivalent Points
Cash Equivalent
Description
Provided by LMUK. Identified Merchant. 10 Characters, Alpha.
By Points: Redeem using points value.
By Monetary Value: Redeem using a monetary value.
By Promotion: Redeem using Promotional codes only.
By Points: Refund using points value.
By Transaction ID: Refund using a previous Transaction ID.
By Promotion: Refund using Promotional codes only.
Never: Never print a Balance Enquiry Voucher
Prompt: Prompt to print a Balance Enquiry Voucher
Always: Always Print a Balance Enquiry Voucher
Never: Never print a Merchant Txn Voucher
Prompt: Prompt to print a Merchant Txn Voucher
Always: Always Print a Merchant Txn Voucher
Never: Never print a Customer Txn Voucher
Prompt: Prompt to print a Customer Txn Voucher
Always: Always Print a Customer Txn Voucher
Not Required: No reference option will be available.
Optional: Will prompt for a reference, but allow blank.
Required: Requires a reference to be entered before allowing
to continue.
Is a PIN required to process a refund?
The refund PIN, if enabled.
The default number of points to translate into the Cash
Equivalent. All transactions must then be a multiple of this
value.
The cash equivalent value of those points. Again, all
transactions must then be a multiple of this value.
4.2 Nectar Promotions
The Nectar Promotions table allows a number of different promotional codes to be configured for
use with this system. Those promotions already configured would be displayed here, and can be
changed using the edit function. Alternatively, a new promotion can be added.
When adding a new Nectar promotion. Promotions are a great way of configuring specific
transactions outside of the normal Nectar processing system. The following options are available:
Commidea Ocius & ICP © 2002 - 2007
Page 14 of 24
WebCom User Guide V3.3 – July 2007
Item
Promotion Code
Promotion Name
Reward ID
Download
Points Value
Cash Value
Image
Default
Description
6-8 Characters, Alphanumeric. Unique Promotion Code. Used
to identify this promotion and reward ID from the terminal.
The name allocated to this promotion for identification
purposes.
10 Characters, Alphanumeric. Supplied by LMUK - used to
identify this promotion on their system.
When ticked, this promotion will be downloaded to all
terminals when a Config Update is performed.
The number of points used by this promotion.
The cash equivalent for that number of points.
The image used to print on vouchers for this promotion. This is
often a barcode used to scan into the POS. Images used must
be correctly formatted by Commidea prior to being made
available.
Is this the default promotion on this system?
Commidea Ocius & ICP © 2002 - 2007
Page 15 of 24
WebCom User Guide V3.3 – July 2007
4.3 Nectar Voucher
This section configures the layout of each Nectar Voucher.
Voucher types available are:
Balance:
Redemption:
Reversal:
Used for printing a Balance Enquiry
Used when redeeming points for goods.
Used to reverse an abandoned Nectar transaction.
Select the voucher type to configure from the “Change Voucher Type” drop down list. The system
will then allow you to configure the layout of both the Merchant and Customer vouchers (where
applicable) and generate a preview. The key at the bottom shows each available field that can be
added to the voucher layout - select each parameter from the drop down list toward the top of the
form, and select “Add To Merchant” or “Add To Customer” to add that field to the layout.
Free text can also be typed into the voucher layout at any point, as well as using the fields. Click
“Refresh Preview” to update the preview window with your new layout. Once previewed, click “Save
Details” against each voucher type to save your changes.
For more information on voucher layout requirements, please contact Implementations who will be
able to offer further assistance, and configure example layouts if required.
4.4 Nectar Images
Nectar images are only used for promotions and must conform to a certain format.
The image must be set to monochrome, be 154 pixels high, and the Width must be divisible by 32,
but a maximum of 384 pixels. Images must also be converted by Commidea into the appropriate
file format. Existing images will be shown in the table in WebCom.
Please submit new images to Implementations for conversion. The file will then be sent back to you
for uploading to your system using the “Add New Nectar Image” tool in WebCom.
Commidea Ocius & ICP © 2002 - 2007
Page 16 of 24
WebCom User Guide V3.3 – July 2007
Once uploaded, an image can then be assigned to a promotion, at which point it will be printed on
the vouchers at the appropriate time according to your chosen voucher layouts.
4.5 Nectar Reports
The Nectar Report Criteria allows the creation of custom report generation to suit your needs.
There are two report types currently available.
Detailed Transaction Report
The Detailed Transaction report will list all valid Nectar transactions, including reversals, for the
given period.
Rejected Transaction Report
The Rejected Transaction report will list all Nectar transactions that failed for the given period,
including information as to why the transaction failed.
Select the required report type and select the To and From dates to create a range. It is also possible
to limit the report data to specific terminals (PTIDS) or PED user ID’s. Alternatively, select “All” to
capture transactions for all terminals and users.
Click on View Report to generate the information, which can then be printed if required.
Commidea Ocius & ICP © 2002 - 2007
Page 17 of 24
WebCom User Guide V3.3 – July 2007
5. WebCom Functions – Transactions
The Transactions area of WebCom is for generating and exporting reports on card transactions
(excluding Nectar) across the merchant system.
5.1 EFT Report
The EFT report can be used to generate a number of different transaction reports depending on the
criteria selected. It is possible to generate those reports using data from one, some or all system
accounts, between any date and time ranges or even limited to specific terminals or users.
Item
Transaction Result
Report Source
Report
PED User ID
Operator
Description
All: Will list all transaction types
Accepted: Will only list successful transactions
Rejected: Will only list un-successful transactions.
Live Store: All transactions recorded against this
system/account combination.
No other options are available at this time.
Summary: Will show transaction total information.
Detailed: Will list each transaction in detail.
Will allow you to select a User ID to report on, so you can
capture the transactions processed by a particular login
Allows you to enter the name of a user rather than using their
User ID
5.2 Transaction Search
The transaction search feature allows the user to find specific transaction information to resolve any
relevant query they or their customer may have regarding a payment.
A variety of options are available to narrow the search. The more information supplied, the more
accurate the search will be and as such will display less results.
Commidea Ocius & ICP © 2002 - 2007
Page 18 of 24
WebCom User Guide V3.3 – July 2007
In an environment where the host system uses unique Transaction Reference codes, we would
recommend a search that incorporates that information as being the most likely to find the
transaction in question. It is of course possible to find the required transaction using any available
information.
5.3 Create Reports
Some users may find the existing standard reports are not tailored to meet their demands. To
overcome this, the “Create Reports” option has been built.
To enable this functionality, the user group the user belongs to must enable ‘Create Reports’ under
‘Transactions’. For instructions on this, refer to ‘6.2 User Groups’.
Selecting ‘Create Reports’ from within the main ‘Transactions’ option will take you to the following
screen:
This provides a view of all the Quick Reports currently available. To run any of these reports click
‘Run Now’, or ‘Generate CSV’ to produce the report in a file with comma-separated values.
To edit an existing quick report, the ‘edit’ button is available to the left of the ID field, and this will
allow you to adjust the report layout. To remove a Quick Report completely, use the ‘Delete’ button
on the far right hand side of the screen.
Creating/Editing a report:
Before creating a new report, it is necessary to build the report layout and criteria.
To view all existing layouts select ‘Report Layout’. It is possible to edit existing layouts, or create a
new one. On choosing one of these options, the following fields are displayed:
Item
Layout Short Name
Layout Window Title
Layout Description
Fields for the Layout
Description
Short name to be used to refer to the report
Title for the browser window when the report is generated
Description for the layout
Pick, from a list of fields, which information is to be displayed
in the report. The fields available are:
Account ID – Account ID of the account being reported upon
Account Name – Account name being reported upon
Auth Code – Auth code for the transaction
Auth Only – Y/N field to show if the transaction was auth only
Auth Result – Result of the authorisation for the transaction
Bank Account Number – Bank account number assigned to the
account
Capture Method – Method of capturing card details
Card Number – Card number from each transaction
Card Scheme ID – ID of the card scheme
Commidea Ocius & ICP © 2002 - 2007
Page 19 of 24
WebCom User Guide V3.3 – July 2007
Item
Group By
Order By
Show Totals
Page No.
Page Orientation
Footer Note
Description
Cashback – Cashback value if included
CNP – Cardholder Not Present Y/N field
Cont. Auth – Y/N field for a Continuous Authority transaction
Currency – Currency name field
Ecommerce – Y/N field for Ecommerce
EFTSN – Electronic Funds Transfer Sequence Number
Electron CNP – Y/N field for Electron Cardholder Not Present
Expiry Date – Card expiry date
Gratuity – Gratuity value if included in transaction
Issue – Card issue number if applicable
Offline – Y/N field to show if transaction was processed offline
Online – Y/N field to show if transaction was processed online
Operator – Operator which processed the transaction
PTID – PTID of terminal which processed the transaction
Purchase Count – Reserved, do not use
Reference – Reference field sent with transaction
Rekeyed – Y/N field to show if the transaction was marked as
rekeyed
Scheme Name – Scheme name the card charged fell under
Start Date – Card start date
System ID – System ID account linked to on database
Terminal ID – Reserved, do not use
Terminal User ID – User ID of the terminal operator
TID –Terminal ID for merchant account
Transaction ID – Transaction ID assigned by database
Txn Date Time – Date and time of transaction
Txn Result – Result of transaction
Txn Status – Status of transaction
Txn Type – Transaction type, e.g. Purchase/Refund
Txn Value – Value of transaction
Unattended – Y/N field for Unattended transaction modifier
WinTI Txn Type – Txn Type modifier, e.g. 01 – Purchase
Zero Pre Auth – Y/N field for Zero Pre Auth transaction
modifier
Choose which field the report is to be grouped
Which field the report is to be ordered by
Select how the totals are displayed, currently ‘Standard’ only
Tick box for enable/disable page number on the report
Choose the page layout as either Portrait or Landscape
Any note to be included in the report footer
Each ‘Layout Field’ consists of FieldName(Width), with the width value showing how much space the
selected field requires. The total report width is 13500, and this cannot be exceeded. A field is
displayed on screen which shows how much space has been used each time a field is added or
removed. The order of the fields can also be amended, using the arrows to the right of the fields list.
If a field needs to be removed, select the field and click ‘X’ to do so. Once the selections are
finished, choose ‘Update’ or ‘Save’, depending upon if the layout is being created or edited.
The Report Criteria section allows the information being report upon to be defined.
The following fields are presented and allow configuration of the criteria:
Item
Report Criteria Title
Report Criteria Description
Transaction Result
PTIDs
Accounts
Card Schemes
Description
Title of the report criteria
Description of the report criteria being defined
Choose to display All transaction results, or either Accepted or
Rejected transactions only
Select which PTIDs to base the report upon. Selecting no PTIDs
will report on all PTIDs
As above, choose specific accounts to base the report on, or
leave the selection blank to include all accounts
As above, choose card schemes to report on, or select none
Commidea Ocius & ICP © 2002 - 2007
Page 20 of 24
WebCom User Guide V3.3 – July 2007
Item
PED User ID
Operator
Dropdown/Calendar
From Date
From Time
To Date
To Time
Txn Type
Pre Auth ONLY
Offline ONLY
Txn Value
Cashback Value
Gratuity Value
Card No, First 6 digits
Card No, Last 2 digits
Conditions
Description
and report on all the card schemes available
Select All, or choose a User ID to report upon
Or choose an operator name to report upon
Radio button to choose how the dates are presented for
selection
Date to report from
Time to report from
Date to report to
Time to report to
Tick box for all, or choose from Cash Advance, Purchase,
Purchase with Cashback or Refund
Tick box to display only pre authorisation transactions
Tick box to display only transactions processed offline
Transaction value field, allowing you to stipulate equal to,
greater than, less than, greater than or equal to, less than or
equal to a value provided
As with the Txn Value field, but for a cashback value
As above, but for Gratuities
First 6 digits of the card number to be reported upon
Last 2 digits of the card number to be reported upon
Select a field from the list provided, and then a value and
condition of how to quantify the value provided
Once the criteria is completed, ‘Save’ or ‘Update’ the selection and then both this and the Layout
can be assigned to a Quick Report.
Building a quick report from scratch is achievable using ‘Create New Quick Report’ on the main
“Quick Report” screen. A Quick Report Name and description of what the report produces are
required, then choose the report layout and criteria to assign to this report.
Select to either ‘Update’ or ‘Save’ the settings to render the report available for use.
Commidea Ocius & ICP © 2002 - 2007
Page 21 of 24
WebCom User Guide V3.3 – July 2007
6. WebCom Functions – WebCom Setup
This area is used to configure different WebCom user accounts, and their associated level of access.
There is no limit on the number of WebCom users that can be allocated to any system, although an
e-mail address can only be used once on WebCom.
If you have a requirement to manage multiple WebCom systems, using one e-mail address as the
User name, please see section 6.3 - WebCom SuperUsers.
6.1 Users
The users section will list all users currently configured. It is possible to edit existing user details, or
add new users.
The user name must be a valid e-mail address for that user. This can be up to 100 characters long.
The password can be anything, from 6 to 50 characters long, although we recommend make it as
long as possible, using a mixture of numeric and alpha characters, for security purposes.
6.2 User Groups
User Groups allow for the configuration of the relevant level of access to any WebCom user, and
their default menu. The default menu is the first page the user is taken to following a successful
login.
Once a user group has been created - select edit to make changes to that user’s level of access.
It is also possible from within this section of WebCom to limit the accounts that can be viewed by the
User Group. This is performed by moving any accounts you wish to exclude from their interactivity
into the ‘Excluded Accounts’ section. Once you are happy with the changes, press Update to
confirm them.
Expanding the group using the ‘+’ will enable you to configure the menu permissions within
WebCom for that group.
Firstly, each of the main WebCom menus are listed. It is possible to enable or disable them using
the tick boxes to the right.
Commidea Ocius & ICP © 2002 - 2007
Page 22 of 24
WebCom User Guide V3.3 – July 2007
For more detailed options - select one of the menus by clicking on the ‘+’ symbol to its left. This will
display the sub-menus as shown below.
It is now possible to enable or disable each sub-menu, and if enabled, select if the user is allowed to
Insert (add new), Update (make changes to existing) or Delete the records in that table.
We recommend making your selections, and selecting “Update All” in the bottom right hand corner
to apply your changes. Alternatively, please update each row individually using the option to the
right hand side of the table.
Commidea Ocius & ICP © 2002 - 2007
Page 23 of 24
WebCom User Guide V3.3 – July 2007
6.3 WebCom SuperUsers
For customers or system administrators who may have a requirement to manage multiple
WebCom/ICP Systems, it is possible to be configured as a WebCom SuperUser.
This functionality allows one e-mail address and password to provide access to multiple system
accounts, with the use of an additional login menu similar to the one shown below.
This level of access obviously provides an additional security risk. Particularly when managing
multiple merchant systems across different businesses. For this reason, it is not possible to configure
SuperUser accounts using the WebCom interface itself.
If you require SuperUser access, please write to [email protected] detailing the
System ID’s that you require access to. The Implementations team will then investigate your enquiry,
and if approved configure your access.
Commidea Ocius & ICP © 2002 - 2007
Page 24 of 24