1
Intel PCH RAID
Configuration Utility
USER’S MANUAL
Revision 1.0a
The information in this User’s Manual has been carefully reviewed and is believed to be accurate.
The vendor assumes no responsibility for any inaccuracies that may be contained in this document,
and makes no commitment to update or to keep current the information in this manual, or to notify
any person or organization of the updates. Please Note: For the most up-to-date version of this
manual, please see our web site at www.supermicro.com.
Super Micro Computer, Inc. ("Supermicro") reserves the right to make changes to the product
described in this manual at any time and without notice. This product, including software and documentation, is the property of Supermicro and/or its licensors, and is supplied only under a license.
Any use or reproduction of this product is not allowed, except as expressly permitted by the terms
of said license.
IN NO EVENT WILL Super Micro Computer, Inc. BE LIABLE FOR DIRECT, INDIRECT, SPECIAL,
INCIDENTAL, SPECULATIVE OR CONSEQUENTIAL DAMAGES ARISING FROM THE USE
OR INABILITY TO USE THIS PRODUCT OR DOCUMENTATION, EVEN IF ADVISED OF THE
POSSIBILITY OF SUCH DAMAGES. IN PARTICULAR, SUPER MICRO COMPUTER, INC. SHALL
NOT HAVE LIABILITY FOR ANY HARDWARE, SOFTWARE, OR DATA STORED OR USED
WITH THE PRODUCT, INCLUDING THE COSTS OF REPAIRING, REPLACING, INTEGRATING,
INSTALLING OR RECOVERING SUCH HARDWARE, SOFTWARE, OR DATA.
Any disputes arising between manufacturer and customer shall be governed by the laws of Santa
Clara County in the State of California, USA. The State of California, County of Santa Clara shall
be the exclusive venue for the resolution of any such disputes. Supermicro's total liability for all
claims will not exceed the price paid for the hardware product.
FCC Statement: Refer to Supermicro's web site for FCC Compliance Information.
California Best Management Practices Regulations for Perchlorate Materials: This Perchlorate
warning applies only to products containing CR (Manganese Dioxide) Lithium coin cells. “Perchlorate
Material-special handling may apply. See www.dtsc.ca.gov/hazardouswaste/perchlorate”.
WARNING: Handling of lead solder materials used in this
product may expose you to lead, a chemical known to
the State of California to cause birth defects and other
reproductive harm.
Manual Revision 1.0a
Release Date: February 1, 2013
Unless you request and receive written permission from Super Micro Computer, Inc., you may not
copy any part of this document.
Information in this document is subject to change without notice. Other products and companies
referred to herein are trademarks or registered trademarks of their respective companies or mark
holders.
Copyright © 2013 by Super Micro Computer, Inc.
All rights reserved.
Printed in the United States of America
Preface
Preface
About This Manual
This manual is written for system integrators, PC technicians and
knowledgeable PC users. It provides instructions on how to use the Intel PCH RST
RAID Configuration Utility to configure RAID settings for Supermicro motherboards
or systems.
Manual Organization
Chapter 1 Provides an overview on the Intel PCH RAID Setup and Rapid Storage
Technology enterprise (RSTe).
Chapter 2 Provides instructions on how to configure the BIOS for SATA RAID and
how to use the Intel PCH RST RAID Configuration Utility to configure RAID settings.
Conventions Used in This Manual
Pay special attention to the following symbols for proper installation and to prevent
damage to the system or injury to yourself.
Warning: Important information given to prevent erroneous RAID configuration and to
ensure proper system setup.
Note: Additional information given to ensure correct RAID configuration
setup.
iii
Intel PCH RAID Configuration User's Guide
Contacting Supermicro
Headquarters
Address:
Tel:
Fax:
Email:
Web Site:
Europe
Address:
Tel:
Fax:
Email:
Asia-Pacific
Address:
Super Micro Computer, Inc.
980 Rock Ave.
San Jose, CA 95131 U.S.A.
+1 (408) 503-8000
+1 (408) 503-8008
[email protected] (General Information)
[email protected] (Technical Support)
www.supermicro.com
Super Micro Computer B.V.
Het Sterrenbeeld 28, 5215 ML
's-Hertogenbosch, The Netherlands
+31 (0) 73-6400390
+31 (0) 73-6416525
[email protected] (General Information)
[email protected] (Technical Support)
[email protected] (Customer Support)
Tel:
Fax:
Web Site:
Email:
Super Micro Computer, Inc.
4F, No. 232-1, Liancheng Rd.
Chung-Ho Dist., New Taipei City 235
Taiwan
+886-(2) 8226-3990
+886-(2) 8226-3991
www.supermicro.com.tw
[email protected] (Technical Support)
Tel: +886-(2) 8226-3990 (Technical Support)
iv
Preface
Notes
v
Intel PCH RAID Configuration User's Guide
Table of Contents
Preface
Chapter 1 Intel PCH RAID Setup Overview
Intel Rapid Storage Technology Enterprise..................................................... 1-1
Intel PCH RAID Configurations........................................................................ 1-1
Chapter 2 Configuring the PCH RAID Settings
2-1 Configuring the AMI BIOS for SATA RAID Settings......................................... 2-1
2-2 Using the Intel PCH RSTe RAID Configuration Utility..................................... 2-3
Creating RAID Volumes................................................................................... 2-4
Deleting a RAID Volume.................................................................................. 2-8
Resetting to Non-RAID.................................................................................... 2-9
Exiting the Intel RSTe RAID Configuration Utility.......................................... 2-10
2-3 Installing Windows OS and RSTe RAID Drivers.............................................2-11
Installing Windows Server 2008 OS...............................................................2-11
Installing Windows 2003 OS.......................................................................... 2-12
vi
Chapter 1: Intel PCH RAID Setup Overview
Chapter 1
Intel PCH RAID Setup Overview
After all hardware has been installed, you must first configure the Intel PCH RSTe
(Rapid Storage Technology enterprise) RAID settings before you install the Windows
Operating System and other software drivers. For instructions on installing the
Windows OS and Intel RSTe driver, go to section 2-3 on page 2-11.
Notes
1. This setup guide describes RAID configuration instructions for the Intel PCH
RAID controllers designed for the Windows OS.
2. Two RAID controllers (AHCI and SCU) are supported by the Intel PCH. The AHCI
controller supports SATA drives and the SCU controller supports both SATA
and SAS drives (Note: The SCU controller for PCH C602 supports SATA only).
3. The current version (v 3.5) of the Intel PCH RSTe SATA/SAS RAID utility supports Windows 7 & 8 and Windows Server 2003 (64 bit), 2008, and 2012 OS.
4. The AHCI controller supports SATA RAID 0, 1, 5, and 10. The SCU controller
supports the following: SAS/SATA RAID 0, 1, and 10 for PCH C606 and SATA
RAID 0, 1, 5, and 10 for PCH C602.
Intel Rapid Storage Technology Enterprise
Intel’s Rapid Storage Technology enterprise (RSTe) protects data against hard drive
failure when the system is configured for RAID 1, RAID 5, or RAID 10. These RAID
settings are fault-tolerant because they copy and store data on multiple hard drives
to avoid data loss or system downtime caused by single hard drive failure. A RAID
0 setting, however, increases response time on data intensive applications because
it will access data on multiple hard drives simultaneously.
Note: The above RAID configurations will protect against drive failure, but
none provide 100% protection against data loss. Data backup is always
recommended.
1-1
Intel PCH RAID Configuration User's Guide
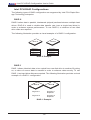
Intel PCH RAID Configurations
The following types of RAID configuration are supported by Intel PCH Rapid Storage Technology enterprise:
RAID 0
RAID 0 writes data in parallel, interleaved (striped) sections between multiple hard
drives. RAID 0 is used to double data transfer rate (over a single hard drive) in
order to enhance system performance. To use RAID 0, a minimum of two hard
drive disks are required.
The following illustration provides a visual example of a RAID 0 configuration.
Drive A
Drive B
Segment 1
Segment 2
Segment 3
Segment 5
Segment 4
Segment 6
Segment 7
Segment 8
RAID 0 Example
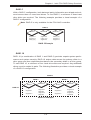
RAID 1
RAID 1 allows identical data to be copied from one disk drive to another. By doing
so, a mirror of source data is created in order to enhance data security. To use
RAID 1, two hard drive disks are required. The following illustration provides a visual
example of a RAID 1 configuration.
Drive B
Drive A
Segment 1
Segment 1
Duplicate
Segment 2
Segment 2
Duplicate
RAID 1 Example
1-2
Chapter 1: Intel PCH RAID Setup Overview
RAID 5
With a RAID 5 configuration, both data and parity information are striped and mirrored across three or more hard drives. To use RAID 5, a minimum of three hard
drive disks are required. The following example provides a visual example of a
RAID 5 configuration.
Note: RAID 5 is only available for the PCH AHCI controller.
RAID 5
Drive A
Segment 1
Segment 3
Parity (5,6)
Drive B
Drive C
Segment 2
Parity (3,4)
Segment 5
Parity (1,2)
Segment 4
Segment 6
RAID 5 Example
RAID 10
RAID 10 (a combination of RAID 1 and RAID 0) provides superb system performance and system security. RAID 10 stripes data across the primary disks in a
drive group and then duplicates that data to the secondary disks in a drive group.
To use RAID 10, a minimum of four hard drive disks are required. Any additional
drives must be added in pairs. The following illustration provides a visual example
of a RAID 10 configuration.
RAID 0
RAID 1
Drive A
RAID 1
Drive B
Drive C
Drive D
RAID 10
Segment 1
Segment 1
Duplicate
Segment 2
Segment 2
Duplicate
Segment 3
Segment 3
Duplicate
Segment 4
Segment 4
Duplicate
RAID 10 Example
1-3
Intel PCH RAID Configuration User's Guide
Notes
1-4
Chapter 2: Configuring the PCH RAID Settings
Chapter 2
Configuring the PCH RAID Settings
This chapter provides instructions on how to configure the BIOS for RAID settings
and how to use the PCH RST RAID configuration utility for the AHCI and SCU
controller. If you do not wish to configure RAID settings, skip this section and go
directly to OS Installation. For OS installation instructions, please refer to our web
site at www.supermicro.com.
Note: For system stability, do not use both SAS and SATA drives or both
SATA 2.0 and SATA 3.0 hard drives in the same array.
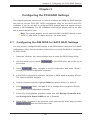
2-1 Configuring the AMI BIOS for SATA RAID Settings
You may need to configure RAID setings in the BIOS before using the PCH RAID
configuration utility. Follow the below instructions to ensure the BIOS is configured
for SATA RAID.
1. Press the <Delete> key during system boot to enter the BIOS Setup Utility.
2. Use the arrow keys to select
the screen.
in the BIOS menu bar at the top of
3. In the
menu, navigate to SATA Configuration and press <Enter>
to enter the SATA Configuration submenu.
4. In the SATA configuration submenu, navigate to SATA Mode and press <Enter>.
The Options window displays.
5. From the Options window, highlight RAID and press <Enter> to select it.
6. In the
menu, navigate to SCU Configuration and press <Enter>
to enter the SCU configuration submenu.
7. In the SCU Configuration submenu, make sure that Storage Controller Unit
and OnChip SCU Option ROM are set to Enabled.
8. Press <ESC> to return to the previous menu and use the arrow keys to select from the BIOS menu bar.
2-1
Intel PCH RAID Configuration User's Guide
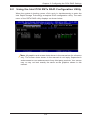
9. From the
submenu, navigate to Save Changes and Reset. Press <Enter> to save the changes and exit the BIOS. The system will
reboot.
10.During the system bootup, you are prompted to:
Press <Ctrl> <I> to enter Configuration Utility...
This prompt appears twice, first for the SCU controller and a second time for the
AHCI controller (as shown below).
Press <Ctrl> <I> at the appropriate prompt to enter the Rapid Storage Technology
enterprise RAID configuration utility for the desired controller.
Note: The Intel RAID Configuration Utility is only available for systems with
two or more drives installed. The Intel RAID Utility screen will not display
in systems with one drive installed, unless a RAID configuration exists.
2-2
Chapter 2: Configuring the PCH RAID Settings
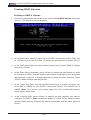
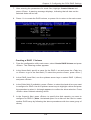
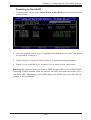
2-2 Using the Intel PCH RSTe RAID Configuration Utility
When the system is booting, press <Ctrl> and <I> simultaneously to enter the
Intel Rapid Storage Technology enterprise RAID configuration utility. The main
menu of the RSTe RAID utility displays as shown below.
Note: All graphics and screen shots shown in the manual are for reference
only. The screen shots shown in the manual do not imply Supermicro's
endorsement or non-endorsement of any third-party products. Your screen
may or may not look exactly the same as the graphics shown in this
manual.
2-3
Intel PCH RAID Configuration User's Guide
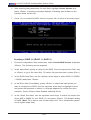
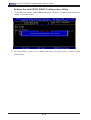
Creating RAID Volumes
Creating a RAID 0 Volume
1. From the configuration utility main menu, select Create RAID Volume and press
<Enter>. The following screen appears:
2. In the Name field, specify a name for the RAID 0 set and press the <Tab> key
or <Enter> to go to the next field. (To select the previous menu, press <Esc>.)
3. In the RAID Level field, use the up/down arrow keys to select RAID 0 (Stripe)
and press <Enter>.
4. In the Disks field (if available), press <Enter> to select the hard drives you want
to configure for RAID. Use the up/down arrow keys to highlight a drive and press
the spacebar to select it. A triangle appears to confirm the drive selection. Press
<Enter> when finished selecting drives.
5. In the Stripe Size field, use the up/down arrow keys to select the stripe size
(from 4KB to 128KB) for your RAID 0, and press <Enter>. The default size is
128KB. (Note: For a server, use a lower stripe size. For a multimedia system,
use a higher stripe size.)
6. In the Capacity field, press <Enter> to specify the disk capacity you want to
configure for RAID 0. (Note: Unclaimed space on a disk can be used to create
another RAID array by following the above procedures with the same group of
drives.)
2-4
Chapter 2: Configuring the PCH RAID Settings
7. After entering the parameters for each field, highlight Create Volume and
press <Enter>. A warning message displays, indicating that all data on the
selected disks will be lost.
8. Press <Y> to create the RAID volume, or press <N> to return to the main menu.
Creating a RAID 1 Volume
1. From the configuration utility main menu, select Create RAID Volume and press
<Enter>. The following screen appears:
2. In the Name field, specify a name for the RAID 1 set and press the <Tab> key
or <Enter> to go to the next field. (To select the previous menu, press <Esc>.)
3. In the RAID Level field, use the up/down arrow keys to select RAID 1 (Mirror)
and press <Enter>.
4. In the Disks field (if available), press <Enter> to select the hard drives you want
to configure for RAID. Use the up/down arrow keys to highlight a drive and press
the spacebar to select it. A triangle appears to confirm the drive selection. Press
<Enter> when finished selecting drives.
5. In the Capacity field, press <Enter> to specify the disk capacity you want to
configure for RAID 0. (Note: Unclaimed space on a disk can be used to create
another RAID array by following the above procedures with the same group of
drives.)
2-5
Intel PCH RAID Configuration User's Guide
6. After entering the parameters for each field, highlight Create Volume and
press <Enter>. A warning message displays, indicating that all data on the
selected disks will be lost.
7. Press <Y> to create the RAID volume, or press <N> to return to the main menu.
Creating a RAID 10 (RAID 1+ RAID 0)
1. From the configuration utility main menu, select Create RAID Volume and press
<Enter>. The following screen appears:
2. In the Name field, specify a name for the RAID 10 set and press the <Tab> key
or <Enter> to go to the next field. (To select the previous menu, press <Esc>.)
3. In the RAID Level field, use the up/down arrow keys to select RAID 10 (RAID1
+ RAID0) and press <Enter>.
4. In the Disks field (if available), press <Enter> to select the hard drives you
want to configure for RAID. Use the up/down arrow keys to highlight a drive
and press the spacebar to select it. A triangle appears to confirm the drive
selection. Press <Enter> when finished selecting drives.
5. In the Stripe Size field, use the up/down arrow keys to select the stripe size
(from 4KB to 64KB) for your RAID 10, and press <Enter>. The default setting
is 64KB. (Note: For a server, use a lower stripe size. For a multimedia system,
use a higher stripe size.)
2-6
Chapter 2: Configuring the PCH RAID Settings
6. In the Capacity field, press <Enter> to specify the disk capacity you want to
configure for RAID 10. The default setting is the maximum capacity allowed.
(Note: Unclaimed space on a disk can be used to create another RAID array
by following the above procedures with the same group of drives.)
7. After entering the parameters for each field, highlight Create Volume and
press <Enter>. A warning message displays, indicating that all data on the
selected disks will be lost.
8. Press <Y> to create the RAID volume, or press <N> to return to the main menu.
Creating a RAID 5 Set (Parity)
1. From the configuration utility main menu, select Create RAID Volume and press
<Enter>. The following screen appears:
2. In the Name field, specify a name for the RAID 5 set, and press the <Tab> key
or <Enter> to go to the next field. (To select the previous menu, press <Esc>.)
3. In the RAID Level field, use the up/down arrow keys to select RAID 5 (Parity)
and press <Enter>.
4. In the Disks field (if available), press <Enter> to select the hard drives you
want to configure for RAID. Use the up/down arrow keys to highlight a drive
and press <Space> to select it. A triangle appears to confirm the drive selection. Press <Enter> when finished selecting drives.
2-7
Intel PCH RAID Configuration User's Guide
5. In the Stripe Size field, use the up/down arrow keys to select the strip size
(from 16KB to 128KB) for your RAID 5, and press <Enter>. The default setting
is 128KB. (Note: For a server, use a lower stripe size, For a multimedia system,
use a higher stripe size.)
6. In the Capacity field, press <Enter> to specify the disk capacity you want to
configure for RAID 5. The default setting is the maximum capacity allowed.
(Note: Unclaimed space on a disk can be used to create another RAID array
by following the above procedures with the same group of drives.)
7. After entering the parameters for each field, highlight Create Volume and
press <Enter>. A warning message displays, indicating that all data on the
selected disks will be lost.
8. Press <Y> to create the RAID volume, or press <N> to return to the main menu.
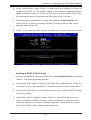
Deleting a RAID Volume
1. From the main menu, select Delete RAID Volume (as shown below) and
press <Enter>.
2. Use the up/down arrow keys to select the RAID set you want to delete and
press the <Delete> key. A warning message displays.
3. Press <Y> to delete the RAID volume, or press <N> to return to the Delete
Volume menu.
Warning: Be sure to back up your data before deleting a RAID set. You will lose
all data on the disk drives when deleting a RAID set.
2-8
Chapter 2: Configuring the PCH RAID Settings
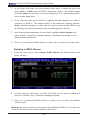
Resetting to Non-RAID
1. From the main menu, select Reset Disks to Non-RAID (as shown below) and
press <Enter>.
2. Use the up/down arrow keys to highlight the RAID drives to reset, and press
the Spacebar to select it.
3. Press <Enter> to reset the RAID set drive. A warning message displays.
4. Press <Y> to reset the drive, or press <N> to return to the main menu.
Warning: Be cautious when you reset a RAID volume HDD to a non-RAID HDD.
Resetting a RAID member HDD will remove its RAID structures and revert it to a
non-RAID disk. Depending on the RAID setup, the RAID array will either be degraded or fail completely.
2-9
Intel PCH RAID Configuration User's Guide
Exiting the Intel RSTe RAID Configuration Utility
1. From the main menu, select Exit and press <Enter>. A warning message appears as shown below.
2. At the prompt, press <Y> to delete the drive, or press <N> to return to the
main menu.
2-10
Chapter 2: Configuring the PCH RAID Settings
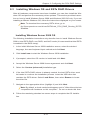
2-3 Installing Windows OS and RSTe RAID Drivers
After all hardware components have been installed, you can then install the Windows OS and perform the necessary driver updates. This section provides instruction on how to install Windows Server 2008 and Windows 2003 OS only. If you are
installing a different Windows OS, follow the instructions displayed on your screen.
Note: To download the necessary RSTe driver, go to:
ftp://ftp.supermicro.com/driver/SATA/Intel_PCH_RAID_Romley_RSTE/
Windows
Installing Windows Server 2008 OS
The following installation instructions only describe how to install Windows Server
2008 in Intel RSTe RAID, non-RAID, and AHCI mode (it is assumed that Intel RSTe
is enabled in the BIOS setup).
1. In the initial Windows Server 2008 installation screen, select the desired
language, time and keyboard input method and click Next.
2. Click Install now to start the Windows Server 2008 installation.
3. If prompted, select the OS version to install and click Next.
4. Accept the Windows Server 2008 license agreement and click Next.
5. Select the Custom (advanced) installation type.
6. If the Intel RSTe RAID volume is already created, the Intel RSTe driver must
be loaded to continue the installation process. Insert the USB drive that
contains the RSTe driver. Select Load Driver, then select Browse to locate
the driver file.
7. Navigate to the appropriate driver (highlight it) and click Next.
Note: By default, a check mark should appear next to "Hide drivers that are
compatible with hardware on this computer." Do not un-check this item.
8. Follow the remaining standard on-screen steps to complete the OS installation.
2-11
Intel PCH RAID Configuration User's Guide
Installing Windows 2003 OS
1. Before creating any RAID volumes, make sure the Intel RAID setting is enabled in the motherboard BIOS (see section 2-1).
2. Copy the RAID driver to a floppy disk and connect the floppy disk device to
the motherboard. (Do not create any RAID array at this time).
3. Insert the Microsoft Windows 2003 Setup CD in the CD drive. The system will
boot from CD.
4. Press the <F6> key when the following message displays: "Press F6 if you
need to install a third-party SCSI or RAID driver."
5. When the Windows 2003 Setup screen displays, press <S> to specify additional devices.
6. Load the driver from the floppy disk and select the device "Intel(R) C600
Series Chipset SATA RAID Controller" and press <Enter>.
7. Press the <Enter> key again to continue with installation. (If you need to
specify additional devices to install, do so at this time). Once all devices are
specified, press <Enter> to continue with the insatllation.
8. From the Windows 2003 Setup screen, press the <Enter> key. The 2003
Setup will automatically load all device files and then continue with the Windows 2003 installation.
9. Install Windows 2003 on single disk connected to the SATA port. The system
will automatically reboot once the Windows 2003 OS installation is complete.
10.Install all chipset drivers and install Intel Rapid Storage Technology Enterprise, located at:
ftp://ftp.supermicro.com/driver/SATA/Intel_PCH_RAID_Romley_RSTE/
Management
11. Download the Hot-Fix from the Microsoft website (http://support.microsoft.
com/kb/932755) and run the .exe file, then reboot.
12.Open Intel Rapid Storage Technology Enterprise and begin creating RAID
volumes using your system disk. Choose to keep the data on the system disk.
To install Windows 2003 using an alternative method, refer to FAQ 14616 located at:
http://www.supermicro.com/FAQ/index.aspx
2-12
(Disclaimer continued)
The products sold by Supermicro are not intended for and will not be used in life support systems, medical equipment, nuclear facilities or systems, aircraft, aircraft devices,
aircraft/emergency communication devices or other critical systems whose failure to perform be reasonably expected to result in significant injury or loss of life or catastrophic
property damage. Accordingly, Supermicro disclaims any and all liability, and should buyer use or sell such products for use in such ultra-hazardous applications, it does so
entirely at its own risk. Furthermore, buyer agrees to fully indemnify, defend and hold Supermicro harmless for and against any and all claims, demands, actions, litigation, and
proceedings of any kind arising out of or related to such ultra-hazardous use or sale.