1
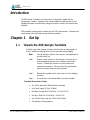
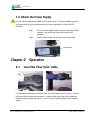
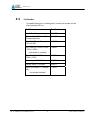
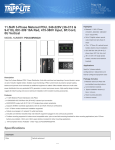
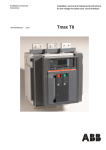
Sample Turntable User Manual ASD Document 600610, Revision A © January, 2011 by ASD Inc. www.asdi.com www.asdi.com Table of Contents Copyright Information ......................................................................................................... 4 Disclaimer ........................................................................................................................................ 4 Technical Support ................................................................................................................ 4 Returning Instrument to ASD for Service .............................................................................................................. 4 Key to Symbols ..................................................................................................................... 5 Introduction............................................................................................................................. 6 Chapter 1 Set Up ............................................................................................................... 6 1.1 Unpack the ASD Sample Turntable ...................................................................................... 6 1.2 Attach the Power Supply ..................................................................................................... 7 Chapter 2 Operation ......................................................................................................... 7 2.1 Insert the Fiber Optic Cable ................................................................................................. 7 2.2 Select a Sample Dish ............................................................................................................ 8 2.3 Load the Sample Dish .......................................................................................................... 9 2.4 Place the Sample Dish .......................................................................................................... 9 2.5 Using the Reference Standard ........................................................................................... 10 2.5 Power on the Sample Turntable ........................................................................................ 10 2.6 Collecting Spectra .............................................................................................................. 11 Chapter 3 3.1 Maintenance .................................................................................................. 11 Cleaning the System .......................................................................................................... 11 3.1.1 Cleaning the Sample Turntable ............................................................................................................ 11 3.1.2 Cleaning the Lamp ............................................................................................................................... 12 3.1.3 Cleaning the Spectralon Reference Panel ........................................................................................... 12 3.2 Replacing the Lamp ........................................................................................................... 13 3.3 Turntable Bearing Maintenance ........................................................................................ 14 ASD Inc. 2010© Document 600610 Revision A 2 Sample Turntable User Manual www.asdi.com 3.4 Switch Maintenance .......................................................................................................... 15 3.5 Trouble Shooting Guide ..................................................................................................... 16 Chapter 4 4.1 Appendix ........................................................................................................ 17 Specifications .................................................................................................................... 17 4.1.1 Sample Turntable ................................................................................................................................. 17 4.1.2 Environmental Specifications .............................................................................................................. 17 4.1.3 Lamp Specifications ............................................................................................................................. 17 4.1.4 Power Source Specifications ................................................................................................................ 18 4.2 Spare Parts ........................................................................................................................ 18 4.3 Part Numbers .................................................................................................................... 19 ASD Inc. 2010© Document 600610 Revision A 3 Sample Turntable User Manual www.asdi.com Copyright Information This document contains proprietary information protected by copyright law and may not be reproduced in any manner without the express written approval of ASD Inc. Disclaimer The information and specifications contained in this manual are subject to change without notice. ASD Inc. shall not be held liable for technical errors, editorial omissions, or errors made herein; nor for incidental or consequential damages resulting from furnishing, performance, or use of this material. Technical Support If there are any questions or concerns, please contact ASD Inc. by phone, fax, or email: Phone: 303-444-6522, Extension-144 Fax: 303-444-6825 E-mail: [email protected] Web: www.asdi.com Software/Documentation: http://support.asdi.com Technical support is committed to providing a timely response to all questions and is available by phone Monday through Friday, 8 am to 5 pm Mountain Standard Time. Returning Instrument to ASD for Service In order to return the instrument to ASD for maintenance or repair, a Return Merchandise Authorization (RMA) must be issued by ASD technical support. The RMA includes scheduling details, contact information, shipping instructions, and a brief description of the maintenance or repair requirements. Please contact the technical support department at 303-444-6522, Extension 144 or [email protected]. ASD Inc. 2010© Document 600610 Revision A 4 Sample Turntable User Manual www.asdi.com Key to Symbols CAUTION SYMBOLS The following are personal danger warning symbols. Documentation must be consulted in all cases where these symbols are marked. Failure to acknowledge these warnings could result in personal injury to the user or cause damage to the equipment. CAUTION: Risk of Danger. This is a personal danger warning. Documentation must be consulted in all cases where this symbol this is marked. CAUTION: Risk of Electric Shock. This is a personal danger warning. Beware of live electrical circuits before working with or performing maintenance on the equipment. Failure to acknowledge this warning could result in personal injury to the user or cause damage to the equipment. CAUTION: Hot Surface. This is a personal danger warning. Equipment may be hot to the touch and could potentially cause burns. Failure to acknowledge this warning could result in personal injury to the user. CAUTION: Risk of Explosion. This is a personal danger warning. Beware of explosion potential before working with or performing maintenance on the equipment. Failure to acknowledge this warning could result in personal injury to the user or cause damage to the equipment. Warnings and cautions are placed throughout this manual for the protection of the user. However, the absence of warnings and cautions does not preclude the user of proper caution and handling. Usual precautions are recommended to be taken at all times, either written or otherwise, to avoid injury or damage to ASD equipment. ASD Inc. 2010© Document 600610 Revision A 5 Sample Turntable User Manual www.asdi.com Introduction The ASD Sample Turntable is used for analysis of irregularly shaped and nonhomogeneous samples. Rotation of the sample enables the spectrometer to view multiple orientations and effectively average non-uniform surfaces for accurate data collection. ASD turntables are designed to operate only with ASD spectrometers. Reference the spectrometer manual for spectroscopy technical guidance. Chapter 1 1.1 Set Up Unpack the ASD Sample Turntable Carefully inspect the shipping container and take notes and photographs if there is evidence of damage that may have occurred during shipping. Note: Save all packing materials, foam spacers, and paperwork for possible future use. Step 1 Prepare a clear space on a sturdy bench or counter near a power receptacle and away from a window or other light sources. External light sources may have influence on spectral measurements. Please refer to the spectrometer manual for spectroscopy technical guidance. Step 2 Remove the turntable and its accessories from the shipping container. Step 3 Ensure all items are included before using the turntable. Standard Accessories include One 3.62in Spectralon White Reference Standard One Power Supply (15 Volt, 36 Watt) One Metal Sample Dish (150x15mm / 5.91in x0.70in One Glass Petri Dish (100x15mm / 3.94x0.70in One 100mm Plate (used with 100mm Petri Dishes) Two packets of bearing grease ASD Inc. 2010© Document 600610 Revision A 6 Sample Turntable User Manual www.asdi.com 1.2 Attach the Power Supply Use only ASD provided power supplies and AC power cords. ASD power supplies and cords have been tested to ensure all performance and safety requirements comply with ASD standards. Step 1 Press the power supply two-pin connector into the back of the turntable. Lock in place by turning the locking barrel clockwise. Step 2 Plug the power supply’s AC power cord into a wall outlet. Locking Barrel Chapter 2 2.1 Operation Insert the Fiber Optic Cable It is important the distance from the fiber optic tip to the sample remains constant. Variance in distance could influence measurements. Ensure the fiber optic cable is fully seated and extends through the underside about a 1/2in (as shown in the photo above) when collecting spectra. ASD Inc. 2010© Document 600610 Revision A 7 Sample Turntable User Manual www.asdi.com 2.2 Step 1 Slip the spectrometers fiber optic cable downward into the fiber optic port until fully seated. A spring plunger will snap to indicate when the cable is seated fully. Step 2 Pull the fiber optic upward to verify the cable is firmly retained by the spring plunger and won’t easily pull out. Select a Sample Dish The Sample Turntable is designed to work with three different sample dishes. Dish types include a 150mm x 15mm (5.91in x 0.70in) metal dish, a 150mm x 15mm glass petri dish (not included) and a 100mm x 15mm (3.94in x 0.70in) glass petri dish. The turntable is designed to fit only Pyrex® (Corning Brand) glass petri dishes. For the most effective sample presentation, use the larger sample dish. As illustrated below, the larger sampling dish has a more effective sampling area, which could result in more precise data collection. Sample height must be as uniform as possible and level with the top of the sample dishes. Select the smaller dish only when sample volume won’t completely fill the larger dish. ASD Inc. 2010© Document 600610 Revision A 8 Sample Turntable User Manual www.asdi.com 2.3 Load the Sample Dish It is important the distance from the fiber optic tip to the sample and reference panel remains constant. Variance in distance could influence measurements. When loading the sample dish, ensure the sample is uniform and level with the sample dish rim. It is important to load the sample holder as consistently as possible. If multiple operators are loading samples ensure all follow the same procedure. To level the sample, use an object with a flat surface larger than the sample dish (such as a Petri dish lid as illustrated below). Place the flat object on the loaded sample dish. With little downward pressure, slide the object in a circular motion until the sample height matches the rim height of the sample dish. Inspect the sample to ensure it is uniform and the height is correct. Clean the dish after each use. 2.4 Place the Sample Dish Place the larger sample dish (metal or glass type) directly on the Sample Turntable. To use the smaller dish, rotate the petri dial until it snaps into position over the rotating turntable. Use the small plate with the 100mm dish as illustrated below. 100mm Dish Small Plate Petri Dial ASD Inc. 2010© Document 600610 Revision A 9 Sample Turntable User Manual www.asdi.com 2.5 Using the Reference Standard The Spectralon® reference panel is an optical standard and should be handled with extreme care. Although the material is very durable, care should be taken to prevent contaminants— such as finger oils—from contacting the material’s surface and altering the reflectance. Always handle the reference panel from the sides to help maintain the panel’s high reflectance. To take a white reference (reference the Spectrometer User Manual) turn the lamp on and allow it to warm up for at least 15 minutes. Position the petri dial, center the reference panel on the small plate and place it on the turntable. Turn the motor on and take a white reference. Note: To ensure the quality of sample collection, use only Spectralon reference panels supplied by ASD. ASD supplied reference panels are designed to work with the turntable and samples dishes that are provided. For replacement parts, please contact ASD Technical Support. 2.5 Power on the Sample Turntable The Sample Turntable has power available when the power supply is connected and plugged into a wall outlet. Press the switch near the lamp icon to power the lamp on/off. There is separate control for the turntable rotate and the lamp functions. The button above the lamp icon controls the lamp on/off, the button above the rotate icon controls the rotate on/off. Rotate Icon Lamp Icon ASD Inc. 2010© Document 600610 Revision A 10 Sample Turntable User Manual www.asdi.com 2.6 Collecting Spectra When using the Sample Turntable, samples will be exposed to the heat of the halogen lamp. Depending on the material being sampled, this heating of the sample may affect the data and could potentially damage the sample. ASD recommends the samples be removed from the turntable when not in use. To operate the turntable, follow the steps as outlined in this chapter. Select the number of scans that most closely matches whole intervals of the dish rotation. Matching the rotational speed and number of scans will produce the most consistent results when using inhomogeneous materials. To collect spectra, follow the instructions in the spectrometer manual. Chapter 3 3.1 Maintenance Cleaning the System 3.1.1 Cleaning the Sample Turntable CAUTION: Risk of Electric Shock. Turn the power off and disconnect the power supply before cleaning. CAUTION: Risk of Explosion. Do not allow water or a damp cloth to make contact with a hot lamp. Turn the power off and disconnect the power supply. Allow the lamp to cool to room temperature before attempting to clean the turntable. CAUTION: Risk of Burn. To prevent burn injuries, the lamp must be allowed to cool down. Allow the lamp to cool to room temperature before cleaning. Step 1 Remove the power cord and allow the lamp to cool. Step 2 Clean the unit with a damp cloth and mild soap and/or isopropyl alcohol. Do not allow water to get into power connections. Step 3 Ensure all soap residue is removed and all surfaces and power connections are dry before reconnecting power. ASD Inc. 2010© Document 600610 Revision A 11 Sample Turntable User Manual www.asdi.com 3.1.2 Cleaning the Lamp CAUTION: Risk of Explosion. Do not allow water or a damp cloth to make contact with a hot lamp. Turn the power off and disconnect the power supply. Allow the lamp to cool to room temperature before cleaning. CAUTION: Risk of Burn. To prevent burn injuries, allow the lamp to cool to room temperature before attempting to clean. Step 1 Remove the power cord and allow the lamp to cool. Step 2 Remove the lamp from its cradle (Reference ‘Replacing the Lamp’ in chapter 3.2 of this manual). Step 3 Remove loose dirt and dust with canned nitrogen-propelled compressed air. Step 4 Use a lint free cloth and 97%-99% isopropyl alcohol and clean the lamp window. Note: Use medical grade isopropyl alcohol. Other grades typically contain 70%-90% alcohol and 10%-30% water and other impurities which may negatively affect lamp performance. Step 5 Use the compressed air to rid the lamp window of any loose contaminants. Step 6 Reinstall the lamp. 3.1.3 Cleaning the Spectralon Reference Panel The Spectralon reference panel is an optical standard and should be handled with extreme care. Although the material is very durable, care should be taken to prevent contaminants—such as finger oils—from contacting the material’s surface and altering the reflectance. Always handle the reference panel from the sides to help maintain the panel’s high reflectance. To Clean Lightly Soiled Spectralon Step 1 Spray with a jet of dry air or nitrogen. Note: DO NOT use Freon. To Clean a Heavily Soiled Reference Panel Step 1 Place a flat surface, such as a thick, flat piece of glass into a sink. Step 2 Place 220 grade wet sandpaper onto the glass. ASD Inc. 2010© Document 600610 Revision A 12 Sample Turntable User Manual www.asdi.com 3.2 Step 3 Holding the sandpaper in place, gently rub the reference panel in a figure-eight motion over the paper until the panel is hydrophobic (water beads and runs off immediately). Note: Be sure to follow these steps rather than setting the reference panel onto the glass and rubbing the sandpaper onto the panel—doing so will apply uneven pressure to the reference panel’s surface, thus creating areas of unequal reflectance. Step 4 Use water as needed to wash away the thin layer of sanded material. Step 5 Blow dry with air or nitrogen, or allow the material to air dry for a minimum of 4 hours. Note: Do not use oils or soaps to clean the reference panel. Replacing the Lamp CAUTION: Risk of Burn. To prevent burn injuries, allow the lamp to cool to room temperature before attempting to replace. Prevent dirt and oils from contacting the lamp window. Do NOT touch the window of the lamp. Oils on hands may transfer to the window—this can significantly affect the lamp temperature and corrupt important operating properties of the lamp. This could influence data collected by the spectrometer. Step 1 Remove the six screws (located at top of enclosure) securing the shroud cover and lift upward to remove. ASD Inc. 2010© Document 600610 Revision A 13 Sample Turntable User Manual www.asdi.com Step 2 Pull the lever assist upward to eject the lamp. Step 3 Remove the lamp and press the lever assist down back in place. Step 4 Without touching the glass bottom surface (window), slide a new clean lamp into place. Ensure the lamp is fully seated (centered with the hole in the lamp cradle). 3.3 Turntable Bearing Maintenance Occasionally debris may find its way to the turntable bearing and if excessive, bearing life and performance may be affected. If the turntable is noisier than normal it’s likely the bearing needs to be cleaned (reference the trouble shooting section in this manual). To service the bearing, follow these steps. Step 1 While pressing down on the turntable with one hand use the other to remove the hex nut. Use a ratchet and 5/8in socket. Step 2 Remove the hardened bearing washers and bearing. Step 3 With a dry cloth, clean and remove all lubrication from the bearing and bearing washers. Step 4 Lubricate the bearing using grease (not oil), ASD part 906311, or other type formulated to protect against rust and corrosion. Step 5 Reinstall the bearing components and turntable. ASD Inc. 2010© Document 600610 Revision A 14 Sample Turntable User Manual www.asdi.com 3.4 Switch Maintenance Avoid spilling sample debris on the rotation and lamp switches. If this occurs, do not press the switch until the material is removed. Pressing the switch may lodge the material between the switch and its bezel. If excessive, the switch may bind and not operate correctly (reference section 3.5 Trouble Shooting Guide in this manual). To recover, remove the debris using a thin needle. The switch is operating correctly when there is tactile snapping action when pressed. ASD Inc. 2010© Document 600610 Revision A 15 Sample Turntable User Manual www.asdi.com 3.5 Problem The turntable is noisier than normal. The main turntable will occasionally stall and clatter loudly. The smaller 100mm plate rotates irregularly. It hesitates or stutters excessively at times. The turntable lamp and/or motor will not turn on. Trouble Shooting Guide Possible Cause Repair Action/Notes The turntable bearing is contaminated with debris. Clean and re-lubricate the turntable bearing. The gear motor is beginning to wear. Replace the motor. Excessive sample weight on turntable. Lighten the load placed on the turntable. Debris buildup between main platen and plastic enclosure. Remove turntable plate and clean. Toothed drive belt is loose. Remove the bottom cover and adjust the belt tension or contact ASD and schedule repair. Toothed drive belt is damaged. Remove the bottom cover and replace the belt or contact ASD and schedule repair. Gear motor is damaged. Replace the motor. Debris on plate surfaces and/or oring. Some irregular motion is normal and will not affect measurements. If the turntable plate hesitates or stutters excessively, clean the underside of the small plate (including the orange o-ring) and the top of the turntable plate with a damp cloth. Loose or open power connection. Verify the power connector on the back of the turntable is fully seated and locked in place. Using a ratchet and a 5/8in hex socket, remove the turntable plate to gain access to the bearing. With a dry cloth, clean and remove all lubrication from the bearing and bearing surface. Lubricate the bearing using grease (not oil) formulated to protect against rust and corrosion (reference Turntable Bearing Maintenance in this chapter). Contact ASD and schedule repair. Use a ratchet and a 5/8” hex socket to remove the turntable plate (to remove the turntable, reference Turntable Bearing Maintenance in section 3.3 of the manual). Contact ASD and schedule repair. Verify the AC power cord is properly connected to the AC power source. Over current condition. Power to the turntable will be cut off if over current is detected. Both the turntable and the power supply have an over current protection circuit. To recover, disconnect and then reconnect the power connector located on the back of the turntable. If power is not restored, disconnect and then reconnect the AC power plug from the wall outlet. If power is not restored or the turntable repeatedly looses power, contact ASD and schedule repair. Switch is binding Avoid spilling sample debris on the motor and lamp switch. If this occurs, do not press the switch until the material is removed. Pressing the switch may lodge the material inward between the switch and its bezel. If excessive, the switch may bind rendering it inoperative. To recover, remove the debris using a thin needle. Recovery is realized when the tactile snapping action is regained. Reference Switch Maintenance in section 3.4 of this manual. If recovery is not possible contact ASD and schedule repair. The turntable lamp and/or motor will not turn off. Switch is binding Follow the repair action as describe above. ASD Inc. 2010© Document 600610 Revision A 16 Sample Turntable User Manual www.asdi.com Chapter 4 4.1 Appendix Specifications 4.1.1 Sample Turntable Physical Dimensions 8x11x11 inch / 20.32 x 27.94 x 27.94 cm Weight 6.8 lbs / 3.1 kg Sample Spot Size 4.80 cm /1.89in 4.1.2 Environmental Specifications The Sample Turntable is designed for indoor use only. Operating Temperature 5- 35°C Non-condensing Operating and Storage Humidity Storage Temperature 4.1.3 41- 95°F 0-45°C 32-113°F Light Source Specifications Halogen Based Lamp 12 VDC, 20 Watt Life (hours) 3,500 Correlated Color Temperature 2900 K, 510 Lumens ASD Inc. 2010© Document 600610 Revision A 17 Sample Turntable User Manual www.asdi.com 4.1.4 Power Source Specifications Use only ASD provided power supplies. 4.2 AC Power Input 100/240~, 50/60 Hz, 1.0 Amp Peak DC Operating Current 2.2 Amps Normal DC Operating Current 1.86 Amp Spare Parts Metal Sample Dish (150mm x 15mm / 5.91in x 0.70in The metal 150mm diameter x 15mm high sample holder retains samples for the Sample Turntable. Petri Dish (150mm x 15mm / 5.91in x 0.70in) The Pyrex brand 150mm diameter x 15mm high dish holds samples for the Sample Turntable. Not included as standard. Petri Dish (100mm x 15mm / 3.94in x 0.70in) The Pyrex brand 100mm diameter x 15mm high dish holds samples for the Sample Turntable. Power Supply (15 Volt 36 Watt) The AC/DC power supply for the Sample Turntable. Spare Halogen Bulb (2in Diameter 12 V) The replacement halogen bulb is for use in the Sample Turntable. Not included as standard. Reference Panel (9.19cm /3.62in Diameter Spectralon) The Spectralon reference panel is the optical standard used with all ASD instruments and designed specifically for the ASD Sample Turntable. ASD Inc. 2010© Document 600610 Revision A 18 Sample Turntable User Manual www.asdi.com 4.3 Part Numbers To expedite the process of ordering parts, have the part number on hand when contacting ASD, Inc. Part Name Part Number Sample Turntable A128798 Reference Panel 9.19cm /3.62in Diameter Spectralon A128001 Metal Dish 150mm x15mm / 5.91in x0.59in A133353 Glass Petri Dish 100mm x 15mm / 5.91in x 0.59in 126666 (not included as standard) Glass Petri Dish 100x15mm / 3.94in x 0.59in 128008 Power Supply, 15V 36 Watt A350534 Bearing Grease, 1cc Packet 906311 Spare 2in Diameter 12 V Halogen Bulb 126545 (not included standard) ASD Inc. 2010© Document 600610 Revision A 19 Sample Turntable User Manual