1
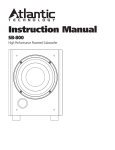
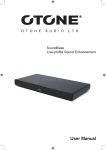
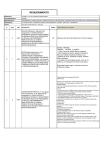
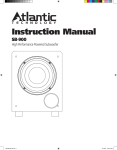
Stilo 5.1
Multimedia Speaker System
User Manual
User Manual
CAU T I O N
RISK OF ELECTRIC SHOCK
DO NOT OPEN
PLEASE
READ
FIRST
CAUTION: To reduce the risk of electric shock, do not remove the cover. No user
serviceable parts inside. Refer to qualified personnel.
WARNING: To reduce the risk of fire or electric shock, do not expose this appliance
to rain or moisture.
The lightning flash with arrowhead, with in an equilateral triangle, is
intended to alert the user to the presence of uninsu lated “dangerous
voltage” within the product’s enclosure that maybe of suficient magnitude
to constitute a risk of electrical shock to persons.
The exclamation point within an equilateral triangle is intended to alert
the user to the presence of important operating maintenance (servicing)
instructions in the guide accompanying this device.
CAUTION: Please read these important safety instructions carefully
Read Instructions–All the safety and operating instructions should be read before the unit is
operated.
Retain Instructions–The safety and operating instructions should be retained for future
reference.
Heed Warnings–All warnings on the unit and in the operating instructions should be
adhered to.
Follow Instructions–All operating and use instructions should be followed.
Cleaning–Unplug the unit from the wall outlet before cleaning. The unit should be cleaned
only as recommended by the manufacturer.
Attachments–Only use attachments recommended by the manufacturer as
non-recommended attachments may cause hazards.
Water and Moisture–Do not use the unit near water–for example, near a bath tub, wash
bowl, kitchen sink, or laundry tub; in a wet basement; or near a swimming pool.
Accessories–Do not place the unit on an unstable surface, stand, tripod, bracket, or table.
The unit may fall, causing serious injury to yourself or others, and serious damage to the unit.
Ventilation–Do not place in a location or position that will interfere with the unit’s ventilation.
Do not operate on a bed, sofa, rug, or other similar surface.
Power Sources–The unit should be operated only from the type of power source indicated
on the marking label. If you are not sure of the type of power supplied to your
User Manual
home, consult your unit dealer or local power company.
Power-Cord Protection–Power-supply cords should be routed so that they are not likely to
be walked on or pinched by items placed upon or against them, paying particular attention to
cords where they enter a plug, or exit from the unit.
Lightning–For added protection for the unit during a lightning storm, or when it is left
unattended and unused for long periods of time, unplug it from the wall outlet and disconnect
from other devices. This will prevent damage to the unit due to lightning and power-line surges.
Overloading–Do not overload wall outlets, extension cords, or integral convenience
receptacles as this can result in a risk of fire or electric shock.
Object and Liquid Entry–Never push objects of any kind into the unit through openings as
they may touch dangerous voltage points or short-out parts that could result in a fire or electric
shock. Never spill liquid of any kind on the unit.
Servicing–Do not attempt to service the unit yourself as opening or removing covers may
expose you to dangerous voltage or other hazards. Refer all servicing to qualified service
personnel.
Damage Requiring Service–Unplug the unit from the wall outlet and refer servicing to
service qualified personnel under the following conditions:
When the power-supply cord or plug is damaged,
If liquid has been spilled, or objects have fallen into the unit,
If the unit has been exposed to rain or water,
If the unit does not operate normally by following the operating instructions,
If the unit has been dropped or damaged in any way, and great care should be
exercised in handling, and the unit should be examined by qualified service personnel.
When the unit exhibits a distinct change in performance– this indicates a need for service.
Replacement Parts–When replacement parts are required, be sure the service technician
has used replacement parts specified by the manufacturer or have the same characteristics as
the original part. Unauthorized substitutions may result in fire, electric shock, or other hazards.
Heat–The unit should be situated away from heat sources such as radiators, heat registers,
stoves, or other units (including amplifiers) that produce heat.
User Manual
OTONE Audio Stilo 2.1 Pro Multimedia Speaker
User Manual
● Introduction
Thank you for purchasing Otone Audio’s Stilo 5.1 Multimedia speaker. Your new audio
system combines great audio performance and user-friendly operation with cutting edge style.
Whether used with your PC or another audio system, Otone’s 5.1 Multimedia speaker will
enhance your listening experience.
We are committed to creating innovative audio products to meet your home and desktop
needs. To get the most from your new system, please be sure to read this User Manual
completely. It contains all of the necessary information to connect and operate your system for
maximum performance.
● Specifications
Power Input: 220v 50/60Hz
Total RMS power output: 165W (5 x 20W + 65W)
Frequency Response: 70 Hz - 20 KHz (-10dB)
Signal to Noise Ratio: >75dB
Satellites drivers: 2 x 2” high-sensitivity full-range speakers
Subwoofer: 5¼” long-excursion driver
Audio Input: 3.5mm six channel direct audio jacks, 3.5mm stereo jack
Power Supply: AC
Dimensions: Sat 253 x 65 x 106mm; Sub 257 x 245 x 255mm
Weight: 6.1kg
● Package Contents
Remove all of the components and accessories from the carton. Make sure all of the items
listed below are present:
User Manual
■ Subwoofer
■ An infrared remote control
■ Front satellites x2
■ User's manual
■ Rear satellites x2
■ Warranty card
■ Centre satellite
■ 3.5mm stereo cable x3
If for any reason any of the items are missing or damaged, please contact Otone Audio Ltd.
Service & Support, details can be found at: www.otoneaudio.co.uk/service_and_support
8
10
Mute
Use black input if your equipment
has only one output jack (stereo)
Source
Reset
Sorround
Front in
Orange FL/FR
Green RL/RR
Pink C/SW
9
1. Front left speaker
6. Overweight Subwoofer
2. Front right speaker
7. AC power cord
3. Back right speaker
8. Infrared remote control
4. Back left speaker
9. 3.5mm audio signal wire
10. Status LED
5. Center speaker (remote receiver)
User Manual
Instructions
Getting Started
●
Set Up
Important Notice: For safety reasons, please ensure the power is off on the system before
beginning set-up.
1. All cables should be connected to the subwoofer but first ensure that they are positioned
correctly. Remove the speakers from the packaging and place the front satellites either side
of the computer or in a suitable position on your desktop or table if using an alternative audio
source. The centre speaker should be positioned equidistant between the two front satellites.
The rear satellites should be positioned behind you, ideally at ear level and adjust the position
of the speakers to best direct the sound towards you. For best 5.1 surround sound set up
please refer to the diagram below:
To get the best sound ensure that the subwoofer is placed on the floor and that there is
adequate ventilation around all speakers. Avoid moisture and other adverse factors which
can affect the sound quality.
2. The satellite speakers are connected by color-coded RCA jacks. The plug jacks on the
end of the speaker cables connect into the corresponding socket jacks on the back of the
subwoofer unit. Connect the red plug from the right hand satellite speaker into the red
socket on the back of subwoofer then repeat for the white plug from the left hand speaker.
Take care when connecting and positioning the front and rear satellites. The rear satellites
have longer length cables (to help position them around the room) and should be connected
into the sockets marked “Rear Out”.
User Manual
3. Next plug in the center speaker into the back of the subwoofer. The socket on the subwoofer
is marked "Centre Out". Note: Before inserting the plug ensure the pins are correctly aligned.
4. There are now two options to connect to your audio source:
a. If you have a 5.1 channel PC or other audio source, connect using all three 3.5mm
audio cables supplied. There are individual cables for front, rear and subwoofer/centre
channels.
Colour-coded 3.5mm jacks connect each channel. The plug jacks connect into the
corresponding socket jacks on the back of the subwoofer unit. Connect the orange
plug for the front channel to the orange socket on the back of subwoofer then repeat
for the green plug (rear channel) and pink plug (subwoofer/center channel).
b. If your audio source only has stereo output you should connect using a single 3.5
mm stereo cable. Plug one end of the cable into the black subwoofer socket marked
"Line In (stereo)" and the other end into your computer or other audio source’s output
jack.
5. Once all cable connections are complete, insert the mains plug into the mains socket on the
wall. Finally switch on the mains socket, press play on your audio/visual source and enjoy great
sound!
●
Remote Control Fuction
Power button
Volume Down/Volume Up
Mute Control
Mute
BASS reduce/increase buttons
TREBLE reduce/increase buttons
Switch stereo and 5.1 input
Surround sound on /off
Source
Reset
Restore factory settings
Sorround
Troubleshooting
Only one of the speakers is working what should I do?
First make sure the 3.5mm stereo cable is properly connected, if it still does not work then try
to switch to an alternative source e.g. CD or MP3 player. Also check that the both satellite
speakers are connected via the RCA lead.
Sounds only comes out of one side when playing a CD through a computer
User Manual
This can often occur in a new set-up of a computer. You can sometimes find this problem when
playing a CD, although a .WAV sound file will play normally. This is because the CD-ROM and
sound card have not been correctly configured. Please consult your computer user manual for
instructions of how to correctly configure your sound card.
No sound
1 . Check the power cord is plugged in to the wall power socket and the power socket is
switched on.
2 . Check all audio cables are connected properly.
Background hiss or buzzing
Check that your audio source volume is not set at 100% as this can cause distortion. Set the
volume to between 70-75% and use the volume control on your speaker system as the master
volume control.
Background hiss or buzzing
Check that your audio source volume is not set at 100% as this can cause distortion. Set the
volume to between 70-75% and use the volume control on your speaker system as the master
volume control.
Speaker sound quality issues
Otone 2.1 speakers will give you excellent sound quality, if you find any unusual sound, please
check to see if the audio cable connectors are oxidized, or speaker cable terminals are loose.
If you have any questions
Please visit our website www.otoneaudio.co.uk/service_and_support
Or contact our support team via email at [email protected]
●
Note
1. The system should not be placed in hot, humid environment should not be
exposed to rain or subjected to strong impact.
2. There are no customer-serviceable parts in this product, to prevent electric shock and other
accidents do not try to service this product yourself. Refer all servicing to qualified service
personnel.
3. If you accidentally spill liquid on or in any part of the speaker, you should immediately switch
off the power and then arrange for it to be checked by qualified service personnel before you
use it again.
4. When connecting the system to a source with a large signal volume, do not set the input on
the source to maximum, it should be set to the level where no distortion can be detected.
5. If you are not going to use your speaker for an extended period of time always switch off the
power at the mains power socket.
This product conforms to all the applicable requirements of the standards EN 60065 (safety), EN 55013 and EN 55020 and as defined by
EU Directive 1999/5/EC and is CE-marked accordingly.
All features and specifications are subject to change without notice or liability this may be done to upgrade or
improve existing designs or features.
7