1
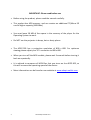
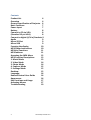
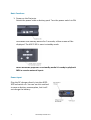
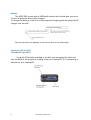
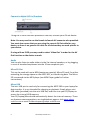
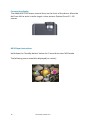
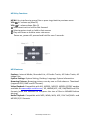
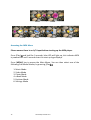
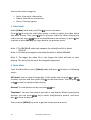
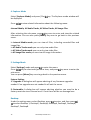
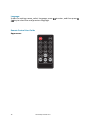
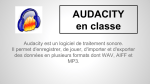
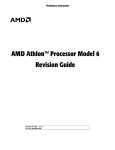
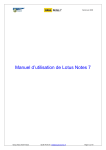
Adapt ADPP-305 Projector
User Manual
I
IMPORTANT: Please read before use
• Before using the product, please read the manual carefully.
• This product has 4GB memory, and can receive an additional TF/Micro SD
card of higher capacity (8GB Max)
• You must leave 30 MB of free space in the memory of the player for the
Operating System to work.
• Do NOT use the projector in damp, hot or dusty places.
• The ADPP-305 has a projection resolution of 800 x 600. For optimum
viewing please adjust your PC’s resolution to 800 x 600.
• When you turn off the MP4 module, please wait 3 seconds before turning it
back on repeatedly.
• It is advised to compress all MP4 files that you store on the ADPP-305, as
this will increase the operating speed of the device
• More information can be found on our website at www.adapt-mobile.com
2
www.adapt-mobile.com
Contents
Product List
4
Overview
4
General Specification of Projector 6
Basic Functions
7
Power Input
7
Battery
8
Connect to PC via VGA
8
(Standard 15 pin VGA)
8
Connect to digital (A/V in) Products 9
Audio
9
Micro SD Slot
9
Micro USB
9
Focusing the display
10
MP4 Player Instructions
10
MP4 Key Functions
11
MP4 features
11
Accessing the MP4 Menu
12
MP4 Function Descriptions
13
1. Music Mode
13
2. Video Mode
14
3. Photo Mode
14
4. Explorer Mode
15
5. Settings Mode
15
Desktop:
15
Language:
16
Remote Control User Guide
16
Appearance
16
Key Functions and Usage
17
Accessing Menus
17
Troubleshooting
19
3
www.adapt-mobile.com
Product List
ADPP-305 Projector
AC Adapter
A/V Cable
Battery
Charger
Tripod
Remote Controller
1
1
1
1
1
1
1
Overview
Fig 1.1 Top View
4
www.adapt-mobile.com
Fig 1.2 Side View
Fig 1.3 Back View
5
www.adapt-mobile.com
General Specification of Projector
Parameters
Resolution
Aspect ratio
Projection lens type
Projection angle
Recommended projection size
Light source
Input
Weight
6
Normal
800x600
4:3
Manual focus
33.4
30-40 Diagonal
LED
RGB, A/V
290
www.adapt-mobile.com
Unit
Pixel
Remarks
Degree
Inch
NTSC/PAL
Gram
Basic Functions
1. Power on the Projector
Attach the power cable or battery pack. Turn the power switch to ON
Hold down the Standby button for 3 seconds, a blue screen will be
displayed. The ADPP-305 is now in standby mode.
Note: When the projector is in standby mode it is ready to playback
MP4 or receive external inputs
Power Input
Plug the DC charger directly into the ADPP305 and switch on. You can use this method
to save on battery consumption, but it will
not charge the battery.
7
www.adapt-mobile.com
Battery
The ADPP-305 comes with a 2000mAH battery that should give you up to
2 hours of playback when fully charged.
To charge the battery, slide it onto the separate charging plate and plug the DC
charger into the wall.
You can connect the battery to the ADPP-305 in the same way.
Connect to PC via VGA
(Standard 15 pin VGA)
Using the VGA cable provided in the box you must plug the male end
into the back of the projector, leading from your Laptop/PC, as if connecting a
Monitor to your Laptop/PC.
8
www.adapt-mobile.com
Connect to digital (A/V in) Products
Using the 3.5mm Data Jack provided in the box, connect your AV out device.
Note: You may need to use the female to female AV converter also provided.
You must also ensure that you are using the correct AV Out cable for your
device, as there is no generic AV cable for all devices they are each specific to
your device.
If using with an iPOD you may need to select ‘Video Out’ in order for the AV
Out function on the device to work.
Audio
You can also listen to audio either via the 2w internal speakers, or by plugging
in a set of standard earphones into the 3.5mm earphone jack.
Micro SD Slot
This can be used with up to 8GB (maximum capacity) Micro SD card. For either
extending the storage space on the ADPP 305, or transferring data. The Micro
SD is accessed via the MP4 player (see MP4 Player guide for further
instructions).
Micro USB
The mini USB port is used only for connecting the ADPP 305 to your laptop for
data transfer. It is not intended for charging or playback. Simply plug a mini
USB cable (provided) into the mini USB slot, and then into your PC/Laptop to
access the internal 4GB memory.
Your PC/Laptop/Mac should automatically detect the internal memory. There
are however some exceptions, see troubleshoot page or visit www.adaptmobile.com or email [email protected]
9
www.adapt-mobile.com
Focusing the display
The Adapt ADPP 305 uses a manual focus on the front of the device. Move the
dial from left to write in order to get a clear picture. Optimal from 0.5 -1.8
metres.
MP4 Player Instructions
Hold down the ‘Standby button’ button for 3 seconds to enter MP4 mode.
The following screen should be displayed (or similar):
10
www.adapt-mobile.com
MP4 Key Functions
MENU: Key interface to access files or press to go back to previous menu
VOL+ : V+ volume up (Max 32)
VOL+ : V- volume down (Min 0)
: Select next track or hold to fast forward
: Select previous track or hold to fast reverse
: Play and Pause or hold to enter sub-menu.
Power on, power off: pressed and held for over 3 seconds.
MP4 features
Explorer: Internal Media, Recorded List, All Audio Tracks, All Video Tracks, All
Image Files.
System Settings: System Setting, Desktop, Language, System Information.
Browsing Pictures: Browsing pictures one by one or Slide show or Thumbnail
(supports JPEG, BMP and GIF format).
Video Playback: Compatible with AVI, MPEG1, MPEG2, MPEG4 (CODEC update
available at www.adapt-mobile.com) 3G, WMV9/VC1, ASF, RM/RMVB and FLV
formats (must use software to compress the size of files to 640x480 before
playing).
Audio Playback: Compatible with MP3, WMA, WAV, APE, FLAC AAC/AAC+ and
MPEG1/2/2.5 formats.
11
www.adapt-mobile.com
Music
Photo
E-Book
Video
Explorer
Settings
Accessing the MP4 Menu
Please ensure there is no A/V input before starting up the MP4 player.
Press [Play] and hold for 3 seconds, blue LED will light up, this indicates MP4
is powered on and 3 seconds later the start up logo displays.
Press [MENU] key to access the Main Menu. You can then select one of the
following Sub-Menu Modes, by pressing [Play]
1. Music Mode
2. Video Mode
3. Photo Mode
4. eBook Mode
5. Explorer Mode
6. Settings Mode
12
www.adapt-mobile.com
MP4 Function Descriptions
1. Music Mode
A.
Switch on the player, then select Music Mode and press [Play] to enter
sub-menu, then select and press [Resume Play] and press [Play] to play the
music. Press to pause.
B. Select music:
: Select previous song
: Select next song
C. Volume Adjust: Press [VOL] key and
V+: Increase volume
V- : Decrease volume
D. Press / key over 1 second to do FR/FF function when playing the music.
E. After entering Music mode, short press [Play] and you can view the
following sub-menus:
Resume play, All Music, Artist, Album, Genre, My Favorite, Medialib Update
In Resume play option, when the play list is displayed:
Press
/
to select the music, then press [Play]
to start the playback.
When all songs (tracks) are displayed:
Press / key to select the song, then press [Play] to play.
When you press and hold [MENU] key, the following options will be displayed:
Repeat Mode—Repeat the selected song.
Play Mode—Shuffle songs, or play in order. Press / key to select.
MSEQ— Select: 3D, Bass IEQ . Press / key to select.
EQ Sel— Select: Normal, MSEQ, Rock, Pop, Classic, Bass, Jazz, User EQ. Press
/ key to select.
Display—Set the Lyrics, Freq Chart or Close.
13
www.adapt-mobile.com
You can also search songs by:
• Artist: View artist information.
• Album: View album information.
• Genre: View each genre.
2. Video Mode
Select [Video] mode and press [Play] to enter the menu.
Press / to enter the video play queue in order to select the video which
you want to play. Then press key to play the video file. When playing the
video, you can press / key to increase/decrease the volume, or press key
to pause or press [MENU] key to go back to the previous menu.
Note 1: The RM/RMVB video only supports the video file which is below
720x576.
Note 2: AVI video only supports the video file which is below 800x480..
Note 3: The bigger the video file is, the longer the video will take to start
playing. The size of the file must be changed/compressed
3. Photo Mode
From the Main Menu, select [Photo] mode and press
menu:
to enter the following
All Photos: You can view all image files. In this mode, you can press or key
to select a picture and then press [Play] to view the picture. You can press
and to view the next/previous picture.
Manual: To view picture one by one press /
key.
Thumbnail: You can view several pictures in one display. When browsing the
pictures, you can press / key to select next/previous picture, and press
play to view the picture.
You can press [MENU] key once to go back to the previous menu.
14
www.adapt-mobile.com
4. Explorer Mode
Select [Explorer Mode] and press [Play]
be displayed.
Press
/
key. The Explorer mode window will
to view related information about the following menu:
Internal Media, All Audio Tracks, All Video Tracks, All Image Files.
After selecting the sub-menu, press key once to enter and view the related
information. You can also press [Menu] key once to go back to the previous
menu.
In Internal Media mode you can view all files, including recorded files and
image files.
In All Audio Tracks mode you can only view audio files.
In All Video Tracks mode you can only view video files.
In All Image files mode you can view all image information.
5. Settings Mode
Select [Settings] mode and press to enter the menu:
Press / key to select next/previous item, and press key once to enter the
sub-menu.
You can press [Menu] key once to go back to the previous menu.
System Setting:
1: Upgrade: A dialog box will appear advising of any firmware upgrades
needed. If no upgrades are not needed it will exit the menu.
2: Restorable: A dialog box will appear advising whether you need to do a
factory reset due to an internal error. If not there will be no message here.
Desktop:
Under the setting menu, select Desktop, press
to enter, and then press /
to select Desktop 1, Desktop2, Desktop3, Desktop4, Desktop5, Desktop6,
Desktop7, Desktop8.
15
www.adapt-mobile.com
Language:
Under the settings menu, select Language, press
/ key to select the next/previous language.
Remote Control User Guide
Appearance
16
www.adapt-mobile.com
to enter, and then press
Key Functions and Usage
PWR: Power off. Click this button twice, fans will stop within 15sec.
Gamma:System provides three Gamma options : CINEMA/NORMAL/BRIGHT
MENU: Use this button to enter the main menu;
This button also can be used for returning to main menu when you are in the
submenu。
Main menu has two submenus as below:
DISPLAY:
Contrast
Brightness
Sharpness
Saturation
Tint
Colour temperature
Recall (Restore system default settings)
SYSTEM:
Language
OSD location (On Screen Display, adjustment)
Transparency (Adjust the display transparency of menu)
OSD timeout
Accessing Menus
To toggle between the main menus ‘DISPLAY’ or ‘SYSTEM’ press “Down” or
“UP”.
Accessing Sub-Menus
To select a submenu such as a Contrast, Brightness or other menu option, first
select main menu ‘DISPLAY’ or ‘SYSTEM’ by pressing “OK” then “Down” to
highlight the submenu. Press “OK” again to select the submenu.
17
www.adapt-mobile.com
Adjusting Display Settings
To adjust Contrast, Brightness, Saturation, Tint, and Color temperature
access the submenu and use “Vol +” and “Vol –“ to adjust. Use Recall
to return to factory settings
Adjusting System Menu Settings
Language To change language access the submenu and select the
appropriate language
OSD Location changes the location of the menu
Transparency changes the transparency of the menu
OSD Timeout sets the number of seconds that the menu stays on without
user input
NOTE: The Advanced Image Adjustment (AIA) menu is only accessible
while in MP4 mode or video input mode.
Mirror Image – The “R/L” button flips the image horizontally
Vertical Image Flip – The “U/D” button flips the image vertically
VOLUME ADJUSTMENT
The hardware volume adjustment can be accessed via the “VOL +” and
“VOL –“ buttons on the remote control. Please note that there is an
additional software volume adjustment available while playing videos.
MP4 PLAYER CONTROL
The “Menu”, Reverse, Forward, Play/Pause buttons function the same
as the MP4 player buttons found on the top of the projector. Please see
the MP4 player section for more information.
18
www.adapt-mobile.com
Troubleshooting
No power: Check AC adapter’s connection and confirm press PWR key
No sound: Check if volume is in a neutral position and if the headphone plug is
well connected. Corrupted media file may also cause static noise.
OSD Scrambled Code: Check if the right display language has been selected.
Failure of downloading media files: Check whether USB cable is in a healthy
condition and connected properly. Check if driver is installed correctly on the
computer. Check if there is enough free space. Try using another USB Port.
Pictures appear distorted: Check to make sure picture resolutions are correct.
Files larger than 640x480
are re-processed by the player which may cause distoration.
Media player has problems playing files or files are incompatible: Due to the
large variety of encoding methods, not all encoding methods
are supported by our media decoder. First check to make sure the file
resolution
is the appropriate size (no larger than 640x480). Second check to make sure
the
bit rate is not too high. We recommend using conversion utilities such as
FormatFactory freeware conversion software to obtain a better conforming
encoding of video files
File system/format problems occur while copying files from a Mac to the
onboard memory: Make sure the file system format used for the transfer is
FAT/FAT32.
Newer Macs should auto-detect the file system on the ADPP-305
Media Player is Frozen: On occasion some files will cause the player to crash.
Unplug / detach the battery and power source for a hard-reset.
Unable to connect to a computer/laptop: First check to make sure computer is
able to output a VGA signal. On some laptops this requires activating the VGA
output feature. If there is a signal, check to make sure the signal resolution is
not too high. The ADPP-305 supports up to 1280x720 video input but operates
best at 800x600.
19
www.adapt-mobile.com
Computer / Laptop output fuzzy or blurry: Check the focus adjustment. Check
to ensure that output is set to 800x600 – the native resolution of the ADPP-305
projector.
Unable to display PowerPoint slides: Save slides as a series of JPG images.
Animations will be lost.
Another option is to use an Apple Ipod or Microsoft Zunes to output
PowerPoint slides via third party software and a device specific AV cable.
My AV out device does not play through the projector: The ADPP-305 only
support SVGA output, on devices such as Apple iPHONE, but will not support
standard AV out devices like HTC Smartphone.
Important notice for remote control use
“MP4” button on the remote controller will not start or stop MP4, and can not
adjust the volume, for above operations, user must use the panel controls of
micro projector. Once entering MP4 mode, the controller can be used as
instructed in the manual.
Important notice for Projector use
1. If you need to use battery, please open the rear cover and insert the battery,
please ensure the battery is well connected
2. When you charge the battery, please use A/C adapter. If the battery has run
down, you need up to 6 hours for full charge, which will last 60~120 mins.
3. The battery duration may differ by usage, setting, fittings and volume.
4. For long term non usage, please ensure you charge the battery once every 3
months to avoid deep discharge, or take off the full charged battery and keep
it in a dry environment.
5. Battery life time maybe gradually consumed and reduced after long term
usage
6. For safety consideration, please DO NOT put the battery into water or fire.
7. Please use the projector in a normal environment, DO NOT use it in damp or
dusty places.
8. Please DO NOT throw or strike the projector to avoid damage of
components.
20
www.adapt-mobile.com
9. The performance of projection might be affected by original playing file,
such as pixel, volume. Please ensure the quality of the film on your laptop or
DVD player before assuming the ADPP -305 is defect
10. Adapt-Mobile Ltd is in no way responsible for media installed on the
device, any copyright abuse is down to the individual user of the projector not
the company producing it.
Thank you for purchasing an Adapt-Mobile Ltd product. We hope you enjoy
the Adapt experience, and we would appreciate any feedback you have. You
can write product questions and support to:
[email protected]
Adapt-Mobile Ltd
No.1 Liverpool St
London
EC2M 7QD
+44 (0)2079562119
www.adapt-mobile.com
21
www.adapt-mobile.com