1
MPX
User manual
We wish to save you time and money!
We can assure you that a thorough reading of this manual will
guarantee correct installation and safe use of the product described.
CONTENTS
General Features …………………………………………………………………………………………………………………………...2
1.
Main features of the multiplexed Master/Slave units..................................................................................................................... 3
2.
Models in the MPX series. ................................................................................................................................................................ 5
3.
Installation ......................................................................................................................................................................................... 6
3.1
Electrical connections ................................................................................................................................................................ 6
4.
User interface - Buttons and display................................................................................................................................................ 7
4.1
The LED display ........................................................................................................................................................................ 7
4.2
Operating indications ................................................................................................................................................................. 7
4.3
Keypad ....................................................................................................................................................................................... 7
5.
Configuration of the controllers....................................................................................................................................................... 9
5.1
Configuration of the controllers as Master or Slave:.................................................................................................................. 9
5.2
Selecting the principal operating parameters.............................................................................................................................. 9
5.3
Other important parameters...................................................................................................................................................... 10
5.4
Important parameters for all units (Master/Slave).................................................................................................................... 10
5.5
List of parameters to be checked during installation ................................................................................................................ 11
6.
Programming................................................................................................................................................................................... 12
6.1
Accessing the parameters ......................................................................................................................................................... 12
6.2
Modifying the parameters ........................................................................................................................................................ 12
6.3
Exiting the programming procedure......................................................................................................................................... 13
6.4
Manual reboot of the controllers .............................................................................................................................................. 13
7.
Programming by remote control ................................................................................................................................................... 14
7.1
Remote control layout .............................................................................................................................................................. 14
7.2
Introduction. ............................................................................................................................................................................. 14
7.3
Technical specifications ........................................................................................................................................................... 15
7.4
Description of the keypad ........................................................................................................................................................ 15
7.5
The PSW button and the command buttons. ............................................................................................................................ 16
7.6
How to use the remote control ................................................................................................................................................. 16
8.
Re-configuring a control with the default parameters................................................................................................................. 18
9.
The alarm log................................................................................................................................................................................... 19
10.
New local network functions...................................................................................................................................................... 20
10.1
Network defrost for multiplexed systems................................................................................................................................. 20
10.2
Remote alarm signals. .............................................................................................................................................................. 20
10.3
The network auxiliary relay. .................................................................................................................................................... 20
10.4
Configuring a network by “downloading” the parameters from the Master unit...................................................................... 20
10.5
Functions available to the RS485 serial supervisory system. ................................................................................................... 21
11.
DESCRIPTION OF THE CONFIGURATION PARAMETERS........................................................................................... 22
11.1
Configuration parameters ......................................................................................................................................................... 22
11.2
Parameter categories ................................................................................................................................................................ 22
11.3
The password ........................................................................................................................................................................... 22
11.4
/ = parameters for the management of the temperature probes................................................................................................. 23
11.5
r = parameters for temperature regulation ................................................................................................................................ 25
11.6
c = parameters for compressor management ............................................................................................................................ 27
11.7
d = Parameters for defrost management ................................................................................................................................... 30
11.8
A = parameters for alarm control ............................................................................................................................................. 33
11.9
Digital inputs and description of the interface commands for the supervisor........................................................................... 34
11.10
F = parameters for controlling the evaporator fans .............................................................................................................. 38
11.11
H = other settings................................................................................................................................................................. 39
12.
Operating states of the units ...................................................................................................................................................... 41
12.1
Sequence of the main phases.................................................................................................................................................... 41
13.
Alarms ......................................................................................................................................................................................... 42
13.1
Defective or incorrect operation............................................................................................................................................... 42
13.2
Description of the signals flashing on the display of the MPX ................................................................................................ 42
14.
Troubleshooting .......................................................................................................................................................................... 44
15.
Technical specifications.............................................................................................................................................................. 45
15.1
Technical characteristics: ......................................................................................................................................................... 45
15.2
Temperature/Resistance ratios for NTC thermistors ................................................................................................................ 46
15.3
View of the instrument ............................................................................................................................................................. 47
16.
WIRING DIAGRAMS ............................................................................................................................................................... 48
16.1
MPX contact rear view:............................................................................................................................................................ 48
17.
Summary of parameters............................................................................................................................................................. 49
General Features
The multiplexed Master/Slave units belong to the MPX Series for refrigeration, made up of microprocessor-controlled electronic
controllers with LED display, specifically designed for the management of refrigeration units. In this particular case the refrigeration
units may be stand-alone type or grouped together as multiplexed cabinets.
1. Main features of the multiplexed Master/Slave units
Power supply
12V alternating current
Soft touch keypad
The aesthetics of the MPX Series have been designed to blend harmoniously with the new lines of the refrigeration units. In the MPX
Series, special attention has been paid to the “ergonomic" aspect. In this way, the modification of parameters and the setting of the
more common functions can be done by simply pressing only one button at a time, simplifying the use of the instruments.
New rear connections
The rear connectors have been redesigned to make the instrument effectively a plug & play unit.
LED Display
The LED display shows two and half digits with a range from -55÷+95ºC; the temperature value appears with one decimal point
(which can be omitted via the setting of the relative parameter) in the range from -19.9 to +19.9°C. In addition, depending on the
model, up to 4 LEDs are available for signalling the active “actuators”.
Buzzer
All controls come complete with an alarm buzzer upon request.
LAN
The multiplexed Master/Slave units can operate both in Stand Alone mode and connected together in a network for the management
of multiplexed refrigeration cabinets. The unit configured as the Master in this case synchronises the defrost of all the slave cabinets.
The individual units, on start-up, can be configured either as Master or as Slave. The LAN is set-up using a half-duplex two-lead
serial interface, which allows up to 6 units to be connected together (1 Master + 5 Slave).
Alarm log
Each individual unit features a log with a maximum of 9 alarms: each new alarm is recorded in the log where it can be consulted by
the user.
RTC
Some models are fitted with RTC (battery backup) and allow the management of the defrosts at pre-set times. Up to 8 defrost times
can be set during a day (24 hours). In the models where RTC is not featured, the defrosts can in any case be performed cyclically or
manually .
Third probe
Used for measuring the temperature in the hot point of the refrigerated cabinet, this can be displayed as a frequent parameter, and
corresponds to new parameter “dA”. Probe 3, on a stand alone instrument, may also be used to manage the defrost on a second
evaporator.
Duty setting
A completely new function allows the compressor to run even if the regulation probe is damaged. In the case of a short-circuit or
open-circuit probe, the compressor is instructed to start on the basis of time-intervals (minutes) selected using the 'duty setting'
parameter ('c4') and to turn OFF every 15 minutes (fixed time-interval).
Multifunction input
The multiplexed units are fitted with three digital inputs, which can be configured by setting parameters A4, A5 and A8 respectively.
Two of these are physical, that is, relate to an electrical contact (parameters A4, A5), while one is related to the LAN (parameter A8),
for the Slave models, or to the RS-485 serial interface for the Master models fitted with RS-485 serial interface. These inputs can be
used to enable/disable defrost, to manage serious alarms that require the immediate (e.g. high pressure) or delayed (e.g. low pressure)
shut-down of the unit, or for remote control by the Master models and/or a supervisory system.
Cod. +030220191 rel. 2.0 dated
25/06/01
3
Multifunction output
A fourth relay is present to remote the alarm signal or to control the On/Off command of accessory devices. If the FAN relay is not
used to control the fans it can be used as an auxiliary relay; in this case the fourth relay can be used as an alarm relay.
Continuous cycle
This function operates the ON routines of the compressor for a time 't', selected via a specific parameter. This is particularly useful
when a rapid drop in temperature is required.
Serial connection
Some Master models are fitted with a built-in RS-485 serial interface, which allows them to be connected to a supervisory system.
These units can therefore act as a gateway between the supervisory system and the local multiplexed sub-network they are part of.
Dimensions
Even the most sophisticated model has standard dimensions. The dimensions required on the panel are in fact 71x29 mm.
Index of protection
In the MPX series the 'O-RING' inside the front panel and the material used for the keypad ensure the controller IP65 index of
protection. In addition, a flat gasket is supplied as standard in order to increase the index of protection of the panel the instrument is
mounted on.
Fastening the unit
The unit is fastened using a compact, quick-fit plastic fastening bracket. This allows the instrument to be mounted on the panel
without requiring the use of screws.
Test in circuit
The instruments in the MPX series are the result of the most advanced SMD technology. All controls are built using high quality
components. Quality control includes a rigorous 'TEST-IN-CIRCUIT' on each single component to ensure that the controller is
completely reliable.
NTC probe
The MPX instruments have been designed to be connected to Carel NTC probes, as these offer greater precision than other probe
types.
Watchdog
A special device that protects the microprocessor of the controller even in the event of strong electromagnetic noise. In the case of
abnormal conditions, the watchdog restores the initial operating status of the unit.
Immunity against noise
The devices conform to EU standards on electromagnetic compatibility.
& ISO9001 Approvals
The quality and safety of the MPX series are assured by the ISO 9001 design and production certification, as well as the CE Mark.
Cod. +030220191 rel. 2.0 dated
25/06/01
4
2. Models in the MPX series.
The models in the MPX series have different codes according to their features. The table below lists the various codes and the
corresponding options that characterise each model:
OPTIONS
MODEL CODE
SPC
IRMPX00000
IRMPX0M000
IRMPX0A000
IRMPX10000
IRMPX1M000
IRMPX1A000
IRMPXM0000
IRMPXMM000
IRMPXMA000
Cod. +030220191 rel. 2.0 dated
RS485
4 RELAY
IR
RTC
BUZZER
•
•
•
•
25/06/01
•
•
•
•
•
•
•
•
•
•
5
•
3. Installation
Actual installation:
1) insert the instrument into the previously-created opening;
2) fasten the instrument to the panel by sliding it onto the fastening bracket.
3) insert the rear connectors of the instrument into the corresponding pre-wired connectors
4) close the panel
5) connect the power and configure the operating parameters.
3.1 Electrical connections
Warning: Before performing electrical installation, read the instructions and take careful note of the diagrams on the following pages
(cap. 16). Remember that all safety devices necessary for correct operation must be fitted in advance.
To install the controllers, the following cables must be pre-wired to special connectors:
12-way connector: power, LAN communication channel, analogue probes, digital inputs.
14-way connector: relay outputs.
The IRMPX*M* models feature RS485 serial connection (using a special connector with removable terminals).
The RS485 connection is made to installations featuring a supervisory system. Once the connections have been pre-wired, the
controllers can be easily replaced without having to repeat the pre-installation operation described above.
Installation should be avoided in the following circumstances:
1. Relative humidity greater than 85%,
2. Heavy vibration or shocks,
3. Exposure to continuous water sprays,
4. Exposure to corrosive or pollutant gases (e.g. sulphur or ammonia fumes, saline mist, smoke) so as to avoid corrosion and
oxidisation,
5. Strong magnetic and/or radio interference (therefore installation of the unit near transmitter aerials should be avoided),
6. Exposure of controls to direct solar radiation and other climatic elements.
The following warnings must be heeded when making the connections during the pre-installation of the controllers:
1. Connecting a power supply of the incorrect voltage can seriously damage the system.
2. So as to avoid any possible electro-magnetic interference, separate as far as possible the signal leads from the probes and the digital
inputs, from the induction and power leads. Do not place power leads and probe leads in the same channels. Furthermore, avoid placing
probe leads in the immediate vicinity of powered components (thermo-magnetic contacts or others). Keep the probe leads as short as
possible and avoid sharing their routes with power leads. As defrost probes use only guaranteed IP67 sensors; place the probes with the
bulb in an upright position to assist the drainage of any condensation that may occur. Note that thermistor temperature probes (NTC or
PTC) have no polarity, and so the terminals may therefore be connected either way.
3. If connection to a supervisory network is featured, connect the shield of the RS485 channel to the 485 ground on the instrument.
4. The secondary side of transformers supplying the units must not be earthed. If it is necessary to connect to a transformer that has a
secondary earth, an insulating transformer must be installed in between.
5. If more than one control is connected to the same transformer, refer to the following wiring diagrams for details of the wiring
method.
Cod. +030220191 rel. 2.0 dated
25/06/01
6
4. User interface - Buttons and display
Each instrument features:
• 12Vac power supply;
• two and a half digit display;
• temperature display to the tenths;
• LED indicating the output state;
• 4 buttons for programming;
• buzzer (according to model)
PANEL-MOUNTED VERSION
10
5
6
fan
7
8
9
4.1 The LED display
The display shows temperature in the range -55 to 95ºC.
The temperature measured by the probe is displayed with decimal resolution, between -19.9 and +19.9.
It is possible to exclude the decimal point by modifying the value of parameter /6.
According to the function in progress, the display shows one of the following:
• in normal operation: temperature measured by the probe selected by parameter /7;
• in parameter selection phase: code of the parameter or the value associated to it;
• in the presence of an alarm condition: flashing code of the alarm detected alternated to detected temperature value.
4.2 Operating indications
On the display are some signal areas (see !, ", #, $, % and & in the figure). They indicate:
4
compressor operating;
4b
continuous cycle active;
5
fan operating;
fourth relay energised;
6
7
defrost in progress
8
decimal point;
4.3 Keypad
The buttons present on the front allow the following functions:
'
- goes to the next parameter;
- increases the value associated with the parameter;
activates/de-activates the auxiliary output
- resets the remote alarm signal (on Master unit)
- resets the remote alarm and failed download signal (on the Master)
if pressed together with button 1 :
- activates the continuous cycle
- on start-up, displays the identification code of the software version loaded on
the controller, preceded by a graphic symbol
if pressed for 5 seconds together with buttons 2 and 9:
- in normal operation resets the controller
Cod. +030220191 rel. 2.0 dated
25/06/01
-
7
(
- stops the audible alarm for 10 minutes(only if fitted);
if pressed for over 5 seconds:
- accesses the menu of the type “F” parameters (frequent);
if pressed for more than 5 seconds together with button 9:
- accesses the menu of the type 'C' parameters (configuration);
- accesses the alarm log via password ( = 44)
- activates the parameter download from the Master units, via password (=66)
if pressed at instrument start-up:
- activates the procedure for reloading the controller's default configuration
if pressed for 5 seconds together with buttons 1 and 9:
- in normal operation resets the controller
)
- displays and/or selects the SET-POINT;
- displays the value associated to the selected parameter;
if pressed for more than 5 seconds together with button 2:
- accesses the type “C” parameter menu (configuration);
- allows access to the unit-configuration “In” parameter as Master or Slave at
the Boot of the unit or immediately after its reset;
if pressed together with button10:
- on Master units starts a network defrost on the entire multiplexed island;
- on all units, if pressed during the start-up of the controller, resets the alarm log.
if pressed for 5 seconds together with buttons 1 and 2:
- in normal operation resets the controller
if pressed alone for 5 seconds during the probe test phase:
- accesses the manual probe calibration procedure (see calibration)
*
- resets the temperature alarms and restarts their monitoring;
- attempts to reload the parameters, if there is a configuration read error during
the start-up of instrument;
- passes from one parameter to the previous;
- decreases the value associated to the parameter;
if pressed for more than 5 seconds:
- activates a manual defrost;
if pressed together with button 1 (*):
- activates/deactivates the continuous cycle;
- on start-up displays the identification code of the software version loaded on
the controller, preceded by a graphic symbol
if pressed together with button 9:
- on Master units starts a network defrost on the entire multiplexed island;
- on all units, if pressed during the start-up of the controller, resets the alarm log.
(*) Note: to enable/disable the continuous cycle. press button 10 and button 1 and hold for 5 seconds.
Cod. +030220191 rel. 2.0 dated
25/06/01
8
5. Configuration of the controllers.
The multiplexed units are supplied ready for use. They have in fact been programmed using a default configuration so as to satisfy the
more common requirements. Programming is performed by assigning all the parameters the more-frequently required value. These
values are listed in the table of parameters at the end of the manual. If the user wants to maximise the operation of the controllers or
has other specific regulation needs, the value of the operating parameters can be modified. The following notes indicate the default
values and the parameters that are more frequently modified before starting to operate the unit.
5.1 Configuration of the controllers as Master or Slave:
• on start-up of the unit press the
and
buttons together for 5 seconds;
• the display shows the configuration parameter code “In”;
• press the
• press
• press the
reboot;
button to modify the value: 0 = Slave unit; 1 = Master unit;
again to temporarily confirm the new value and move onto the display of the parameter code;
button to save the new value and exit the Master or Slave configuration procedure; the unit will perform a software
NOTE: the controllers are Master or Slave as default depending on the model and its options:
all the models featuring RTC with battery backup and/or built-in RS485 interface are set as Master units.
5.2 Selecting the principal operating parameters
How to set the ambient set-point
The instrument is configured with a default set point of -10ºC. If this is not compatible with the required application it can be
modified as follows:
• press the
button for one second to display the value of the set-point; the previously set value will flash;
• increase or decrease the value of the set-point using the
• press the
and/or
buttons until the desired value is displayed;
button again to confirm the new value.
How to set the differential (regulator hysteresis)
The instrument is programmed with a differential of 2 degrees as default. If this is not compatible with the required application it can
be modified as follows:
press the
button for more than 5 seconds (in case of alarm, first silence the buzzer, if fitted);
• the display shows the code of the first modifiable parameter (/C);
• press the
• press
button or
button until the code “rd” is displayed;
to display the associated value;
• increase or decrease the value using the
• press
• press the
and/or
button until the desired value is displayed;
again to temporarily confirm the new value and move onto the display of the parameter code;
button to save the new value and exit the parameter modification procedure.
Cod. +030220191 rel. 2.0 dated
25/06/01
9
5.3 Other important parameters
LAN configuration parameters:
For the Master:
• parameter “Sn” (Slave number): from 1 to 5; number of Slaves in the LAN; during boot the display shows “uM” : unit-Master
• parameters for setting defrost times: “hx”, “mx”; x = 1, 2,... , 8: hours and minutes of defrost times; the tens of minutes can be set
(only if RTC is present)
• parameters “hh” and “mm” : current hour and minute (only if RTC is present)
For the Slaves:
• parameter “SA” (Slave address): address of the slave in the LAN; during machine boot, if configured as Slave, “uN” is displayed,
where N = SA (e.g.: u1, if the address of the Slave in the LAN is 1; SA = 1)
5.4 Important parameters for all units (Master/Slave)
As indicated, the instruments are factory-programmed to measure both the high and the low temperature alarm. The alarms set off the
internal buzzer, if fitted, and show a code on the display: HI for the high temperature, and LO for the low temperature.
The conditions that generate a temperature alarm are:
• high temperature alarm: the temperature measured by the ambient probe is above the set-point by a value greater than AH
(ambient temperature > set point +AH),
• low temperature alarm: the temperature measured by the ambient probe is below the set-point by a value greater than AL
(ambient temperature < set point -AL).
The default settings are AL= 4 and AH = 4, and any signalling of the alarm is delayed by 120 minutes (Ad=120). The value
associated to “Ad” in fact indicates the number of minutes of delay that the controller must wait before generating a temperature
alarm. Obviously, if during the set delay the temperature conditions return within the set limits (that is, within the ±4 degrees around
the set-point) no alarm is generated.
NOTE: during installation the unit may not reach a temperature within the range of ±4 degrees around the set-point within the set 120
minute delay, and so the temperature alarm will be activated. In this case, it is suggested to increase the delay by modifying parameter Ad.
DEFROST PARAMETERS
When using the unit to control defrost, check the following parameters before starting the unit:
dI: Interval between defrost cycles (without RTC or without programmed times)
Defrost cycles occur periodically, depending on the intervals (in hours) set using the parameter 'dI'. When the interval is 0 (dl=0), the defrost
cycle is never performed, unless it is forced via keypad (manual defrost), via the digital input (see parameter A4) or by a command form the
Master in a LAN. Temperature alarms are inhibited during defrosts.
If the parameter is set to a value other than the default value, the new value will be operative only after the successive defrost.
Def.: 8 (hours)
NOTE: even when cyclical defrosts are not expected to be used (for example, with RTC or otherwise), “dI” should not be set to 0,
but rather to a value that is higher than the maximum interval between two defrosts. This acts a safety function, as it ensures at least
one defrost is performed every “dI” hours even when, due to unforeseen anomalies, the programmed defrosts would normally not be
performed. This will not affect the normal performance of the programmed defrosts, as the timer associated to the value of “dI” will
be restarted at the end of each defrost.
dP: Maximum defrost time
The parameter dP determines the maximum duration of the defrost cycle, in minutes. This parameter represents the effective duration
of the defrost when d0 = 2 or d0 = 3. If this parameter is modified while a defrost is in progress, the new setting will not influence the
duration of the current defrost, but rather that of the successive defrost.
Def.: 30 minutes
d0: Type of defrost
Establishes the type of defrost:
0 = defrost by electrical heating element, 1 = defrost by hot gas, 2 = timed defrost by electrical heating element,
3 = timed defrost by hot gas;
Def.: d0=0, electrical heater defrost by temperature
Cod. +030220191 rel. 2.0 dated
25/06/01
10
dt: End defrost temperature
This parameter allows the end defrost temperature, as measured on the evaporator, to be set. In any case, the maximum defrost time is equal to
the value, in minutes, set for parameter dP. When the temperature measured by the defrost end probe is higher than the defrost end temperature
set by the user, the defrost cycle will not be performed, that is, only the following dripping and, if required, post-dripping phases will take place.
The use of the third probe as a defrost probe on a second evaporator allows an end defrost when both probes (S2 and S3) measure a temperature
above that set for parameter “dt”.
Def.: 4ºC
5.5 List of parameters to be checked during installation
Code
Sn
SA
rd
d0
dI
dt
Ad
F4
H0
H1
h1
m1
...
h8
m8
Parameter
Type
LAN PARAMETERS
Number of slaves (for the Master)
Address in the LAN (for the Slave)
CONTROL PARAMETERS
Control differential
DEFROST PARAMETERS
Type of defrost
Interval between defrost cycles
Defrost end temperature
ALARM PARAMETERS
Temperature alarm delay
FAN PARAMETERS
Fan relay used for the fans or as auxiliary
OTHER FUNCTIONS
RS485 serial address (only for Master with RS485)
Configuration of fourth relay (auxiliary and/or alarm)
DEFROST TIMES (only for Master with RTC)
Hour of the first defrost time able to be set
Minute of the first defrost time able to be set
Hour of the eighth defrost time able to be set
Minute of the eighth defrost time able to be set
Cod. +030220191 rel. 2.0 dated
25/06/01
11
Min
Max
UOM
Def
0
0
5
5
-
0
0
F
0.1
+19.9
°C/°F
2
C
F
F
0
0
-40
1
199
+199
flag
hours
°C/°F
0
8
4
C
0
+199
min
120
C
0
2
-
0
C
C
0
0
199
3
-
1
0
C
C
0
0
24
50
hours
min
24
0
C
C
0
0
24
50
hours
min
24
0
6. Programming
The microprocessor in the MPX instruments allows the configuration of the functions of the controller according to the application
requirements. To simplify this operation, we have divided the operating parameters into two main groups:
• frequently used parameters (indicated as 'F' parameters in the tables below);
• configuration parameters ('C'), protected by a code or password to prevent unauthorised access to the data.
The parameters are modifiable as follows:
• using the keypad on the front panel
• via LAN (download the parameters from the Master to its connected Slaves)
• if the relative options are available, from the RS485 serial network (using the Master as a protocol converter, the parameters can
be read from Supervisory system and written to Slave units which are not physically connected to the RS485 serial
communication channel).
To modify the parameters using the keypad on the front panel, proceed as described in the following paragraphs.
6.1 Accessing the parameters
To access the 'F' parameters:
for more than 5 seconds (in the case of an alarm condition, silence the buzzer first);
press the
the display shows the code of the first modifiable parameter (/C);
To access the 'C' parameters:
press the
and
the display shows 00;
buttons simultaneously for more than 5 seconds;
or
press either the
appears;
button until '22' (access password for the type “C” parameters)
confirm by pressing
;
the display shows the code of the first modifiable parameter, that is '/C'.
6.2 Modifying the parameters
Modifying parameters
After having displayed the first parameter, either 'C' or 'F', follow these instructions.
press either
press
or
until reaching the parameter whose value needs to be changed;
to display its current value;
increase or decrease its value using the
or
key until reaching the required value;
press
to temporarily save the new value and display the code of the parameter again;
• To modify the values of the other parameters, repeat all the operations from the ”modifying the parameters” paragraph.
Saving the new values:
Push the PRG button to save the new value/s and exit from the parameter modification procedure.
•
Cod. +030220191 rel. 2.0 dated
25/06/01
12
How to exit the procedure
How to save the new set values
•
Press
to save the new values and exit the procedure.
Important: press
to save the new values. In the case of power failure before
has been pressed, all changes will be lost.
6.3 Exiting the programming procedure
To exit the programming procedure without saving the changes, do not press any key for at least 60 seconds (TIME OUT). The
instrument will return to its normal operating mode.
6.4 Manual reboot of the controllers
The controllers can be manually rebooted at any time without disconnecting the power. This is done by pressing the
,
and
buttons together and holding them for 5 seconds.
This procedure may be useful if operating anomalies occur during the configuration / installation of the instrument, after having
changed some important configuration parameters, such as the configuration of the digital inputs.
Cod. +030220191 rel. 2.0 dated
25/06/01
13
7. Programming by remote control
(AVAILABLE FOR THE FOLLOWING MODELS: IRMPX0A000, IRMPX1A000, IRMPXMA000)
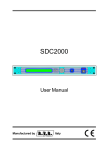
7.1 Remote control layout
Remote-local
interface
buttons:
PRG, SEL,
KEY_UP,
KEY_DOWN
(I)
(I)
Numeric
keypad
Fig. 1
(I): Function buttons; History, PSW, ESC, ENABLE.
7.2 Introduction.
The remote control for the IRMPX series has been designed to provide the user, in the palm of their hand, all the functions offered by
the MPX family instruments and its local network structure:
1. Remote programming of the individual instrument (direct access to the parameters and/or by entering password 22 on the remote
control);
2. Remote programming of a multiplex network, using the Master unit only, starting the “download” from the remote control;
3. Remote setting of the defrost times (only for models with RTC and configured as Master);
4. Remote setting of the current hour and minute current (only for models with RTC and configured as Master);
5. Direct access, by simply pressing one button, to the alarm logs;
6. Direct remote access to the local auxiliary relay;
7. Direct remote access to the network auxiliary relay, using the remote control on the Master unit;
8. Remote silencing of the buzzer (switching off the corresponding local alarm relay);
9. Remote starting of manual defrosts (local and/or network).
In implementing the user interface for the MPX remote control, the aim has been to provide harmonious expansion, that is, to offer
the user all the functions available on the local keypad, as well as some extra options (direct access to the parameters, the defrost
times, the alarm log, separate management of the network relay and local relay) that the local user interface does not have. The
available functions are accompanied by the following system security features aimed at protecting the user:
• No control configuration parameters can be modified by accident from the remote control.
• Each instrument has its own enabling code for the use of the remote control, set by parameter H3. When H3 is assigned a value
other than zero during the installation of the instruments, the use of the remote control is disabled as default. Only the START
procedure (see below) can access the functions of the remote control: in this case, the value saved for H3 acts as the access code.
• Assigning different H3 values for each instrument allows the same remote control to be used with different controllers.
•
The faulty pressing of buttons on the remote control for one minute disables the remote control, in which case the START
procedure is required before being able to use it again.
Cod. +030220191 rel. 2.0 dated
25/06/01
14
7.3 Technical specifications
Power supply
Case
Dimensions
Storage
Operating temperature
Type of transmission
Weight
2 alkaline batteries, 1.5V (type UM-4 AAA, IEC R03)
plastic
60x160x18mm
-25°C÷ +70°C
0°C÷ 50°C
Infrared
80 g (without batteries)
7.4 Description of the keypad
The buttons can be divided into the following groups, based on their functions,:
•
function buttons: to activate/deactivate the use of the remote control, to access the alarm log and for the password
entry prompt;
• pre-programmed buttons to modify the main parameters;
• pre-programmed buttons to send direct commands (activate aux relay, start defrost, etc.…);
• buttons that repeat the local keypad on the instrument.
When a button is pressed on the remote control, the LED above the decimal point on the main display of the instrument is turned on.
The LED will stay ON while the button is pressed on the remote control.
7.4.1 Function buttons
ENABLE
History
PSW
: accesses the procedure for enabling the use of the remote control.
: direct access to the alarm logs
: accesses the password entry prompt
ESC:
1) exits the parameter programming phase, without saving the modifications made (this option is not available on the local user
interface, where the parameter programming phase is exited by timeout);
2) ends a session (dialogue with an instrument) on the remote control.
NUMERIC KEYPAD: sets the enabling code for using the remote control. This code is recommended when more than one controller
is within the operating range of the remote control, as in the case of a series of controls installed in an electrical panel. Selecting a
different code for each instrument allows the remote control to interact with the required controller only. For the use of the buttons,
see the section “HOW TO USE THE REMOTE CONTROL”.
Buttons used to modify the main parameters (direct access buttons)
All type F parameters and “cc” and “Ad” parameters, type C, are directly accessible from the remote control, and their identification
code is shown next to the associated button. For the use of the buttons, see the section “HOW TO USE THE REMOTE CONTROL”.
7.4.2 Buttons for the remote control of the instrument’s keypad
The PRG,
,
, SEL buttons reproduce the functions of the controller’s local keypad on the remote control. The main functions
are summarised below for convenience:
SEL
displays the value of the selected parameter and accesses the set-point
1)
2)
3)
4)
passes from one parameter to the next;
increases the data on the display, when setting the value of the parameters;
scrolls the alarm log;
accesses the network auxiliary relay.
1)
2)
3)
4)
passes from one parameter to the previous;
decreases the data on the display, when setting the value of the parameters;
starts a local defrost;
scrolls the alarm log.
PRG:
1)
2)
3)
pressed for 5 sec accesses the type F parameters;
permanently saves the values of the modified parameters and exits the parameter programming mode;
silences the buzzer if activated when the controller is not in parameter programming mode.
Cod. +030220191 rel. 2.0 dated
25/06/01
15
7.5 The PSW button and the command buttons.
7.5.1 The PSW button: enter the system password from the remote control
Pressing the PSW button for at least 5 seconds accesses the enter prompt for the system password (see using the local keypad and
Table of parameters):
• 22 (C parameters);
• 44 (read log);
• 66 (start download procedure).
To enter a password from the remote control, proceed as follows:
• press PSW for at least 5 seconds;
• the password entry prompt will appear (00 blinking);
•
•
set the password using the arrow buttons,
press the SEL button to confirm.
and
, on the remote control;
7.5.2 Direct access to the alarm log
Pressing the HISTORY button allows direct access to the controller’s alarm log. The
and
buttons on the remote control
scroll the list of the saved alarms. To exit the display of the alarm log, press the PRG button. Access to the log is inhibited when the
instrument is in parameter programming mode. Similarly, access to the parameter programming mode is inhibited while the log is
displayed.
7.5.3 Command buttons:
•
•
•
•
•
•
Lan_Defr
CC_ON
CC_OFF
AUX_ON
AUX_OFF
: starts a network defrost (valid only on units configured as Master).
: starts the continuous cycle.
: stops the continuous cycle.
: switches on the local auxiliary relay.
: switches off the local auxiliary relay.
: toggles the network auxiliary relay (on/off).
7.6 How to use the remote control
7.6.1 ACCESS WITHOUT USING THE CODE (H3 = 0)
The ENABLE button is not required if H3 = 0. In this case, the remote control is always enabled.
7.6.2 ACCESS USING THE CODE (H3 ≠ 0)
How to set the access code: setting the code
The controllers are supplied by the manufacturer without the access code. To enter the code, modify parameter H3. Proceed as
follows:
• press PSW for at least 5 seconds;
• the controller will show the password entry prompt;
• enter the password 22, using the arrow buttons on the remote control;
• confirm by pressing the SEL button;
• press until parameter H3 is displayed on the controller;
• press SEL to display the value (00, default);
• use to set the required code (thus must be a value between 01 and 99);
• press SEL to confirm the new value and return to the display of parameter H3;
• press PRG to exit, saving the code.
Removing the code
Repeat the previous procedure, assigning the value 00 to H3. In this way, the remote control can be used without requiring the
access code.
Cod. +030220191 rel. 2.0 dated
25/06/01
16
7.6.3 ENABLING THE CONTROLLER FOR RECEIVING COMMANDS FROM THE REMOTE CONTROL
press the ENABLE button to enable the use of the remote control;
the instrument will display a two digit code (the value of parameter H3);
enter the code displayed using the numeric keypad on the remote control. The code must be entered correctly, without ignoring the
zeroes (e.g. if the display on the controller shows 05, type 0 then 5 on the remote control);
• If the code entered corresponds to the code shown on the instrument, full access is provided to the functions of the remote
control, and the controller enters parameter F programming mode: the code “/C” will be displayed, corresponding to the
parameter “ambient probe calibration”.
• If the code entered does not correspond to the code displayed, the controller will immediately exit the START procedure and will
ignore the pressing of any buttons on the remote control, other than the ENABLE button.
•
•
7.6.4 MODIFYING THE MAIN PARAMETERS
The buttons on the remote control used to modify the parameters (buttons labelled with codes), allow direct access to all type F
parameters (frequent) for the instrument, as well as type C (configuration) parameters “Ad” and “cc”. To access one of these, proceed
as follows:
•
•
•
•
•
•
•
•
press the button associated to the corresponding parameter;
the code of the parameter will blink on the display;
pressing the arrow buttons on the remote control scrolls the entire list of F parameters. The possibility of scrolling
the list of parameters is inhibited, for safety reasons, for direct access configuration parameters: cc, Ad, and defrost
times;
press the SEL button on the remote control to display the current value of the parameter;
press the arrow buttons to modify the value;
press the SEL button to temporarily confirm the value entered;
pressing PRG will permanently save the new value;
pressing the ESC button will exit the parameter programming mode without saving the changes.
7.6.5 Setting the clock (only for Master with RTC)
Press the hh button to set the hours and the mm button to set the minutes. Follow the same procedure as above.
7.6.6 MODIFYING THE DEFROST TIMES (only for Master with RTC):
Proceed as follows:
• press hh (for hours) / mm (for minutes);
• press a numeric button from 1 to 8 to select the required hours/minutes for the defrost being set;
• the display will show the fixed code hn / mn (n = 1, …, 8);
• press the SEL button on the remote control to display the current value of the parameter;
• press the arrow buttons to modify it;
• press the SEL button to temporarily confirm the value entered;
• pressing PRG will permanently save the new value;
• pressing the ESC button will exit the parameter programming mode without saving the changes.
When displaying the code associated to the hours or the minutes of any defrost time, pressing a button on the remote control numeric
keypad associated to a defrost time other than the one being displayed will access the associated defrost time.
Example: assume parameter “h8” (”m8”) is displayed, that is, the hours (minutes) associated to the eighth defrost time that can be
set. Pressing button 2 on the numeric keypad will show the code “h2” (”m2”), associated to the second defrost time that can be set.
Cod. +030220191 rel. 2.0 dated
25/06/01
17
8. Re-configuring a control with the default parameters
Under exceptional conditions − high electromagnetic noise levels, for example − there may be errors when storing data.
Consequently, the unit may not work correctly. When the microprocessor identifies an error in the process of storing data, one of the
following groups of letters will be displayed:
EA, EB, -EThe last symbol will only appear at the start-up of the instrument.
To reset correct operation a special RESET procedure must be followed.
This procedure is only to be performed in exceptional circumstances, as its possible causes are exceptional. Thanks to the RESET
procedure, it is almost always possible to reset correct operation. In any case it is useful to investigate the cause of this type of error to
be able to prevent it from occurring again. Special attention is drawn to the “Installation” chapter and the “Warnings” paragraph on
page 9 of this manual.
To reset the controller:
• disconnect power from the instrument or reset it manually by pressing the PRG & SEL & UP buttons together for 5 seconds;
• During the start-up / reboot of the instrument, press and hold the
• the display shows "
• hold the
button;
";
until the display shows the decimal point
• in this way the instrument indicates that it is accessing the default configuration parameters
• once the default configuration is reloaded, the instrument automatically performs a reboot
Important: after the RESET procedure the values of each single parameter will be the default values. Any modifications
made before the reset procedure will therefore be lost
Important note: given the delicate nature of this operation, the reset procedure must be carried out by specialised personnel. In any
case the procedure will not damage the instrument, but rather simply return it to the state in which it was purchased. Thus, if the
operating parameters have been incorrectly or randomly modified to the point where the controller no longer functions as desired, it
can be reset to its initial configuration.
If following the above-described procedure the “-E-” symbol remains during power-on, followed by the letters EB, press the
button until the letters disappear. If the EB error remains and the letters EA appear, the instrument must be replaced. If, on the other,
hand the letters disappear the controller can continue to be used. If the EB error occurs frequently and/or tends to persist, the
controller should be checked as its original specified precision can not be guaranteed.
Cod. +030220191 rel. 2.0 dated
25/06/01
18
9. The alarm log
All the models in the MPX Series are fitted with an alarm log that records up to until 9 alarm signals. The models configured as
Master and fitted with RTC also allow the display of the age of each alarm, that is, the time in hours elapsed between the moment in
which the log is consulted and the time the alarm was recorded.
Events recorded in the log:
The following anomalies are saved in the log:
• the high and low temperature alarms,
• the regulation probe error (probe S1 and/or probe S3 short-circuited and/or open)
• the defrost probe error, short-circuited and/or open
• the signalling of temperature defrost ended due to timeout (if enabled as alarm)
• the signalling of loss of communication to the LAN by a networked controller, both for Master and Slave units
Display of the log
The alarm log is accessed using a password, in the same way as the configuration parameters; the password used is 44.
Description of the alarm log
If the alarm log is empty the display shows three horizontal dashes; otherwise, the following information is displayed:
• the index of the position of the alarm in the log, preceded by a graphic symbol displayed in the highest value digit of the display;
• the alarm code
• the time elapsed in hours (only for units fitted with RTC and configured as Master) from the recording of the event.
For the Slave units, the graphic symbol “_ _” is displayed in the place of the time. The three displays appear in an alternating cycle.
The log is scrolled by pressing the arrow buttons:
•
to display the older alarms
•
for more recent alarms.
The size of the log is 9 events.
The alarms appear in the log according to the time of their recording.
At each new alarm event, the older alarms are pushed back in the list. If the log is full, the most recent alarm replaces the oldest event.
When an alarm event remains in the log for more than 199 hours its age is replaced by the symbol “_ _”.
NOTE: If the instrument loses its current time value (this may occur if the rechargeable backup battery fitted in the instruments with
RTC discharges), the display shows “tC”, and the age of all of the alarm events is replaced by the symbol “_ _”.
On instruments, whose serial number is = 23610, the display of the code “hE” indicates the accidental loss of the alarm log.
Exiting the display of the log
The display of the log is exited either by pressing the
button, or by not pressing any button for 60 seconds.
Deleting the log
The alarm log can be deleted in three ways:
• by carrying out a System Reset;
• on the start-up of the controller, pressing the
and
buttons together for 5 seconds.
• reconfiguring the controller from Master to Slave or vice-versa.
Cod. +030220191 rel. 2.0 dated
25/06/01
19
10. New local network functions
10.1 Network defrost for multiplexed systems
The Master controls the defrost in the entire multiplexed island (cabinet controlled by the Master + cabinets controlled by the Slaves).
This waits for all units to exit the actual defrost stage before sending the end defrost command to the entire network. The Slaves which
have exited the actual defrost stage, await the end defrost command from the Master before passing to the dripping stage. This waiting
status is identified on the display by the flashing of the “def” and “fan” LEDs. Once they receive the end defrost command, the Slaves
move onto the dripping phase. The actual defrost stage for each individual unit and for the network as a whole end in any case due to
timeout. The default end defrost timeout is 30 minutes. The network defrost, which is set to occur cyclically every 8 hours, may also be
started manually (pressing the “DEF” + ”SEL” buttons for 5 seconds) or at set times (if the RTC is present). The Master may control and
manage the network defrost cyclically, “manually”, by time or via its digital contact, even in operating conditions under which it cannot
perform a local defrost.
10.2 Remote alarm signals.
The unit configured as the Master in a multiplexed network may signal remote alarms present in the slave units, if this is enabled, by
setting the relative configuration parameter (parameter Ar = 1). All Master units are set to do this as default.
If the Master detects that a Slave unit is in alarm status (regulation probe error, defrost probe error, high/low temperature error, ...) the
display shows the signal “nX” (alternating with the display of the temperature), where X (= 1, 2, 3, ... 5), the sub-network address of
the Slave in question. Following this event, the alarm relay of the Master is activated, if configured to do so (parameter H1 = 1, or
parameter H1 = 2). This allows the use of just one alarm relay (that of the Master) in the multiplexed sub-network. The “nX” signal on
the Master may be inhibited for one minute by pressing
for 1 second.
10.3 The network auxiliary relay.
By default the fourth relay of an MPX unit is configured as the network auxiliary. In a multiplexed network, pressing the
button
on the Master propagates the action of the Master's auxiliary relay to all the Slaves with a relay (fan relay or fourth relay) that is
configured as an auxiliary (F4 = 2, or H1 = 3). The action of the Master's auxiliary relay is also propagated to the Slaves by a
variation (closing/opening of a contact) to the Master's digital inputs (see configuring the digital inputs: parameters A4, A5, A8)
EXAMPLE: in the case of the Curtain Switch, simply connect a switch to the second digital input of the Master (DIN2) so as to be
able to also turn on/off the lights on the refrigerated cabinets controlled by the Slave units (the Slaves must be set as F4 = 2, or H1 = 3).
10.4 Configuring a network by “downloading” the parameters from the Master unit.
A Master/Slave network is used to control the temperature of refrigerated cabinets with similar product types. As a consequence, the Master
and the Slaves must have the same values for the parameters such as the regulation set-point, the end defrost timeout, the end defrost
temperature, the interval between defrosts, the dripping time, etc. All the instruments in the MPX Series feature the possibility of manually
configuring just the Master unit, and then transferring the Master's configuration via network to the corresponding Slave units.
The following is a list of the parameters that can be transferred via LAN by the Master to the Slaves:
TABLE OF DOWNLOADABLE PARAMETERS.
CODE
St
/4
/5
/6
/7
/9
/A
rd
r1
r2
r3
r4
r5
r6
c0
c1
Cod. +030220191 rel. 2.0 dated
CAUSE
Regulation probe Set Point
Virtual probe (%)
Temperature unit of measure
Enable the use of the decimal point in the display of the temperature
Parameter for management of the repeater display and main display
Use third probe for defrost
Flag showing presence or not of defrost probe (defrost with virtual probe)
Control differential
Minimum set temperature allowed to the user
Maximum set temperature allowed to the user
Enable signalling of end defrost due to timeout
Variation in the daytime - night-time set-point and vice-versa
Enable Max and Min temperature monitoring
Enable night-time regulation with the third probe
Delay compressor start-up on controller power up
Minimum time between two successive compressor starts
25/06/01
20
CODE
c2
c3
c4
cc
c6
d0
dI
dt
dP
d4
d5
d6
dd
d8
d9
dC
A0
AH
AL
A6
A7
Ad
F0
F1
F2
F3
F4
Fd
CAUSE
Minimum compressor off time
Minimum compressor on time
Compressor on time in Duty Setting mode
Duration of continuous cycle
Exclusion time for low temperature alarm after continuous cycle
Type of defrost
Interval between defrosts
End defrost temperature
Maximum duration of one defrost
Defrost on instrument start-up (YES/NO)
Delay defrost on instrument start-up
No temperature display during defrost
Dripping time
Alarm exclusion time after defrost
Defrost priority over compressor protection
Choice of time base for cyclical defrost and the maximum defrost duration
Fan alarm differential
High temperature alarm upper band
Low temperature alarm lower band
Compressor on time in the case of Duty Setting from external alarm
Delay time in detecting digital input
Delay in measuring the high and low temperature alarms
Fan management (always on or subject to fan controller)
Fan set-point
Fans off when compressor off
Fans off during defrost
Config. fan relay as AUX if relay 4 is alarm
Fans off during post-dripping
How to perform a download:
To carry out a download, on the unit configured as Master use the same procedure as for accessing the configuration parameters, and
enter the password 66.
The lowest value digit on display of the Master will flash until the end of the download to all the Slave units.
Each Slave, after having been configured by the Master, will perform an auto-reboot.
At the end of the download the lowest value digit on the Master will automatically stop flashing.
Download failed signal:
The Master will display the failure of a download to a Slave by showing the signal (alternating with the temperature) “dX”, where X
= 1, 2, ..., 5, that is the value of the parameter “LA” of the Slave for which the operation of configuration via LAN failed.
10.5 Functions available to the RS485 serial supervisory system.
The MPX Series controls can easily be integrated into large supervisory networks by using the MPX models fitted with a built-in
RS485 serial interface. These models must be configured as the Master; the units to integrated must be configured as Slaves, with a
maximum of 5 for each Master, which has the function of interface to the RS485 network of the supervisory system. The structure of
the software in the MPX provides the supervisory system a number of powerful monitoring and control functions that can be
performed on the remote workstation (PC):
• Monitoring of the temperature measured by the three probes on each controller
• Monitoring of the status of the digital inputs of each instrument
• Monitoring of the alarms on all the controllers, including the Slaves, which are not directly connected to the RS485 serial
communication channel
• Reading and modification of the value of the parameters of each controller, including the Slaves, which are not directly connected
to the RS485 serial communication channel
• Remote control of the controllers’ actuators (light relay) for an entire locked-out multiplexed island
• Remote control of the light relays for each individual MPX unit
• Network defrost for a multiplexed island by Supervisory units
• Defrost of any remote unit belonging to a multiplexed island
• Switching OFF of any MPX by a Supervisory unit
• Activation of alarm signals and associated operating mode (Duty Setting) from the Supervisory system.
Cod. +030220191 rel. 2.0 dated
25/06/01
21
11. DESCRIPTION OF THE CONFIGURATION PARAMETERS
11.1 Configuration parameters
As already mentioned, (see chapter on how to modify the operating parameters), there are two types of parameter:
•
parameters used frequently (indicated by 'F' in the following tables)
•
configuration parameters (type C), which are protected by a password to prevent unwanted modification.
11.2 Parameter categories
Besides being divided into TYPES, the parameters are grouped into logical categories labelled by letters indicating their function. The
categories and their identifying letters are given below:
Category
Flashing 00
Description
Does not indicate a category, but merely that a password must be
entered in order to access the configuration parameters or the alarm log.
parameters corresponding to temperature probe;
parameters corresponding to temperature control;
parameters corresponding to compressor management;
parameters corresponding to defrost management;
parameters corresponding to alarm management;
parameters corresponding to evaporator fan management;
general parameter configuration;
/
r
C
d
A
F
H
11.3 The password
FLASHING PASSWORD:
This is a protective device that intentionally "complicates" access to Configuration parameters in order to prevent accidental changes
or any that might be made by unauthorised persons. Type C parameters are in fact those that alter the controller's configuration. Once
the configuration parameters have been entered via the use of the password, the system also allows the user to alter type F parameters
as required
and
The password request (flashing 00) appears when the two buttons
Access to type C parameters is gained as follows:
are pressed at the same time.
•
press
•
•
•
•
confirm using
;
the code of the first modifiable parameter is displayed, that is '/C'.
enter 44 as the password, if you wish to access the alarm log
enter 66 as the password on a Master unit if you wish to download the parameters from the Master to its Slaves, for the
configuration of a multiplexed island
or
to enter 22 or the correct password;
The following paragraphs describe all the parameters.
In addition, the default value (Def.), that is the value set in the factory, will also be indicated.
Cod. +030220191 rel. 2.0 dated
25/06/01
22
11.4 / = parameters for the management of the temperature probes
/
St
/C
/2
/3
/4
/5
/6
/7
/8
/9
/d
PROBE PARAMETER
Temperature set-point
Regulation probe calibration
Measurement stability
Probe reading rate
Virtual probe (between probe 1 and probe 3)
(0 = probe 1; 100 = probe 3)
°C/°F (0 = °C; 1 = °F)
Decimal point enabling (0 = No, 1 = Yes)
Display on main display and repeater
0 = repeater not present
1 = 3rd probe reading only on repeater
2 = 3rd probe reading also on main display
3 = virtual probe reading on the main display and defrost probe on
repeater
3rd probe calibration
Defrost with probe 3
1 = the defrost in temperature ends when the temperature measured
by probe 3 is >= the temperature set for parameter “dt”
Defrost probe calibration
Type
Max.
r2
+20
15
15
100
UOM
F
C
C
C
Min
r1
-20
1
1
0
°C/°F
°C/°F
-
Def.
-10.0
0.0
1
1
0
To LAN
C
C
0
0
1
1
flag
flag
0
0
•
C
0
3
flag
0
•
C
C
-20
0
+20
1
°C/°F
flag
0.0
0
•
C
-20
+20
°C/°F
0.0
New
•
•
•
Short descriptive note about probes with NTC- and PTC-type thermistors:
Units in the MPX series are designed to work with Carel NTC temperature probes, or probes using thermistors with a negative
characteristic (NTC stands for Negative Temperature Coefficient). This type of thermistor modifies an electrical parameter (its own
resistance) in inverse proportion to any change in temperature; that is, the resistance falls as the temperature rises, and vice versa.
Other types of thermistor are on the market. PTC thermistors are widely available, with a resistance of 985 Ohms at 25C. PTC stands
for Positive Temperature Coefficient; by contrast with the NTC, these increase their resistance directly as the temperature increases.
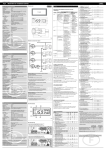
As can be seen in the diagram below, (the horizontal axis represents the operating range, the vertical axis the error), the NTC type of
probe shows greater accuracy than the PTC version. This is why the NTC probes have been adopted as standard.
Maximum variation of NTC and PTC temperature
probes from theoretically assumed values.
-30
-25
-20
-15
-10
-5
0
3
5
10
15
20
25
30
Tolerance of Carel NTC probe
2
1
0
-1
-2
-3
4 25ºC
Tolerance of PTC probe, 985 Ohms -at
/C: Calibration Offset for the ambient probe (probe S1)
The value assigned to this parameter is added to (if positive) or subtracted from (if negative) the temperature transmitted by the probe
S1. For example, to reduce the temperature displayed by 2.3 degrees, /C should be set to -2.3. The calibration offset can be varied
from -20 to +20 with precision to a tenth of a degree, from -19.9 to +19.9.
- Available on all models
- Default is 0.0, i.e. no offset is applied to the probe's reading.
Cod. +030220191 rel. 2.0 dated
25/06/01
23
/2: Stability of measurement
This parameter is used to control the stability with which the temperature is measured. Low values assigned to this parameter produce
a prompt response by the probe to variations in temperature; however, the display becomes correspondingly sensitive to changes.
High values slow down the response, causing less fluctuation and a more stable reading.
- Available on all models.
- Default value is 1.
/3: Probe reading speed
Establishes the maximum variation in the measurement of the temperature for each complete analogue input acquisition cycle. Small
values of this parameter restrict the variation in temperature within the short period, and thus reduce the unit's susceptibility to erratic
impulses
Note: When modifying both this parameter and the previous, operate in a consistent manner: that is, if /2 is increased, /3 should be
left unchanged or reduced. Vice-versa if /2 is decreased.
- Available on all models.
- Default value is 1.
/4: Virtual probe
Defines a fictitious probe, which does not exist physically, used for normal regulation operations. This parameter determines the
weighted average used to calculate the value of the virtual regulation probe based on the readings from the ambient probe (S1) and
probe S3 (cabinet hot point). The formula is the following:
virtual probe =
−
+
;
With a value of 0 the virtual probe coincides with the ambient probe; with a value of 100 the virtual probe coincides with probe 3.
- Parameter can be transferred via LAN from the Master to its connected Slaves.
- Available on all models
- Def.: 0.
/5: Selection of °F or °C
Defines the unit of measurement.
0 = for working in degrees Celsius,
1 = for working in degrees Fahrenheit.
When passing from one unit to another, the unit of measure for the set-point and the regulator differential are also automatically
changed.
- Parameter can be transferred via LAN from the Master to its connected Slaves.
- Available on all models
- Def.=0, operation in degrees Celsius.
/6: Decimal point
Allows the display of temperature with or without tenths of degrees ranging from -19.9 to +19.9.
0= data displayed with tenths of degrees;
1= data displayed without tenths of degrees.
- Parameter can be transferred via LAN from the Master to its connected Slaves.
- Available on all models
- Def.: 0, decimal point enabled.
/7: Reading on main display and repeater
Allows the selection of the readings on the repeater and the main display
0 = repeater not present; default value
1 = third probe reading on repeater
2 = third probe reading also on the main display
3 = second probe reading (defrost probe) on repeater
- Parameter can be transferred via LAN from the Master to its connected Slaves.
- Available on all models
- Def.: 0, external display not present.
/8: Calibration of the third probe (cabinet hot point)
The value assigned to this parameter is added to (positive value) or subtracted from (negative value) the temperature measured by
probe S3. For example, to reduce the temperature by 2.3 degrees /8 must be set to -2.3. The offset may range from -20 to +20, with
decimal precision between -19.9 and +19.9.
- Available on all models
- Def.: 0.0 (no offset to probe reading)
Cod. +030220191 rel. 2.0 dated
25/06/01
24
/9: defrost with probe 3
This parameter allows a defrost to be carried out using probes S2 and S3 together, if set to 1. In this case the temperature defrost ends
when the temperature measured by both probes is greater than or equal to that set as the end defrost temperature (See parameter “dt”).
Probe 3 can therefore be used as a defrost probe on a second evaporator.
- Parameter can be transferred via LAN from the Master to its connected Slaves.
- Available on all models
- Def.: 0. Temperature defrost with probe S2 only (one evaporator only)
/d: Calibration of the second probe (S2: defrost probe)
The value assigned to this parameter is added to (positive value) or subtracted from (negative value) the temperature measured by
probe S2. For example, to reduce the temperature by 2.3 degrees /8 must be set to -2.3. The offset may range from -20 to +20, with
decimal precision between -19.9 and +19.9.
- Available on all models
- Def.: 0.0 (no offset to probe reading)
/A: Presence of probes S2 and S3 (defrost and hot point)
The value of this parameter tells the instrument if the defrost probe (S2) and/or cabinet hot point probe (S3) are connected or not. The
possible values for this parameter are the following:
0 = defrost probe and third probe absent
1 = defrost probe absent and probe 3 present
2 = defrost probe present and probe 3 absent
3 = defrost probe and probe 3 both present
Examples:
I)
If probe S2 is not present set “/A = 0” or “/A = 1”. The instrument will in this way be informed that probe S2 has not been
wired during pre-installation and will use probe S1 to manage any temperature defrosts. The absence of probe S2 will not
generate any error signals.
II)
If probe S3 is not present set “/A = 0” or “/A = 2” : this will avoid the signalling of the “rE” regulation error due to the
detected disconnection of probe S3 (that is an error due to the malfunctioning of one of the two probes which together
determine the value of the virtual probe).
- Parameter can be transferred via LAN from the Master to its connected Slaves.
- Available on all models
- Def.: 3; probes S2 and S3 both present
11.5 r = parameters for temperature regulation
r
rd
r1
r2
r3
r4
r5
r6
rt
rH
rL
REGULATION PARAMETERS
Regulator differential (hysteresis)
Minimum set allowed to the user
Maximum set allowed to the user
Ed alarm enabling (defrost interrupted for timeout)
0 = No, 1 = Yes
Automatic variation of the night-time set-point (curtain switch
closed)
Enable min. and max. temperature monitoring
Night-time variation with third probe
(1 = night with curtain lowered, regulation with probe 3;
0 = night regulation with the virtual probe)
Min. and max. temperature measuring interval
Max. temperature measured in the interval “rt”
Min temperature measured in the interval “rt”
Cod. +030220191 rel. 2.0 dated
25/06/01
Type
F
C
C
C
Min
0.1
-50
r1
0
Max.
+20
r2
+199
1
UOM
°C/°F
°C/°F
°C/°F
flag
Def.
2.0
-50
90
0
C
-20
+20
°C/°F
3.0
•
C
C
0
0
5
1
flag
flag
0
0
•
F
F
F
0
-
199
-
hours
°C/°F
°C/°F
-
25
To LAN
•
•
•
•
•
New
rd: Regulation delta
Sets the value of the differential, or hysteresis, used in regulating the temperature. A narrow differential, i.e. one with a low number,
ensures a temperature that differs little from the set-point (or optimal operating temperature), but one that requires the frequent
switching on and off of the main operating components (normally the compressor). It is possible to extend the life of the compressor
by appropriately setting the parameters to define the number of start-ups per hour and the minimum off period (see the Compressor
parameters).
In all MPX refrigeration units the differential is placed to the right of the set-point as indicated below (DIRECT operation):
Direct (freddo/cooling)
rd
on
attuatore
off
Set point
- Parameter can be transferred via LAN from the Master to its connected Slaves.
- Available on all models
- Def.: rd=2.0
r1: Minimum set allowed
This parameter establishes the minimum value that can be given to the set-point. Using this parameter prevents the user from setting a
set-point lower than the value assigned to r1
- Parameter can be transferred via LAN from the Master to its connected Slaves.
- Available on all models
- Def.: -50
r2: Maximum set allowed
This parameter establishes the maximum value accepted as a set-point. Use of this parameter prevents the user from setting a set-point
greater than the value assigned to r2
- Parameter can be transferred via LAN from the Master to its connected Slaves.
- Available on all models
- Def.: +90
r3 : enable signalling of end defrost for timeout
enables alarm “Ed”: defrost ended due to timeout.
0 = alarm disabled
1 = alarm enabled
- Parameter can be transferred via LAN from the Master to its connected Slaves.
- Available on all models
- Def.: 0
r4: set-point variation by digital input
automatic set-point variation by digital input: day/night set-point
The parameter r4 ranges from -20 to +20 degrees with decimal resolution. When configured, on the closing of a digital input the setpoint varies by the amount stored in parameter “r4”.
- Parameter can be transferred via LAN from the Master to its connected Slaves.
- Available on all models
- Def.: 3.0
r5: enable temperature monitoring (maximum and minimum)
Enables the monitoring of the max (“rH”) and min (“rL”) temperatures in the interval “rt” (max 199h).
r5
0
1
2
3
4
5
Enable min. and max. temperature monitoring
None
On probe S1
On probe S3 (only if /7 = 1)
None
On probe S1
On probe S3 (only if /7 = 1)
Temperature alarm monitoring (HI and LO)
On virtual probe
On virtual probe
On virtual probe
On probe S3
On probe S3
On probe S3
Monitoring begins when “r5” is assigned a value greater than or equal to 1.
Cod. +030220191 rel. 2.0 dated
25/06/01
26
To inhibit monitoring and/or reset the values recorded, set “r5” to 0. After 199 hours the measuring of the max. and min. temperatures
is halted, having reached the maximum monitoring time allowed by the instrument. Modify “r5” to perform monitoring again (first set
to 0 using the arrows and the SEL button and then to the required value between 1 and 5, again using the arrows and SEL. Press PRG
to save.).
In the event of blackouts, keypad resets or Off commands from digital input, monitoring will be reset and then start from zero when
the same conditions as described above are true.
- Parameter can be transferred via LAN from the Master to its connected Slaves.
- Available on all models.
- Def.: r5=0; temperature monitoring not enabled.
r6: night-time regulation with third probe
if regulation is performed using the night-time set-point, regulation can be selected using either the virtual probe or the third probe
only (cabinet hot point):
r6 = 1: night-time regulation using probe S3
r6 = 0: night-time regulation using the virtual probe
- Parameter can be transferred via LAN from the Master to its connected Slaves.
- Available on all models
- Def.: 0; regulation using virtual probe
rt: temperature monitoring time
once temperature monitoring has been enabled the time in hours from the start of the monitoring period is saved for this parameter.
- Available on all models
- Def.: - ;
rH: maximum temperature measured in time “rt”
once temperature monitoring has been enabled the maximum temperature measured from the start of the monitoring period is saved
for this parameter.
- Available on all models
- Def.: - ;
rL: minimum temperature measured in time “rt”
once temperature monitoring has been enabled the minimum temperature measured from the start of the monitoring period is saved
for this parameter.
- Available on all models
- Def.: -
11.6 c = parameters for compressor management
c
c0
c1
c2
c3
c4
cc
c6
COMPRESSOR PARAMETERS
Compressor start delay when the instrument is turned ON
Minimum time between two successive compressor starts
Minimum compressor off time
Minimum compressor on time
Relay safety (0 = compressor always OFF,
100 = compressor always ON)
Continuous cycle duration
Low temp. alarm exclusion-time after continuous cycle
Cod. +030220191 rel. 2.0 dated
25/06/01
Type
C
C
C
C
C
Min
0
0
0
0
0
Max.
15
15
15
15
100
UOM
min
min
min
min
min
Def.
0
0
0
0
0
C
C
0
0
15
15
hours
hours
4
2
27
To LAN
•
•
•
•
•
•
•
New
c0: Delay in switching on the compressor and fans (if controlled) after switching on the instrument
From when power is supplied to the controller, the start-up of the compressor is delayed by a time (in minutes) equal to the value
assigned a this parameter. This delay serves to protect the compressor from repeated start-ups when there are interruptions to the
power supply. For example, setting c0=6 the compressor will wait 6 minutes before starting from when power is supplied. In the case
of systems with more than one compressor, the parameter “c0” may also be used to prevent the simultaneous starts of the units. In this
case a different value of “c0” should be set for each compressor.
- Parameter can be transferred via LAN from the Master to its
connected Slaves.
- Available on all models
- Def.: c0=0 (no delay is set for the activation of the compressor following
the start-up of the instrument).
c1: Minimum time between two compressor starts
This sets the minimum time in minutes that must elapse between two starts of the compressor, independently of the temperature and
of the set-point. By setting this parameter it is possible to restrict the number of starts per hour. For example, if the greatest number of
starts permitted in an hour is 10, simply set c1=6.
- Parameter can be transferred via LAN from the Master to its
connected Slaves.
- Available on all models
- Def.: c1=0 (no minimum time is set between two start-ups)
c2: Minimum compressor OFF time
This sets the minimum time in minutes for which the compressor may remain inactive. The compressor will not be started if the
minimum time selected has not elapsed (c2). This parameter is useful for equalising pressure after switch-off in the case of
installations with hermetic and capillary compressors
- Parameter can be transferred via LAN from the Master to its connected
Slaves.
- Available on all models
- Def.: c2=0 (no minimum OFF time is set)
c3: Minimum compressor ON time
This sets the shortest period for which the compressor may operate. The compressor will not be switched off if it has not been on for
a time equivalent to the minimum selected
- Parameter can be transferred via LAN from the Master to its connected Slaves.
- Available on all models
- Def.: c3=0 (no minimum ON time is set)
Cod. +030220191 rel. 2.0 dated
25/06/01
28
c4: Duty setting or safety relay
If the “regulation error” alarm occurs (that is, probes S1 and/or S3 are short-circuited or disconnected) this parameter ensures the
operation of the compressor until of the elimination of the fault. As the compressor is unable to function based on the temperature
(because of the faulty probe), it is activated cyclically with an operating time ("ON time") in minutes equivalent to the value assigned
to c4 and a fixed OFF time of 15 minutes.
There are two values of c4 that produce special functions.
If c4=0, the compressor will remain permanently OFF in the case of a defective probe
if c4=100, the compressor will remain permanently ON, the 15-minute off-time being cancelled.
The following particular situations should also be considered:
if the regulation error occurs while the compressor is off, it is turned on (respecting the delays set by parameters “c1” and “c2”), and
remains on for a time equal to “c4”. This is called “duty setting” operation, which is signalled by the "COMP" LED that flashes
during compressor off period and stays on when the compressor is in operation. The fans continue to operate according to their
respective parameters (see F parameters). If the probe fault alarm is signalled while the compressor is operating, the compressor is
switched off (without regard to the minimum operating time which may have been selected under parameter c3), and remains off for
15 minutes; (the "COMP" LED flashes during this phase). After this, periodic operation commences according to the operating time
set under c4. If the probe fault alarm is signalled while the system is in defrost or in continuous cycle, control immediately exits from
the current state and duty setting starts. To re-activate the defrost or continuous cycle operation, a back-up operation can be
performed by modifying parameter “/A”, assigning it values 0 or 2 (third probe not present). If the error disappears, the machine
returns to normal operation (regulation). If the error persists even after this operation, the correct operation of both probes S1 and S3
must be checked by opening the panel and checking the electrical connections. Please keep in mind that, in the case of a regulation
error on a Master/Slave unit, neither manual defrosts nor continuous cycle can be performed. A Master which shows a regulation
error may, on the other hand, manage the defrosts of all its Slaves (network defrost).
- Parameter can be transferred via LAN from the Master to its connected Slaves.
- Available on all models
- Def.: 0 (compressor always off in the case of faulty ambient probe).
Cc: duration of the continuous cycle
The period in hours for which the compressor remains in operation so as to lower the temperature even below the set-point. If cc=0,
the continuous cycle is not activated. Control exits from continuous cycle mode when the period set under parameter cc has elapsed,
or when the minimum set temperature has been reached: (set-point - AL)
- Parameter can be transferred via LAN from the Master to its connected Slaves.
- Available on all models
- Def.: 4 (hours)
c6: Alarm cut-out after continuous cycle operation
The time, in hours, that the low temperature alarm is no longer monitored after a continuous cycle. In practice, if the temperature of
the refrigerated unit, following a continuous cycle, falls due to inertia below the minimum temperature (set-point - AL) the
monitoring of the relative alarm is delayed by the time c6. In theory, the persistence of the conditions for a low temperature alarm, at
the end of a continuous cycle, can be detected after a time equal to the sum of “c6” hh + “Ad ” mm (parameter “Ad”: delay in minutes
for the signalling of low/high temperature alarm). Please remember that at the minimum temperature (set-point - AL), the continuous
cycle is deactivated.
- Parameter can be transferred via LAN from the Master to its connected Slaves.
- Available on all models
- Def.: 2 (hours)
Cod. +030220191 rel. 2.0 dated
25/06/01
29
11.7 d = Parameters for defrost management
d
d0
dI
dt
dP
d4
d5
d6
dd
d8
d9
d/
dA
dC
DEFROST PARAMETERS
Defrost types
0 = electrical: ends by temperature and/or for timeout
1 = hot gas: ends by temperature and/or for timeout
2 = electrical: ends for timeout
3= hot gas: ends for timeout
Interval between two defrosts
(activated for defrosts without RTC)
Defrost end temperature
Maximum defrost time
Defrost when the instrument starts (0 = No, 1 = Yes)
Defrost delay when instrument starts or from digital input
Main display and repeater during defrost:
0 = No display block and the temperature alternates with the
“dF” symbols on both displays
1 = display is blocked on both displays
2 = “dF” on both displays 1
Type
C
Min
0
Max.
3
UOM
-
Def.
0
To LAN
•
F
0
199
hours
8
•
F
F
C
C
C
-50
1
0
0
0
+199
199
1
199
2
°C/°F
min
flag
min
flag
4
30
0
0
1
•
•
•
•
•
Dripping time after defrost
High temperature exclusion time after defrost and if ( A4 = 5, A5 =
5 or A8 = 5) alarm exclusion time from the opening of the door
Defrost priority over compressor protection (0 = No, 1 = Yes)
Defrost probe display (S2)
Third probe display (S3)
Time base for the intervals between defrosts and maximum
duration (dP) (0 = hours/mins; 1 = mins/secs )
F
F
0
0
15
15
min
hours
2
1
•
•
C
F
F
C
0
0
1
1
flag
°C/°F
°C/°F
flag
0
0
•
New
•
d0: Type of defrost
This parameter sets the type of defrost for units fitted with defrost relays:
0 = electrical heating element : ends at temperature and/or for timeout
1 = hot gas : ends at temperature and/or for timeout
2 = electrical heating element : ends for timeout
3= hot gas : ends for timeout
- Parameter can be transferred via LAN from the Master to its connected Slaves.
- Available on all models
- Def.: d0=0, electrical defrost, temperature end
dI: Interval between cyclical defrosts
The parameter “dI" manages the so-called "cyclical" defrosts for of each individual Master/Slave unit. These are controlled by a
timer, built-into the instrument, with a set value (in hours / minutes: see parameter “dC”) saved for parameter “dI”. This timer is reset
after each attempted defrost (including non-cyclical ones). If the time “dI” is set to 0 (dI=0) no cyclical defrosts are performed.
Cyclical defrosts may be local (that is, performed independently on the individual units), or network: after the time “dI” on a Master
with connected Slaves, the Master will manage a network defrost. During the defrost the temperature alarms are disabled.
Parameter can be transferred via LAN from the Master to its connected Slaves.
- Available on all models
- Def.: 8 hours
1 (*) Only the new repeaters with updated FW allow the display of the codes besides the temperature; the others, if d6 = 2, display only one fixed temperature.
30
Cod. +030220191 rel. 2.0 dated 25/06/01
dt: End defrost temperature set-point
This parameter allows the setting of the temperature of the evaporator at which the defrost is ended (the temperature of the evaporator is measured by
the defrost probe: probe 2). If at the start of a defrost (d0 = 0) the temperature measured by the defrost probe is greater than the set end defrost
temperature, the unit goes directly to the dripping phase (See further on, network defrost). In the case of malfunction of the defrost probe, the
controller will effect a defrost lasting for a period equivalent to the value set for dP. Thus if the end defrost set-point can not be reached, the defrost
will be interrupted after a maximum period equivalent to the value in minutes of dP, and the Ed error will be displayed (if r3 = 1) and will persist
until a defrost is “correctly” performed, that is, ends at the set temperature. In the case where probe S3 is used as a defrost probe on a second
evaporator, the temperature defrost ends when both probes, S2 and S3, measure a temperature above or equal to that set in parameter “dt”.
- Parameter can be transferred via LAN from the Master to its connected Slaves.
- Available on all models
- Def.: 4
dP: Maximum defrost duration
Determines the duration of the defrost in minutes (or seconds, see parameter dC) for timed defrost. In the case where, during a
temperature defrost, the end defrost temperature is not reached within the time “dP”, “dP” represents the maximum duration of the
defrost.
- Parameter can be transferred via LAN from the Master to its connected Slaves.
- Available on all models
- Def.: 30 minutes
d4: Defrost at power ON
Activates a defrost when the unit is switched on. Possible values are:
0 = no defrost on start-up of the units;
1 = defrost is effected on start-up.
Commanding a defrost when the unit is switched on can be useful in certain particular situations, for example if the installation suffers from
frequent blackouts. If there is a power failure, the internal clock that calculates the intervals between two defrosts will be set to zero. In extreme
cases, if the frequency of power failures is greater than the frequency of defrosts (for example, a power failure every 8 hours with a defrost
interval of 10 hours), the controller would never command a defrost. In such a situation, it is better to activate defrost at power on, especially if
defrost is set by temperature (evaporator probe) so as to avoid unnecessary defrosts or at least reduce the duration of such.
In the case of multi-unit installations, if defrost at power-on is chosen, when power is restored all the units may start defrosting at the same time,
and therefore the power supply will be overloaded. To avoid this, use parameter d5, which allows an initial delay in defrost; this delay obviously
has to set to a different value for each unit
- Parameter can be transferred via LAN from the Master to its connected Slaves.
- Available on all models
- Def.: d4=0, the instrument does not perform a defrost on start-up.
d5: Delay of defrost at power-on or start of Multi-function
This parameter sets the time that is to elapse between the controller power on and the start of defrost. When a digital input is used, either to start
a defrost (see parameter A4/A5/A8 =3) or to convey a defrost command from an external contact (see parameter A4/A5/A8 =4), this parameter
represents the delay between the defrost start command and its actual start. The digital input for defrost (see parameter A4/A5/A8) can be used
to carry out defrosts in real time. Simply connect a timer to the multifunction digital input (see parameter A4/A5). The defrost will be activated
when the timer contacts close. Where several units are connected to the same timer, use parameter d5 to delay the various defrosts, so as to avoid
overloading the power supply. Furthermore, to avoid unwanted defrosts being commanded by the unit's internal clock, parameter dI should be
set to 0 on all the units, and timed defrosts should be disabled on all units configured as Master and fitted with RTC (defrosts only from keypad
or from multi-function contact).
- Parameter can be transferred via LAN from the Master to its connected Slaves.
- Available on all models
- Def.: d5=0 (no delay in defrost from the start-up of the instrument or the activation of the multifunction input)
d6: Management of the instrument's display and the repeater during defrost
There are 3 options:
0=
Display not locked-out and temperature reading alternates with the symbol “dF” on both displays
1=
Both displays locked at the last value displayed before of the start of the defrost
2=
“dF” fixed on both displays
Readings normally return to both displays after the post-dripping phase (under normal regulation). Repeaters belonging to older
models do not manage the display of symbols; for these, d6 = 1 and d6 = 2 represent the same setting.
- Parameter can be transferred via LAN from the Master to its connected Slaves.
- Available on all models
- Def.: d6=1 (during defrost the last temperature measured before the start of the defrost remains on the display)
Cod. +030220191 rel. 2.0 dated
25/06/01
31
dd: Dripping time
This parameter makes it possible to shut down the compressor and the evaporator fans after a defrost, so as to speed up the dripping
from the evaporator. The value of the parameter indicates the minutes of shut-down. If dd=0, no dripping time is provided for, with
the result that the compressor will be re-activated immediately when defrost ends.
- Parameter can be transferred via LAN from the Master to its connected Slaves.
- Available on all models
- Def.: dd=2 minutes
d8: Period of alarm cut-out after defrost and/or open door
This indicates the time for which a high temperature alarm will be inhibited at the end of a defrost and/or after the door of a storeroom has been opened, in the case of the Multi-function input being connected to the door-switch (see parameter A4/A5).
- Parameter can be transferred via LAN from the Master to its connected Slaves.
- Available on all models
- Def: d8=1 hour of cut-out
d9: Defrost priority over compressor protection
This parameter cancels the compressor protection times (c1: minimum time between two successive start-ups, c2: minimum shutdown time and c3: minimum operating time) at the start of defrost.
0=
protection times are observed;
1=
protection times are not observed; defrost has greater priority and takes no account of the compressor timings.
As an example, this is useful for avoiding a delay in the hot gas defrost when the compressor has just stopped and has been restarted
with a minimum time between two starts. It must be remembered, however, that in this event the maximum number of compressor
starts per hour may not be observed.
- Parameter can be transferred via LAN from the Master to its connected Slaves.
- Available on all models
- Def.: d9=0 the defrost follows the compressor times (by default these are set to zero).
D/: Defrost probe reading
This parameter displays the value being read by the defrost probe, in the units where it is fitted. When the parameter d/ has been
selected, pressing
will not allow the value to be changed, but the value recorded by the defrost probe can be read.
- Available on all models
dA: Third probe reading
This parameter displays the value read by the defrost probe, where fitted. Once the parameter dA has been selected, pressing
does not allow the modification of the value but rather the reading of the temperature measured by the third probe (S3).
- Available on all models
dC: Time bases
Changes the units of measure used to count the times for parameters dI (interval between defrost) and dP (duration of defrost).
0 = dI is expressed in hours and dP in minutes;
1 = dI is expressed in minutes and dP in seconds.
The parameter dC=1 can be useful for quickly testing the defrost operation with reduced times.
It is however considered that if defrost requires the activation of the compressor (hot gas defrost) and the parameter d9=1, there may
be a risk of damaging the compressor by too many starts at short intervals.
The defrost cycle thus becomes the condensate discharge cycle, which needs to be started at short intervals (minutes) and for very
brief periods (seconds). Contact your Carel agent for further information.
- Parameter can be transferred via LAN from the Master to its connected Slaves.
- Available on all models
- Def.: dC=0, that is, defrost interval, in hours and dP, maximum defrost duration, in minutes.
Cod. +030220191 rel. 2.0 dated
25/06/01
32
11.8 A = parameters for alarm control
A
ALARM PARAMETERS
A0
AH
Fan and alarm differential
High temperature alarm: indicates the maximum variation from
the set-point. AH = 0 excludes the high temperature alarm
Low temperature alarm: indicates the maximum variation from
the set-point. AL = 0 excludes the low temperature alarm
Digital input no.1 configuration (*)
Digital input no.1 configuration (*)
Compressor stop (set Duty Setting from external alarm:
A4 = 1 or 2; a5 = 1 or 2); 0 = compressor always OFF
100 = compressor always ON
Detection delay time for the “delayed alarm” input (A4 = 2, or
A5 = 2)
Temperature alarm delay
Configuration of the instrument’s virtual digital input
Enable propagation via LAN of the second digital input on the
Master (1 = propagation, 0 = no propagation)
Enable remote alarm signals from Slaves on the Master (1 =
remote alarm signals enabled)
AL
A4
A5
A6
A7
Ad
A8
A9
Ar
Type
Min
Max.
UOM
Def.
To
LAN
•
•
C
F
0.1
0
+20
+199
°C/°F
°C/°F
2.0
4
F
0
+199
°C/°F
4
•
C
C
C
0
0
0
7
7
100
min
0
0
0
•
C
0
199
min
0
•
C
C
C
0
0
0
199
7
1
min
flag
120
0
1
•
C
0
1
flag
1
New
A0: Alarm and fan differentials
This parameter represents the differential used for activating the high and low temperature alarms (AL and AH − see the
diagram below) and for the control of the fans (see F parameters). In the case of the alarms, as can be seen from the
diagram, the value A0 contributes to determining the points at which the temperature alarms actually occur.
- Parameter can be transferred via LAN from the Master to its connected Slaves.
- Available on all models
allarme alta temperatura
- Def.: 2.0 degrees
allarme bassa temperatura
high temperature alarm
low temperature alarm
A0
A0
AL
AL
set point
AH: High temperature alarm
It allows the high temperature alarm to be set. The value of AH does not indicate the temperature at which the alarm is given, but
rather the maximum deviation allowed from the set-point (i.e. the requested operating temperature). Therefore:
High temperature alarm > (set point) + (value of AH)
Note that changing the set-point automatically changes the high temperature alarm, while the maximum deviation permitted remains
the same. The end of the alarm condition occurs when:
temperature <= (set point) + (value of AL) - (value of A0)
The end of the alarm condition automatically cancels the corresponding signal. The re-occurrence of the alarm condition returns the
instrument to monitor the condition itself.
- Parameter can be transferred via LAN from the Master to its connected Slaves.
- Available on all models
- Def.: AH=4
Cod. +030220191 rel. 2.0 dated
25/06/01
33
AL: Minimum temperature alarm
This parameter allows the low temperature alarm to be selected. The value of AL does not indicate the temperature at which the alarm
will sound, but rather the maximum deviation from the set-point (i.e. the requested operating temperature) that is permitted.
The low temperature alarm is given as follows:
Low temperature alarm < (set point) - (value of AL)
Note that changing the set-point automatically changes the temperature at which the low temperature alarm will be given, while the
maximum differential permitted (AL) remains as set. The end of the alarm condition occurs when:
temperature >= (set point) - (value of AL) + (value of A0)
The end of the alarm condition automatically cancels the corresponding signal. The re-occurrence of the alarm condition returns the
instrument to monitor the condition itself. It should be remembered that the low temperature alarm is also used in the continuous
cycle (see relative section). In fact, if the temperature falls to the level set for the alarm, the continuous cycle is automatically stopped,
even if the set period of time has not elapsed. The stopping of the cycle does not lead to any alarm signal.
- Parameter can be transferred via LAN from the Master to its connected Slaves.
- Available on all models
- Def.: AL=4
Ad: Temperature alarm delay
Indicates the delay in minutes before a registered deviation is signalled. The measuring of a temperature alarm condition leads to the
monitoring of the condition itself for a time equal to “Ad” minutes, after which, if the condition persists, the alarm is signalled. If
there is an end to the alarm condition within the period “Ad”, no alarm is signalled.
Setting a delay in signalling temperature alarms can help to avoid false alarms due to interference with the probe or situations lasting
only a limited time, such as briefly opening the door of a store-room.
Alarm delays do not affect two particular functions: defrost and continuous cycle. To delay any temperature alarms after these
functions, parameters d8 for defrost and c6 for continuous cycle must be set. Remember that temperature alarms are not generated
during defrost and continuous cycle operation.
- Parameter can be transferred via LAN from the Master to its connected Slaves.
- Available on all models
- Def.: Ad=120 (120 minutes' delay in signalling temperature alarms).
11.9 Digital inputs and description of the interface commands for the supervisor.
A4/ A5 / A8: Configuration of the Multi-function digital inputs
The instruments in the MPX Series are fitted with three digital inputs, which can be configured using parameters A4, A5, A8.
Parameters A4 and A5 configure the digital inputs DIN1 and DIN2, which are wired during pre-installation.
All units (both Master and Slave) can also manage, using an electrical analogy, a “third digital input”, known as the “virtual” input:
This input in the unit Slave is “physically" supported by the terminals in the LAN, while for the units configured as Masters and fitted
with RS 485 serial connection, it is supported by the signal terminals (+ and -) of the RS485.
In the case of a multiplexed network (Master + Slave), the virtual digital inputs for all the instruments are “wired” in parallel. The
virtual inputs of the Slave are served by the Master and that of the Master is served by the supervisory system. The physical input
DIN2 of the Master may also be "wired“ in parallel to the virtual inputs, by setting (on the Master unit) the parameter A9. In this case
the closing/opening of the physical contact DIN2 on the Master will be propagated to the “virtual digital” inputs on all the connected
Slave units (as by default happens for the Master's "virtual digital” input).
The parameter A8 configures the "virtual digital” input of a MPX.
Note that this is used only as an analogy: do not physically connect external switches to the LAN and RS485 inputs to access the
functions associated with the virtual digital input!!!
The following is a description of the functions for each value of A4/A5/A8:
A4/A5/A8 = 0: corresponding input not active
The Multifunction digital input is not used and is insensitive to variations (closing/opening) of any externally-connected contacts.
A4/A5/A8 = 1: input associated to immediate external alarm
It is possible to connect the digital input to an external alarm, which will request immediate intervention (for example a high pressure
or compressor temperature alarm). In particular, the alarm is registered when the contact is opened (normal operation being in the
closed state).
Activation of the alarm produces a display signal (see alarm A1), the sounding of the buzzer, if fitted, and initiates the following
actions:
compressor:
works in Duty Setting; the “ON” times are, however, determined by the parameter “A6” and
not by the parameter “c4”, as in the case of a regulation error.
fan:
continues to work according to fan parameters (F). If the external alarm is registered during defrost or a continuous
cycle, control exits from the procedure.
Cod. +030220191 rel. 2.0 dated
25/06/01
34
When the alarm ceases the unit resumes normal temperature control operation.
WARNING: If A8 = 1 the alarm can be activated by a specific command from the supervisory system (if the latter exploits the
functions supplied by the MPXs) or, on Slave units where A8 = 1, by the opening of the digital input DIN2 on the Master.
Important note: it should be remembered that to guarantee the safety of the unit in the case of serious alarms, the unit itself must
always be fitted with all the electro-mechanical safety devices needed to ensure correct operation.
A4/A5/A8 = 2: input associated to delayed external alarm
The significance, connection and operating mode are similar to those already indicated for the parameter A4=1. However, when
A4=2 it is possible to delay the alarm signal for a period in minutes equivalent to value chosen for A7. After the set delay period, the
effects on the compressor, fans, defrost and continuous cycle are the same as when A4/A5/A8=1.
A4/A5/A8 = 3: input associated to defrost activation
An external contact can be connected to the multi-function input to prepare for or to inhibit defrost. When the contact is open, defrost is
inhibited, and when closed, defrost is possible. If the contact is closed, yet no defrost is requested, the defrost is obviously not performed. If
the contact is closed and a defrost is in progress, the opening of the digital input will end the current defrost, while successive defrosts will
be inhibited, until the next closing of the same digital contact. This function is useful, for example, with refrigerated cabinets fitted with hot
gas defrost. With these installations it is necessary to defrost an "island" at a time, so at any one moment, some islands will be enabled for
defrost and others inhibited. Another use for this function is to inhibit defrost of those units open to the public during shopping hours.
ATTENTION: If A8 = 3 the defrost of a unit can be enabled/disabled by a command from the supervisory system (if the latter exploits
the functions supplied by the MPXs) or by the closing/opening of digital input DIN2 on the Master (if A9 = 1 on the Master). In this
way, using only the DIN2 digital contact on the Master, the defrost of an entire multiplexed sub-network (Master + connected Slaves)
can be enabled/disabled, or only of those units in the sub-network where A8 = 3.
NOTE: the enabling/disabling of defrost by digital contact is local for all units; a Master, with A4/A5/A8 = 3 and with its
corresponding digital input open, cannot defrost locally, while it may command the defrosts of its connected Slaves (manual, cyclical
or timed defrost: the latter option is only available on models fitted with RTC)
A4/A5/A8 = 4: input associated to defrost by contact
This function allows the defrost to be activated by an external contact. If the defrost is activated by an external contact, all the type
“d” parameters selected remain valid. In particular, it may be useful to set dI=0 and inhibit defrosts by RTC (on Master units fitted
with RTC) if manual defrosts, or by external contact only are desired. This function is useful for performing real time defrosts. To
do this, simply connect a mechanical or electronic timer to the digital input. When the contact of the timer switches from open to
closed, the request for defrost is activated. As mentioned in the description of parameter d5, more than one unit can be connected to
the same timer. By selecting a different value of d5 for each unit, simultaneous defrosts can be avoided.
NOTE: in the case of a Master with connected Slaves, on the closing of its digital contact a network defrost will be performed, even
when a local defrost cannot be performed.
ATTENTION: If A8 = 4 on Master unit with connected Slaves, a network defrost can be performed by a command from the
supervisory system (if the latter exploits the functions supplied by the Master).
If A8 = 4 on one Slave a defrost can be performed by:
• a command from the supervisory system (if the latter exploits the functions supplied by the Master that the Slave is connected
to, and if the Master is fitted with built-in RS485 interface);
• the closing of the digital input DIN2 of the Master (if on the Master A9 = 1).
t
timer
defrost
dP(1)
d5(2)
unit 1
defrost
dP(2)
unit 2
defrost
d5(3)
dP(3)
unit 3
richiesta sbrinamento
defrost request
EXPLANATION:
t = impulse from timer to start defrost, the minimum duration must be 0.5 seconds
dP(1) = maximum duration of defrost, unit 1
d5(2) = external contact’s defrost delay for unit 2. This must be grater than dP (1) if two units are not to be defrosted at the same
time
Similarly for d5(3) and dP(3)
Cod. +030220191 rel. 2.0 dated
25/06/01
35
A4/A5/A8 = 5: Door Switch
Setting A4/A5/A8= 5 controls the switch on the store-room door. When the switch is opened the compressor and the fans are switched off
and the lights are switched on (if at least one of the two fan or AUX relays is configured as an auxiliary and is used as a light relay).
When the door is closed (as well as the Multifunction contact), the unit resumes the previous operation, delaying any temperature alarm
by a number of hours equivalent to the value of d8. If the door stays open for a time longer than d8, the display begins to flash and the
controller returns to normal operation, the same as before the door was opened. Specifically:
• if the controller was in Duty Setting it returns to Duty Setting mode;
• if the controller was in continuous cycle it returns to continuous cycle and the maximum time for the continuous cycle is extended
by the length of time the door was opened;
• if the controller was in defrost it remains in defrost;
On re-starting the compressor, however, any protective time constraints selected will be respected (see 'c' parameters).
Note: even if the fan is controlled by the fan controller (see category F), the fans will be shut down.
ATTENTION: the “Door Switch” algorithm can be activated on units where A8 = 5 by a command from the supervisory system (if
the latter exploits the functions supplied by the Master) or by the opening of the second digital input (DIN2) on the Master (if on the
Master A9=1)
A4/A5/A8 = 6: control off by digital contact
Contact closed = On ; contact open = Off
In “Off” status the controller displays the temperature alternating with the symbol “_ _”. It only displays the temperature, and does
not control the compressor or the fans, which are off, nor monitors for any alarms. In the case where the temperature displayed is
outside the limits of the instrument, the code “or” is displayed (out-of-range). The instrument ignores requests for defrost, continuous
cycle and Duty Setting. If the instrument in Off status is a Master with a sub-network of Slaves, this may still manage a network
defrost (even using another digital contact) and signal any alarms on remote units.
ATTENTION: machines where A8 = 6 can be placed in Off status by a command from the supervisory system (if the latter exploits
the functions supplied by the Master) or by the opening of the second digital input (DIN2) on the Master (if on the Master A9=1 and
if the machine is a Slave)
A4/A5/A8 = 7: automatic variation of the set-point by digital contact
Contact closed, night-time set-point; contact open, daytime set-point (set-point set by user interface using the SEL button).
For the night-time set-point; the value of the set-point is added to the value (with sign) of parameter “r4”. Thus the new set-point is:
Daytime set-point + “r4”
The switching-on of the lights is associated to the opening of the digital contact if the auxiliary relay is used as a light switch.
ATTENTION:
The daytime/night-time set-point can be modified by a command from the supervisory system and/or by the opening/closing of the second
digital input on the Master (DIN2) (if A9 = 1 on the Master unit), on all units where A8 = 7.
Practical example:
in a multiplexed sub-network, setting A8 = 7 on all units, simply connect the second digital input of the Master to a switch to be able
to manage the light relay and the variation of the set-point for all the controllers.
Summary of the programmable digital inputs: list of options
Value
A4/A5/A8
Meaning
0
1
2
3
4
input not active
immediate external alarm
external alarm with delay
enable defrost
start defrost
5
door switch
6
7
remote On/Off
curtain switch
Cod. +030220191 rel. 2.0 dated
25/06/01
Function
Contact open =alarm active
Contact open =alarm active. Delay: see parameter A7
Contact open =defrost not enabled
Defrost is activated when the contact closes. It can be used for real time defrost. Simply
connect the digital input to a clock with power back-up, select A4=4 (if the chosen input is
DIN1) or A5=4 (if the chosen input is DIN2). To exclude cyclical defrost automatically
activated by the controller, set dI=0.
Contact open =door open. When the door is open the compressor and the fan are turned off.
If H1=0, or H1 = 3, or F4 = 1, or F4 = 2, the auxiliary relay is activated to turn the light on.
If the door stays open for a time longer than d8, the display will begin to flash and the
controller will restart normal operation (compressor and fan ON, if required).
Contact closed= On. Contact open = Off
Contact closed = curtain down. If the input is selected as curtain switch, when the contact
closes the controller modifies the set point adding the value of parameter r4. With r4=3.0
(pre-programmed value), the set is increased by 3 degrees from the value used for the open
curtain. If the auxiliary output is used for the light switch (only for H1 = 0, or H1 = 3, or F4
= 1, or F4 = 2) the lowering of the curtain automatically switches off the light, while the
raising of the curtain switches it on.
36
A9: Enable the propagation via the LAN of the Master's second digital input
This parameter is accessible only for instruments configured as Master. It allows “parallel connection” to the virtual digital input on
the connected Slave units of the Master's second (physical) digital input DIN2. In this way, the second digital input of the Master may
be propagated or not to the Slaves.
1 = DIN2 can be propagated;
0 = DIN2 can not be propagated;
For Stand-Alone Master units, set the value of A9 to 0.
Def.: A9=1; Available on all models, if configured as Master
Some important warnings:
For correct management of the functions associated to the digital inputs, the values of A4, A5, A8 must be different from one another,
or else null. That is, when A4, A5, A8 have values other than zero, the following must be true: A4≠A5, A4≠A8, A5≠A8. By default
A4, A5, A8 are zero and, thus the corresponding inputs are not associated to any special functions.
Note: The configuration of a controller's digital inputs is carried out only during installation. It is good practice, after having
configured the controller's digital inputs, to carry out a manual reset (pressing the PRG SEL and UP buttons for 5 seconds) of the
controller. In the case of a multiplexed network, slaved, using the virtual digital input of the Master, to a supervisory system that
controls, for example, the synchronisation of the defrosts, the day/night set-point etc., the propagation of the second digital input of
the Master must be disabled, setting A9 = 0 from the supervisory system, before using the command interface that the Master offers
the Supervisor. This operation ensures the correct response of the multiplexed network to the commands from the supervisory system
and the synchronisation of the controllers to the same commands. Failure to heed this warning may lead to anomalies in the operation
of the controllers, both in stand-alone systems (i) and (ii) and in network systems (iii) !!!
A6: Compressor stop by external alarm
The function of this parameter is similar to that of parameter c4 (duty setting). As well as acting on the probe alarm, it acts on the
external alarm via the multi-function input (A4/A5/A8=1 or2). When an external alarm occurs (whether immediate or delayed), the
compressor works for a period equivalent to the value given to parameter A6 (in minutes), while remaining off for a fixed period of
15 minutes.
When given two particular values, A6 serves the following functions:
A6=0:
the compressor always remains off;
A6=100:
the compressor always remains on.
The fans continue to be controlled according to the selected parameters (see category F).
- Parameter can be transferred via LAN from the Master to its connected Slaves.
- Available on all models
- Def.: A6=0 (compressor off in the case of external alarm)
A7: Delay in signalling of external alarm (multi-function input)
Sets the delay (in minutes) in signalling the external alarm when A4/A5/A8=2.
- Parameter can be transferred via LAN from the Master to its connected Slaves.
- Available on all models
- Def.: A7=0
Ar: Enable Master for the signalling of alarms on remote Slave units.
The Master unit, if Ar = 1, can indicate the presence in its own sub-network of a Slave in alarm. If an alarm is activated on one Slave,
the Master displays the signal “nX”, alternating with the display of the temperature, where X is the address of the Slave in alarm (X =
1, ..., 5). If on the Master relay 4 is configured as an alarm relay (H1 = 1, or H1 = 2), the alarm relay of the Master is also activated.
- Available on all models, if configured as Master
- Def.: 1; Monitoring enabled
Cod. +030220191 rel. 2.0 dated
25/06/01
37
11.10 F = parameters for controlling the evaporator fans
F
F0
F1
F2
F3
F4
Fd
FAN PARAMETERS
Fan management:
0 = fan always ON (except in special cases: see parameters F2, F3, Fd)
1 = fans thermostat-controlled in accordance with the absolute set-point F1
Fan start absolute set-point - Active if F0 = 1
Fans OFF with compressor OFF (0 = No, 1 = Yes) - Active if F0 = 0
Fans OFF in defrost (0 = No, 1 = Yes) - Active if F0 = 0
FAN relay configuration as AUX relay (in this situation the fourth relay can be used
as an alarm relay by setting H1 = 1 or H1 = 2):
0 = the aux relay is the fourth relay
1= the aux relay is the fan relay (local relay)
2= the aux relay is the fan relay (network relay)
Fan off in post-dripping
Type
C
Min
0
Max.
1
UOM
flag
Def.
0
To LAN
F
C
C
-40
0
0
+50
1
1
°C/°F
flag
flag
5.0
1
1
•
C
0
2
flag
0
•
F
0
15
min.
1
•
New
•
•
•
The “F” parameters are available on the following models:
IRMPX10000, IRMPX1M000, IRMPX1A000, IRMPXM0000, IRMPXMM000, IRMPXMA000
F0: Fans managed by fan controller
The fans can be put under the control of the fan controller, which manages them according to the temperature measured by the defrost and
control probes. Alternatively, the fans can work constantly, with the possibility of switching them off when the compressor is off (see
parameter F2), during defrost (see parameter F3), during a dripping period (see parameter dd) and for a further post-dripping period (see
parameter F1). Values allowed for this parameter are:
F0 = 0 : in this case the fans are not subject to fan control, but to parameters F2, F3 and Fd.
F0 = 1 : the fans are subject to fan control (see parameter F1)
It should be remembered that if a dripping period has been provided for (dd not=0), the fans will be stopped in any case.
- Parameter can be transferred via LAN from the Master to its connected Slaves.
- Def.: F0=0, that is, not subject to fan control.
F1: (Absolute Set Point) Fan stop temperature (operative only when F0=1)
The fans are activated when the temperature on the evaporator is less than (F1 - A0).
The fans are turned off if the temperature on the evaporator is above the absolute set-point F1.
- Parameter can be transferred via LAN from the Master to its connected Slaves. - Def.: F1=5
F2: STOP fans when compressor idle (parameter operative only when F0=0).
Selects whether the fans should operate continuously (except F3, dd and Fd) or only when the compressor is working. If F0=1 the fans are
managed by the fan control and therefore are working or off according to the difference between evaporator and ambient temperatures,
irrespective of the state of the compressor.
F2=0 (=no):
Fans operate even if compressor is off.
F2=1 (=yes):
Fans are off when the compressor is off.
- Parameter can be transferred via LAN from the Master to its connected Slaves. - Def.: F2=1, fans off when compressor off
F3: Stop fans during defrost (parameter operative only when F0=0)
Selects whether the fans should operate during defrost. Inactive if the fans are managed by the fan control.
F3=0 (no):
fans work during defrost;
F3=1 (yes):
fans do not work during defrost.
Please remember that during the dripping waiting time (in the case of network defrost, if featured), the fans are always off.
- Parameter can be transferred via LAN from the Master to its connected Slaves. - Def.: F3=1, evaporator fans off during defrost.
F4: configuration of the fan relay as an auxiliary relay
This parameter allows the fan relay to be configured as an auxiliary (local or network) allowing the fourth relay to be used as an
alarm relay (H1 = 1 or H1 = 2). If F4 = 1 or F4 = 2, the interventions normally performed on the 4th relay are re-routed to the fan
relay, which acts as an auxiliary relay. If F4 = 1 the fan relay can only be managed locally; if F4 = 2 the fan relay may be commanded
via LAN, for example, by pressing the AUX button on a Master unit.
- Parameter can be transferred via LAN from the Master to its connected Slaves. - Def.: F4= 0.
Fd: fans off during post-dripping
The fans, after the defrost, can be stopped for a further period (in minutes) defined by the value of Fd. This is useful in allowing the
evaporator to return to the correct temperature after the defrost, thus avoiding forcing “hot” air into the refrigeration unit. In the case
of fan controller management, Fd does not need to be selected, in that the fan controller starts the fans only when the evaporator has
reached the correct temperature. If fan control is active (F0=1), on assigning Fd a value other than zero, the fans stay off for a period
equal to the value of Fd, irrespective of the temperature of the evaporator.
- Parameter can be transferred via LAN from the Master to its connected Slaves. - Def.: Fd= 1.
NOTE: Please remember that during the dripping time (dd) and post-dripping time (Fd), if set to a value other than zero, the fans will
in any case stay off, irrespective of the values assigned to parameters F0, F2 and F3.
Cod. +030220191 rel. 2.0 dated
25/06/01
38
11.11 H = other settings
/H
H0
H1
H2*
H3*
OTHER PRE-SETTINGS
Serial address (only for the network Master)
Relay 4 selection:
0 = auxiliary output
1 = alarm relay, normally open (closed in alarm)
2 = alarm relay, normally closed (open in alarm)
3 = auxiliary relay: Master serves the Slaves;
the action of the Master relay is transmitted via LAN to the
Slaves, the 4th relay of which is configured with H1 = 3
-
Type
C
C
Min
0
0
Max.
199
3
UOM
flag
Def.
0
3
To LAN
-
-
-
-
-
-
New
(*) not managed
H0: Serial address
Sets an address for the unit for connection to a supervisory or telemaintenance system. Also used for serial or network connection.
- Available only on models: IRMPX0M000, IRMPX1M000, IRMPXMM000
- Def.: H0 = 0
H1: Configuration of the fourth relay:
This parameter allows the fourth relay to be configured as a local or network auxiliary relay, or as an alarm relay; in this case the
parameter H1 also allows the selection of “rest” as the position of the alarm relay.
0 = auxiliary output
1 = alarm relay normally closed
2= alarm relay normally open
3= auxiliary relay: served by the master to the slaves; on the master the action of the relay is propagated via the LAN to the slaves,
where the 4th relay is configured using H1=3
- Available on models: IRMPX10000, IRMPX1M000, IRMPX1A000, IRMPXM0000, IRMPXMM000, IRMPXMA000
- Def.: H1 = 3 : the relay is configured as a network auxiliary
H2: Enable remote control
Enables or disables the use of the remote control for the instruments that feature this function.
H2 = 0, remote control enabled;
H2 = 1, remote control disabled.
- Available on models: IRMPX0A000, IRMPX1A000, IrmpxMA000, IRMPXMAC00
- Def.: H2=1
H3: Instrument identification code for programming by remote control
This parameter sets the code that enables the controller to receive the commands from the remote control. If there are a series of
instruments enabled for the use of the remote control, when pressing the “start” button on the remote control, all the instruments will
“respond”, waiting for the code from the remote control; this code thus allows the operator to identify and thus select which
instrument to operate on.
- Available on models: IRMPX0A000, IRMPX1A000, IrmpxMA000, IRMPXMAC00
- Def.: H3=0
Sn
SA
In
LAN PARAMETERS
Number of Slaves:
parameter accessible only on the Master units
(0 = LAN not present)
Slave address in the LAN
parameter accessible only on the Slave units
(0= LAN not present)
Configuration parameter of the single unit as Master
(In = 1) or Slave (In = 0)
Type
C
Min
0
Max.
5
UOM
-
Def.
0
C
0
5
-
0
IN
0
1
To LAN
New
Sn: Number of Slaves
This parameter informs the Master of the number of Slaves it must manage. It can be accessed using a password (22) and is used
during the installation of a network of Master and Slaves
- Available on all models, if configured as Master
- Def.: Sn = 0 : Master stand-alone
Cod. +030220191 rel. 2.0 dated
25/06/01
39
SA: Slave Address
This parameter is assigned to the Slave when it is installed in a multiplexed network managed by a Master. It is the address of the unit
in the network: the correct assigning of this number means the Master may communicate correctly with this unit.
- Available on all models, if configured as Slave
- Def.: SA = 0 : Slave stand-alone
Procedure for the installation of a multiplexed network:
1) Assign the value of Sn on the Master
2) Assign the value of SA on each Slave
Please heed the following warnings:
• During installation, check that in the multiplexed network the values of SA on the various units are different from one another.
• The value that may be assigned to SA must not be above the value of Sn on the Master, if the unit is to be correctly managed by
the latter.
• In a multiplexed network, only one unit can be configured as Master
In: Installation parameter
The value of this parameter configures the unit as Master or Slave; this can be accessed by pressing the PRG and SEL buttons
together for 5 seconds during the power on phase of the instrument, that is, when first 3 hyphens and then the identification code of
the unit as Master (uM) or slave u? (? = 1 ... 5: address of slave in the LAN) are displayed.
• In = 1: unit configured as Master
• In = 0: unit configured as Slave
- Available on all models
- The default for this parameter depends on the model of the instrument; see the second row of the following table for the default
values of the various models:
IRMPX00000
0
IRMPX0M000
1
IRMPX0A000
0
IRMPX10000
0
IRMPX1M000
1
IRMPX1A000
0
IRMPXM0000
1
IRMPXMM000
1
IRMPXMA000
1
IRMPXMB000
1
NOTE: in all models configured as Slave access is denied (even by password) to the following parameters: “H0”, “Sn”, “Ar”, “A9”,
the clock and the parameters for setting the defrost times; units configured as Slaves do not manage these !!!
hh
mm
h1
m1
h2
m2
--------h8
m8
RTC PARAMETERS (only on Master unit)
Current hour
Current minute
Hour of the first defrost
Minute (of hour h1 on the current day) when a defrost starts
Hour of the second defrost
Minute (of hour h2 on the current day) when a defrost starts
------------------------------------------------------------------------------------------------------------------------------------------------Hour of the eighth defrost
Minute (of hour h8 on the current day) when a defrost starts
Type Min
F
0
F
0
C
0
C
0
C
0
C
0
------- -------------- -------C
0
C
0
Max.
23
59
23
50
23
50
------------23
50
UOM
hours
min
hours
10 min
hours
10 min
----------hours
10 min
Def.
24
0
24
0
------24
0
To LAN
New
The RTC parameters are present on models:
IRMPXM0000, IRMPXMM000, IRMPXMA000, IRMPXMB000
hh, mm: current hour and minute
These can be set as for the "F"-type parameters. Setting the current hour and minute automatically cancels the signalling of an RTC
error: “tC”.
hX, mX: are respectively the hour and the minute set for the X-th defrost
If a defrost is required, for example, at 3:30 in the morning, set hX = 3 and mX = 30.
X = 1, 2, ... 8.
To inhibit defrost set hX = 24
The parameter mX can only be modified in steps of 10 min
Cod. +030220191 rel. 2.0 dated
25/06/01
40
12. Operating states of the units
As indicated above, the display LEDs can be in three states:
•
•
•
off, when the function indicated or the actuator is not operative;
on, when the function indicated or the actuator is operative;
flashing, when the function is held up by an alarm situation, by a delay, or by a particular status of the Multifunction input.
There are however various specific operating states not directly indicated by the displays. This can lead to erroneous interpretation of
the unit's operating state. For convenience, the status of the display in such situations is shown below:
SPECIFIC STATE
Between defrosts
Awaiting defrost
Defrost requested
Defrost in progress
Dripping
Post-dripping
Serious alarm
COMP LED
FAN LED
DEF LED
♦
♦
♦
♦
off
♦
♦
♦
♦
♦
♦
off
flashing
♦
off
off
flashing (1)
on
off
♦
♦
C. CYCLE
LED
♦
♦
♦
♦
♦
♦
♦
(1) Only if the defrost requested is inhibited by digital contact and if the request for defrost comes from the digital input; the defrost
is performed as soon as the enabling digital contact is closed.
signifies that the LED may be on, off or flashing depending on the other parameters and ambient factors (temperature,
♦
operating set, differential etc.). The general remarks made above on the status of the LEDs should be kept in mind.
12.1 Sequence of the main phases
For easy reference, below is a diagram showing the sequence of all the possible phases in the defrost process. It should be
remembered that some phases (e.g. dripping or post-dripping) can be activated or inhibited by an appropriate choice of parameters.
The type of activators being controlled and the type of control depend on the type and configuration of the units selected.
PHASE
normal
operation
ACTIVITY unit’s
temperature
controlled
defrost
evaporator
defrosted as
required
await
dripping
the defrost
relay is off,
while the
controller
awaits the
other units to
end defrost
dripping
post dripping
compressor and
evaporator fans
are off in order
to help drainage
of water after
defrost
fans are off to
allow the
evaporator to
reach operating
temperature
The sequence progresses from left to right.
Cod. +030220191 rel. 2.0 dated
25/06/01
41
resumption
normal op.
temperature
control
resumed
13. Alarms
13.1 Defective or incorrect operation
The units in the MPX range are able to signal most incorrect operations automatically. When a malfunction occurs, the
microprocessor initiates the following actions:
• the malfunction is signalled on the display by an appropriate alarm code. More specifically, the display shows the alarm code and
the temperature read by the probe, alternating in sequence.
• if more than one alarm occurs at the same time, these are signalled in sequence, alternating with the temperature.
• for some alarms an internal buzzer, if fitted, emits an audible warning.
• for these alarms, the AUX relay, where fitted and if configured as an alarm output, will be activated.
Pressing the
button silences the buzzer and de-energises the relay for 10 min, while the alarm code only disappears when the
corresponding cause is eliminated. The alarm codes are listed in the table below:
ALARM CODE
rE
E0
E1
E2
IA
dA
L0
HI
EA, Eb
Ed
dF
tC
MA
u’x’ (x= 1,...,5)
n’x’ (x= 1,...,5)
d’x’ (x= 1,...,5)
BUZZER and AUX Relay
active
inactive
inactive
inactive
active
active
active
active
inactive
inactive
inactive
inactive
active
active
active
inactive
CAUSE
regulation probe error
ambient probe error (S1)
defrost probe error (S2)
product probe error (S3)
immediate external alarm
delayed external alarm
low temperature alarm
high temperature alarm
data saving error
defrost end by time-out
defrost in progress
RTC invalid
Lost contact with the Master
Slave ‘x’ not communicating
Slave ’x’ in alarm
Download failed on Slave ‘x’
MODELS applicable
ALL
ALL
ALL
ALL
ALL, if external alarm connected
ALL, if external alarm connected
ALL
ALL
ALL
ALL
ALL
Masters with RTC
Slave units
Master units
Master units
Master units
13.2 Description of the signals flashing on the display of the MPX
rE FLASHING
Regulation probe error:
• Probe malfunction: the probe signal is interrupted or short-circuited;
• Probes not compatible with the instrument.
E0 or E1 or E2 FLASHING
Probe error (S1, S2 or S3 respectively)
• Probe not working because the signal is interrupted or there is a short circuit
• Probe not compatible with the unit
IA FLASHING
Immediate multi-function digital input alarm
• Check the multi-function input and parameters A4 and A5.
Ad FLASHING
Delayed multi-function digital input alarm
• Check the multi-function input and parameters A4, A5 and A7.
L0 FLASHING
Low temperature alarm. The probe has measured a temperature further below the set value than the value set for parameter AL.
• Check parameters AL, Ad and A0.
The alarm will cease as soon as the temperature returns within the set limits (see parameter AL).
Cod. +030220191 rel. 2.0 dated
25/06/01
42
HI FLASHING
High temperature alarm. The probe has measured a temperature further above the set value than the value set for parameter AH.
• Check parameters AH, Ad and A0.
• The alarm will cease as soon as the temperature returns within the set limits (see parameter AH).
EA, EB DISPLAYED DURING OPERATION OR WHEN SWITCHING-ON
Data acquisition error.
• See the section on “Procedure for re-configuring the controller with the default parameters”.
Ed FLASHING
The last defrost has stopped due to the expiry of the maximum time, rather than the end defrost set temperature being reached.
• Check parameters dt, dP and d4.
• Check the effectiveness of the defrost.
• If the next defrost ends due to temperature the signal will automatically disappear.
dF FLASHING
Defrost in progress.
• This is not an alarm signal but rather an indication that the unit is carrying out a defrost.
• Appears only if parameter d6=0 or d6 = 2.
“TC” FLASHING
RTC error on the units fitted with RTC and configured as Master:
• Set the hour and minutes on the user interface
“n1,… n5” FLASHING ON THE MASTER
Slave 1, …, 5 in local alarm:
• Press AUX to reset the alarm
“u1, … u5” FLASHING ON MASTER
Loss of communication with Slave 1, …, 5 for around 3 minutes:
• Check LAN electrical connections
“MA” FLASHING ON SLAVE
Loss of communication between the Slave and the Master for at least 1 minute.
The defrost will be performed in any case by the timer, which was reset to the value of parameter “dI” after the previous defrost.
• Check the electrical connections between the Slave and the LAN;
• The resetting of the network signals (both on the Master and the Slaves) occurs automatically as soon as communication is
restored between the Master and the Slave;
“d1, ..., d5” FLASHING ON THE MASTER
Failed parameter download on unit 1, ..., 5
• Check the wiring of the LAN
•
Press
for 5s to reset this signal.
NOTE: The alarms on the Slave that generate the alarm n”x” (x= 1,…,5) on the Master are:
HI, LO, dA, IA, and rE.
Cod. +030220191 rel. 2.0 dated
25/06/01
43
14. Troubleshooting
PROBLEM
compressor does not start :
• power on
• compressor LED flashing
temperature is outside set limits but no alarm
signalled and the buzzer, if fitted, does not
sound
the AL or Ad alarm signalled (Multi-function
input) without in fact being active
CAUSE
compressor delay in progress
CHECK
parameters c0, c1 and c2
alarm delay in progress
check Ad
Multi-function input generates alarm as power
goes on
check connection of input and
whether it is off in normal
operation
see whether A4/A5=1 or
A4/A5=2;
if A4/A5=1 check status of
digital input;
if A4/A5=2 check A7
parameter dP and dI
the alarm connected to Multi-function input is alarm delay operating or parameter programming
not signalled
error
• defrost cycle too short (dP)
• interval between defrosts dI=0: in this case the
defrost is not activated
• no defrost time set
manual defrost not activated and defrost LED compressor protection delays in progress
parameter d9 (select d9=1)
flashing
defrost not activated :
• contact open
• defrost LED off
high temperature alarm given after defrost
•
•
•
•
fans do not start
fan power on
compressor LED flashing
fan LED flashing
after changing a value, or programming, the
controller continues to work with old values
alarm delay after defrost too short or alarm
threshold too low
• compressor and fan delay selected
• if F0=1 (fans under fan control)
•
evaporator is warm: temperature can be read
by selecting parameter /d
• dripping is in progress
• a post dripping delay is in progress
• if F0=0
• F2=1 and compressor off
• dripping is in progress
• post-dripping shut-down
unit has not yet updated the new values, the
parameters have not been satisfactorily saved, by
pressing
continuous cycle is not activated
press
Cod. +030220191 rel. 2.0 dated
25/06/01
before
.
44
parameter d8 and AH and Ad
check c0
parameters F0, F1, Fd, dd
parameters F0, F2, dd and Fd
switch off the controller or
program parameters again
correctly
15. Technical specifications
15.1 Technical characteristics:
Probe type:
Operating field:
Precision :
Storage:
Operating conditions:
Power supply:
Power consumption:
Front panel index of protection:
Fastening:
Connections:
Classification according to protection against shock:
Number of automatic cycles for each automatic action:
Disconnection action type:
PTI of materials used for insulation:
Environmental pollution:
Heat and fire resistance category:
Software class and structure:
Safety device:
Display:
Light signals:
Audible signal:
Inputs:
multifunction digital inputs
Relay outputs (all):
Compressor:
Defrost:
Fan
Aux/alarm output:
RTC rechargeable backup battery:
Immunity to disturbance - electromagnetic compatibility
conforming to standards:
En50081- 2 (emission)
Conformity to safety standards for devices in l.v.:
Disposal of the product:
NTC Carel
-55°c - +95°c
± 0.5°C
-10°C/ 70°c
0°C/+50°c
12Vac
150mA
IP65 with panel mounted and gasket inserted
by bracket
Molex-type crimped connectors
should be integrated in class I or II devices
100,000
1B
250V
normal
D
class A
watch dog
2 and a half digits
compressor, continuous cycle, defrost, fan alarm/auxiliary output
buzzer (optional)
regulation probe, defrost probe, cabinet hot-point probe, two
type of action of the device 1C - nominal values of the 3a/250Vac relays
SPST relay, Imax = 3A res (2A), Vac max=250V
SPDT relay, Imax = 3A res (2A), Vac max = 250V
SPST relay, Imax = 3A res (2A), Vac max = 250V
SPST relay, Imax = 3 res (2A), Vac max = 250V
duration of charged battery at least 72 hours
The devices pass the EMC tests for general and
domestic environments (En50082- 2 (immunity)
En60730-1
do not dispose of the device as ordinary waste.
To dispose of the device refer to the environmental protection laws in
force in your country
(*) only on models with this function available
Note: the cables to be connected to the controller must be heat resistant (90°C)
Cod. +030220191 rel. 2.0 dated
25/06/01
45
15.2 Temperature/Resistance ratios for NTC thermistors
The temperature probes with NTC thermistors, normally featured on the MPX controllers, change resistance as the temperature
changes. Following is a description of the resistance values corresponding to various temperatures. In the case of malfunction or
inaccurate control, users can check the operation of the probes as follows:
•
with a standard thermometer to determine the temperature measured by the probe
•
with an ohmmeter measure the resistance at the head of the probe and compare it with the values in the table.
In view of the variation shown by thermistors, three resistance values are given in the table for each temperature.:
• Rstd = the typical resistance value at the temperature indicated;
• Rmin is the minimum value;
• Rmax is the maximum value.
For the sake of simplicity, the values corresponding to only a limited number of temperatures are given. Intermediate values can be
determined by interpolation.
Temperature/Resistance ratios for the Carel NTC temperature probe
Temperature
-40 ºC
-30 ºC
-20 ºC
-10 ºC
0 ºC
10 ºC
20ºC
30 ºC
40 ºC
50 ºC
60 ºC
70 ºC
80 ºC
90 ºC
Cod. +030220191 rel. 2.0 dated
Rmin
181.10 kΩ
107.50 kΩ
65.80 kΩ
41.43 kΩ
26.74 kΩ
17.67 kΩ
11.95 kΩ
8.21 kΩ
5.73 kΩ
4.08 kΩ
2.95 kΩ
2.17 kΩ
1.62 kΩ
1.22 kΩ
25/06/01
Rstd
188.40 kΩ
111.30 kΩ
67.74 kΩ
42.25 kΩ
27.28 kΩ
17.95 kΩ
12.09 kΩ
8.31 kΩ
5.82 kΩ
4.16 kΩ
3.02 kΩ
2.22 kΩ
1.66 kΩ
1.26 kΩ
46
Rmax
195.90 kΩ
115.10 kΩ
69.74 kΩ
43.50 kΩ
27.83 kΩ
18.24 kΩ
12.23 kΩ
8.41 kΩ
5.92 kΩ
4.24 kΩ
3.09 kΩ
2.28 kΩ
1.71 kΩ
1.30 kΩ
15.3 View of the instrument
Dimensions of the MPX in mm:
A
=
75
B
=
34
C
=
66
D
=
75
Cod. +030220191 rel. 2.0 dated
25/06/01
47
16. WIRING DIAGRAMS
Master/Slave connection wiring diagram:
Transformer
Transformer
Transformer
Transformer
(*) Insulating
transformer
Example of wiring for serial connection of the instruments:
Main = mains power supply
TRF = transformer
INS TRF = insulating transformer
= earth
SER = multiple connection to the controller system
16.1 MPX contact rear view:
Label of connections for the IRMPX10000 model (slave with 4 relays):
Label of connections for the IRMPXM0000 model (Master with 485):
Cod. +030220191 rel. 2.0 dated
25/06/01
48
17. Summary of parameters
PARAMETER
Type
Min.
Max.
UOM
Def.
To LAN2
New
C
C
C
00
00
00
199
199
199
-
22
44
66
Max.
r2
+20
15
15
100
UOM
F
C
C
C
Min.
r1
-20
1
1
0
°C/°F
°C/°F
-
Def.
-10.0
0.0
1
1
0
To LAN
New
C
C
0
0
1
1
flag
flag
0
0
•
C
0
3
flag
0
•
C
C
-20
0
+20
1
°C/°F
flag
0.0
0
•
•
PA
PASSWORD PARAMETERS
LOG PASSWORD
DOWNLOAD PASSWORD
/
St
/C
/2
/3
/4
PROBE PARAMETERS
Temperature set-point
Regulation probe calibration
Measurement stability
Probe reading rate
Virtual probe (between probe 1 and probe 3)
(0 = probe 1; 100 = probe 3)
°C/°F (0 = °C; 1 = °F)
Decimal point enabling (0 = No, 1 = Yes)
Display on main display and repeater
0 = repeater not present
1 = 3rd probe reading only on repeater
2 = 3rd probe reading also on main display
3 = virtual probe reading on the main display and defrost probe on
repeater
3rd probe calibration
Defrost with probe 3
1 = the defrost in temperature ends when the temperature measured
by probe 3 is >= the temperature set for parameter “dt”
Defrost probe calibration
Defrost probe present
0 = defrost probe and third probe absent
1 = defrost probe absent and probe 3 present
2 = defrost probe present and probe 3 absent
3 = both defrost probe and probe 3 present
Type
C
C
-20
0
+20
3
°C/°F
flag
0.0
3
REGULATION PARAMETERS
Regulator differential (hysteresis)
Minimum set allowed to the user
Maximum set allowed to the user
Ed alarm enabling (defrost interrupted for timeout)
0 = No, 1 = Yes
Automatic variation of the night-time set-point (curtain switch
closed)
Enable min. and max. temperature monitoring
Night-time variation with third probe
(1 = night with curtain lowered, regulation with probe 3;
0 = night regulation with the virtual probe)
Min. and max. temperature measuring interval
Max. temperature measured in the interval “rt”
Min temperature measured in the interval “rt”
Type
F
C
C
C
Min.
0.1
-50
r1
0
Max.
+20
r2
+199
1
UOM
°C/°F
°C/°F
°C/°F
flag
Def.
2.0
-50
90
0
C
-20
+20
°C/°F
3.0
•
C
C
0
0
5
1
flag
flag
0
0
•
F
F
F
0
-
199
-
hours
°C/°F
°C/°F
-
/5
/6
/7
/8
/9
/d
/A
r
rd
r1
r2
r3
r4
r5
r6
rt
rH
rL
2 NOTE: the “to-LAN” column in the table identifies the parameters that can or can not be transferred via LAN from the Master to the Slave.
49
Cod. +030220191 rel. 2.0 dated 25/06/01
•
•
•
To LAN
•
•
•
•
•
New
c
c0
c1
c2
c3
c4
cc
c6
d
d0
dI
dt
dP
d4
d5
d6
dd
d8
d9
d/
dA
dC
A
A0
AH
AL
A4
A5
A6
A7
Ad
A8
A9
Ar
COMPRESSOR PARAMETERS
Compressor start delay when the instrument is turned ON
Minimum time between two successive compressor starts
Minimum compressor off time
Minimum compressor on time
Relay safety (0 = compressor always OFF,
100 = compressor always ON)
Continuous cycle duration
Low temp. alarm exclusion-time after continuous cycle
Type
C
C
C
C
C
Min.
0
0
0
0
0
Max.
15
15
15
15
100
UOM
min.
min.
min.
min.
min.
Def.
0
0
0
0
0
C
C
0
0
15
15
hours
hours
4
2
DEFROST PARAMETERS
Defrost types
0 = electrical: ends by temperature and/or for timeout
1 = hot gas: ends by temperature and/or for timeout
2 = electrical: ends for timeout
3= hot gas: ends for timeout
Interval between two defrosts
(activated for defrosts without RTC)
Defrost end temperature
Maximum defrost time
Defrost when the instrument starts (0 = No, 1 = Yes)
Defrost delay when instrument starts or from digital input
Main display and repeater during defrost:
0 = No display block and the temperature alternates with the “dF”
symbols on both displays
1 = display is blocked on both displays
2 = “dF” on both displays 3
Type
C
Min.
0
Max.
3
UOM
-
Def.
0
F
0
199
hours
8
•
F
F
C
C
C
-50
1
0
0
0
+199
199
1
199
2
°C/°F
min.
flag
min.
flag
4
30
0
0
1
•
Dripping time after defrost
High temperature exclusion time after defrost and if ( A4 = 5, A5 = 5
or A8 = 5) alarm exclusion time from the opening of the door
Defrost priority over compressor protection (0 = No, 1 = Yes)
Defrost probe display (S2)
Third probe display (S3)
Time base for the intervals between defrosts and maximum
duration (dP) (0 = hours/mins; 1 = mins/secs )
F
F
0
0
15
15
min.
hours
2
1
•
C
F
F
C
0
0
1
1
flag
°C/°F
°C/°F
flag
0
0
•
Type
C
F
Min.
0.1
0
Max.
+20
+199
UOM
°C/°F
°C/°F
Def.
2.0
4
F
0
+199
°C/°F
4
•
C
C
C
0
0
0
7
7
100
min.
0
0
0
•
C
0
199
min.
0
•
C
C
C
0
0
0
199
7
1
min.
flag
120
0
1
•
C
0
1
flag
1
ALARM PARAMETERS
Fan and alarm differential
High temperature alarm: indicates the maximum variation from the
set-point. AH = 0 excludes the high temperature alarm
Low temperature alarm: indicates the maximum variation from the setpoint. AL = 0 excludes the low temperature alarm
Digital input no.1 configuration (*)
Digital input no.1 configuration (*)
Compressor stop (set Duty Setting from external alarm:
A4 = 1 or 2; a5 = 1 or 2); 0 = compressor always OFF
100 = compressor always ON
Detection delay time for the “delayed alarm” input (A4 = 2, or A5
= 2)
Temperature alarm delay
Configuration of the instrument’s virtual digital input
Enable propagation via LAN of the second digital input on the
Master (1 = propagation, 0 = no propagation)
Enable remote alarm signals from Slaves on the Master (1 =
remote alarm signals enabled)
To LAN
New
•
•
•
•
•
•
•
To LAN
New
•
•
•
•
•
•
•
To LAN
New
•
•
3 (*) Only the new repeaters with updated FW allow the display of the codes besides the temperature; the others, if d6 = 2, display only one fixed temperature.
50
Cod. +030220191 rel. 2.0 dated 25/06/01
F
F0
FAN PARAMETERS
Fan management:
0 = fan always ON (except in special cases: see parameters F2, F3,
Fd)
1 = fans thermostat-controlled in accordance with the absolute setpoint F1
Fan start absolute set-point
Active if F0 = 1
Fans OFF with compressor OFF (0 = No, 1 = Yes)
Active if F0 = 0
Fans OFF in defrost (0 = No, 1 = Yes)
Active if F0 = 0
FAN relay configuration as AUX relay
(in this situation the fourth relay can be used as an alarm relay by
setting H1 = 1 or H1 = 2):
0 = the aux. relay is the fourth relay
1= the aux. relay is the fan relay (local relay)
2= the aux. relay is the fan relay (network relay)
Fan off in post-dripping
Type
C
Min.
0
Max.
1
UOM
flag
Def.
0
F
-40
+50
°C/°F
5.0
•
C
0
1
flag
1
•
C
0
1
flag
1
•
C
0
2
flag
0
•
F
0
15
min.
1
•
OTHER SETTINGS
Serial address (only for the network Master)
Relay 4 selection:
0 = auxiliary output
1 = alarm relay, normally open (closed in alarm)
2 = alarm relay, normally closed (open in alarm)
3 = auxiliary relay: Master serves the Slaves;
the action of the Master relay is transmitted via LAN to the Slaves,
the 4th relay of which is configured with H1 = 3
H2*
H3*
(*) Available but not managed
Type
C
C
Min
0
0
Max.
199
3
UOM
flag
Def.
0
3
To LAN
-
-
-
-
-
-
LAN PARAMETERS
Number of Slaves:
parameter accessible only on the Master units
(0 = LAN not present)
Slave address in the LAN
parameter accessible only on the Slave units
(0= LAN not present)
Configuration parameter of the single unit as Master
(In = 1) or Slave (In = 0)
Type
C
Min.
0
Max.
5
UOM
-
Def.
0
To LAN
New
C
0
5
-
0
IN4
0
1
RTC PARAMETERS (only on Master unit)
Current hour
Current minute
Hour of the first defrost
Minute (of hour h1 on the current day) when a defrost starts
Hour of the second defrost
Minute (of hour h2 on the current day) when a defrost starts
------------------------------------------------------------------------------------------------------------------------------------------------Hour of the eighth defrost
Minute (of hour h8 on the current day) when a defrost starts
Type
F
F
C
C
C
C
------------C
C
Min.
0
0
0
0
0
0
--------------0
0
Max.
23
59
23
50
23
50
------------23
50
UOM
hours
min.
hours
min.
hours
min.
----------hours
min.
Def.
24
0
24
0
------24
0
To LAN
New
F1
F2
F3
F4
Fd
H
H0
H1
Sn
SA
In
hh
mm
h1
m1
h2
m2
--------h8
m8
To LAN
New
•
New
4 The IN parameters are accessible only when starting the machine by pressing the PRG & SEL buttons during the POWER ON phase during which the 3 hyphens “-
--“ and a code identifying the unit as Master (uM) or slave u? (? = 1 ... 5: address of the slave in the LAN) are displayed.
51
25/06/01
Cod. +030220191 rel. 2.0 dated
Note: ___________________________________________________________________________________
________________________________________________________________________________________
________________________________________________________________________________________
________________________________________________________________________________________
________________________________________________________________________________________
________________________________________________________________________________________
________________________________________________________________________________________
________________________________________________________________________________________
________________________________________________________________________________________
________________________________________________________________________________________
________________________________________________________________________________________
________________________________________________________________________________________
________________________________________________________________________________________
________________________________________________________________________________________
________________________________________________________________________________________
________________________________________________________________________________________
________________________________________________________________________________________
________________________________________________________________________________________
________________________________________________________________________________________
________________________________________________________________________________________
________________________________________________________________________________________
________________________________________________________________________________________
________________________________________________________________________________________
________________________________________________________________________________________
________________________________________________________________________________________
________________________________________________________________________________________
CAREL srl
Via dell’Industria, 11 - 35020 Brugine - Padova (Italy)
Tel. (+39) 049.9716611 Fax (+39) 049.9716600
http://www.carel.com - e-mail: [email protected]
cod. +030220191 rel. 2.0 del 25/06/01
Agency: