1
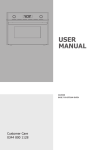
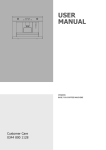
USER
MANUAL
AWD14SS
BUILT-IN WARMING DRAWER
Customer Care
0344 800 1128
IMPORTANT INFORMATION
AWD14SS
CONTENTS
Important Information
Before you start
Safety information
Environment information
Technical and legal information
Your warming drawers
Warming drawer
Warming drawer controls
First use/Setting up your oven
Cleaning the oven
Intended use
2
3
4
4
5
5
6
6
Daily operation of your warming drawer
Using the drawer
7
Selecting a temperature
7
Heating up items
7
Capacity7
Care and Maintenance
Drawer front, control panel and interior
8
Installation9
Trouble shooting
11
Guarantee12
Useful contacts
13
BEFORE YOU START
To avoid the risks that are always present when you use
an electrical appliance it is important that this appliance is
installed correctly and that you read the safety instructions
carefully to avoid misuse and hazards. Please keep this
instruction booklet for future reference and pass it on to
any future owners. After unpacking the appliance please
check that it is not damaged. If in doubt, do not use the
appliance but contact Apelson on 0344 800 1128.
Decide on the appropriate location for your product.
Check the package and make sure you have all of the
parts below.
AWD14SS Warming Drawer x1
Your product contains glass please take care when fitting
or handling to prevent personal injury or damage to the
product.
The specifications plate displays all the necessary
identification information for ordering replacement parts.
If you sell the appliance, give it away, or leave it behind
when you move house, make sure you also pass on this
manual so that the new owner can become familiar with
the appliance and its safety warnings.
Anti-slip mat x1
Fixing screw x2
Plastic supports x2
2
IMPORTANT INFORMATION
AWD14SS
SAFETY INFORMATION
These instructions are for your safety. Please read through
them thoroughly prior to installation and retain them for
future reference.
All installation work must be carried out by a competent
person or qualified electrician.
This appliance must be installed correctly by a suitably
qualified person, strictly following the manufacturer’s
instructions.
This appliance complies with all current European safety
legislation, however, the Manufacturer must emphasise
that this compliance does not prevent the surfaces of the
appliance from heating up during use and remaining hot
during its operation.
Do not allow the electric cables to touch the hot parts of
the appliance.
Make sure that the power cord is not caught under or in
the appliance and avoid damage to the power cable.
Do not remove the plug in the presence of flammable gas.
Do not install the appliance outdoors in a damp place or in
an area which may be prone to water leaks such as under
or near a sink unit. In the event of a water leak allow the
machine to dry naturally.
Please dispose of the packing material carefully.
Do not use flammable sprays in close vicinity to the
appliance.
This appliance can be used by children aged from 8 years
and above and persons with reduced physical, sensory or
mental capabilities or lack of experience and knowledge if
they have been given supervision or instruction concerning
use of the appliance in a safe way and understand the
hazards involved. Children shall not play with the appliance.
Cleaning and user maintenance shall not be made by
children without supervision.
Regularly check the power plug and power cord for
damage. If the supply cord is damaged, it must be replaced
by the manufacturer, its service agent or similarly qualified
persons in order to avoid a danger or injury.
A steam cleaner is not to be used.
The appliance is not intended to be operated by means of
external timer or separated remote-control system.
The appliance is for domestic use only.
The Manufacturer declines all liability for personal or
material damage as a result of misuse or incorrect
installation of this appliance.
Danger of burns! During use the appliance becomes hot.
Care should be taken to avoid touching heating elements
inside the oven.
Warning! Accessible parts may become hot during use.
Children should be kept away.
Warning! If the door or door seals are damaged, the
oven must not be operated until it has been repaired by a
competent person.
If smoke is emitted, switch off or unplug the appliance and
keep the door closed in order to stifle any flames.
Use the appliance exclusively for the preparation of food.
Do not use the appliance to dry clothing, paper or other
objects.
Do not operate the appliance without food in the cooking
compartment. Operating without food can damage the
appliance.
Dishes can become hot due to the heated food. Therefore,
always use oven gloves to take the food out of the
appliance.
Failure to maintain the oven in a clean condition could lead
to deterioration of the surface that could adversely affect
the life of the appliance and possibly result in a hazardous
situation.
Warning! Only allow children to use the oven without
supervision when adequate instructions have been given
so that the child is able to use the oven in a safe way and
understands the hazards of improper use.
Caution! If the appliance operates in combination mode,
it is recommended that children use the oven only under
the supervision of adults because the temperature may be
high.
Connect the power plug to an easily reachable electrical
outlet so that in case of an emergency the appliance can
be unplugged immediately. Pull the power plug out of the
electrical outlet to completely switch off the appliance. Use
the power plug as the disconnection device.
Disconnect the power plug from the electrical outlet when
not in use and before cleaning.
Always turn the appliance off before disconnecting the
power plug.
This appliance is classified as protection class I and must
be connected to a protective ground (Earth).
Means for full disconnection must be incorporated in
the fixed wiring in accordance with the wiring rules. To
achieve this install an appropriate circuit breaker (CB) and
residual current device (RCD). It should be installed in an
easily reachable place so that in case of emergency the
appliance can be disconnected from power immediately.
The fixed wiring must be protected against heat surfaces.
Do not hang an objects to the handle of the oven door.
3
IMPORTANT INFORMATION
AWD14SS
Do not store or never use harsh chemicals, sprays,
flammable or non-food in or near the oven. Oven is
designed specifically for heating or cooking food. The use
of corrosive chemicals in heating or cleaning will damage
the unit and may cause injury.
Should any food inside the oven catch fire, keep the
door closed. Switch the oven off and disconnect the power
supply.
Always exercise caution when opening the door. Move
to side, open the door slowly to vent the hot air and/or
steam. Make sure your face is away from the opening and
make sure there are no children or pets near the oven.
ENVIRONMENTAL INFORMATION
TECHNICAL AND LEGAL INFORMATION
Waste electrical products should not be disposed of
with household waste. Please recycle where facilities
exist. Check with your Local Authority or retailer for
recycling advice.
TECHNICAL INFORMATION:
This symbol on the product or its packaging
indicates that this product cannot be treated
as normal household waste. This product must
be handed over to an electric and electronic
equipment collection point for recycling.
On ensuring that this product is disposed of correctly, you
will help to avoid possible negative consequences for the
environment and public health, which could occur if this
product is not handled correctly. To receive more detailed
information about recycling this product, contact your
local government, domestic waste disposal services or the
outlet where the product was bought.
4
Power supply: Power consumption: Measurements:
Max load of dishes: External dimensions (WxHxD): Net weight: 220-240V~, 50/60Hz
max 432W
25kg
653.5x657x210mm
16.5kg
LEGAL INFORMATION
The Manufacturer declines all liability for damage caused
to persons and objects due to incorrect or improper
installation of the appliance.
YOUR OVEN
AWD14SS
YOUR WARMING DRAWER
[01]
[02]
[04]
[03]
[05]
01. On/Off switch (neon indicator)
04. Anti-slip mat
02. Temperature control
05. Operation indicator
03. Warming drawer
WARMING DRAWER CONTROLS
The controls consist of a temperature dial and an
On/Off switch. These are only visible when the drawer
is open. When the drawer is closed, you can tell when
the appliance is switched on because the On/Off switch
illuminates through the hole in the front of the drawer.
5
FIRST USE/SETTING UP YOUR OVEN
AWD14SS
We recommend that you read the instructions in this owner’s manual carefully before use for the best performance and to
extend the life of your appliance, as it will provide you with all the instructions you require to ensure its safe installation,
use and maintenance. Always keep this owner’s manual close to hand since you may need to refer to it in the future.
Thank you.
CLEANING THE OVEN FOR THE FIRST TIME
INTENDED USE
When the warming drawer is used for the first time,
it should be heated to the maximum temperature for
long enough to burn off any oily residues left during the
manufacturing process, which might contaminate foods
with unpleasant smells.
The warmer drawer is intended exclusively for heating
crockery.
It uses a hot air warming system. A fan distributes heat
given off by a heater element evenly throughout the
drawer. The circulating air ensures that crockery is heated
evenly and quickly.
A protective grille protects you from touching either the
fan or the heating elements.
NOTE:
Do not use the appliance to re-heat, cook or keep food
and drink warm. Condensation from the food or drink
could lead to corrosion in the appliance.
Always use heat-resistant gloves to remove heated
crockery from the drawer.
The load bearing capacity of the appliance, irrespective of
its height, is 25kg maximum.
6
DAILY OPERATION OF YOUR WARMING DRAWER
AWD14SS
USING THE DRAWER
Place dishes inside the drawer. Select the temperature
required. Switch on the appliance (
). The neon
indicator lights up. Close the drawer gently: if you use too
much force, it can spring open again. Switch the appliance
off (
) before removing the warmed dishes.
SELECTING A TEMPERATURE
The temperature dial allows you to select any temperature
between approx. 30°C and 80°C.
approx. 60°C - For serving dishes and plates. Food
stays warmer for longer if served in pre-heated dishes.
The dishes will not get too hot to handle.
NOTE!
The temperature dial must only be turned in a clockwise
direction as far as it will go and then back again. Do not
turn it too far as this would damage it.
HEATING UP TIMES
Various factors will affect the heating up times:
When the selected temperature is reached, the heating
element switches itself off.
The material and thickness of the dishes, the quantity,
how the dishes are arranged and the temperature setting.
When the temperature falls below that selected, the
heating element switches on again automatically.
It is therefore not possible to state precise times. However,
the following information can be used as a guide:
The temperature scale around the dial is shown in symbols
rather than in °C. The symbols represent the most suitable
temperature for the type of dishes depicted:
is approx. 60°C. Evenly heated
Temperature setting
dishes w
ill take about:
30 - 35 minutes for 6 place setting.
40 - 45 minutes for 12 place setting.
approx. 40°C - For cups or glasses. Drinks poured into
warmed cup do not cool down so quickly, the cup will not
get too hot to handle.
As you use the plate warmer, you will get to know which
setting suits your own needs best.
CAPACITY
NOTE!
The quantity that can be loaded will depend to a great
extent on the type and size of your own dishes.
The maximum load bearing capacity of the drawer is 25kg.
The following layouts are suggestion only
Layout 1
Or individually
#
Item
Diameter (mm)
#
Item
Diameter (mm)
6
Dinner plates
280
20
Dinner plates
280
6
Soup bowls
100
36
Soup bowls
220
1
Serving bowl
220
30
Soup bowls
100
1
Serving bowl
190
10
Pizza plates
360
1
Serving bowl
170
80
Espresso cups
40
Cappuccino cups
30
Punch glasses
Or layout 2
10
Dinner plates
280
10
Soup bowls
220
Or layout 3
18
Soup bowls
220
2
Soup terrines
210x180
7
CARE AND MAINTENANCE
AWD14SS
WARNING
Always switch off the electricity supply before
performing maintenance work. In the event of a
fault, contact customer services.
DOUBLE POLE SWITCHED
FUSED SPUR OUTLET
FUSE
ON
USE A 30 AMP FUSE
CAUTION
Do not use hot water, dilutents, petrol, alcohol, kerosene,
washing powder, cleanser, alkaline detergent, acid,
chemical cloth, etc. for cleaning so as not to damage the
enamel coating and plastic. The appliance must not be
cleaned directly with water as this could cause rusting or
render the insulation less efficient.
The appliance should be cleaned after use.
Wipe the inner and outer surface of the appliance and its
accessories with a wet cloth.
The door frame and seal and adjoining parts must be
cleaned carefully with a damp cloth when dirty.
Regularly check the power plug and power cord for
damage. If the supply cord is damaged, it must be
replaced by the manufacturer, its service agent or similarly
qualified persons in order to avoid a danger or injury.
WARNING!
The microwave oven should be cleaned regularly, with all
food remains being removed. The surface of microwave
may deteriorate if it is not clean. That may reduce the
oven‟s working life and possibly result in a dangerous
situation.
DRAWER FRONT, CONTROL PANEL AND
INTERIOR
All surfaces and controls should be cleaned using warm
water with a little washing up liquid applied with a soft
sponge or cloth.
Wipe the surfaces dry using a soft cloth.
Avoid knocking the glass front with dishes when loading
the drawer as the glass is tough but not unbreakable.
Avoid rubbing the glass surface with any abrasive cleaner
or pad as it can cause scratching.
If the glass front becomes damaged switch off the
appliance at the mains to avoid electric shock.
For indoor use only.
NOTE!
WARNING!
Allow the appliance to cool down to a safe temperature
before cleaning
Never use a steam cleaner to clean the inside of the oven.
8
INSTALLATION
AWD14SS
Only a qualified person in compliance with the instructions
provided must install the appliance. The manufacturer
declines all responsibility for improper installation, which
may harm persons and animals and damage property.
CAUTION
The power supply to the appliance must be switched
off before any adjustments or maintenance work is
undertaken.
≥55
5mm
The appliance is supplied with three metal trims which
have an adhesive underside. These trims must be stuck
on to the drawer so that they seal any gaps between the
housing unit and the drawer.
m
68m
5
0
56
mm
537
548
mm
128mm
Carefully pull the protective foil off the underside of each
trim.
141mm
715-720mm
POSSIBLE INSTALLATION EXAMPLES
mm
595
23m
m
Then position the side trims x2 so that they are flush with
the side walls of the housing unit and If the unit does not
have a back wall you do not need the third trim. If the unit
has a back, position the back trim x1, so that it is flush
with the back wall of the
6mm
7mm
POSITIONING THE APPLIANCE IN THE
HOUSING UNIT
Push the appliance into the housing unit as far as the
vapour strip and align it
Open the drawer, and use the 2 screws and plastic
supports supplied to secure the appliance to the side walls
of the housing unit.
9
INSTALLATION
AWD14SS
If required, carefully fit an oven (in accordance with
its manufactures instructions) on top of the warming
drawer, taking care not to damage the top edge of the
glass drawer unit. Ensure that the mains connection lead
is located near to the socket outlet to avoid having to
remove the product again to connect the mains electrical
supply.
NOTE!
Ensure that the housing unit is aligned at a right angle.
ELECTRICAL REQUIREMENTS
Any permanent electrical installation must comply with
the latest I.E.E. Regulations and local electricity company
regulations. For your own safety a qualified electrician or
contractor who is on the roll of the National Inspection
Council for Electrical Installation Contracting (NICEIC)
should undertake the electrical installation.
ELECTRICAL CONNECTION
Before connecting the mains supply ensure that the mains
voltage corresponds to the voltage on the rating plate
inside the appliance.
WARNING: THIS APPLIANCE MUST BE EARTHED
The appliance is supplied with a 3-core mains cable and
must be connected to the electricity supply via a double
pole switch having a 3mm minimum contact gap on each
connector.
A Switched Fused Connection Unit to BS 1363 Part 4 is
recommended.
The fuse must be rated at 3 Amps.
The wires in the mains lead are coloured in accordance
with the following code:
Brown = L - Live
Blue = N - Neutral
Green and Yellow =
- Earth
The connection point must be placed in a position adjacent
to the appliance so as to be readily accessible for an
engineer in the event of a breakdown.
Disconnect the appliance from the mains supply before
carrying out any kind of maintenance or cleaning.
THE APPLIANCE IS NOW READY TO USE.
10
TROUBLESHOOTING
AWD14SS
WHAT TO DO IF...
...THE DISHES ARE NOT WARM ENOUGH.
Check whether,
- The appliance has been switched on.
- The correct temperature setting has been selected.
- Any ventilation openings have been blocked by large
plates or bowls.
- The dishes have been allowed to heat up for a
sufficiently long time.
Various factors will affect how long the dishes will take
to heat up, for example:
- The material and thickness of the dishes
- The quantity
- How the dishes are arranged
- The temperature setting
The times quoted are only guidelines. As you use the
warming drawer you will get to know which setting
suits your own needs best.
If any of the following problems occur, the advice of
a qualified electrician or Customer Services must be
sought.
... THE CROCKERY DOES NOT HEAT UP.
CHECK WHETHER,
- You can hear the noise from the fan or not.
- If you can hear the noise from the fan, there could
be a problem with the heater element. Call Customer
Services.
- If you cannot hear the noise from the fan, there could
be a problem with the fan or the mains fuse has blown.
Check the mains fuse and if this does not solve the
problem call Customer Services.
...THE CROCKERY IS TOO HOT.
- There could be faulty on temperature control. Check
the temperature control is set to the right level and if
still faulty call Customer Services.
...THE ON/OFF SWITCH DOES NOT LIGHT UP
WHEN THE APPLIANCE IS SWITCHED ON.
- There could be defective on the indicator light of the
switch. Check the mains fuse and if this does not solve
the problem call Customer Services.
11
GUARANTEE
AWD14SS
This appliance is covered by a full manufacturer’s 2 year
parts and 2 year labour guarantee and covers all parts and
labour costs associated with the repair of the appliance
in a domestic environment. We will repair any defect that
arises due to faulty materials or workmanship and use
genuine manufacturers parts.
All claims must be supported with the original receipt or
other reasonable proof of purchase.
If, during the guarantee period, the appliance becomes
irreparable as agreed by the engineer approved by
Apelson Appliances UK Ltd then we reserve the right, at
our discretion, to exchange the defective product with
a replacement appliance at Apelson Appliances UK Ltd
sole cost. If the same product is no longer available an
alternative will be offered with the same functions as the
faulty item.
After an appliance has been repaired or replaced any
remaining balance of the Apelson Appliances UK Ltd
guarantee will be valid and any further call outs during this
prescribed period will be covered by Apelson Appliances
UK Ltd on the replacement appliance.
Should any person other than an authorized engineer
modify or attempt to repair the appliance then the
warranty will be invalid.
The guarantee applies to the UK mainland, Scotland and
Ireland but is not transferable between EU countries.
This guarantee is non-transferable to any other person or
product.
The guarantee is covered by UK law and is in addition to
and does not diminish your legal rights.
EXTENDED PARTS ONLY WARRANTY
As testimony to our commitment to you as a valued
customer of Apelson Appliances UK Ltd, we will offer you
an additional 3 years parts warranty absolutely free.
If during the extended parts warranty period the
12
appliance fails and it is considered uneconomical to repair
our Customer Service Department will offer you the
opportunity to purchase the same or equivalent model at a
discounted price.
All parts supplied free of charge under the extended
warranty must be fitted by our approved engineers and
will be subject to a call out charge to fit the part.
EXCLUSIONS TO THE GUARANTEE
This guarantee does NOT cover:
Appliances that have been damaged or neglected as a
result of failure to store, assemble, install, use or care
of the products in accordance with the manufacturer’s
instructions - Apelson Appliances UK Ltd will not accept
responsibility under this guarantee if a product is damaged
or becomes defective due to, misuse, neglect, wilful or
accidental damage or act of god.
Normal wear and tear.
Consumable items such as carbon filters and bulbs.
Claims arising from non-domestic use or commercial
environment.
Any gas appliance not fitted by a gas safe qualified
installer.
If no fault is found then Apelson Appliances UK Ltd
reserves the right to charge for the call out at the going
rate of £55.00 plus VAT.
In the course of the service work carried out it may be
necessary to remove the built in appliance from its fitted
position. If the appliance is glued, grouted or tiled in such
a manner that it cannot be removed, it is the responsibility
of the customer/installer to remove and reinstall the
appliance to facilitate the repair.
This Guarantee does not affect your statutory rights.
The guarantee is offered by Apelson Appliances UK Ltd,
8QLW1RUPDQG\/DQGLQJV3RSH6WUHHW&DVWOHIRUG:$$*
USEFUL CONTACTS
AWD14SS
USEFUL CONTACTS
TECHNICAL SUPPORT
Apelson Appliances UK LTD
Phone: Email: [email protected]
Web: www.myspareparts.co.uk
SPARES
Apelson Appliances UK LTD
Phone: 0 800 1128
Email: [email protected]
Web: www.myspareparts.co.uk
SERVICE AND GUARANTEE
Apelson Appliances UK LTD
Phone: 044 800 1128
Email: [email protected]
Web: www.myspareparts.co.uk
13
APELSON APPLIANCES UK LTD,
Unit 3 Normandy Landings
Pope Street
Castleford
WF6 2AG