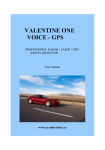
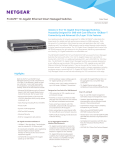
1
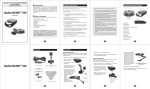
SKYWAY User Manual
www.aguriworld.co.uk
1.
Contents
2. What’s in the box?
3. Product overview
4. Button operation explained
4. Standby screen explained
5. Installation
5. Connecting to power
6. General operation
7. Using Skyway outside of the UK
8. GPS speed trap settings
8. Smart Filter
8. Brightness control
9. On/Off volume control
9. Changing speed unit MPH/KMH
9. Speed limit alert
9. GPS clock
10. Voice alert settings
10. Checking software version number
10. Factory reset
10. Updating the speed trap database.
11. Technical specification
12. Disposal of Old Electrical & Electronic Equipment
23. Service under warranty
What’s in the box?
1 X Aguri Skyway
1 x USB cable
1 x 12V car power connector
1 x Windscreen bracket
1 x User guide
2.
Product overview
4
3
5
2
6
7
1
12
11
8
10
1.
2.
3.
4.
5.
6.
9
DC Power in.
Radar receiver
Built-in GPS antenna
Loud speaker
360 degree laser receiver
Mute button
7.
8.
9.
10.
11.
12.
3.
Smart Filter button
OLED display
Dim button
Menu button
On/Off/Volume control
USB socket
3
2
1
2
3
4
5
1
4
Standby screen explained
Button operation explained
1. Menu button
Press the Menu button once to enter the
menu. The Menu button can also be used to
exit the menu.
2. Dim/Plus (+) button
Press the ‘Dim’ button to adjust the
brightness of the display between Bright, Dim
or Dark.
The Dim button also doubles as the ‘Plus (+)’
button when scrolling through different
options in the menu.
3. Mute button
Press the Mute button to ‘mute’ the audible
alarm during an alert.
1. Time/Clock generated via GPS.
Press the Mute button to switch the
AutoMute setting on or off.
2. Smart Filter mode selected.
The Mute button also doubles as the
‘Minus (-)’ button when scrolling through
different options in the menu.
3. Your current speed generated by GPS.
4. Smart Filter button
Press the Smart Filter button to change
the Smart Filter setting between 1, 2
or 3.
5. GPS signal strength meter. Please note that if
there is no GPS signal strength a cross will
appear.
The Smart Filter button also doubles as
the ‘Select/Save’ button when you want
to save or select a feature from within
the menu.
4.
4. Compass/Direction of travel.
Installation
Attach the windscreen bracket by sliding it in to the slot on the rear of the unit. (Attach the suction cups if they are not already attached) Using
the suction cup bracket, mount your Skyway in a safe and convenient position in the front windscreen where it has an unobstructed view of
the road ahead. We recommend mounting it toward the bottom of the windscreen, just above the dashboard so that it has a good view of the
road ahead, but so that it’s view is not obstructed by the windscreen wipers. Remember, however, that you will need to attach the power
cable to the unit and plug the other end in to your cigarette lighter/12V power socket, so find a position where this can be done without
obstructing or becoming a danger to the driver or passengers.
Once you have chosen a suitable location, press the suction cup bracket to the glass, ensuring that it is well secured. Finally, adjust the bracket
so that the unit is in a horizontal position. Please note that you will have to gently bend the bracket to do this.
Connecting to power
Attach the small end of the power cable to the ‘DC in’ socket on the side of the unit. Insert the other end in to an appropriate cigarette
lighter/12V socket in your vehicle.
Installation tips
Before mounting your Skyway, clean the area of the windscreen where you have chosen to mount your unit, with a good quality glass cleaner
to ensure the suction cup bracket makes a good contact.
Remember to mount the unit and install the power cable safely in a location where it does not interfere with the driver or the controls of the
vehicle.
It is also possible to ‘hard-wire’ your Skyway and hide the power cables, providing a neater installation. Please contact an auto electrician or
your local car dealer for further details.
5.
General operation.
We have shipped your Skyway with the user settings, set for optimum performance in the UK as follows:Radar/laser alert settings
X Band - Off
K Band On
Ka Band - Off
Laser - On
GPS alert settings
Speed trap alerts – On
Red light cameras – On
Mobile speed trap locations – On
Smart Filter – 2
AutoMute – On
Menu settings
It is however, possible to change these settings to suit your own requirements. For further information follow the instructions below.
Radar/Laser settings.
It is possible to switch individual radar frequencies on and off, to fine tune Skyway to the country you are driving in.
Enter the menu by pressing the ‘menu’ button. Scroll left or right, using the ‘Dim’ (+) or ‘Mute’ (-) buttons, until you highlight the radar frequency
you want to change and press the ‘Smart Filter’ button to select. Use the ‘Dim’ (+) or ‘Mute’ (-) buttons to switch the frequency on or off and
press the ‘Smart Filter’ button to confirm your selection. The following options are available:X Band – On/Off
K Band – On/Off
Ka Band – On/Off
Laser – On/Off
User notes
We recommend you keep Laser switched on at all times.
6.
Using Skyway in other countries outside of the UK.
Below are the radar/laser set-ups we would recommend for a selection of other countries if you want to use your Skyway outside of the UK.
Germany/Austria
Spain/Portugal
Italy
Radar/laser alert settings
X Band - Off
K Band On
Ka Band - On
Laser - On
Radar/laser alert settings
X Band - On
K Band On
Ka Band - On
Laser - On
Radar/laser alert settings
X Band - Off
K Band On
Ka Band - On
Laser - On
GPS alert settings
Speed trap alerts – On
Red light cameras – On
Mobile speed trap locations – On
GPS alert settings
Speed trap alerts – On
Red light cameras – On
Mobile speed trap locations – On
GPS alert settings
Speed trap alerts – On
Red light cameras – On
Mobile speed trap locations – On
Warning. Please note that it is illegal to use a GPS/radar/laser detector in France. We do not recommend you use Skyway if driving in France.
Please note that it may be illegal to use a radar/laser detector in Spain, so please check local laws before using Skyway in Spain.
Warning. Whilst we have provided some advice on the use of GPS/radar/laser detectors above, the laws surrounding the use and ownership
of GPS speed trap detectors and radar/laser speed trap detectors, varies from country to country. It is the sole responsibility of the driver to
check the local laws of the country they are driving in or intend to drive in, before using Skyway or any other form of GPS speed trap detector
or radar/laser speed trap detector.
7.
GPS speed trap settings.
The GPS speed trap settings, control alerts to the locations stored in the Speedshield database that is pre-loaded in to your Skyway.
It is possible to individually switch alerts to these locations, on or off, to suit your personal requirements. The following options are
available:Speed traps – On/Off
Red Light cameras – On/Off
Risk Zone locations – On/Off
Enter the menu by pressing the ‘Menu’ button. Scroll left or right, using the ‘Dim’ (+) or ‘Mute’ (-) buttons, until you highlight the speed
trap/red light camera/Risk Zone location setting you want to change and press the ‘Smart Filter’ button to select. Use the ‘Dim’ (+) or ‘Mute’
(-) buttons to switch the speed trap/red light camera/mobile speed trap location setting on or off and press the ‘Smart Filter’ button to
confirm your selection.
Smart Filter
There are three Smart Filter settings that can be used to reduce the amount of ‘False’ alerts you may get from other ‘non-police’ radar
sources, such as automatic doors at petrol stations and supermarkets.
Smart Filter 1 – Low filtration
Smart Filter 2 – Medium filtration
Smart Filter 3 – High filtration
The current Smart Filter setting is identified on the OLED display. Press the ‘Smart Filter’ button once to change the setting.
Brightness control
You can choose between three levels of brightness.
Bright
Dim
Dark
Press the ‘Dim’ button once to change the brightness of the display screen.
8.
On/Off/Volume control
Press the volume control in towards the unit once, to power your Skyway on and off.
Increase the volume by pulling and holding the volume control button towards you.
Decrease the volume by pushing and holding the volume control button away from you.
Speed unit - KMH/MPH
Use this feature to switch between MPH and KMH.
Enter the menu by pressing the ‘Menu’ button. Scroll left or right, using the ‘Dim’ (+) or ‘Mute’ (-) buttons, until you highlight MPH/KMH and
press the ‘Smart Filter’ button to select. Use the ‘Dim’ (+) or ‘Mute’ (-) buttons to switch to between MPH or KMH and press the ‘Smart Filter’
button to confirm your selection.
Speed limit alert
Use this feature to set the unit to alert you if you exceed a pre-selected speed limit.
Enter the menu by pressing the ‘Menu’ button. Scroll left or right, using the ‘Dim’ (+) or ‘Mute’ (-) buttons, until you highlight the ‘Speed Limit’
setting and press the ‘Smart Filter’ button to select. Use the ‘Dim’ (+) or ‘Mute’ (-) buttons to select the speed limit you would like to be alerted
to and press the ‘Smart Filter’ button to confirm your selection.
User tip: If you do not want to be alerted to a speed limit, set the speed limit to zero.
GPS Clock
Skyway will automatically display the time using GPS based on the GMT time zone. Use this setting to adjust the time to DST or a different time
zone, depending on your location.
Enter the menu by pressing the ‘Menu’ button. Scroll left or right, using the ‘Dim’ (+) or ‘Mute’ (-) buttons, until you highlight the ‘Clock’ setting
and press the ‘Smart Filter’ button to select. Use the ‘Dim’ (+) or ‘Mute’ (-) buttons to add or deduct hours from GMT as necessary and press the
‘Smart Filter’ button to save your changes.
9.
Voice alerts
Use this feature to turn voice alerts on and off.
Enter the menu by pressing the ‘Menu’ button. Scroll left or right, using the ‘Dim’ (+) or ‘Mute’ (-) buttons, until you highlight the ‘Voice alerts’
setting and press the ‘Smart Filter’ button to select. Use the ‘Dim’ (+) or ‘Mute’ (-) buttons to switch the voice alerts on or off as necessary, and
press the ‘Smart Filter’ button to save your changes.
Version
Use this feature to check the version of software your Skyway is currently using.
Enter the menu by pressing the ‘Menu’ button. Scroll left or right, using the ‘Dim’ (+) or ‘Mute’ (-) buttons, until you highlight the ‘Version’
setting and press the ‘Smart Filter’ button to select. Press the ‘Menu’ button to exit.
Factory reset.
Use this feature to return your Skyway to the original factory default settings.
Enter the menu by pressing the ‘Menu’ button. Scroll left or right, using the ‘Dim’ (+) or ‘Mute’ (-) buttons, until you highlight the ‘Reset’ setting
and press the ‘Smart Filter’ button to select. Press the ‘Menu’ button to exit.
Updating the speed trap database and system software.
Your Skyway was supplied with a CD Rom containing the Aguri Skyway updater software. To update the Skyway system software or the
Speedshield speed trap database, insert the CD in to your PC and follow the on-screen instructions.
User notes.
If you do not have the CD Rom, you can download the Aguri Skyway updater software from our website www.aguriworld.co.uk
10.
Technical Specification
General
Power requirements (14.5V +/-2.0V or 12.5V - 16.5V ) DC, 250mA (Negative Ground)
Temperature Range 4 to 158ºF (-20 to 70ºC)
Dimensions: Width 74mm, Length 125 mm, Height 32mm
GPS
GPS Receiver 50-channel Receiver
Acquisition Times Hot < 3 sec typical
Warm < 10 sec typical
Cold < 40 sec typical
Time to Initial Fix -148dBm typical
Tracking Sensitivity -162dBm typical
Update Rate 1/sec
Radar/laser detection
X-Band Sensitivity -105/-103dB
K-Band Sensitivity & Safety Alert -128/-125dB
Ka-Band Sensitivity
(33.800GHz) -128/-125dB
(34.300GHz) -128/-125dB
(34.700GHz) -128/-125dB
(34.940GHz) -128/-125dB
(35.500GHz) -128/-125dB
Ku-Band Sensitivity ( 13.435 GHz) -90/-88dB
Laser Sensitivity (Front) -129/-110dBJ
11.
Disposal of Old Electrical & Electronic Equipment - applicable in the European Union.
If you see this symbol on a product or its packaging, it indicates that the product should not be treated as normal household waste. If you see
this symbol on any product or packaging it should be handed over to an applicable collection point for the recycling of electrical equipment.
By ensuring that this product is disposed of correctly you will help prevent a potentially negative impact on the environment. In addition the
recycling of materials will help to conserve natural resources. For further information about recycling please contact your local civic office or
recycling centre.
12.
Warranty
Please note that to receive technical support or service under warranty, you must first register your unit at
www.aguriworld.co.uk
Having a problem with your Aguri Skyway?
Try visiting the FAQ section at www.aguriworld.co.uk. We find that most issues can be resolved there.
If you are still experiencing problems, your Aguri Skyway comes with a standard 12 month warranty. To return your unit under warranty please
ship it in suitable protective packaging, using Special Delivery or an alternative insured delivery service to:Warranty Department
Aguri Limited
Ollershaw Lane,
Marston,
Northwich
Cheshire
CW9 6ER
Please enclose the following information:
(a) Your name, address and a full description of the problem.
(b) A telephone number where you can be reached during business hours.
(c) Your units’ serial number.
(d) A copy of your proof of purchase.
Please note that the warranty will be considered void if the product:Has been dropped or otherwise obviously mistreated.
Has been subjected to heat, moisture or damp conditions.
Has been opened or dismantled.
Has been charged or powered with any cable or charger other than the one supplied.
13.
www.aguriworld.co.uk