1
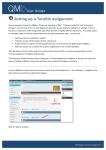
QMUL
Reading Lists
Online
User Manual
CONTENTS
PAGE
INTRODUCTION
2
BOOKMARKING RESOURCES
3
Installing the Bookmark Tool (see how to do this)
3
Bookmarking Books from the Library Catalogue (see how to do this)
5
Bookmarking Journal Articles from the Library Catalogue (see how to do this)
8
Bookmarking from a Subject Database (see how to do this)
14
Bookmarking from Online Repositories (see how to do this)
16
Bookmarking from Other Library Catalogues (see how to do this)
19
Bookmarking from Book Vendors (see how to do this)
23
Bookmarking from the Internet (see how to do this)
24
Importing Bookmarks from Reference Managers (see how to do this)
26
Adding Bookmarks Manually (see how to do this)
34
CREATING A LIST
35
Naming a List (see how to do this)
35
Structuring a List (see how to do this)
36
Populating a List with Bookmarked Resources (see how to do this)
39
Setting Importance/Notes (see how to do this)
40
Saving a List (see how to do this)
42
Editing a List (see how to do this)
43
Requesting Library Reviews (see how to do this)
44
PUBLISHING A LIST (see how to do this)
Inviting List Publishers (see how to do this)
45
47
LINKING A LIST TO A MODULE (see how to do this)
48
LINKING A LIST TO THE VLE – QMplus
50
GETTING LIST USAGE STATISTICS
52
THIS GUIDE IS AVAILABLE IN VIDEO FORMAT: Watch it online
Introduction
The web address for the QMUL online reading lists management system is:
http://lists.library.qmul.ac.uk/. Sign in with your usual college ID. Please note: Firefox is
recommended as the best browser for the system.
Creating an online reading list using this system is done following these steps:
1. Bookmark (collect) all your resources using various sources of information
Bookmarking requires installing the bookmark button onto your browser’s toolbar: this tool
will enable you to pull in bibliographic data for resources you bookmark, in most cases,
eliminating the need to enter bibliographic information manually for your titles
You need to open your sources of information in additional tabs in your browser
Primary sources for bookmarking are the QMUL library catalogue (which includes online books,
journals, and subscription databases as well as print resources) and the QMRO database
Secondary sources are other library catalogues (e.g. UoL libraries, British Library), union
catalogues (e.g. COPAC, WorldCat), book vendors (e.g. Amazon), the Internet, etc.
You can also import bookmarks from reference managers such as EndNote and Zotero as well
as manually add a resource in Talis Aspire
2. Construct your list and populate it with your bookmarked resources
Creating a list involves structuring and dividing it in to sections, adding notes and pages if
relevant; resources included in the list require tagging as to their importance
Once the list is saved, a Library review can be requested for acquisitions purposes
3. Publish your list
Publishing a list takes it out from its draft status; your colleagues and students can view it
It also allows you to invite list publishers, colleagues whom you would like to have contribute
to your list
4. Link your list to a module and the VLE
Module titles are pre-downloaded from Registry; just link your list to the right module
Your list will be automatically linked to the VLE (QMplus) module page
Your list is available to students but as the list owner, you can edit and update your list
on a continuous basis
Bookmarking resources
Installing the Bookmark Tool
In order to bookmark resources for reading lists, one has to install the bookmark button. To do this,
go to My Bookmarks in the main navigation pane.
Click on Install Bookmark Button on the right hand side.
Back to contents page
Follow the instructions set out for your browser: for Firefox, click and drag the ‘Add to My
Bookmarks’ button to the bookmarks toolbar (if the toolbar is not visible, enable it from the View
menu).
The Add to My Bookmarks button will be there on the bookmarks toolbar. Once it is there, you
have the option of renaming it from its properties by right-clicking on it.
Back to contents page
Bookmarking Books from the Library Catalogue
Open another tab in your browser for the library homepage (http://www.library.qmul.ac.uk/) and
either use the Search box for a direct search in the library content or follow the link to the Library
Catalogue to that opens a new tab.
If you click Library Catalogue this will open the catalogue search engine homepage
(http://qmul.summon.serialssolutions.com) into a new tab.
Back to contents page
Find your resource.
Back to contents page
Go into the record of the title and click on your Add to My Bookmarks button on the browser’s toolbar
to bookmark the resource.
In the window that appears, check the bibliographic data on the left (you can amend or add fields) and
click on Create.
Back to contents page
Once the resource is bookmarked, go back to your original reading lists tab.
Click on the My Bookmarks link, or refresh it if you were there already; your first bookmarked resource
will be listed. All your bookmarked resources will be collected in here. Using the library catalogue, you
can bookmark electronic books, journals, and audiovisual resources in the same way.
Back to contents page
Bookmarking Journal Articles from the Library Catalogue
In the library catalogue, search for your journal title.
Select the electronic title when there is this option; click on the “eJournal: Full Text Online”.
Back to contents page
This will take you to the QMUL Library Database where you will have access options for that journal
title. Bear in mind volumes/issues available from each publisher/provider before you choose one.
Once you reach the journal’s web site, it is a matter of following links until you find your article; or you
can simply search for the article within the journal. Sometimes journal titles or articles open in
separate windows and the bookmark button might not be immediately visible.
Back to contents page
When this happens, even if the bookmark button (Add to My Bookmarks) is not immediately visible
on your browser’s toolbar, it will always be under Bookmarks/Bookmarks Toolbar in the
browser’s menu. So click on “Add to My Bookmark” either in the normal toolbar or via the browser
menu.
Your article is bookmarked in two parts: the first Article tab contains article information.
Note: if proper bibliographic data fails to appear for an article at the point of bookmarking, you can use
DOI Lookup if the online article database offers a DOI (Digital Object Identifier) for that resource. Just
copy and paste the DOI in the DOI Lookup field and click on Lookup.
Back to contents page
10
The ‘Is part of Journal’ tab contains journal title information. Click on Create to finish.
Go back to your original window and to the reading lists tab; refresh your screen and the journal
article will be there at the top of your list.
Back to contents page
11
As mentioned before, you can also use the Library Catalogue Summon search engine to find the
article directly. Please bear in mind, however, that not all subscription journals are indexed by this
tool.
As the search results show, by positioning the mouse cursor on a title you will automatically see a tab
appearing on the right side with a description of the article and more details about the resource.
Bear in mind that you can refine your search by selecting more search options on the left hand side of
the page (full text online, discipline, content type etc.)
Back to contents page
Back to contents page
12
You can go into the full text article by clicking the Title or the Full Text Online link. This will
open into a new page/tab.
Use the Add to My Bookmarks button on your browser to bookmark the article in the usual way.
The bookmarking window will open and the article will be bookmarked in the usual way.
Back to contents page
13
Bookmarking from a Subject Database
Access your database via the library catalogue and find your resource; Search normally or
via the A-Z list of Electronic Journals and Databases link.
Find your resource and go into the record; click on your Add to My Bookmarks button.
Back to contents page
14
Sometimes the bibliographic data pulled in will be limited and the resource type information will state
that it is a web page; you can manually Add bibliographic data, such as author, date, etc. as required.
You can also change Resource Type from Webpage to something else.
Click on Create and the resource would be added to your bookmarks list.
Back to contents page
15
Bookmarking from Online Repositories
From the library home page follow the link to Queen Mary Research Online
The research database will open in a new tab; search for your resource.
Back to contents page
16
Once you find your resource, go into the record and click on Add to My Bookmarks.
If insufficient bibliographic data is pulled in, you can manually add author, date, etc. as
previously mentioned. You can also change Resource Type if required
Back to contents page
17
Click on Create when you complete your amendments.
Go back to your reading lists tab and refresh your screen; your latest addition will be at the top of your
list.
Back to contents page
18
Bookmarking from Other Library Catalogues
Open the relevant library catalogue in another tab and search for your resource.
Go into the record and click on Add to My Bookmarks.
Ba page
Resources from other libraries are generally bookmarked as web pages and proper data is not pulled in.
When this happens, there is an additional step you can take to get the full bibliographic data.
Back to contents page
20
Copy the ISBN of the title from the right into the ISBN Lookup field in the left. Then click on Lookup.
Back to contents page
20
This action will pull in all available bibliographic data; however, you will lose the web link to the
resource once this is done.
You can manually add a Web address field to the bookmark; this is useful as it will lead to resource
location information, i.e. the library that holds the resource.
Back to contents page
21
When you go back to your reading lists tab and refresh your screen, the latest addition will be at the
top.
Back to contents page
22
Bookmarking from Book Vendors
You have the option of temporarily bookmarking resources from a book vendor before asking the
Library to purchase them. Go to your vendor and find your resource. Click on your Add to My
Bookmarks button.
Click on Create; the resource will be added to your list. Do not forget to ask the Library to
purchase the resource, especially if it is an essential one.
Back to contents page
23
Bookmarking from the Internet
Bookmarking resources from the Internet is quite straightforward. Using your bookmark tool you
can bookmark any open access web based resource.
It would be good to consider how authoritative and permanent these web sites/pages are; the reading
lists system does not have a link checker and does not automatically remove/replace broken links.
When bookmarking web-based resources, if provided by the web site, you should copy across
permanent or persistent links that are less likely to be broken into the web address field of your
bookmark.
You can bookmark audio and video resources too. When selecting your resources, please be
aware of copyright issues.
Back to contents page
24
Bookmark the video in the usual way, making bibliographic amendments if required. Click on Create.
You resource will be added to your list. Depending on the video provider, videos might be
embedded in the reading lists management system instead of being bookmarked as an external
link.
Back to contents page
25
Importing Bookmarks from Reference Managers
Instead of bookmarking your resources one-by-one, if you have your resources collected in A reference
manager, you can import them into Talis Aspire. This requires first exporting the file from the
reference manager and saving it, and then importing it into Talis Aspire
EndNote Desktop
In EndNote Desktop, select your list and go to File/Export in the menu.
When the dialogue box comes up, name you file and check settings:
In Save as type leave the default as it is, Text File (*txt.)
In Output style select RefMan (RIS) Export
Then click on Save.
Back to contents page
26
Your file will be exported as a Talis Aspire compatible RIS file.
In Talis, go to My Bookmarks and click on Import. Browse for your file; select it and click on OK.
You will see a message telling you whether your import request has been successfully submitted; if it
is, you will receive an email after a minute or so when the import is completed.
Back to contents page
27
If you follow the link in your email, or if you refresh your bookmarks page, your imported
bookmarks will be there in Talis.
Note: If ISBNs and DOIs were available in EndNote for your resources, these ISBNs and DOIs will
also be imported into Talis. Using these ISBNs and DOIs, Talis will link these resources to the Library
catalogue automatically provided that they are available in the Library.
Back to contents page
28
EndNote Web
In EndNote Web, go to Format/Export References.
Select your References and Export style which should be RefMan (RIS) Export; and click on Save.
When a dialogue box comes up, click on Save File and OK.
Back to contents page
29
Open the downloaded file and go to File/Save As from the menu.
Name the file and Save it.
Back to contents page
30
Find your renamed file and right click on it: select Open With/WordPad.
Once you open your file, go to File/Save As and add .ris to the file extension by deleting the .txt
extension.
Save the file. Then go to Talis and import the file in the usual way.
Back to contents page
31
Zotero
Select your resources; then, from Actions, select Export Library.
The file format will automatically be RIS, the format recognised by Talis for importing bookmarks.
Click on OK.
Back to contents page
32
In the second dialogue box, the file type too will automatically be RIS with the file extension .ris added
to the file name; re-name your file if you want to do so without changing any file extension name and
click on Save. The file name format will be [filename].ris when a file is exported from Zotero,
recognisable by Talis import.
Import your file into Talis Aspire in the usual way. If ISBNs and DOIs were available in Zotero for
your resources, these ISBNs and DOIs will also be imported into Talis. Using these ISBNs and DOIs,
Talis will link these resources to the Library catalogue automatically provided that they are available
in the Library.
Back to contents page
33
Adding Bookmarks Manually
If the resource you would like to add is not available anywhere, you can add bookmarks manually in
Talis using the Add bookmarks- Add manually tool in My Bookmarks.
Simply complete the fields that you require and click on Create.
Back to contents page
34
Creating a list
Naming a List
In your reading lists system, go to My Lists and click on the Create a New List button.
In List name, enter your module code and module name in title case. Anticipated student numbers
field is helpful for the Library when deciding on the number of copies of resources to be bought.
Under Description you can enter a description for the module. Click on OK.
The next dialogue box is for assigning a list owner. If the list creator is not the owner of the list, e.g. the
list is created by support staff on behalf of a lecturer, the list creator can search for the lecturer and
assign it to him or her. If not sure, you can cancel it and come back to it later.
Back to contents page
35
Structuring a List
Once you create your list, you will be taken to the draft page. Structuring a list is just a matter of
clicking and dragging a New Section in to your list. You can also add New Notes and New Pages.
You will be asked to enter a Title each time you drag in a section. Study note is note to your
students: it is optional and editable. Click Save.
Back to contents page
36
You can create sections in sections by clicking and dragging New Section wherever you want it to be
each time.
You have to enter a Title each time; Study note is optional. Click on Save.
Back to contents page
37
Keep on repeating this until your sections are complete. You can have as many sections as you wish;
you can put them into one another; you can start a new section and continue. You can see in the
Table of Contents at the top how your list is beginning to take shape. You can use the Table of
Contents to move your sections around for re-structuring. All sections (names and notes) are
editable and you can remove a section at any time.
You can also insert New Notes (can be used for entering explanatory text and extensive notes copied
and pasted from Word documents) and New Pages (can be used for inserting additional audio visual
content, images, etc.) in your list structure.
You have the option of saving your draft and coming back to it later by using the Save Draft button
at the top.
When structuring your list, you will see your Most Recent Bookmarks on the right hand side of the
screen. Resources you bookmarked last will always be at the top of the list. The list is searchable by
author or title keyword, which is quite a useful feature if you have got hundreds of resources
bookmarked.
Back to contents page
38
Populating a List with Bookmarked Resources
Populating a list is again just a matter of clicking and dragging your bookmarks into your list.
Populate all your sections. You can use a bookmark multiple times (for a textbook that is to be read
every week, for example) and you can remove a bookmark at any time.
Back to contents page
39
Setting Importance/Notes
It is important that students are given clear guidance as to the importance of a resource in a reading
list. You do this by clicking on Set Importance for each resource when you are in the edit screen.
This will open a drop-down menu and you will be able to select from options.
Back to contents page
40
You also have the option of inserting and editing notes by simply clicking on Edit notes and
importance.
In Note for Student, you can give specific instructions to students or insert any other comments
about the resource, e.g. chapters or pages to be read in a book. You can edit the Importance of the
resource. You can also insert a Note for Library regarding purchasing resources.
Back to contents page
41
Saving a List
Normally, your list is saved automatically whenever you make changes. However, to consolidate the
saving process and to come out of the edit screen, click on Save Draft.
You will be taken to the screen below and this is how the list is going to look to your students when
you finally publish and attach it to a module. You also have options now, amongst which is a Request
review tab to ask the library to review your list for acquisitions purposes before you make it
available to your students. You can always go back to editing your list using the Edit tab.
Back to contents page
42
Editing a List
In My Lists, you will have all the lists that you created yourself. You can edit a reading list at any point:
in its draft status, when it is published, even after it is linked to a module and the VLE and is available
to your students. All you need to do is to open the select action drop down menu next to the list you
want to work on and select Edit. This will take you to the original edit screen where you can continue
to work on your list.
You can see other options in this drop-down menu, such as View Draft (to check student view), Publish
(to take the list out from its draft status and make it available to your colleagues and the Library), and
Remove from View (to remove the list from My Lists screen).
Important note: If you are editing a published list, please make sure that you re-publish your
list so that your students can view the updated list. You do not need to re-link your list to the
module or the VLE when you make changes and re-publish your list as the links are updated
automatically.
Back to contents page
43
Requesting Library Reviews
Once you complete your list, you can ask the Library to review your list so that resources on your list
could be purchased. If you entered any notes for the Library while creating your list, the Library will
be able to view them and respond to your requests. Go into your list and click on Request review.
The dialog box that comes up will remind you to set importance for your resources, if you had not
done so already, because purchasing decisions made by the Library will be based on whether a
resource is essential, recommended, or optional, as well as on other factors. Anticipated student
numbers is another factor which affects decision-making; if you had not put in the number when
creating your list, you have the option of doing so here. After you finish, click OK. The Library will be
alerted about your request and will start reviewing your list. When the Library completes reviewing
your list, you will receive an automated email to that effect.
Back to contents page
44
Publishing a list
After completing your list, you need to publish it. You can do it from several places: directly from My
Lists as mentioned above without having to go in to the list first, from the View Draft screen below,
or even in the Edit screen further below.
Back to contents page
45
Whichever screen you are in, the same dialog box will come up asking you to confirm your action once
you press the Publish button. Once you publish your list, it will be available to your students and
colleagues for viewing. You can invite your colleagues to contribute to your lists. You can also ask the
Library to review your list for acquisitions purposes after publishing it too.
Note the term ‘Draft’ being dropped from the start of the list title once your list is published.
Back to contents page
46
Inviting List Publishers
When you are in the list, click on Invite List Publishers. This means inviting other people to
contribute to your lists, to become editors of your lists. They can also delete resources or delete lists.
Enter the email address of the colleague you want to invite and click on Send. The recipient will
get an invitation that he or she will need to accept before becoming a publisher (editor) for this
list. You can invite multiple editors.
Back to contents page
47
Linking a list to a module
In your list, click on Link to hierarchy.
In the box that comes up, start typing your module name or code. Select it when it comes up and click
on
OK.
Back to contents page
48
Your have the option of adding your lists to more than one module. Once finished, click on OK.
Your reading list will not be linked to the module in the Talis Aspire QMUL hierarchy.
Back to contents page
49
Linking a list to the VLE – QMplus
Provided that you link your reading list to its module page in Talis Aspire, it will be automatically linked
to your module page on QMplus. All you need to do is to activate the Reading block in your QMplus
module page if it is not activated already.
Turn editing on in your module page in QM+
Scroll down to ADD A BLOCK tool on the page.
Select the Reading block and wait while the page refreshes.
Back to contents page
59
Your reading list/s will be there attached to the READING block in your QMplus module page.
Alternatively, you can copy and paste your reading list URL into QMplus and embed it in the main area.
Students can also search for and access their reading lists directly at http://lists.library.qmul.ac.uk/.
Back to contents page
51
Getting list usage statistics
The Dashboard tool in a list allows one to gather basic list usage statistics. This tool can be
useful for identifying well-used resources as well as ones that are not popular. Click on the
Dashboard button.
The Dashboard box will come up with Page views (number of times the list has been viewed) and
Clicks (number of times item links have been followed) statistics. You can Choose date range.
There are colour coded bars for High, Moderate, and Low resource use. If you scroll down in the
list, each resource on the list will now be colour-coded to reflect usage.
Back to contents page
52
The Show me alternatives button in a title brings up the Alternative resources box. Based on the
use of that particular title on similar courses in other institutions using Talis Aspire, some potential
alternatives are suggested.
If you click on any alternative resource title, you will be taken to the Talis Aspire community page
where you will have details of the institutions, modules, and reading lists using this title. You can
follow the links to the reading lists of these institutions and look at them to have an idea about
1resources in use.
Back to contents page
53