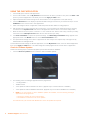
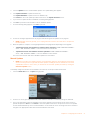
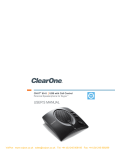
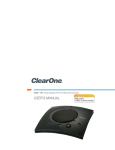
1
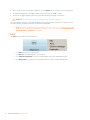
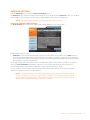
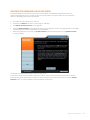
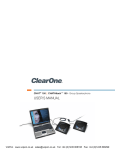
CHAT® 60 | Personal Speakerphone for Skype™
USER’S MANUAL
Telephone 1.800.283.5936
1.801.974.3760
FAX
1.801.974.3669
E-mail
On the Web
[email protected]
www.ClearOne.com
CHAT 60 USER’S MANUAL
CLEARONE PART NO. 800-159-251. November 2010 (REV. 2.1)
© 2010 ClearOne All rights reserved. No part of this document may be
reproduced in any form or by any means without written permission
from ClearOne. ClearOne reserves specific privileges.
Information in this document is subject to change without notice.
U.S. PATENTS: D545,295; D545,805; D545,806; D545,807; D545,808.
OTHER PATENTS PENDING.
Table of Contents
Chapter 1: Introduction
Product Overview................................................................... 1
Service and Support.................................................................. 1
Technical Support...................................................................... 1
Sales and Customer Service..................................................... 1
Product Returns......................................................................... 1
package Contents.................................................................. 1
Replacement Parts & Accessories.................................... 1
Chapter 2: Getting Started
CHAT 60 Controls.................................................................... 3
Power LED Indicator................................................................... 3
Volume and Mute Buttons........................................................... 3
Connecting the CHAT 60 to a PC......................................... 4
Chapter 3: Configuring the CHAT 60
Installing the CHAT Software for Windows................. 5
Using A 3rd-Party Application................................................. 5
Using the CHAT Application.................................................. 6
Check for Firmware Updates. ...................................................... 6
Manual Updates. ......................................................................... 7
Help.............................................................................................. 8
Advanced Settings.................................................................. 9
Advanced Settings: Audio Settings. ............................................. 9
Chapter 4: Maintenance
Caring for Your CHAT 60..................................................... 10
Troubleshooting Poor Sound Quality......................... 10
Interrupted Firmware Update Recovery...................... 11
Chapter 5: Appendix
Specifications......................................................................... 12
System Requirements................................................................. 12
Connections.............................................................................. 12
Controls. ................................................................................. 12
Audio. ....................................................................................... 12
Processing................................................................................ 12
Power....................................................................................... 12
Environmental........................................................................... 12
Mechanical................................................................................ 12
Compliance................................................................................ 12
Model Numbers......................................................................... 12
European Compliance......................................................... 13
www.ClearOne.com/resources/EuroDOC.php .......... 13
FCC PART 15/ICES-003 Compliance...................................... 13
FCC PART 15.19(A) (3) Compliance........................................ 13
Warranty.................................................................................. 13
Chapter 1: Introduction
Product Overview
Thank you for purchasing the ClearOne CHAT 60 Personal Speakerphone.
The CHAT 60 is a portable audio peripheral that provides rich audio for hands-free calls with Skype™, the popular Internet
communication program. The CHAT 60 is completely full-duplex and contains HDConference®, the suite of high performance
audio processing technologies that include Echo Cancellation, Noise Reduction and Automatic Level Controls, producing
crystal clear conversations.
Though designed specifically to be used with Skype, the CHAT 60 can also be used with other devices such as enterprise
telephones and other applications such as VoIP softphones, web conferencing, instant messaging and PC-based gaming.
This manual will provide instructions on using the CHAT 60 with Skype, as well as with these additional devices and
applications.
Service and Support
If you need assistance setting up or operating your CHAT 60 Personal Speakerphone, please contact us. We welcome your
comments so we can continue to improve our products and better meet your needs.
Technical Support
Telephone:
1.800.283.5936 (USA), 1.801.974.3760
Fax:
1.801.977.0087
E-mail:
[email protected]
Web site:
www.ClearOne.com
Sales and Customer Service
Telephone:
1.800.945.7730 (USA) or 1.801.975.7200
Fax:
1.800.933.5107 (USA) or 1.801.977.0087
E-mail:
[email protected]
Product Returns
All product returns require a Return Material Authorization (RMA) number. Contact ClearOne Technical Support before
returning your product. Make sure you return all the items and packing materials that originally shipped with your
product.
package Contents
The illustration below shows the parts that ship in the box with each model of the CHAT 60
Contact your dealer for replacement parts and accessories.
> NOTE: ClearOne is not responsible for product damage incurred during shipment. You must make
claims directly with the carrier. Inspect your shipment carefully for obvious signs of damage. If the
shipment appears damaged, retain the original boxes and packing material for inspection by the carrier.
Contact your carrier immediately.
Replacement Parts & Accessories
Contact your Dealer or ClearOne directly for replacement parts and accessories.
Chapter 1: Introduction
1
Important Safety Information
Read the safety instructions before using this product. This personal speakerphone is not designed for making
emergency telephone calls when the power fails. You must make alternative arrangements for telephone access to
emergency services.
•
Read and understand all instructions. Follow all warnings marked on the product.
•
Unplug the product from the outlet before cleaning. Do not use liquid cleaners or aerosol cleaners. Use only a damp
cloth for cleaning.
•
Do not use this product in or near water, for example, near a bathtub, kitchen sink, or swimming pool.
•
Place this product on a flat, level, dry surface for ongoing operation.
•
Never place product near heat radiators or registers. Allow adequate ventilation for heat dissipation.
•
This product should only be operated using a power source specified on the product label. If you are not sure about
the power source at your location, consult your dealer or local power company.
•
Do not overload wall outlets and extension cords; this can cause fires or electric shock.
•
Never spill liquid on or into the product.
•
Do not disassemble this product. Opening or removing covers can expose you to dangerous voltages and other
risks. Incorrect reassembly can cause electric shock during subsequent use. Disassembly voids the warranty.
•
Unplug the product from the outlet and contact a qualified service technician under the following conditions:
a. When the power supply cord or plug is damaged or frayed.
b. If liquid has been spilled into the product.
c. If the product does not operate normally by following the operating instructions.
d. If the product has been dropped or damaged.
e. If the product exhibits a distinct change in performance.
•
Avoid telephones during an electrical storm. There is a risk of electric shock from lightning.
•
Do not use this product to report a gas leak in the vicinity of the leak.
•
Do not use this product near intensive care medical equipment or by persons with pacemakers.
•
This product can interfere with electrical equipment such as answering machines, TV sets, radios, computers and
microwave ovens. Do not place the product in close proximity to any of these devices.
Save these instructions
2
Technical Support: 800.283.5936
Chapter 2: Getting Started
CHAT 60 Controls
Power LED Indicator
The LED status indicator lights blue when the CHAT 60 is connected to a PC via USB.
The LED status indicator changes to red when Mute is on.
Volume and Mute Buttons
Use the Volume Up/Down buttons to adjust the volume level of the CHAT 60.
Use the Mute button to mute the CHAT 60’s microphone until the button is pressed again.
You can use the volume controls in Windows to make these adjustments as well.
> NOTE: Any changes made to the volume level by pressing the CHAT 60 volume control buttons will
change the PC’s system volume settings accordingly.
Chapter 2: Getting Started
3
Connecting the CHAT 60 to a PC
1. Using the included USB cable, connect the CHAT 60 to your PC or laptop. The status LED on the front of the CHAT
60 turns blue, then red, then blue again to indicate that Windows recognizes the CHAT 60 The Windows New
Hardware Found dialog appears and Windows installs the USB 2.0 device drivers for CHAT on your system.
2. Follow the on-screen instructions. When the installation is complete, click the Close button.
> NOTE: The CHAT 60 derives its audio settings from the PC’s Windows sound settings or through
the 3rd-Party appplication’s settings (Skype, Yahoo, etc.) Refer to the tuning procedures in the
Using the CHAT Application section in this manual or consult the specific 3rd-Party application’s
tuning adjustments.
4
Technical Support: 800.283.5936
Chapter 3: Configuring the CHAT 60
Installing the CHAT Software for Windows
> NOTE: The install procedure is the same for all versions of Windows XP, Windows Vista and Windows 7
operating systems.
The CHAT 60 can be used right out of the box and there’s no software to download or install since it is only used with a
PC. However, ClearOne will occasionally release new versions of the devices’ firmware which will need to be downloaded
and installed.
The following procedure can be used to download and install the CHAT software for the CHAT 60 if the firmware requires
updates.
1. Download the CHAT software by accessing the following:
http://www.ClearOne.com/support/downloads.php?content=main
2. Select your device from the “BY PRODUCT” window and click SEARCH and the screen will display only those
downloads available for your specific device.
3. Select the latest version of the CHAT software and the system will display a confirmation window for the software to
be downloaded to your computer.
4. Unzip the downloaded folder and run the Setup (Setup.exe) file to begin the installation process.
5. Follow the on-screen prompts to complete the software installation.
6. When the CHAT software installation is complete, start the CHAT software by double-clicking the ClearOne CHAT
icon
that is now on your Windows desktop, or by clicking:
(Start > All Programs > ClearOne Communications > CHAT > ClearOne CHAT).
> NOTE: To ensure optimal sound quality, the CHAT 60 MUST be tuned properly prior to use or after
the device has been moved. The CHAT 60’s audio settings must also be customized for the specific
application it is to be used with and for the specific device it is to be connected to.
Using A 3rd-Party Application
It is always recommended to tune the CHAT 60 with the application to be used other than CHAT - such as Cisco
Communicator or Skype - whenever possible. ClearOne recommends using the tuning wizard or audio configuration
controls in that application to adjust audio settings. If the application does not have a tuning wizard or audio settings,
use the CHAT application to tune the audio settings for optimal sound quality as explained in the next section.
> Note: The volume settings in the CHAT software are synchronized with the Windows volume settings.
Changing the volume using the CHAT software or the buttons on the CHAT 60 also changes the volume
settings in Windows. Conversely, changing the volume settings in Windows also changes the settings
in the CHAT software. It is always recommended using the 3rd-Party application’s audio settings to tune
the CHAT device.
Chapter 3: Configuring the CHAT 60
5
Using the CHAT Application
1. If not already open, start the CHAT application.
2. For the CHAT software, click the My Devices button and select the device you want to tune (select the Other or All
option if your device/application is not listed), then click the Apply to CHAT button.
3. Adjust the speaker and volume settings on the external device or in the application to 50% (half volume).
4. Click the Advanced button to display the pre-defined audio settings for the device you selected in step 2. Use the
USB Audio section of the screen to tune applications.
5. Place a call using the device or application. Land lines provide the best audio for tuning purposes.
6. Ask the person on the other end of the call to count from 1 to 10 in a normal voice. While the person is counting,
click and move the Speaker Level slider in the CHAT application until the caller’s voice can be clearly heard.
7. While the caller is still on the phone, count from 1 to 10 in a normal voice. Ask the caller if they can hear you clearly.
Click and move the Microphone Level slider until the caller can hear you clearly.
8. Click Save to Database to capture the optimized settings. The Add Settings to Database dialog appears. Enter
appropriate name in the Model field, then click the Save to Database button.
9. The optimal audio settings for the device or application are now ready for use. Repeat steps 1 through 9 for any
additional devices and applications.
To switch between audio settings for different applications, click the My Devices button, select the desired application,
then click the Apply to CHAT button. The audio settings are instantly applied for the chosen device or application.
Check for Firmware Updates
Perform the following steps to automatically update your firmware and device database:
1. Click the Check for updates button to check the web for available updates.
2. The following series of messages appears below the progress bar:
•
“Locating website...”
•
“Website found”
•
“Click Update to load new firmware into device” (Appears only if a new firmware file is available.)
•
“Click Update to load new database information” (Appears only if a new device database file is available.)
> NOTE: If no new firmware or device database updates are available, then the following messages
appear below the progress bar:
• “Your device contains the most recent firmware”
• “Your database contains the most recent updates”
This indicates that your firmware and database are current. No updates are required.
6
Technical Support: 800.283.5936
3. Click the Update button to install available updates. The Update dialog box appears.
4. Click Update Firmware to update firmware only.
Click Update Database to update the device database only.
Click Cancel to cancel the update procedure and return to the Update Firmware screen.
5. If you choose to update the device database, a warning dialog appears.
6. Click Yes to proceed with the firmware or device database update.
7. A second warning dialog appears. Click Yes to proceed.
8. A series of messages appears below the progress bar indicating that the updates are in progress.
> NOTE: Windows Vista may prompt you to unplug and then reconnect the CHAT 60 to complete the
firmware update.
9.When the update is complete, a message appears below the progress bar depending on the upgrade:
•
“Update Successful! The firmware for CHAT has been changed to <new revision level>”
where <new revision level> is the new firmware revision number.
•
“Update Successful! The database has been updated to <new revision level>”
where <new revision level> is the new database version number.
The most recent firmware and device database updates are now loaded.
Manual Updates
> NOTE: This procedure is for advanced users, technical support purposes, and corporate environments
where IT security policies may prohibit automatic updates. Loading an incorrect firmware file can cause
unpredictable results. In most cases, you should use the automatic update procedure by clicking the
Check for updates button.
To manually change the firmware version loaded in the CHAT 60, use the procedure shown below.
1. Click the Select File button. An Open dialog appears.
2. From the List of file types drop-down menu, select either the Firmware or Database package to download.
3. A list of the appropriate CHAT files available on the system appears in the left hand scroll list. Select the file to
upload and press the OK button or Cancel to cancel the update and return to the previous screen. If the update
file was downloaded directly off the ClearOne Website, use the Folder list in the center-right side of this window to
navigate to the appropriate folder where the downloaded file was saved.
Chapter 3: Configuring the CHAT 60
7
4. Once the file has been located and highlighted, click the Update button to load the selected firmware file.
5. A warning dialog appears. Click Yes to load the selected firmware file or No to cancel.
6. A series of messages appears under the progress bar indicating the update is in progress.
WARNING: Do not unplug the CHAT 60 while the manual update is in progress.
When the update is complete, a message will appear below the progress bar stating that the update has been
successful with the appropriate revision level information if applicable.
> NOTE: If firmware programming was interrupted, such as by a power loss or an accidental cable
disconnection, the CHAT 60 might become unstable. In this case, refer to Interrupted Firmware Update Recovery in Chapter 4 of this manual.
Help
The Help button provides the following options:
8
•
Click Help to activate the online help file.
•
Click About to get information about your CHAT 60
•
Click ClearOne Homepage to visit the ClearOne Website using your default Web browser.
•
Click Registration to register your CHAT 60 with ClearOne using your default Web browser.
Technical Support: 800.283.5936
Advanced Settings
Click the Advanced button to display the Advanced Settings screen.
The Advanced screen displays the current audio settings for your CHAT 60 From the Advanced screen, you can adjust
audio settings for your CHAT 60, view and edit the CHAT 60 database, and view the CHAT 60 log file.
»»
NOTE: The sections grayed out are not available for the CHAT 60 device.
Advanced Settings: Audio Settings
The Audio Settings screen displays the current audio settings and allows you to change them.
Available audio settings include:
•
USB Audio: Controls CHAT 60 audio settings connected via the USB to a PC or laptop. Use the Mute buttons to
mute the microphone and/or speaker on the CHAT 60 Use the sliders to adjust the microphone level and speaker
level. Speaker and microphone level adjustments made in the CHAT software will automatically change the speaker
and microphone volume levels in Windows.
Any settings changes that made on this screen are instantaneously applied to the CHAT 60 In addition, the option to
click on the Save to Database is available to capture the current settings and save them as a custom device.
Use the Database tab to select a specific application setup that has been previously saved.
Use the Log tab to view any CHAT 60 log files generated that describe issues that the device has encountered or
updates that have been made to the CHAT 60 device.
»»
Note: The volume settings in the CHAT software are synchronized with the Windows volume
settings. Changing the volume using the CHAT software or the buttons on the CHAT 60
also changes the volume settings in Windows. Conversely, changing the volume settings in
Windows also changes the settings in the CHAT software.
Chapter 3: Configuring the CHAT 60
9
Chapter 4: Maintenance
Caring for Your CHAT 60
•
Follow all warnings and instructions marked on your CHAT 60
•
Unplug the USB 2.0 cable from the CHAT 60 before cleaning.
•
Unplug the power supply from the wall outlet before cleaning.
•
Do not use liquid or aerosol cleaners. Use a damp cloth moistened with water to clean the outside of your
CHAT 60 and power supply.
Troubleshooting Poor Sound Quality
If you experience poor sound quality, check the following list for solutions to common issues.
•
Ensure the CHAT 60 is connected to your computer, start the CHAT application, then verify, test, and adjust the
audio settings as needed to obtain good sound quality. Or select an appropriate ClearOne pre-programmed
device and click Apply to apply the settings to the CHAT 60 If the issue remains unresolved, the 3rd Party
device or application may be responsible for the poor sound quality. Refer to the device or application
documentation, or contact the manufacturer’s technical support for assistance.
•
Verify that all cables are properly and securely connected. Refer to the connection diagram in Chapter 2:
Getting Started of this manual for more information.
•
If your CHAT 60 is connected to a USB hub, the USB hub must be connected to an external power source.
•
If you have another USB device (such as a digital camera) connected to your computer on the same USB
bus as your CHAT 60, Windows may generate the error message “USB Controller Bandwidth Exceeded.” In
this case, you must move the other USB device to a separate USB bus. The CHAT 60 is a high-performance
USB device that requires sufficient bandwidth to function properly.
•
Some USB cameras that use audio drivers are automatically assigned by Windows as the default audio
playback device (even though the camera doesn’t have a speaker). In this case,disconnect all USB devices
(including your CHAT 60), reconnect the CHAT 60 to the USB bus first, then reconnect the other USB devices.
This allows Windows to properly select the CHAT 60 as the default audio playback device.
If you are unable to resolve the problem, please refer the support pages on our Website, or contact ClearOne Technical
Support:
10
Phone:
1.800.283.5936 (USA) or 1.801.974.3760
Fax:
1.800.974.3669 (USA) or 1.801.977.0087
email:
[email protected]
on the web:
www.ClearOne.com
Technical Support: 800.283.5936
Interrupted Firmware Update Recovery
If a firmware update is interrupted by loss of power to the CHAT 60, the USB cable being disconnected, or an
unexpected programming error, the CHAT 60 may not function properly. To restore firmware, boot the CHAT 60 in
Generic mode using the instructions shown below.
1. Disconnect the USB cable from the CHAT 60
2. Hold down the MUTE button while re-connecting the USB cable.
3. The Update Firmware Recovery screen appears.
4. Click the Update Firmware button and follow instructions that appear on-screen. During the update, the messages
“Initializing” and “Recovering” appear above the progress bar.
5. When the firmware file is recovered, the Update Firmware utility automatically runs (see the Update Firmware
section for details).
The firmware is now restored and your CHAT 60 is ready to use.
In rare cases, Generic mode is unable to restore the firmware. If this occurs, the CHAT 60 automatically re-boots in
protected (DFU) mode and attempts to restore the firmware. Follow the on-screen instructions then click the Update
Firmware button, or contact ClearOne’s Technical Support for assistance.
Chapter 4: Maintenance
11
Chapter 5: Appendix
Specifications
System Requirements
Windows XP
Windows Vista
Windows 7
Connections
USB:
Version 2.0 Compatible
Type: Mini-B Female
3.5 mm Line I/O Mini-Plug:
Frequency Response: 20 Hz - 20 kHz +/- 1 dB
Maximum Input/Output Levels: 0 dBu
Ring - Line Input:
Input Impedance: 10 kΩ
Tip - Line Output
Output Impedance: 50 Ω
Sleeve - Ground
Controls
Volume Up
Volume Down
Microphone Mute
Audio
Speaker:
Bandwidth: 220 Hz - 14 kHz
Max Output Level: 82 dB SPL @ 1 foot (0.30 meter)
Microphone:
Bandwidth: 50 Hz - 7.75 kHz
Processing
Full Duplex
Acoustic Echo Cancellation (AEC)
Noise Cancellation (NC)
Line Echo Cancellation (LEC) - Selectable
Automatic Level Control (ALC)
Power
USB:
5 VDC @ 500 mA Maximum
External:
100 - 240 VAC Input
7 VDC @ 500 mA Output
Tip: Power
Ring: Ground
12
Technical Support: 800.283.5936
Environmental
Operating Temperature:
41 - 104° F (5 - 40° C)
Mechanical
Dimensions (W x D x H):
3.8” x 4.1” x 1.8”
(9.7 cm x 10.4 cm x 4.6 cm)
Weight:
0.55 lbs. (0.25 kg)
Compliance
RoHS
REACH
FCC Class B Part 15
ICES-003
CE Listed
UL Listed
Model Numbers
910-159-251 CHAT 60
European Compliance
See the ClearOne Website for specific and most up-to-date Compliance-related information at:
www.ClearOne.com/resources/EuroDOC.php
FCC PART 15/ICES-003 Compliance
This equipment has been tested and found to comply with the limits for a Class B digital device pursuant to Part 15 of the
FCC Rules and Industry Canada ICES-003. These limits are designed to provide reasonable protection against harmful
interference in a residential installation. This equipment generates, uses and can radiate radio frequency energy and, if
not installed and used in accordance with the instructions, may cause harmful interference to radio communications.
However, there is no guarantee that interference will not occur in a particular installation. If this equipment does cause
harmful interference to radio or television reception, which can be determined by turning the equipment off and on, the user
is encouraged to try to correct the interference by one or more of the following measures:
•
Reorient or relocate the receiving antenna.
•
Increase the separation between the equipment and receiver.
•
Connect the equipment into an outlet on a circuit different from that to which the receiver is connected.
•
Consult the dealer or an experienced Radio/TV technician for help.
FCC PART 15.19(A) (3) Compliance
This device complies with Part 15 of the FCC Rules. Operation is subject to the following two conditions: (1) this device
may not cause harmful interference, and (2) this device must accept any interference received, including interference that
may cause undesirable operation.
Warranty
ClearOne (the Manufacturer) warrants that this product is free of defects in both materials and workmanship. For complete
warranty information including length, coverage, and limitations, visit ClearOne on the Web @ www.ClearOne.com.
ClearOne
Edgewater Corporate Park South Tower
5225 Wiley Post Way
Suite 500
Salt Lake City, Utah 84116 U.S.A.
Chapter 5: Appendix
13