1
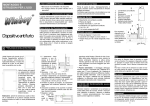
10 Tablet Charging/Sync Station User Manual Benutzerhandbuch Manuel Utilisateur Manuale Eng li sh Deutsch Français Italiano No. 73397 www.lindy.com Tested to Comply with FCC Standards For Home and Office Use! © LINDY ELECTRONICS LIMITED & LINDY-ELEKTRONIK GMBH - FIRST EDITION (December 2013) User Manual English Introduction Thank you for purchasing the LINDY iPad and Tablet Charging Station. This product allows you to charge up to 10 Tablet devices at the same time while encasing it securely in a lockable and stackable cabinet. The Charging Station also has a USB port on the rear to allow you to sync all 10 iPad’s individually while charging them at the same time. Package Contents 10 Bay Charging Station USB A to B Cable 2 x Keys Power Cable Locking Plate & screws User Manual Specification Multi-function, charge up to 10 tablets or charge and sync up to 10 iPad’s Slide in door with lockable function LED indicator for charging and sync status Stackable design Built in fan Built in PSU Installation 1. 2. 3. 4. 5. 6. Place the unit on a flat surface Make sure the power switch is in the off position Connect the power cable to the mains and in to the socket on the rear Plug a USB cable into each port on the front of the unit Insert a Tablet in to each slot and connect the USB cable Switch on the power You can stack 3 of these units safely using the inbuilt stacking system. First, remove the top rubber pad and then screw down the included locking plate with the tabs facing the front of the unit and the plate flush with the top of the first unit. Pull back the bottom hidden bracket of the next unit and then place on top of the first unit. Push the hidden bracket back and this will lock the two items together. Repeat the process for the next unit. Technical Data Voltage: o AC 100-12V 50/60Hz, 3A o AC 200-240V 50/60Hz, 2A USB Output: DC 5V/2.1A (max) per port Capacity: 10 tablets Max tablet size: 18x240x200mm (WxDxH) Dimensions: 350x320x340 (WxDxH) Weight: 9.2kgs User Manual English Operation 1. 2. 3. 4. 5. 6. 7. 8. 9. Tablet slots: Insert up to 10 tablets Sync Button/LED: Red indicates the sync function is active USB ports: Connect your tablet’s charging cable LED: Green=Charged, Amber=Charging, Red=Sync & Flashing Red=Over current protection Handles: Two handles for portability Ventilation holes: To allow air flow through the power unit Fan: To avoid overheating while charging and syncing Rubber pad: remove this pad to stack up to 3 units USB ports: a. USB type A port for connecting to the type B port of another unit when daisy chaining b. USB type B for charging/syncing and daisy chaining up to 3 units 10. Power switch: Turn the unit on and off 11. Power connector: Connect your mains power cable 12. Hidden bracket: To secure the units together when stacking 13. Wall mount holes: Not for use with this model Note The LED’s may not work correctly if the connector cable is damaged. Due to the functionality of iTunes, IOS updates cannot be done across more than one device at a time. Make sure the power is OFF before you connect or disconnect any of the USB cables. Do not sit, stand or climb on the product. Do not store any object on top of the unit. Benutzerhandbuch Deutsch Einleitung Vielen Dank für den Kauf der LINDY Ladestation für iPads und Tablets. Sie erlaubt das gleichzeitige Aufladen von bis zu 10 Tablets in einem sicheren, abschließbaren und stapelbaren Gehäuse. Über den USB Port an der Rückseite der Ladestation können iPads während des Ladevorgangs einzeln synchronisiert werden. Lieferumfang 10fach Ladestation USB Kabel Typ A-B 2 Schlüssel Netzkabel zur Stromversorgung Verschlussplatte mit Schrauben Dieses Handbuch Spezifikationen Laden und Synchronisieren von 10 Tablets Abschließbare Schiebetür LED-Anzeige für Laden und Synchronisation Stapelbar Eingebauter Lüfter Eingebautes Netzteil Installation 1. 2. 3. 4. Stellen Sie die Ladestation auf eine ebene Fläche. Vergewissern Sie sich, dass die Ladestation ausgeschaltet ist. Schließen Sie das Netzkabel an. Je nach der Anzahl der Tablets, die Sie laden möchten, stecken Sie entsprechend viele USB Kabel in die USB Ports vorne an der Ladestation. 5. Dann schieben Sie entsprechend viele Tablets in die Einschübe und verbinden sie mit den USB Kabeln. 6. Schalten Sie die Ladestation nun ein. Sie können 3 dieser Ladestationen sicher stapeln. Nehmen Sie zuerst oben die Gummiplatte ab, dann schrauben Sie die mitgelieferte Verschlussplatte fest wobei die schmalen, vorstehenden Metallplatten nach vorne zeigen sollen und die Verschlussplatte bündig oben mit der ersten Ladestation abschließen soll. Ziehen Sie dann die Befestigungsvorrichtung hinten am Boden der zweiten Ladestation heraus und stellen Sie diese auf die erste Ladestation. Schieben Sie die Befestigungsvorrichtung zurück, dadurch werden die zwei Ladestationen fest miteinander verbunden. Wiederholen Sie dieses Procedere wenn Sie eine weitere Ladestation verbinden wollen. Technische Daten Spannung: o AC 100-120V 50/60Hz, 3A o AC 200-240V 50/60Hz, 2A USB Ausgang: DC 5V/2,1A (max.) pro Port Kapazität: 10 Tablets Benutzerhandbuch Deutsch Maximale Tabletgröße: 1,8x24x20cm (BxTxH) Abmessungen: 35x32x34cm (BxTxH) Gewicht: 9,2kg Inbetriebnahme 1. 2. 3. 4. 5. 6. 7. 8. 9. Einschübe für bis zu 10 Tablets Schalter zum Synchronsieren/LED: bei Synchronisierung leuchtet die rote Led USB Ports: Hier werden die Ladekabel der Tablets angeschlossen LED: Grün=aufgeladen, Gelb=Charging, Rot=Synchronisierung, Rot blinkend=Überstromschutz Zwei Griffe zum Tragen Lüftungsschlitze Lüfter verhindert Überhitzung beim Laden und Synchronisieren Gummiplatte: wird entfernt um mehrere Ladestationen zu stapeln USB Ports: a. USB Typ A Port zum Anschluss eines Typ B Ports einer weiteren Ladestation b. USB Typ B Port zum Laden/Synchronisieren und Verbinden von bis zu 3 Stationen 10. Ein-/Ausschalter 11. Stromanschlussbuchse für Netzkabel 12. Befestigungsvorrichtung verbindet die gestapelten Ladestationen 13. Aufhängevorrichtung (wird bei diesem Modell nicht verwendet) Hinweise Die LEDs funktionieren möglicherweise nicht, wenn das Anschlusskabel defekt ist. Die Funktionsweise von iTunes erlaubt jeweils nur ein iOS Update – es können nicht mehrere Tablets gleichzeitig upgedatet werden. Die Ladestation muss ausgeschaltet sein, ehe Sie USB Kabel anschliessen. Lagern Sie nichts auf oder direkt neben der Ladestation um ausreichende Luftzirkulation zu gewährleisten. Manuel Utilisateur Français Introduction Merci d’avoir choisi la station de charge pour tablettes et iPad LINDY. Ce produit vous permet de charger jusqu’à 10 tablettes simultanément en toute sécurité dans une armoire fermant à clé et empilable. La station de charge dispose aussi d’un port USB situé à l’arrière, il vous permettra de synchroniser tous les 10 iPad individuellement tout en chargeant leurs batteries. Contenu de l’emballage Station de charge 10 baies Câble USB A vers B 2 clés Câble d’alimentation Plaque de verrouillage & vis Manuel utilisateur Spécifications Multi-fonctions, charge et synchronisation de jusqu’à 10 tablettes Porte coulissante pour une ouverture totale, avec fonction de verrouillage Indicateurs LED pour l’état de charge et de synchronisation Empilable Ventilateur intégré Alimentation intégrée Installation 1. 2. 3. 4. 5. 6. Placez l’unité sur une surface stable et plane Assurez-vous que l’interrupteur de mise en route est en position ‘’Off” Connectez le câble d’alimentation au secteur et sur son connecteur à l’arrière. Connectez un câble USB dans chaque port sur le devant de l’unité Insérez une tablette dans les emplacements prévus et connectez le câble USB Mettez sous tension Vous pouvez empiler jusqu’à 3 unités en toute sécurité en utilisant le système intégré. Premièrement, retirez la protection caoutchouc sur le dessus et vissez la plaque de verrouillage (livrée avec le produit) avec les languettes faisant face à l’avant de l’appareil sur le dessus de la première unité. Tirez sur le loquet caché sur le dessous de l’unité suivante et placez cette unité sur le dessus de la première unité. Pousser sur le loquet pour le remettre en place, ceci verrouillera les deux éléments ensemble. Répétez le processus pour l’unité suivante. Données techniques Voltage: o AC 100-12V 50/60Hz, 3A o AC 200-240V 50/60Hz, 2A Sortie USB: DC 5V/2.1A (maxi.) par port Capacité: 10 tablettes Taille maximale de tablette: 240x200x18mm (LxlxH) Dimensions: 350x320x340 (LxlxH) Poids: 9.2kgs Manuel Utilisateur Français Operation Emplacements de tablettes: permet d’insérer jusqu’à 10 tablettes Bouton de synchronisation/LED: en rouge, indique que la fonction de synchronisation est active Ports USB: permet de connecter le câble de charge de votre tablette LED: Vert=Chargé, Ambre=Charge en court, Rouge=Synchronisation & clignote rouge=protection de surintensité 5. Poignées: deux poignées pour un transport aisé 6. Orifice de ventilation: permet une ventilation de l’alimentation de l’unité 7. Ventilateur: évite la surchauffe pendant la charge et la synchronisation 8. Protection caoutchouc: à retirer pour empiler jusqu’à 3 unités 9. Ports USB: a. Port USB type A à connecter au port USB type B d’une autre unité pour la cascade de plusieurs unités. b. Port USB type B pour la charge/synchronisation et la cascade de jusqu’à 3 unités. 10. Bouton d’alimentation: pour mettre l’unité sous/hors tension 11. Connecteur d’alimentation: permet de connecter le câble d’alimentation secteur 12. Système de verrouillage caché: pour sécuriser les unités entre-elles lorsque empilées 13. Trous de fixation murale: NE PAS utiliser avec ce modèle 1. 2. 3. 4. Note Les LED ne donneront pas une indication fiable si le câble de connexion est endommagé. En raison de fonctionnalité avec iTunes, les mises à jour IOS ne peuvent être faites que sur une tablette à la fois. Assurez-vous que l’alimentation est sur “Off” avant de connecter ou déconnecter un des câbles USB. Ne pas s’asseoir, se tenir debout ou grimper sur le produit. Ne pas stocker d’objets sur le dessus de l’unité. Manuale Italiano Introduzione Grazie per aver acquistato la Stazione di Ricarica per iPad e Tablet LINDY. Questo prodotto consente di caricare fino a 10 dispositivi contemporaneamnte, e proteggerli in un box impilabile chiuso a chiave. La stazione di ricarica dispone sul reto anche di una porta USB che consente di sincronizzare individualmente tutti i 10 dispositivi, mentre contemporaneamente vengono caricati. Contenuto della confezione 10 vani di ricarica Cavo USB Tipo A a Tipo B 2 x Chiavi Cavo di alimentazione Piastra di fissaggio con viti Manuale d’uso Caratteristiche Multi-funzione, ricarica e sincronizzazione fino a 10 tablet Porta a scorrimento con serratura di bloccaggio Indicatore a LED per stato di ricarica e sincronizzazione Modulo impilabile Ventola integrata Alimentatore integrato Installazione 1. 2. 3. 4. 5. 6. Collocare l'unità su una superficie piana Assicurarsi che l'interruttore sia in posizione di off Collegare il cavo di alimentazione alla rete e alla presa sul retro Inserire un cavo USB in ciascuna porta sulla parte anteriore dell'unità Inserire un tablet per ogni slot e collegare il cavo USB Accendere l'alimentazione Utilizzando il Sistema di impilaggio integrato è possibile sovrapporre fino a 3 moduli. Rimuovere il gommino superiore e avvitare la piastra di bloccaccio con le linguette rivolte verso la parte anteriore dell'apparecchio. Estrarre I braccetti di fissaggio integrati nell’unità da aggiungere e poi appoggiarla sopra la prima. Per completare il fissaggio, spingere i braccetti per bloccare i due elementi insieme. Ripetere il processo per le unità successive. Dati tecnici Voltaggio: o AC 100-12V 50/60Hz, 3A o AC 200-240V 50/60Hz, 2A USB Output: DC 5V/2.1A (max) per porta Capacità: 10 tablet Dimensione massima tablet: 18x240x200mm (LxPxH) Dimensioni: 350x320x340 (LxPxH) Peso: 9.2Kg Manuale Italiano Utilizzo 1. 2. 3. 4. Slot per Tablet: fino a 10 tablet LED Sincronizzazione: LED rosso indica sincronizzazione attiva Porte USB: Collegare il cavo di ricarica per I tablet LED: Verde=Carica completata, Giallo=Carica in corso, Rosso=Sincro & Lampeggiante Rosso=Protezione da sovracorrente 5. Maniglie: Due maniglie per il trasporto 6. Fori di ventilazione: per consentire il flusso d'aria attraverso l'unità di potenza 7. Ventola: per evitare il surriscaldamento durante la ricarica e la sincronizzazione 8. Gommino: rimuovere questo dispositivo per impilare fino a 3 unità 9. Porte USB: a. USB tipo A per il collegamento alla porta di tipo B di un'altra unità in interconnessione b. USB tipo B per caricare, sincronizzare e interconnettere fino a 3 unità 10. Interruttore di alimentazione: Accende e spegne l'unità 11. Connettore di alimentazione: Collegare il cavo di alimentazione 12. Braccetti integrati: per proteggere le unità quando impilate 13. Fori di montaggio a parete: non utilizzare con questo modello Note I LED potrebbero non funzionare correttamente se il cavo di collegamento è danneggiato. Gli aggiornamenti ad iOS possono essere fatti su un solo dispositivo alla volta Assicurarsi che l'alimentazione sia spenta prima di collegare o scollegare i cavi USB. Non sedersi, stare in piedi o arrampicarsi sul prodotto. Non appoggiare alcun oggetto sulla parte superiore dell'unità CE/FCC Statement CE Certification This equipment complies with the requirements relating to Electromagnetic Compatibility Standards EN55022/EN55024 and the further standards cited therein. It must be used with shielded cables only. It has been manufactured under the scope of RoHS compliance. CE Konformitätserklärung Dieses Produkt entspricht den einschlägigen EMV Richtlinien der EU für IT-Equipment und darf nur zusammen mit abgeschirmten Kabeln verwendet werden. Diese Geräte wurden unter Berücksichtigung der RoHS Vorgaben hergestellt. Die formelle Konformitätserklärung können wir Ihnen auf Anforderung zur Verfügung stellen FCC Certification This equipment has been tested and found to comply with the limits for a Class B digital device, pursuant to part 15 of the FCC Rules. These limits are designed to provide reasonable protection against harmful interference in a residential installation. You are cautioned that changes or modification not expressly approved by the party responsible for compliance could void your authority to operate the equipment. This device complies with part 15 of the FCC Rules. Operation is subject to the following two conditions: 1. This device may not cause harmful interference, and 2. This device must accept any interference received, including interference that may cause undesired operation. LINDY Herstellergarantie – Hinweis für Kunden in Deutschland LINDY gewährt für dieses Produkt über die gesetzliche Regelung in Deutschland hinaus eine zweijährige Herstellergarantie ab Kaufdatum. Die detaillierten Bedingungen dieser Garantie finden Sie auf der LINDY Website aufgelistet bei den AGBs. Recycling Information WEEE (Waste of Electrical and Electronic Equipment), Recycling of Electronic Products Europe, United Kingdom In 2006 the European Union introduced regulations (WEEE) for the collection and recycling of all waste electrical and electronic equipment. It is no longer allowable to simply throw away electrical and electronic equipment. Instead, these products must enter the recycling process. Each individual EU member state has implemented the WEEE regulations into national law in slightly different ways. Please follow your national law when you want to dispose of any electrical or electronic products. More details can be obtained from your national WEEE recycling agency. Germany / Deutschland Die Europäische Union hat mit der WEEE Direktive Regelungen für die Verschrottung und das Recycling von Elektro- und Elektronikprodukten geschaffen. Diese wurden im Elektro- und Elektronikgerätegesetz – ElektroG in deutsches Recht umgesetzt. Dieses Gesetz verbietet das Entsorgen von entsprechenden, auch alten, Elektro- und Elektronikgeräten über die Hausmülltonne! Diese Geräte müssen den lokalen Sammelsystemen bzw. örtlichen Sammelstellen zugeführt werden! Dort werden sie kostenlos entgegen genommen. Die Kosten für den weiteren Recyclingprozess übernimmt die Gesamtheit der Gerätehersteller. France En 2006, l'union Européenne a introduit la nouvelle réglementation (DEEE) pour le recyclage de tout équipement électrique et électronique. Chaque Etat membre de l’ Union Européenne a mis en application la nouvelle réglementation DEEE de manières légèrement différentes. Veuillez suivre le décret d’application correspondant à l’élimination des déchets électriques ou électroniques de votre pays. Italy Nel 2006 l’unione europea ha introdotto regolamentazioni (WEEE) per la raccolta e il riciclo di apparecchi elettrici ed elettronici. Non è più consentito semplicemente gettare queste apparecchiature, devono essere riciclate. Ogni stato membro dell’ EU ha tramutato le direttive WEEE in leggi statali in varie misure. Fare riferimento alle leggi del proprio Stato quando si dispone di un apparecchio elettrico o elettronico. Per ulteriori dettagli fare riferimento alla direttiva WEEE sul riciclaggio del proprio Stato. LINDY No 73397 1st Edition, December 2013 www.lindy.com Tested to Comply with FCC Standards For Home and Office Use!